Quickly export a list of active Twilio numbers, transfer them, and check their usage
Time to read:
In this post, we will learn how to quickly create a web app that allows you to export a list of your Twilio numbers, transfer them within your main account, and check the usage for each number and asset of your Twilio account.
You won’t need your own server to set it up, nor do you need to know how to code. You don’t even need to read the code if you don’t want to. I’ll show you how to do all of these operations using Twilio’s Functions product, which you can use directly from within your Twilio Console.
Demo App
Before I show you how to create the app on your Twilio account, you can test it on our Demo account.
The video below will also show you how the app works.
How are we going to do this?
You won’t need your own server, as the app will be hosted on our Twilio Functions service. Detailed information on Twilio Functions can be found here.
You can host JavaScript code, HTML, CSS and other assets needed to create the app. We call this style of development serverless computing, since Functions will automatically provide resources when you use the tool.
The code for the Function will be copied from our GitHub repository, which can be found on GitHub.
By copying the code, it means that you also don’t need to know how to code. Note, you are free to host the code on your own server as well, and even integrate it in your own web-site.
Prerequisites
Now that we know where to find the code, let’s see what is needed from you in order to create the app.
For this tutorial you will just need:
- Any browser (best if it’s up to date)
- A Twilio account (sign-up to Twilio if you don’t have an account already)
Build the app and use it in the browser
In the below video we will show the steps needed to create the app in the Twilio Function:
The steps mentioned in the video are also listed in detail below.
- The function should be created under your Main account.
- You will have the option, in the created apps, to search the logs of any subaccounts located under your main account.
Steps to take:
- Open the GitHub repository for the desired function. We will reference this as we create the Function in Console.
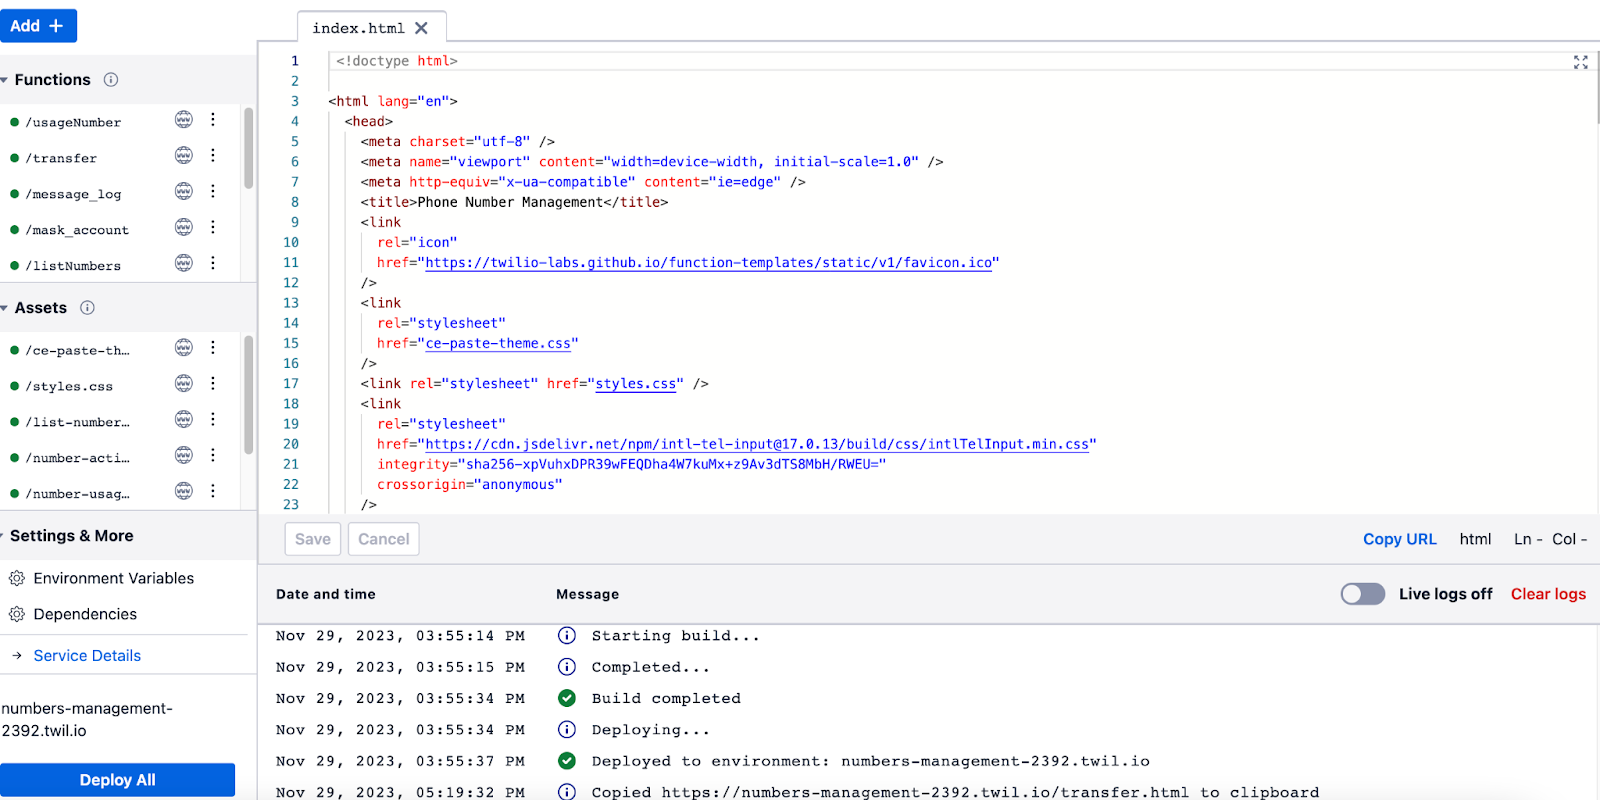
- Create a new Function in your Twilio Console by going to Functions & Assets > Services > Create Service.
- Add a new function file (button in top left corner) and give it the same name as the function in the
/functionsfolder on GitHub (without the.jsextension). - Repeat step 3 for all files in the
/functionsfolder. - Open the
/assetsdirectory in the GitHub repo. - Create an asset file (button in top left corner) and name it
index.html(with the.htmlextension). - Open the file in the GitHub repository and copy the code content from the
index.htmlfile. - Do the same thing for the
.cssfiles that are in the assets folder. - For these assets, when you open them in the online editor, in the bottom-right corner it should say “html” and “css” respectively.
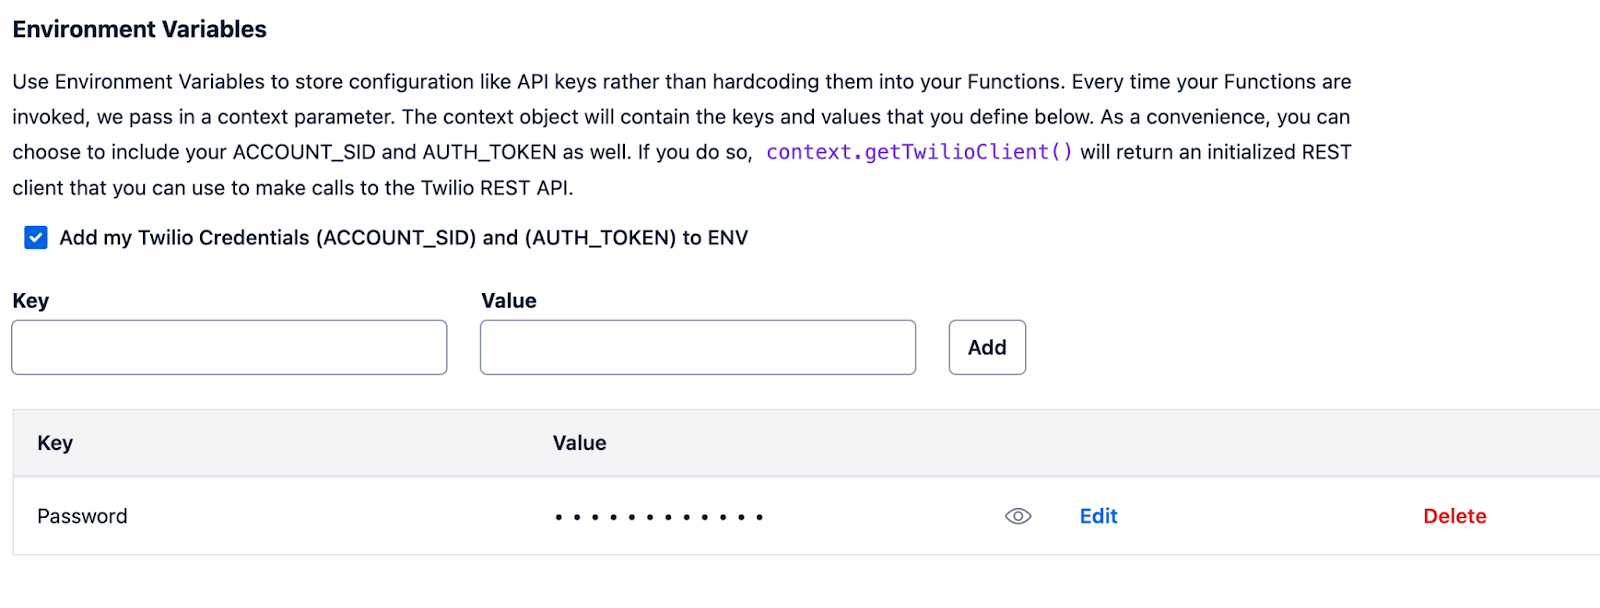
- Click on Environmental Variables and add a new key called “Password” with your desired value (this will be your password to use the app).
- Save all functions and assets in the online editor.
- In the online editor, next to the name of each file, you will see the current access level – set it to Public for all of them. By default they are Protected.
- Click on Deploy All, and wait for the deployment to be completed.
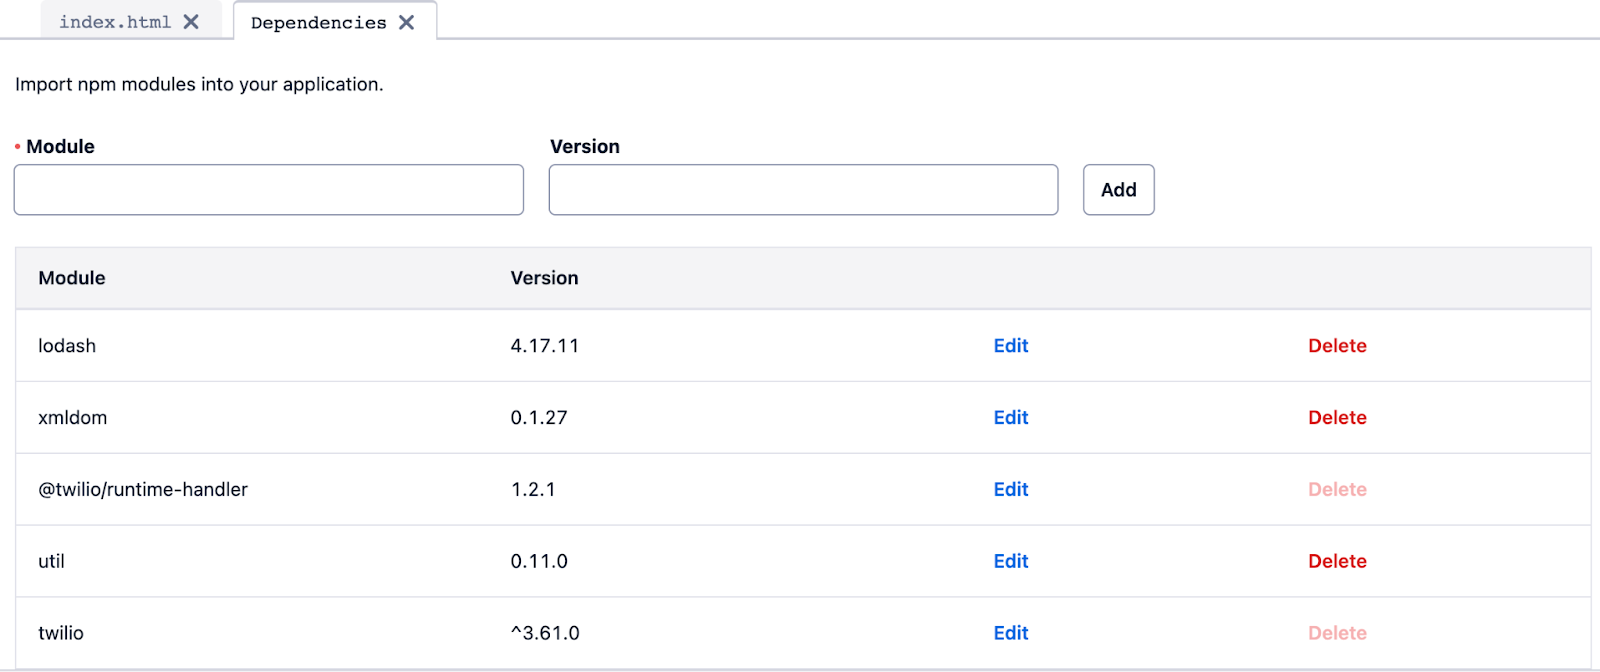
- Click on Dependencies and update some items as needed:
- The twilio module with version
^3.61.0 - The @twilio/runtime-handler with version
1.2.1. - Set the Node version to
18at the top.
- The twilio module with version
- Click Deploy All, and wait for deployment.
- Click on index.html from the list in Console and in the bottom right corner click on Copy URL, paste it in a new browser tab, and hit Enter. This will open the app.
Bookmark the app URL, as you will be able to use it at any time after you have completed the above steps. In case you lose the URL, just open the Function in Console and repeat step 16.
The app will have the same look as you saw in the demo video above – however you might see additional functions in your app, since I might have added more of them after we recorded the video. What will also be missing in your app is the list of subaccounts, exposed password, and some other info meant only for the demo. Rest assured that the core functionalities will be there!
As extra help, to make sure everything is configured correctly on your end, please refer to the below screenshots.


What else can you do with this app and what should you keep in mind?
So now that we have seen how to create the app that will help you manage your numbers and check usage, let’s explore app customization, security, and more.
The GitHub link I shared is part of a larger repository which contains Twilio code samples.
Each directory contains assets and functions that you can copy to a new Function in the same way as described in the numbered list in the “Build the app” section above. This means that you don’t need to create the app with every function to start, but only the ones that you would like to have – each one can be created as a separate Function, with a different URL and password.
In addition, a great benefit of Functions is the control on how they can be accessed (Function visibility). Because the created app is publicly accessible in a browser (but it can only be used if you know the password), what you can do is keep the functions Private or Protected, and only set them to Public when you need to use them (see step 12 above for more).
Apart from controlling Function visibility, to make sure the app is as secure as possible, make sure you set a strong password, and only share the link of the app and the password with people you trust and who should be using the app.
A very important thing to keep in mind is that you need to click on the Deploy All button in the online Function once you are done making your changes. A log will be visible in case there are errors, or the Function did not deploy properly.
Finally, you might be wondering if Twilio charges anything to use the Functions. Twilio charges for Functions usage - there is a free tier which resets monthly, and you should be aware of the usage costs.
We can’t wait to see what you build! Have fun!
Thank you to Jyden Tyree for recording the videos that accompany this post.
Danijel Šumberac is a Senior Manager at Twilio with many years of leadership experience and knowledge in coding, SQL, and Data Analysis, and is highly interested in empowering users to create their own API solutions. He can be reached at dsumberac [@] twilio.com.
Related Posts
Related Resources
Twilio Docs
From APIs to SDKs to sample apps
API reference documentation, SDKs, helper libraries, quickstarts, and tutorials for your language and platform.
Resource Center
The latest ebooks, industry reports, and webinars
Learn from customer engagement experts to improve your own communication.
Ahoy
Twilio's developer community hub
Best practices, code samples, and inspiration to build communications and digital engagement experiences.


