Watching IoT Sensors with an ESP32 Board, JavaScript, Node.js and Twilio Sync
Time to read:
This post is part of Twilio’s archive and may contain outdated information. We’re always building something new, so be sure to check out our latest posts for the most up-to-date insights.
Twilio Sync for IoT provides two sets of API to build end-to-end experiences with your embedded and wearable devices using the same Sync primitives used for mobile devices and web browsers. Sync for IoT lets you expand your real time applications to the Internet of Things.
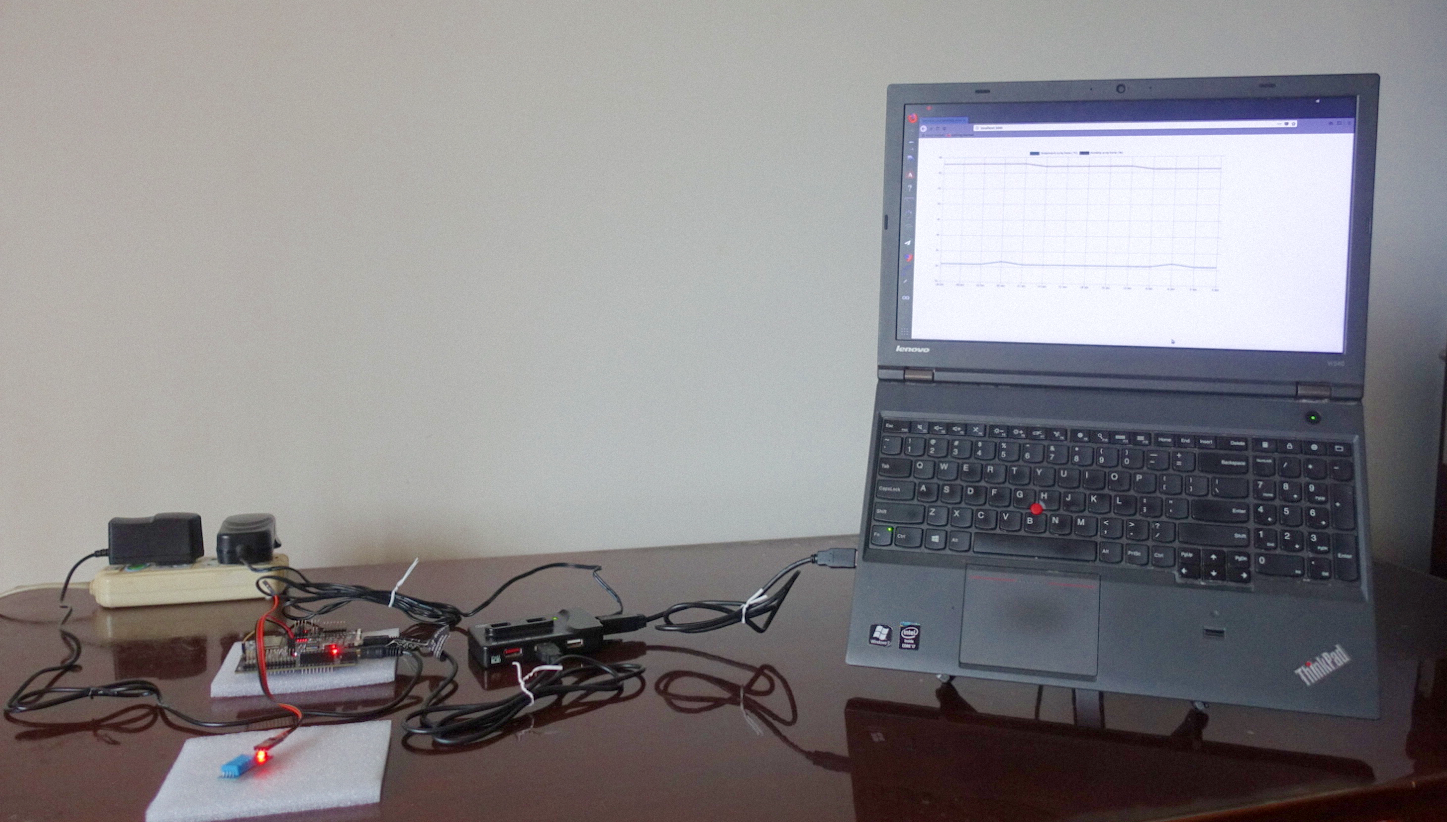
Let’s set up the demo system shown in the main photo, which includes a browser interface and an ESP32 board with a humidity and temperature sensor attached. We’ll use JavaScript, Node.js, the Twilio Sync Rest API and the Twilio Sync JavaScript Client Library to interact with the Sync resource on our IoT device and our web server and browser clients at the same time.
If you just want to see the finished code, see this Github repository. It has been verified to work with Chrome, Firefox and IE and with an ESP-wrover-kit.
Prerequisites for Our Sync for IoT Build
To follow along with today’s demo, you’ll first need to sign-up for a Twilio account. Sync for IoT is currently in developer preview, apply here to gain access.
You’ll also need to purchase some hardware to build this project:
- DHT11 Temperature and Humidity Sensor (or here from US)
- ESP-wrover-kit DEV board (or here from US)
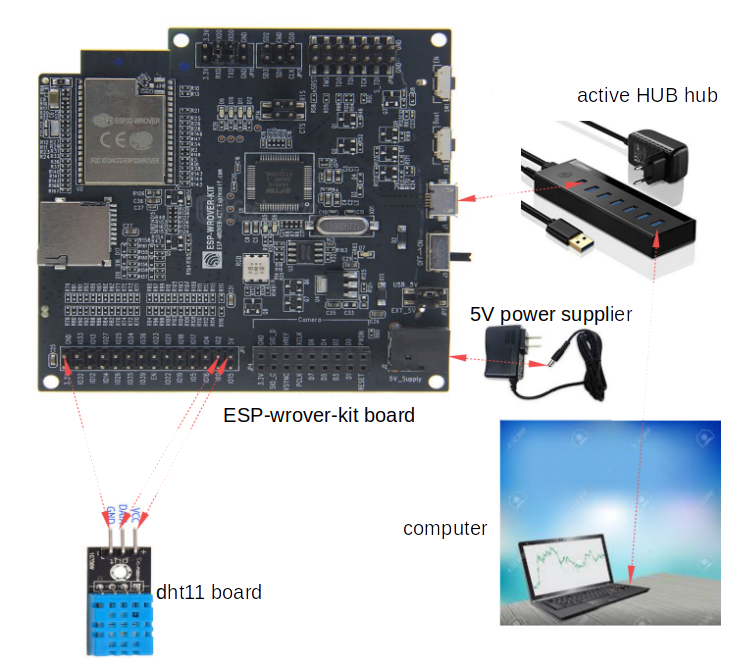
The image below is a simplified diagram of the setup you’ll need to build. Follow the ESP-WROVER-KIT V3 Getting Started Guide, for all of the basic setup and the below diagram for the sensor hookup.
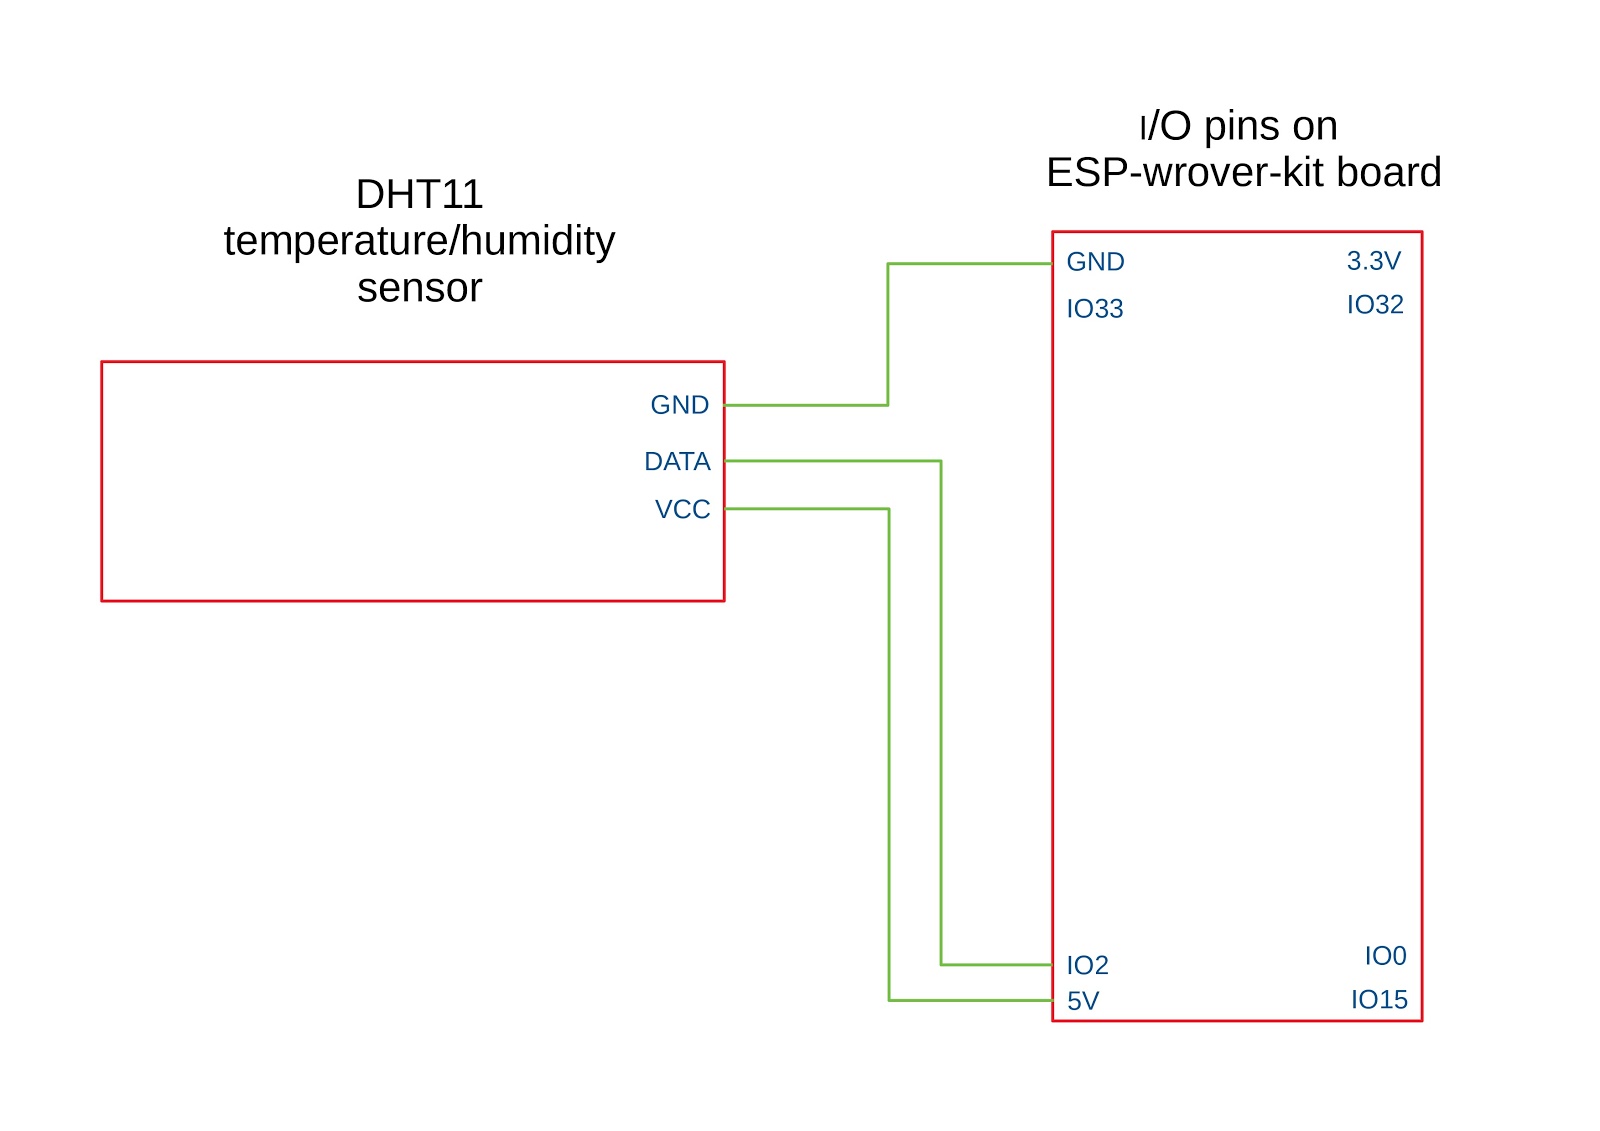
Here’s a schematic of the connections between the DHT11 and the ESP32 board.
We used the Arduino IDE for this demo. You’ll need to download and install:
You’ll also need to install support for the ESP32. This depends on your platform; you can find step-by-step instructions here.
Prepare Your Software Environment
You’ll need to follow a few steps in order to prepare to develop for the client and server.
- Log in to your Twilio Account
- Copy your Account Sid and Auth Token somewhere safe
- Create a service id for using Twilio Sync for IoT
- Clone our demo project
Enter the directory “Watching-Sensors-with-ESP32—Expressjs-Twilio-Sync-for-IoT”. Let’s call this the “root folder” of our demo project.
Getting Started with the Twilio Sync Rest API
Express.js, running on the top of Node.js, provides an infrastructure letting you create a full-stack web app including a server-side app and a browser app. Twilio Sync provides 2 sets of APIs for Express.js application development. For your server-side application, the Twilio Sync Rest API should be used.
Now let’s get started with a demo app to use the API.
Enter the root folder if you haven’t yet and type:
Open the .env in the root folder and fill out the Account Sid, Auth Token and Service ID with the values you copied above from the Twilio Console.
At the root, type:
Open a browser. If this is the first time for you to run the demo web app, type in:
If all goes well, you’ll see “Your device document has been created!”.
Open another browser tab and go to
http://localhost:3000.
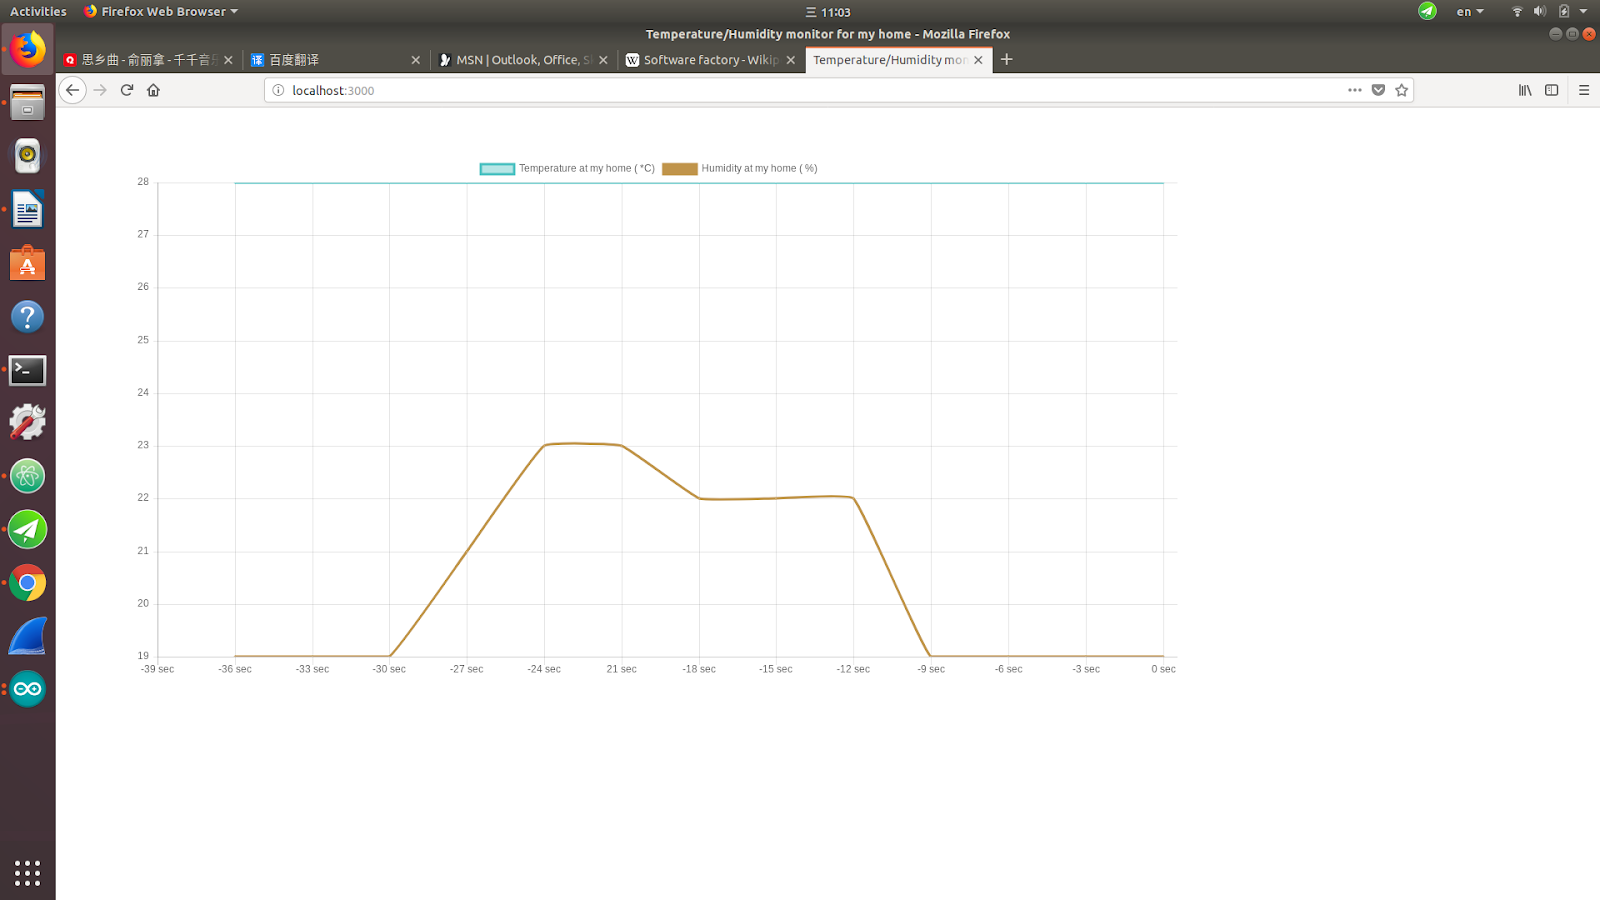
A chart will be rendered in the browser (as the figure shows below) which updates temperature/humidity values at an interval of 3 seconds:
Call the Twilio Sync Rest API
The file server-api-mode/index.js is a typical Express.js server-side program which includes calls to the Twilio Sync REST API.
After the following statements,
Twilio’s APIs start to be used (through the Helper Library), such as:
Drawing the Real-Time Chart of Temperature and Humidity
The file server-api-mode/views/dht11.html is a typical Express.js browser-side program which includes code to show the user interface in the user’s browser.
We use Chart.js to visualize the temperature and humidity data in a customisable way. A Chart object is instantialized as —
The chart renders 2 broken lines, each of which has 14 vertices.
The 2 lines are updated every 3 seconds for both temperature and humidity.
Set A Browser Update Frequency
setTimeout is a HTML DOM interface. Dht11.html calls it every 3 seconds to submit a HTTP-post request to the web server:
On the other side (at server-api-mode/index.js), it’s handled here:
It finally calls:
Here an Express object res (representing the HTTP response of the web server when it gets an HTTP request from a HTTP client) uses its method “render” to render the view “dht11” at the client side, in turn.
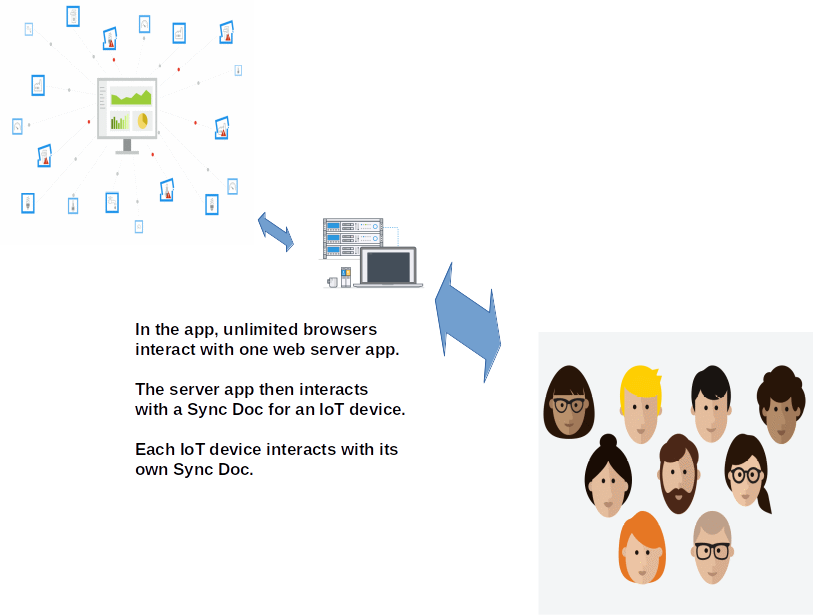
The object res will generate different instances for different HTTP clients.
In short, it guarantees you’ll be able to open an independent server for multiple areas.
For example, you might have multiple people checking on conditions on a factory floor from their browsers.
Drawing Updated Charts in the Browser
The render function executes an event handler in dht11.html, which is a JavaScript function called window.onload.
An important feature of the function is to use the HTML5 method localStorage to store and retrieve historic values of temperature and humidity.
As soon as the old and new data are put into the structure of the chart myline, update it:
Of course, you’re still getting readings of… nothing. Let’s move on to the next step and connect our ESP32 and finally publish some real data.
Using an ESP32 to Monitor Humidity and Temperature
You connected the dht11 sensor and ESP-wrover-kit board but they aren’t doing anything yet.
Let’s turn our attention now to programming it with Arduino.
Editing the Arduino Sketch
In the root folder, run this command:
MQTT_ESP32_Sync.ino is the Arduino program for the demo.
Fill out the “ssid” and “password” in the file, for a connection to your local WiFi.
Now, apply for certificates from Twilio. 3 parameters are required: root_cert, client_key and client_cert. Fill these parameters into:
Sync doc “dht11” was created when we were working in the browser. Now we will be able to publish sensor data there:
Using the Arduino IDE
Start the Arduino IDE. Then on the menu of the IDE, select Tools -> Board "ESP32 Dev Module".
Import the PubSubClient and ArduinoJson library at Sketch -> Include Libraries -> Library Manager.
Open our file esp32-wrover-kit/MQTT_ESP32_Sync /MQTT_ESP32_Sync.ino with File -> Open.
Compile the Arduino program, then verify and compile to fix compilation-time issues using Sketch -> Verify & Compile.
Upload the Sketch to the Board
Power on the ESP-wrover-kit board and activate the USB hub.
In the Arduino IDE, set your port in the Tools menu using Tools -> Port -> /dev/ttyUSB1.
Upload and run our Arduino demo program to ESP-wrover-kit board. Connect and publish data to the “dht11” document immediately by selecting Sketch -> Upload.
You’ll know the program uploaded successfully when you see “Hard resetting via RTS pin” in the message window (the black window under the code).
Open the Serial Monitor to display all output printed by Serial.println() in the Arduino program with Tools -> Serial Monitor.
How the ESP32 Code Works
Let’s walk through some of the most interesting parts of our sketch.
Of course, the first thing we do is connect to WiFi:
Then we connect to Twilio’s MQTT Server:

The main logic of the program is an infinite loop, in which data from the physical dht11 sensor is read and published to Twilio Sync Document in format of a JsonObject.
We can also publish using a “nonblocking” method. The code example below is much better than calling function delay(3000) to publish data every 3 seconds.
A delay call in Arduino blocks all other execution, holding up any processing you do in the background. By checking constantly how much time has elapsed, you can run on a cadence without holding up everything else.
Release JsonBuffer
The method clear needs to be called after the data in the JsonBuffer is published to our Sync doc.
Using the Twilio Sync JavaScript Client Library
Our demo today is really in three parts. You’ve looked at the server implementation and now have the ESP32 updating current conditions. Next, let’s look at a client side application which allows us to create observers of this data.
At the root folder of the demo change into the client-api-mode directory. Edit .env again by filling in TWILIO_ACCOUNT_SID and TWILIO_SYNC_SERVICE_SID into their required areas.
Follow Twilio’s instructions to get a TWILIO_API_KEY and TWILIO_API_SECRET. Fill them into .env as well.
Now, type:
Open 1 more browser tab, and go to http://localhost:3001.
Now you can see the browser’s screen update like the following:
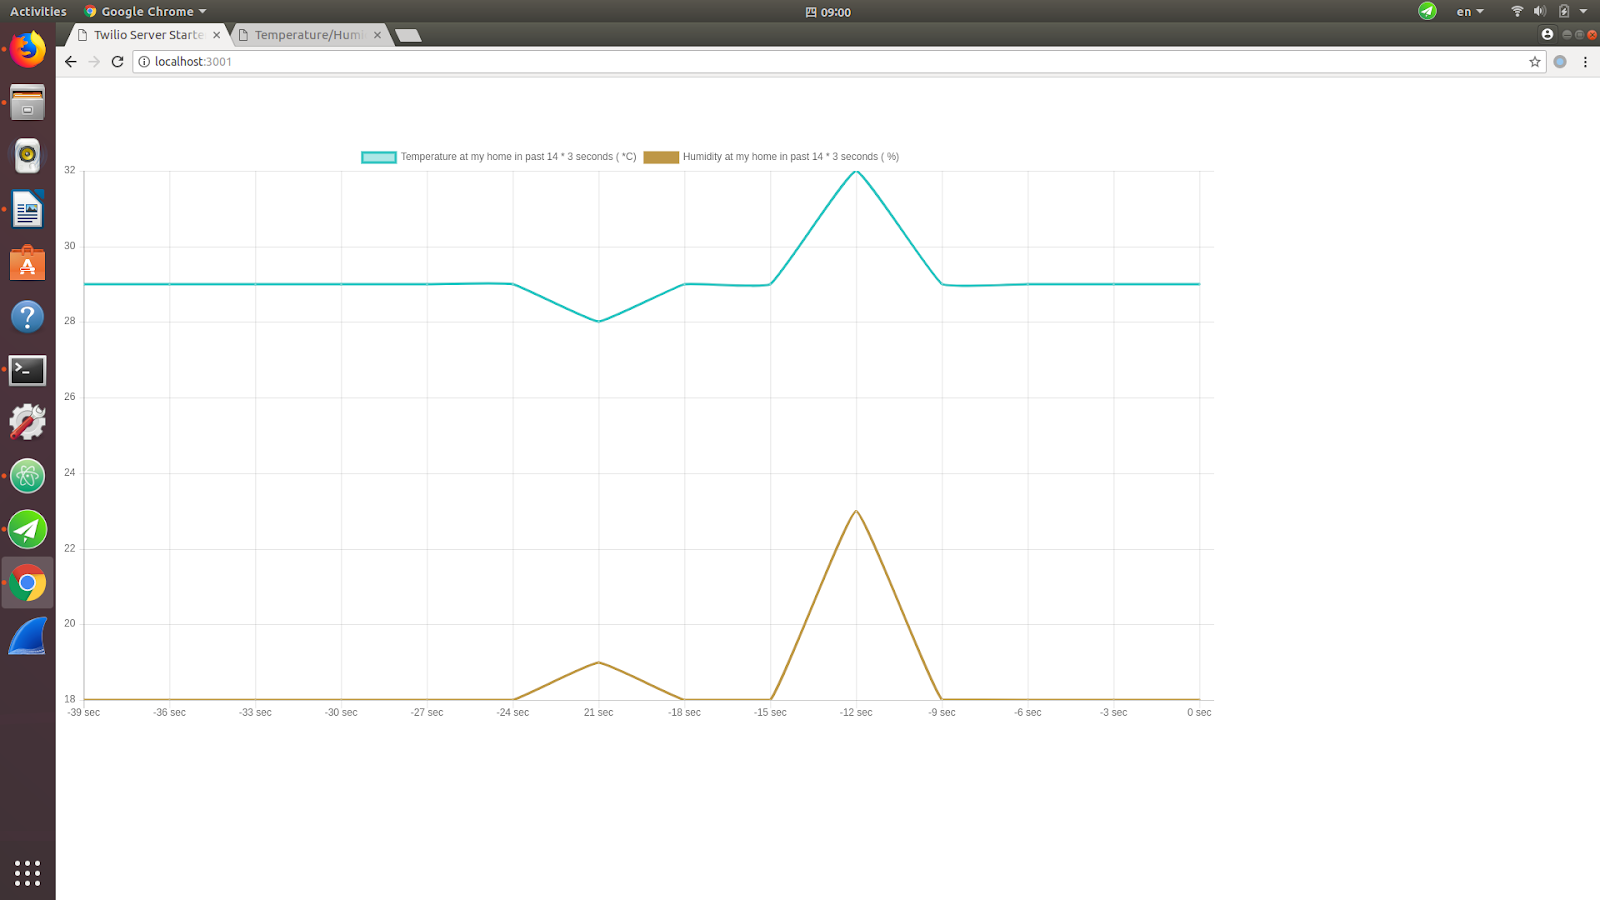
The chart will be updated in real-time and render the values of temperature/humidity that the ESP-wrover-kit publishes.
How We Call the Twilio Sync JavaScript Client Library
The browser app, in client-api-mode/public/index.html, calls the Twilio Sync JavaScript client library. As you can see, it’s different from how we called the Twilio Sync Rest API in the server-side application:
Tee new Twilio.Sync.Client is called to create a Sync client. Twilio Sync cloud server provides a token produced by the server app in client-api-mode/app.js which authenticates the client.
The statement SyncDoc.on subscribes to events triggered by updates of the Sync document “dht11”.
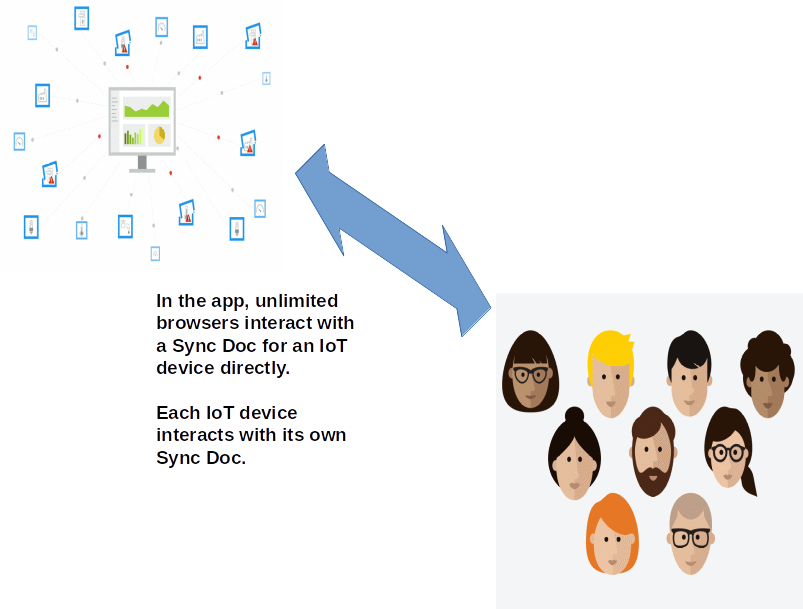
Once again, after the server provides an independent token, the browser is able to update values continuously.
There is no limit on the number of concurrent browser viewers.
Reversing the Direction
So far all of our data has gone one way: from sensor to web app. The web app can also send messages back to the ESP32.
In the Arduino IDE, open the serial monitor if it isn’t currently open.
Open a new browser tab and go to http://localhost:3000/pause-sensor.
Your browser will receive a message from the server: “Sensor at your home is paused. The connection to Twilio will be setup again. Please check information at its debug port!”.
Inside the serial monitor in the IDE the following messages should be displayed:
Now we can send data to the device using the code at server-api-mode/index.js. Here is how to send a message back to the ESP32 via a Sync doc named “BoardLED” and print a message in the browser:
Looking into the code at esp32-wrover-kit/MQTT_ESP32_Sync/MQTT_ESP32_Sync.ino you can see where the command arrives at the ESP32:
Although this is a basic implementation of a message back to the IoT device, you can see a hint of its power. More logic is necessary, but you can start to see how to implement full bidirectional communications in your app with Sync.
Wrapping Up our Sync for IoT ESP32 Demo
This completes our introduction to Twilio Sync for IoT APIs, and the techniques around using them on the server, the client, and on an IoT device. Check out the docs such as Twilio Sync Rest API and Twilio Sync JavaScript Client Library for further reading.
If you run into any issues with your app or you have questions, please reach out to me on GitHub.
Related Posts
Related Resources
Twilio Docs
From APIs to SDKs to sample apps
API reference documentation, SDKs, helper libraries, quickstarts, and tutorials for your language and platform.
Resource Center
The latest ebooks, industry reports, and webinars
Learn from customer engagement experts to improve your own communication.
Ahoy
Twilio's developer community hub
Best practices, code samples, and inspiration to build communications and digital engagement experiences.


