Build a Voice Conference Line with Twilio, Python and Flask
Time to read:

In this tutorial you will walk through the process of setting up a basic voice conference phone line using Twilio Programmable Voice, Python and Flask. By the end of this tutorial you will have a conference call room with a security PIN implemented, plus a demonstration of how to process events from the call in real time.
The only prerequisite step you need to follow before you begin working on the tutorial is to have installed Python 3.6 or newer on your computer. The tutorial will walk you through setting up your Twilio account and preparing the Python virtual environment required to run and develop the application.
Setting up your Twilio Account
If you do not already have a Twilio account please follow these sections from the official Twilio guide. You only need to complete these sections for this tutorial:
- Sign up for your free Twilio trial
- Verify your personal phone number
- Get your first Twilio Phone number set up
Take note of your Twilio phone number after setting it up, as this will be the number that you call in to later on the tutorial to kick off your conference call.
Setting up the Python virtual environment
Following Python best practices, you are going to make a new directory for your project, and inside it you are going to create a virtual environment. You will then install the required Python packages in it.
If you are using a Unix or Mac OS system, open a terminal and enter the following commands to do the tasks described above:
For those of you following the tutorial on Windows, enter the following commands in a command prompt window:
The last command uses pip, the Python package installer, to install the packages that we are going to use in this project, which are:
- Flask is a microframework for web applications.
- The twilio python API client. This library is developed by Twilio and will be used to interact with the Twilio SMS messaging API via Python.
- The Python “ngrok” wrapper library, pyngrok, to create a temporary public URL for your application. Pyngrok will automatically download and run the ngrok command line tool directly from your virtual environment.
Setting up your ngrok proxy
Since you have installed pyngrok, you can now run this command in your terminal of choice, first making sure that your virtual environment has been activated. Whether you are on Windows, Linux or Mac this command will be the same:
You will notice output similar to the following:
Take note of the HTTPS URL that ngrok provides and jot it down. You need this URL later on in the tutorial when you set up the webhook for your phone number. You need to leave this terminal and ngrok running for the duration of this tutorial. If you stop ngrok, or if the ngrok session expires, you will need to restart it, and at this point the URL will change. Keep this mind for later when you set up your TwiML webhook.
Creating your Flask application
Let’s get to it and write the code that facilitates the conference call. Fire up your favorite editor, create a file called “app.py” and add in the following content to it:
There is a little to unpack here but it’s not too bad. Let’s spend some time talking through what this code is doing.
First you set up an endpoint called “/conference”. This endpoint is what Twilio will make a request to when you call the phone number for your conference call. Within this endpoint we add some code that uses the Python Twilio package API to set up the conference call. At the end of the function for this endpoint, you are returning the XML representation of the VoiceResponse object, which contains the TwiML instructions for Twilio execute as a result of an incoming phone call.
The next item to take note of is the status_callback. This is the URL that Twilio will publish events concerning your conference call to. We set this to be the relative URL in our Flask application called “/events”. This is an endpoint that you have configured to subscribe to events concerning the conference call. This endpoint will receive conference metadata from Twilio, i.e. when the call starts or when someone new joins. In this specific case you are just logging this information to stdout using a print statement.
Running the Flask application
Open up a new terminal, change directory into your “conference-call” project, activate your virtual environment and then run the following command:
Now that you have your Flask application running and your ngrok proxy configured, you are ready to set up the TwiML webhook in your Twilio dashboard.
Setting up your custom TwiML webhook
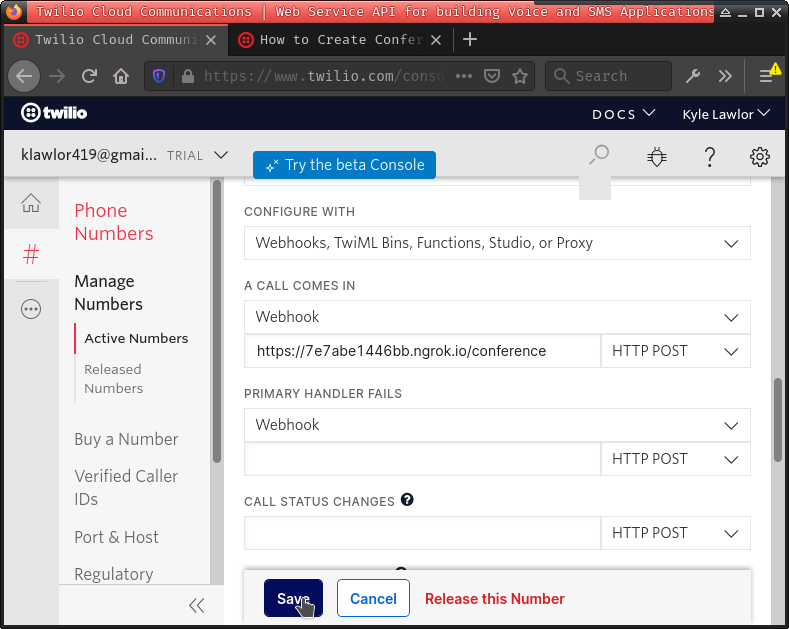
Now you will put together all the pieces and instruct Twilio to invoke a webhook pointed at your ngrok URL whenever a call comes in to your Twilio phone number. To do this you will need to configure the Twilio phone number you created earlier to take a specific action when a call comes in. Follow the section from the official Twilio documentation for setting up this webhook. You will need to take the ngrok URL from the previous step and use that for the webhook. You will also need to add “/conference” to the end of the URL.

Running the conference call
At this point you are ready to test your conference call. From your phone call the number that you created earlier and follow the prompt to enter any number to execute your code:

You will notice that you have been put into a waiting room and there will be waiting music playing in the background. Send your Twilio number to a friend, and have them call in as well, and you will be able to speak with them once they join. You could even invite more friends to join in!
Adding a security PIN
As a very basic proof-of-concept you will now modify the code within the “/conference” endpoint so that anytime a user joins your conference, they will be required to enter in a security PIN. Fire up your code editor and make your “/conference” endpoint like so:
The important changes you made are that whenever Twilio routes an event to your conference call, you check to see if the incoming request contains Digits. This is a piece of data that Twilio will send to you when you make use of the gather verb to request input from the caller. It contains the digits that the gather verb recorded from the user.
If the incoming request does contain Digits and these digits match the secret security PIN we specified in our application code, we then route that user into our conference call. Any subsequent users joining the call will be required to enter the secret security PIN as well. This provides you with a minimal security protection that can be further extended.
In order to run this code you will need to restart the Flask server you ran earlier. If you navigate to that terminal you can use CTRL+C to quit the Flask server. Then simply re-run the command you used earlier flask run. Now you can dial in to your conference number and you will be required to enter the PIN before you are given access to the conference call.
Going further
There are a number of ways in which you can extend this project:
- Take a look at your terminal that is running the Flask application, you’ll be able to see the event info that Twilio sends you whenever someone takes an action in your conference call. What other actions do you think you could take when someone joins your conference call?
- Take a look at the extensive documentation covering all the features of the TwiML Programmable Voice Conference.
- Modify the code we built together here to make use of the other examples provided in the official Twilio documentation. The code developed here followed Example #1.
- How do you think you could improve the security of this call? As an exercise you could try to modify this code so that the moderator of the call sets the pin.
Conclusion
That’s it for this tutorial! I hope you’ve found it helpful to get you up and running with the Twilio conference calling feature. The source code for this application can be found here. Thanks for reading!
Kyle Lawlor-Bagcal (wgwz [at] protonmail [dot] com) is a software engineer and systems developer who is passionate about good code and constantly learning new things. https://wgwz.github.io
Related Posts
Related Resources
Twilio Docs
From APIs to SDKs to sample apps
API reference documentation, SDKs, helper libraries, quickstarts, and tutorials for your language and platform.
Resource Center
The latest ebooks, industry reports, and webinars
Learn from customer engagement experts to improve your own communication.
Ahoy
Twilio's developer community hub
Best practices, code samples, and inspiration to build communications and digital engagement experiences.


