Laravel and Twilio: Group Video Chat
Time to read:
This post is part of Twilio’s archive and may contain outdated information. We’re always building something new, so be sure to check out our latest posts for the most up-to-date insights.

While words alone are powerful, the inflections of people’s voices, the gestures and expressions we unconsciously flow through during conversation all contain a wealth of information often lost to us in our technology driven communications.
Using Twilio’s Video API you can now add the richness of face to face interactions to any web project.
Here we’ll look at how to create a Laravel web application that gives users the ability to join existing video groups or create their own.
You can preview what we’re building here.
Assumptions
This walkthrough assumes you have a PHP development environment setup with git installed, a global install of composer, and which enables you to access your project through a browser using localhost or virtual hosts. You will also want to gather some information beforehand:
- Your Twilio Account SID & Token
- Your Twilio Video API Key and Secret
- An empty database named “video”
Getting Started
We’re going to set up video groups on top of a Laravel 5.5 installation with basic auth and a couple of dependencies: twilio/sdk and laravelcollective/html. We’ll be using the master branch of this repo as a starting place. If you would like to look at the completed project, checkout that repo’s complete branch.
From the command line, in the directory where you keep your project folders, run:
git clone https://github.com/mstaples/LaravelTwilioVideoGroups.git VideoGroupChat
Move into our new project directory.
cd ~/VideoGroupChat
Next we’ll use composer to install dependencies. Then we’ll make sure our storage and cache directories are writeable, create our .env from the example, and generate our project key using the following commands:
composer install
chmod -R 775 storage/
chmod -R 775 bootstrap/cache
cp .env.example .env
php artisan key:generate
Open your new .env file. Update the DB_USERNAME and DB_PASSWORD values if your setup doesn’t match the defaults. Then to generate our database structure we run:
php artisan migrate
You’ll also notice we are connecting to the “video” mysql database. If you run into an error that this database does not exist, you can create it and then run the migration command again:
mysql -u username
create database video;
# EXIT mysql
php artisan migrate
Private Account Information
Okay now let’s replace the placeholder values for our .env variables:
TWILIO_ACCOUNT_SID=your-account-sid
TWILIO_ACCOUNT_TOKEN=your-account-token
TWILIO_API_KEY=your-video-api-key
TWILIO_API_SECRET=your-video-api-secret
For this information to be useable within the Laravel application, the config/services.php file includes the following section:
Now, as an example, if we need to access our Twilio account SID inside the application we would use config('services.twilio.sid').
Create Routes
Only three new routes are needed for our project:
- One for handling our default page where users may select an existing video group or name a new one
- A second route for joining an existing Video group
- And a third for creating a new group from a user submitted name.
In routes/web.php let’s remove the route to the welcome view and add the following lines:
Create the Project Controller
In the app/Http/Controllers directory, create a new file named VideoRoomsController.php. Inside this new file, create a VideoRoomsController class with the dependencies we’ll use:
Inside the new class add four protected variables to hold your Twilio account and API information, then define these variables in your __construct() method.
The rest of the controller class will be made up of three methods to match our three project routes: index, createRoom, and joinRoom.
Our index method will request a list of video rooms associated with our account credentials, then return that list to an index view which we’ll create later.
The createRoom method will take a room name from the posted form request. We’ll check to see if a room by that name already exists. If there is no room by that name, we’ll create one. Whether the room is new or not, we then send the user to joinRoom with that room name specified.
The last method we need to create to complete our controller, joinRoom, creates an access token for the user and the specified room, and then sends that information to the room view we will create later. The room view will use the access token to connect the user with the active Video group.
Create the Views
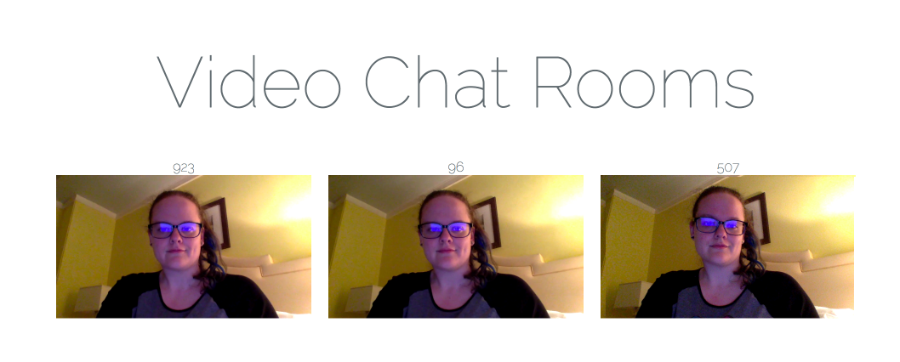
We only need two views for this project. We can use Laravel’s default resource/views/welcome.blade.php as a template. Rename welcome.blade.php to index.blade.php. Inside the content class div, find the div with the title class and replace its contents with “Video Chat Room”. Then replace the rest of the content div with a simple form for entering a new video group name, followed by a list of links to existing rooms:
Make a copy of index.blade.php named room.blade.php. Replace the form and room list in the content div with an empty div with an id of media-div.
The core of the work we’ll add to our script block is a series of sequential steps: first creating the user’s local video and audio tracks, then connecting to the group room, and finally initiating participant setup and event listeners.
The above steps reference two methods we’ll need to create: participantConnected and participantDisconnected. The former method is used both to add the audio and video tracks for existing participants to the view and also to add the tracks for new users as they join. The latter method is triggered by participants leaving the group video chat, removing the departing user’s audio and video from the view.
Here you will see references to our final two methods: trackAdded and trackRemoved. In addition to adding video and audio elements, note that we are also using trackAdded to style the video tracks as we add them.
Demo
If we don’t have a web server setup we can run Laravel’s php artisan serve command which leverages PHP’s built in development web server. From there we can use ngrok to expose our local project to a public url:
ngrok http 80
We can give the resulting “Forwarding” url out to some friends to test out our new video conferencing capabilities.
Troubleshooting
Your project now has all the pieces needed to provide group video chat for users, but what about testing? What if something doesn’t work quite right? There are a few things to know before you get started which may make your troubleshooting tasks easier.
Want to check out your project locally? Unless you are running this project via https or localhost, Chrome will throw blocking errors when your project interacts with Twilio’s Video API, so check it out on Firefox.
Don’t want to figure out how to maintain multiple distinct sessions to test out multiple user video tracks? In the joinRoom method of your VideoRoomsController, change the $identity variable to be a random number rather than a value unique to the authenticated user:
This can cause a bit of strangeness since a new entry to the room is created each time you hit the room/join url with the same room name value, but it works sufficiently well to preview your awesome new video project.
Logs
Take a look at our createRoom and joinRoom controller methods. Each one contains a Log::debug() message. You can keep an eye on information passed to Laravel’s Log by running the following command from your project root:
tail -f storage/logs/laravel.log
Now glance over to the JavaScript we just created. You’ll notice several lines with console.log() messages. If you’re just getting started with JavaScript, it’s useful to note that you can watch the output from these lines in your browser’s inspector. In Firefox or Chrome you can access that by right clicking your page, selecting “Inspect” or “Inspect Element” and selecting the “console” tab.
To get even more info in the console, you can add logLevel: 'debug' to your Twilio.Video.connect options.
Success!


Awesome work! You are now ready to bring your users together for lots of lively face to faces conversations!
There are a lot of great next steps you could tackle to expand this project. Let users send out video group invites using your room/join url and Laravel’s email options or Twilio SMS. You could host video presentations and use Twilio’s voice API to record video and audio for attendees to reference later.
Using this project as a guide you will be able to offer users in any Laravel project the ability to get together for whatever conversations they need. Customer service, tech support, team plans, or the simple joy of hanging out with friends – your project’s social life just got a lot more interesting.
Are you building something awesome for users with Twilio Video? Have suggestions for Video or Laravel howtos you’d like to see? I want to hear about it!
- Email: mstaples@twilio.com
- Twitter: @dead_lugosi
- Github: mstaples
Related Posts
Related Resources
Twilio Docs
From APIs to SDKs to sample apps
API reference documentation, SDKs, helper libraries, quickstarts, and tutorials for your language and platform.
Resource Center
The latest ebooks, industry reports, and webinars
Learn from customer engagement experts to improve your own communication.
Ahoy
Twilio's developer community hub
Best practices, code samples, and inspiration to build communications and digital engagement experiences.