Send SMS and MMS Messages with a Particle Electron
Time to read:
The Particle Electron is an amazing Internet of Things building block. By pairing an ARM Cortex M3 microprocessor with a cellular modem from U-Blox, you can quickly build a product with true global connectivity.
In this post, we'll give you the raw materials you need to have your Particle Electron sending SMSes and MMSes with Twilio in no-time flat. (Okay, maybe closer to 30 minutes.)
Let's hit it!
Note: This code works over a data connection, so you'll be able to use the Particle SIM card or a compatible third-party SIM with data connectivity. It does not require a SIM with text capabilities.
Sign Into - or Sign Up For - a Twilio Account
Create a new Twilio account (click to sign up for a free Twilio trial) or sign into your Twilio account.
Find or Purchase an SMS (and MMS) Capable Number
For this to work, you need to use an SMS (or SMS and MMS) enabled number.
- Enter the Twilio Console
- Select the hash tag/Phone Numbers ('#') section on the left side
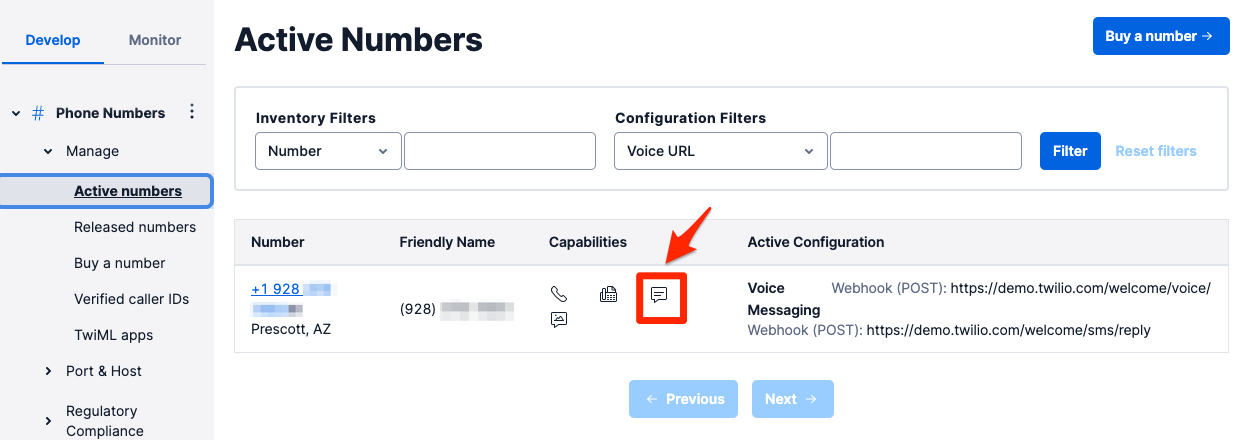
- Navigate to your currently active numbers
Under 'Capabilities,' you will see the phone number capabilities. For this article, you'll need numbers with SMS, or both SMS and MMS enabled.
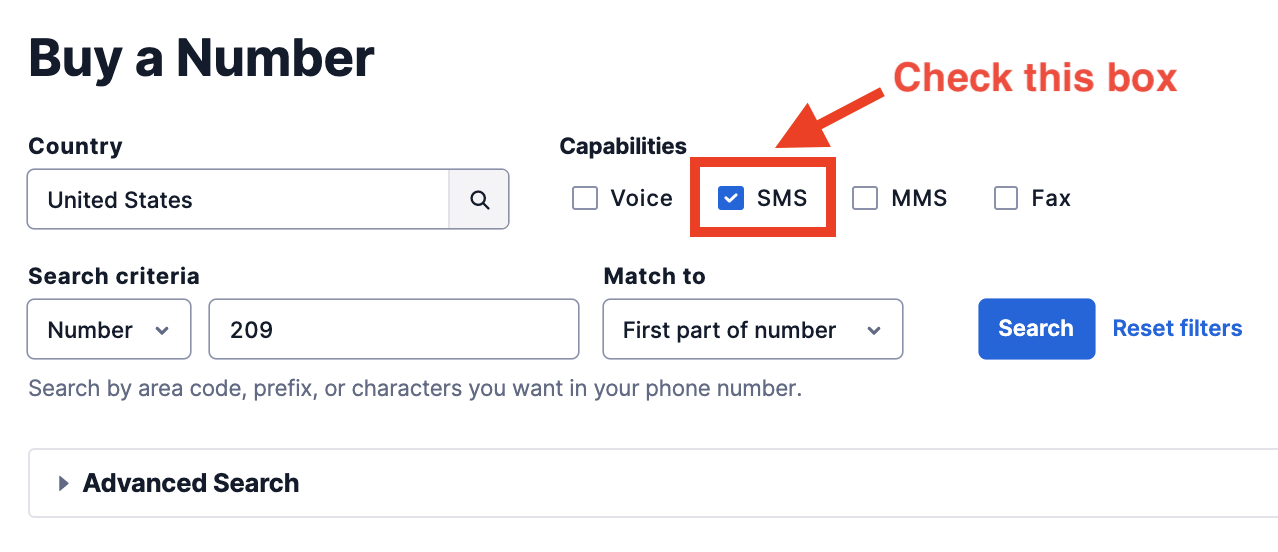
If you don't currently have a number with SMS or MMS capabilities, you can easily purchase one. After navigating to the 'Buy a Number' link, click the SMS and/or MMS checkbox:
Save the number that you use in a tab, so it is easy to copy & paste in further steps.
Retrieve Your Twilio Account SID and API Secret
In order to call the Twilio API, you will need to authenticate with us. For that, you need a Twilio Account SID and a Twilio Auth Token.
You can find these both in the Twilio Console:

As before, keep these handy in a tab. We will copy and paste them into webhook fields to send SMSes with Particle.
Prepare Your Particle Electron for Flashing
To flash your Particle Electron over the air, you'll first need to ensure it's connected to the network.
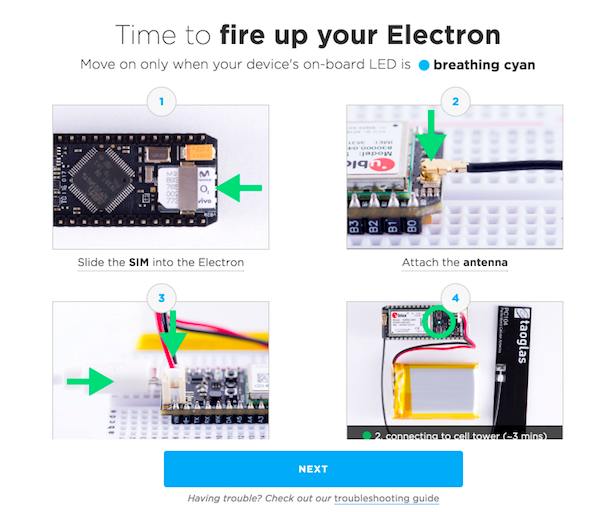
Make sure your SIM is properly inserted and the PCB antenna is connected. Then, plug in the provided Lithium Ion battery. Optionally, connect the USB cable as well.
The Electron is ready to go when the onboard LED pulses cyan:
Particle also has some excellent instructions on how to flash your Electron using USB (not over cellular). We'll be using over-the-air flashing for this guide, but for an extended development cycle, you should get Flash-Over-USB working.
Example 1: A Simple Example of Sending SMSes with a Particle Electron
Particle, like Twilio, uses Webhooks to trigger actions upon an event occurring. Particle Webhooks are a very powerful and easy way to connect your Particle devices with external services.
For our integration today, we're going to be using the Particle Web IDE. Log into your account and make sure you are in the Web IDE.
Copy Our Shared Particle App
There are two ways for you to clone our application. You can grab it from our Github repository, or you can copy it directly from this build on the Particle IDE. Either way, be sure to create a new application or click the 'Copy This App' button.
As you can see, we've boiled down this example to be as basic as possible to make it easy to follow. The key is in this line:
Particle.publish("twilio_sms", body, PRIVATE);We're going to use a Particle function to publish the body to the cloud. In the cloud, we'll set up a Particle Webhook which will then pass along the body to Twilio.
Hit the 'Flash' (Lightning) icon and flash the code to your Electron. You should see some happy LED movement, but you won't get any text messages yet - we'll plug it all together in the next few steps.
Set Up a Basic Webhook
Particle makes it very easy to set up a Webhook directly from their website. Be sure you have your Twilio credentials and an SMS-capable phone number handy.
- Surf to the the Particle Webhook Integration screen in the Particle console
- Click the '+' 'Plus' button icon to create a new integration.
- Select 'Webhook'
- Event Name:
twilio_sms - URL: https://api.twilio.com/2010-04-01/Accounts/[[ENTER_YOUR_ACCOUND_SID]]/Messages
- Request Type:
POST - Device:
Any(Optionally, if you have more than one device you can limit the scope)
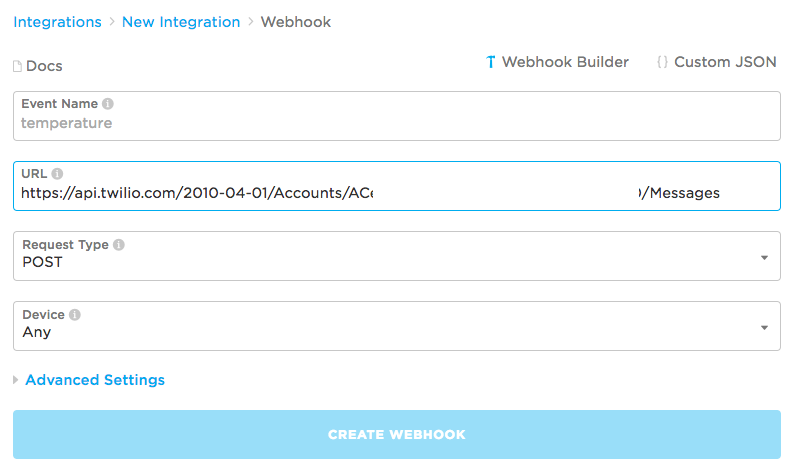
We're not quite done yet; we need to enter some more options in the Advanced Settings. Let's do that now.
Change the Advanced Particle Webhook Options
- Send Custom Data: Form
- Under Data, set the following three:
To - [[YOUR CELL PHONE NUMBER/NUMBER THAT CAN RECEIVE SMSES]]
From - [[YOUR TWILIO NUMBER FROM ABOVE]]
Body -{{PARTICLE_EVENT_VALUE}} - In HTTP BASIC AUTH:
Username - [[Your Account SID]]
Password - [[Your API Secret Key]]
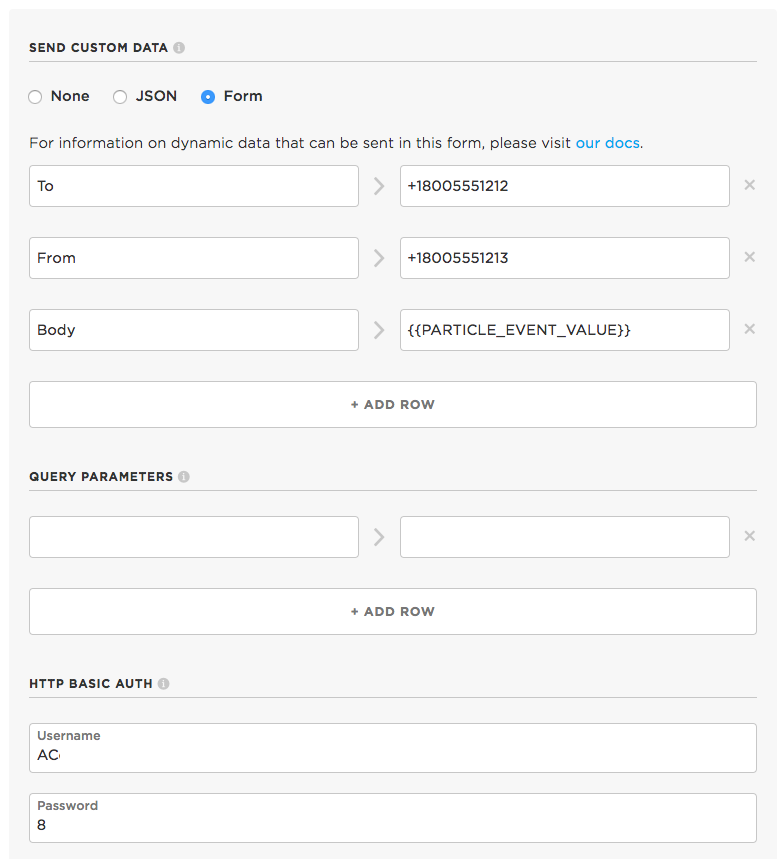
And... that's it! Feel free to save it and test it now (you should get a text!), or roll through to the next step.
Power Cycle or Reflash Your Electron
Either power cycle the Electron or Flash it with the above code.
Look for a nice, friendly message from your Electron!
Example 2: An Advanced Example Adding MMS Support to a Particle Electron
The first example will limit you to just changing the body of the text message to send an SMS.
Particle also allows you to pass multiple variables along to their webhooks with properly formed JSON. We're going to use that capability to send MMSes from the Electron.
Copy Our Shared Advanced Particle App
Either use the copy in the Github repo or copy our app to your Particle Web IDE.
Again, we've left the example rather bare bones.
In your production application, you'll want to check for validity of the inputs (and note text message size limits on Twilio) and check the encoding of the message body. You'll also need to consider special characters, such as quotes.
Set Up a New Webhook
Do the exact same exercise as the Webhook in the "Basic" example above, except name your Webhook twilio_mms.
The only other thing to change is in 'Send Custom Data' for 'Form':
- To - [[YOUR CELL PHONE NUMBER/NUMBER THAT CAN RECEIVE MMSES]]
- From - [[YOUR TWILIO NUMBER FROM ABOVE]]
- Body -
{{body}} - MediaUrl -
{{image}}
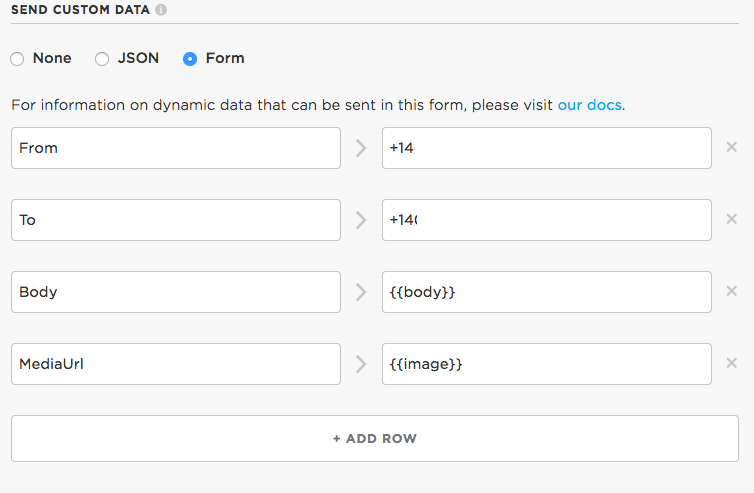
As you can see, we now have 2 custom variables, body and image. We manually craft JSON in the C++ onboard the Electron, and eventually, it will be passed along to Twilio.
Restart or (Re)Flash the Electron
After a power cycle, reset, or flash, you should see an owl pop up on your phone!
A Voice From Somewhere in the Cloud
You've now got a Particle Electron that can send picture or text messages as you need (or want). Monitor a sensor, build a weather station, track a vehicle - the possibilities are truly endless.
With your Electron and Twilio's Messaging APIs, you're going to do big things... even though you might be starting with small devices! However your IoT vision ends up looking, keep us apprised - we'd love to hear from you on Twitter!
We can't wait to see what you build.
Related Posts
Related Resources
Twilio Docs
From APIs to SDKs to sample apps
API reference documentation, SDKs, helper libraries, quickstarts, and tutorials for your language and platform.
Resource Center
The latest ebooks, industry reports, and webinars
Learn from customer engagement experts to improve your own communication.
Ahoy
Twilio's developer community hub
Best practices, code samples, and inspiration to build communications and digital engagement experiences.


