How to Run a Flask Application
Time to read:
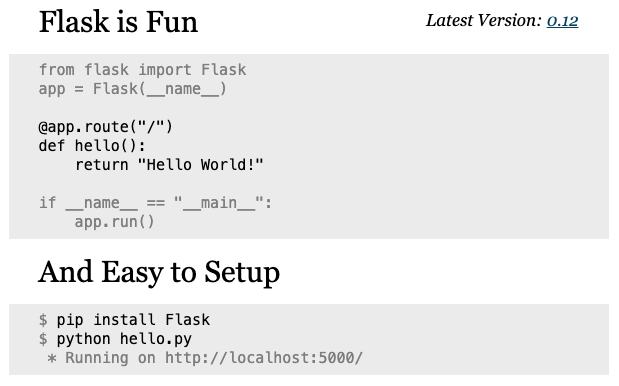
For many years the famous “Hello, World” example Flask application was 7 lines long. Below you can see a snapshot of the Flask website as it looked on June 12th, 2017:

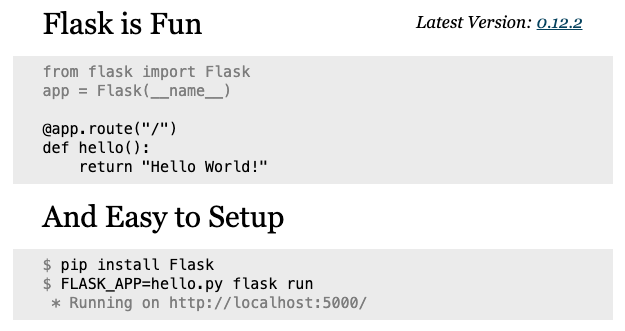
This example application then was shortened to just 5 lines. Here is the same page on June 17th, 2017:

As you can see, the core of the application has not changed, but the method by which the application server is started has indeed changed, and in a very significant way. While previously a simple app.run() call inside the application script was used, now there is a flask run command, plus a FLASK_APP environment variable.
While the design of the Flask website has changed considerably in the years that followed, as I’m writing this article in 2020 the flask run method continues to be the most visible in the official documentation for the framework.
Today you can still find a large number of applications and code tutorials that use the app.run() method. One reason for this is that there is a lot of older but otherwise still relevant content out there for Flask. But also, a lot of people still see app.run() as more convenient and easier to use.
In this article we are going to explore the pros and cons of each of these methods. Ready? Let’s dive in!
Should I use app.run() or flask run?
We'll begin with the million dollar question. If you are starting a new Flask application today, should you use app.run() or flask run?
Unfortunately there isn’t a simple answer.
The most important thing you need to know is that both these methods start a development web server, which is a server that you will use locally on your own system while you develop your application. If you are trying to figure out how to start your application on a production server, then the answer is indeed simple: use neither. For a production deployment use a production-ready web server such as gunicorn or uWSGI.
In a development environment, both methods are fully supported, so you can use the one you like best. But of course, you probably want some help in deciding, so let’s look at both methods in detail.
Using flask run
The flask run method is the newest solution and is recommended by the Flask project.
The flask command is added to your virtual environment when you install the Flask package. It comes out of the box with three commands:
The Flask framework includes a command-line interface module that allows third-party Flask extensions or even your own application to install custom commands to complement the base three, making this a very powerful and extensible system for managing all aspects of your Flask application.
The tricky part about getting the flask run command to work is that somehow this command needs to figure out where your Flask application instance is located, so that it can import it and use it.
How flask run finds your application instance
The way the flask run command learns where your application is located is by setting the FLASK_APP environment variable to point to it. There are actually five different ways this variable can be set:
FLASK_APP="module:name": This is a fairly standard nomenclature for WSGI applications. If your application instance is calledappand is defined in a hello.py module, then you would setFLASK_APP="hello:app". Instead of a simple module you can specify a more complex import path in standard dotted notation, such asFLASK_APP="server.core:app".FLASK_APP="module:function()": If you use the application factory pattern in your application, you can specify the name of your factory function instead of an application name. Flask will import the function and call it to create the application. This form also supports passing arguments into the factory function, for exampleFLASK_APP="hello:create_app('dev')".FLASK_APP=module: If you specify just an import path without an application name or factory function, then Flask will import your module or package and try to locate the application on its own. It will first look for anapporapplicationglobal variable, and if neither is found it will inspect all global variables in the module looking for one that is set to an instance of classFlask. If none of these attempts produce an application, Flask will finally look for an application factory function in your module called eithercreate_app()ormake_app(). If Flask can’t still find your application, then theflask runcommand will exit with an error.FLASK_APP=file.py: If you have your application in a Python file, you can simply set the name of the file, and Flask will import it and find the application using the same rules as in the previous option.- If
FLASK_APPis not defined, Flask will attempt to runimport appandimport wsgi. If either of these succeeds, it will then try to find the application in the imported module using the same rules as the previous two options.
If you are writing a short Flask application for a quick test, calling your Flask application instance app and putting it in an app.py file is enough to make flask run work without having to worry about environment variables.
Specifying server options
The flask run` command provides options to set the server listening IP address and port, SSL certificates, etc:
It is important to note that Flask’s debug mode cannot be specified through an option, and instead is set via FLASK_ENV=development in the environment.
Using app.run()
After going through the many complexities of the flask run command you can probably guess why app.run() hasn’t gone away.
With this method there is no issue with Flask knowing where your application instance is located, because you are directly invoking the run() method on this object. For this reason no environment variables are needed.
Specifying server options
The app.run() method supports several options, including all those you can provide to the flask run command, and a few more:
host– the hostname to listen on.port– the port of the web server.debug– if given, enable or disable debug mode.load_dotenv– load the nearest .env and .flaskenv files to set environment variables.use_reloader– should the server automatically restart the python process if modules were changed?use_debugger– should the werkzeug debugging system be used?use_evalex– should the exception evaluation feature be enabled?extra_files– a list of files the reloader should watch additionally to the modules.reloader_interval– the interval for the reloader in seconds.reloader_type– the type of reloader to use.threaded– should the process handle each request in a separate thread?processes– if greater than 1 then handle each request in a new process up to this maximum number of concurrent processes.passthrough_errors– set this to True to disable the error catching.ssl_context– an SSL context for the connection.
Disadvantages of app.run()
If you are thinking that app.run() seems to be a more convenient way to start your Flask application, consider the two main disadvantages this method has versus flask run:
- The reloader is less robust. Because the application needs to be imported before the
run()method can be invoked, any errors that occur while importing the application cause the reloader to break and exit. Withflask run, if the application fails to import due to an error, the reloader continues to watch the source files and attempts to import it again after you correct the mistake. - The
app.run()command has no command-line interface.
Can’t decide? Use both flask run and app.run() together!
What most people fail to realize is that there is no exclusive choice between the two methods, both can be used together without conflict. First, make sure your main application file invokes app.run() at the end:
Then, set the FLASK_APP environment variable to point to this file. For example, if your file is called hello.py:
Or, if you are using Microsoft Windows:
Now you can start your application via flask run or python hello.py. You have full access to the Flask CLI, while at the same time you can enjoy the convenience of running your own script when appropriate.
Both methods can coexist happily!
Miguel Grinberg is a Python Developer for Technical Content at Twilio. Reach out to him at mgrinberg@twilio.com if you have a cool Python project you’d like to share on this blog!
Related Posts
Related Resources
Twilio Docs
From APIs to SDKs to sample apps
API reference documentation, SDKs, helper libraries, quickstarts, and tutorials for your language and platform.
Resource Center
The latest ebooks, industry reports, and webinars
Learn from customer engagement experts to improve your own communication.
Ahoy
Twilio's developer community hub
Best practices, code samples, and inspiration to build communications and digital engagement experiences.


