Build a Nearby Hospital Finder WhatsApp Chatbot with Laravel, Redis, and Twilio
Time to read:

A chatbot is a software application that is able to handle a conversation with a human user through written or spoken language. The level of intelligence among chatbots varies greatly. While some chatbots are fairly basic, responding to keywords or phrases. Others employ sophisticated artificial intelligence (AI) and machine Learning (ML) algorithms, or like Twilio Autopilot, take advantage of natural language understanding (NLU) to provide a better experience and build out more complicated conversations.
In this tutorial, we’re going to build a chatbot for WhatsApp that finds all nearby hospitals using the Twilio API for WhatsApp, Laravel framework for PHP, and Redis.
Prerequisites
In order to complete this tutorial, you will need the following:
- A Twilio Account (Sign up with this link and receive an additional $10 credit.)
- Composer globally installed
- The Laravel installer
- WhatsApp enabled Twilio Number
- Redis (we will use this as our database)
- ngrok (we will use this to connect to our locally installed Laravel application to a public URL that Twilio can connect to via webhook. If you don’t have ngrok installed, you can down a copy for Windows, MacOs, or Linux)
Architecture/Technical Overview
Our WhatsApp chatbot answers the question, “what hospitals are near me?” To achieve this, we will be storing a list of hospitals and their locations in a database; Redis in our case.
When a message is sent from WhatsApp to our WhatsApp bot Twilio number, a factory method, HospitalResponderFactory::create() , determines how our bot responds to a user. WhatsApp allows a user to send either a text or location message, but not at the same time. This is where the factory method comes to play. If the message sent by a user is a string containing “hi,” our chatbot simply responds with a greeting, else it prompts the user that the text sent is invalid. Lastly, if it’s a location message, then our bot finds hospitals (which are already stored in Redis) that are nearby to the users using the Redis geospatial queries.
Create a Laravel Application
You’ll first need to install a new Laravel application locally. The Laravel installer will help us expedite the installation. Run the following command in your terminal:
This will scaffold a new Laravel application for us into a folder called hospital-finder-whatsapp-bot.
Add the Twilio PHP SDK to the Project
We need to also install Twilio’s SDK, which we will use to interact with the Twilio API for WhatsApp and return our response (we will see this in use later). This can be installed using Composer by running the following command in your terminal:
Configure the Twilio WhatsApp Sandbox
To launch a bot on WhatsApp, you must go through the approval process with WhatsApp. However, Twilio allows us to build and test our WhatsApp apps using the sandbox.
Once your application is complete, you can request production access for your Twilio phone number, which requires approval by WhatsApp.
Let’s start by configuring the sandbox to use with your WhatsApp account.
The Twilio console walks you through the process, but here’s what you need to do:
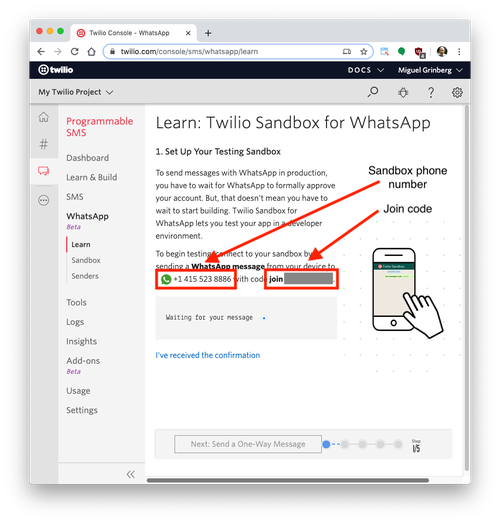
- Head to the WhatsApp sandbox area of the Twilio console, or navigate from the console to Programmable SMS and then select WhatsApp
- The page will have the WhatsApp sandbox number on it. Open your WhatsApp application and send a new message to that number.
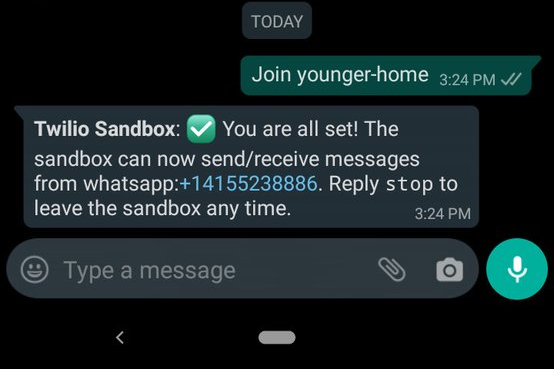
- The page also has the message you need to send, which is “join” plus random words like “join younger-home”. Send your message to the sandbox number.

- After successfully sending your code to the sandbox number you should receive a response like this:

Enable Webhooks
When your number (or sandbox account) receives a message, Twilio makes a webhook request to a URL that you define.
That request will include all of the information about the message, including the body of the message. As stated before, WhatsApp allows a user to send text or location messages, but not both at the same time. For our bot, we are interested in using both the text and location-based messages.
Our application will need to define a route that we can set as the webhook request URL to receive those incoming messages, parse out whether the message contains the words we are looking for, and respond.
To accomplish this, we will define a new invokable controller called HospitalController.
You can create this controller by typing the following command in the terminal:
In our routes/api.php file, add this line:
Open up app/Http/Controllers/HospitalController.php and add the following code:
Our controller has only a single action, which is why we are using an invokable controller. Laravel will automatically call the invoke method. You can read more on invokable controllers in the Laravel documentation.
Twilio provides us with a MessagingResponse class to help us handle our messages. It converts our messages into TwiML, Twilio’s Markup language, to direct Twilio on how to communicate with our application. We will come back to this controller later.
Setting Up REDIS (REmote DIctionary Server)
We are going to use Redis as our database for storing hospitals. Why Redis and not traditional SQL databases?
Because data and queries are created and processed in memory, Redis generally provides a faster response time, which is important in using a bot that feels more natural to the end user.
Also, since our bot is location based, it needs access to location-specific data which is not always that easy to create. Fortunately for us, Redis has a wide array of geospatial capabilities to help us build out this type of functionality.
In order to solve the basic problem of “what hospitals are near me?”, we need the list of hospitals, their locations in latitude and longitude, and the location of the user using our chatbot.
NOTE: When a user sends a location, the incoming webhook will include the latitude and longitude parameters.
To populate our database, we are going to use a seeder, a simple method of seeding our database with test data But first, we need to ensure we have Redis installed. The Redis documentation recommends installing Redis by compiling it from sources, as Redis has no dependencies other than a working GCC compiler and libc. We can either download the latest Redis tarball from redis.io or use a special URL that always points to the latest stable version http://download.redis.io/redis-stable.tar.gz.
After downloading, run the included make file to install.
NOTE: If you use Homebrew, you can also install with these directions.
After installing, ensure you start the Redis server by running this command in a new terminal:
Using Redis With Laravel
To use Redis with Laravel, you can install the predis/predis package using Composer:
Now, proceed to update the REDIS_CLIENT in your environmental variables with the following credential. Open up your .env file and add the following variable:
To generate a seeder, execute the make:seeder artisan command. All seeders generated by the framework will be placed in the database/seeds directory.
Open up app/database/seeds/HospitalSeeder.php and add the following code:
NOTE: Make sure you replace the long and lat of the above seeders with one that is within 5km of your current location.
Now that we have written our seeder, we need to regenerate Composer’s autoloader using the dump-autoload command.
Then seed our Redis database by running this command:
Now we have our list of hospitals with their locations stored in Redis.
Responders and Workflow
We will make use of a handler class, which we’ll call a “Responder,” to interact with any incoming message from a user. The Responder class will simply do two things:
- Take the incoming message
- Check if it should respond, and if it’s to respond, return a response to the user
Responder Contract
Since we know what a Responder is supposed to do, we will create an interface to enforce this contract.
Create a new contract at app/Contracts/ResponderContract.php and add the following code:
The static method shouldRespond() will take in an optional message, longitude and latitude sent as parameters, then return a boolean if the Responder should respond or not.
The respond method will return a response to the user. WhatsApp allows a user to send text or location, but not both at the same time. When a user sends a text, then the $latitude and $longitude fields will be null, but when a location is sent, $message will be null, while the $latitude and $longitude will contain the latitude and longitude parameters passed along in webhook as parameters for a location message.
Let’s define a base class Responder.php in app/Responders that will implement this contract. Copy and paste the following code into the file as shown below:
Keyword
Now, let’s create the keyword our chatbot will interact with. We will put this in a Constants class located in app/Constants.
Create app/Constants/Keywords.php and add the following code:
Conversations
We’ll add another constants class to hold conversation values.
Create app/Constants/Conversations.php and add the following code:
ResponderFactory
The factory pattern becomes useful in situations where the type of object that needs to be generated isn’t known until after runtime.
In our case, our chatbot does not know how to respond to a user until it knows whether the type of message being sent is text or location based.
The ResponderFactory is responsible for generating the appropriate Responder for an incoming message, which can be GreetResponder, HospitalResponder, or an InvalidKeywordResponder.
For instance, if the user sends a text-based message “hi,” then the GreetResponder object is created and responds with a greeting. If a location message is sent by the user, then the HospitalResponder object is created and responds with a list of nearby hospitals. Lastly, if no matching format is detected, then the InvalidKeywordResponder object is created and responds with the instructions on how to communicate with our bot.
Copy and paste the following code into app/Factories/ResponderFactory.php as shown in the code block below:
This code is self explanatory. First we get the phone number, message, longitude and latitude from the request body in the static make method. Next, we pass these values to the resolveResponder method. This retrieves all responders from a config file named helpers (we will create them soon), loops through them, and calls the shouldRespond method. If the return value is true, the Responder class is instantiated with the message and longitude and latitude as parameters.
Updating the Config file
The config file is used by the getResponders() method above to retrieve all of the responders. This declaration should be in the config/hospitals.php file.
Copy and paste the following code into the editor as shown in the code sample below:
Adding the GreetResponder
Let's start with our first Responder. The GreetResponder will greet the user when the message sent by the user matches the string “hi.”
Our shouldRespond method will be responsible for determining whether or not the user’s message matches the expected string.
Open up app/Responders/GreetResponder.php and add the following code:
HospitalResponder
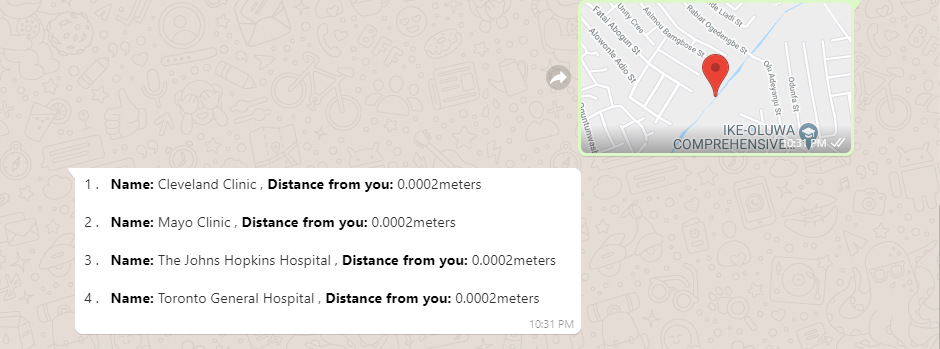
The HospitalResponder is responsible for sending back a list of nearby hospitals to the user and their distance from the user.
In its shouldRespond method, we only want to respond with a list of nearby hospitals to the user if the message sent by the user is a location.
Open up app/Responders/HospitalResponder.php and add the following code:
InvalidKeywordResponder
Lastly, the InvalidKeywordResponder is responsible for handling the responses sent back when the message sent by a user is neither “hi” nor a location.
In its shouldRespond method, we only want to respond if the message sent by the user doesn’t match any acceptable responses.
Open up app/Responders/InvalidKeywordResponder.php and add the following code:
HospitalController
Let’s put everything together by revisiting our HospitalController. At this point, all of the functionality of this controller should make sense.
NOTE: Ensure your local server is running with php artisan serve.
Now we are ready to test our chatbot. We will use ngrok to expose our application to the internet. It works by creating a secure tunnel on our local machine along with a public URL.
This is pretty useful in situations where you need to test a webhook, just like in our case.
Run the following command in a new terminal to tunnel our app using ngrok.

Copy the Forwarding URL, go back to the Twilio WhatsApp sandbox, and paste the URL into the callback field for When a Message Comes In. Append /api/hospitals to the end of the URL to route the traffic to the HospitalController.

Testing the Hospital Finder WhatsApp Chatbot
Add the Twilio sandbox number +1 415 525 8886 to your phone contact list, open WhatsApp, and join the sandbox by sending join empty-wear (my sandbox code will be different from yours.)
Test different responses by sending “hi,” an invakid keyword, and lastly a location (your current location shared via WhatsApp).


Conclusion
This tutorial has not only taught us how to implement Twilio’s API for WhatsApp and how to use Redis as our database, but it also showed us how to use design patterns to structure our code better.
If you would like to extend this further, I would recommend allowing the user to predefine their search radius. In this tutorial we used a default of 5km.
Ossy is a backend developer currently working for a startup based in India. He can be reached via:
- Email: osaigbovoemmanuel1@gmail.com
- Twitter: @ossycodes
- Github: https://github.com/ossycodes
Related Posts
Related Resources
Twilio Docs
From APIs to SDKs to sample apps
API reference documentation, SDKs, helper libraries, quickstarts, and tutorials for your language and platform.
Resource Center
The latest ebooks, industry reports, and webinars
Learn from customer engagement experts to improve your own communication.
Ahoy
Twilio's developer community hub
Best practices, code samples, and inspiration to build communications and digital engagement experiences.


