Build a ChatGPT SMS bot with Azure OpenAI Service and ASP.NET Core
Time to read:
ChatGPT is a state-of-the-art natural language processing tool by OpenAI that can help you create a chatbot that can provide accurate and helpful responses to user queries.
With its extensive knowledge base and advanced language processing capabilities, ChatGPT can assist you in developing a chatbot that delivers a seamless and engaging user experience. It's worth noting that this introduction was generated using ChatGPT itself, with some minor editing, showcasing the power and versatility of this language model.
OpenAI has opened up an API for ChatGPT, but in addition to that, Microsoft Azure has been working with OpenAI to offer its own version of OpenAI's models through Azure, adding on the security, integration, and management features you expect from the Azure cloud platform.
While Azure has released the Azure OpenAI Service as "Generally Available", you’ll still need to fill out this form and be approved by Microsoft to get access to the service. (C'mon Microsoft, any service where you have to be manually approved is not GA, but I digress.)
In this tutorial, you'll learn how to create an Azure OpenAI Service and consume the API using the OpenAI .NET client library to create a chatbot inside the console.
In this tutorial, you'll learn how to
- integrate Twilio SMS with ASP.NET Core,
- create an Azure OpenAI instance and model deployment,
- and call the chat completions API using the Azure OpenAI client library to create the chatbot.
Let's get started!
Prerequisites
Here’s what you will need to follow along:
- .NET 7 SDK (earlier and newer versions may work too)
- A code editor or IDE (I recommend JetBrains Rider, Visual Studio, or VS Code with the C# plugin)
- An Azure Subscription and access to Azure OpenAI Service (request access here)
- A free Twilio account (sign up with Twilio for free)
- A Twilio phone number
- The ngrok CLI and, optionally, a free ngrok account
You can find the source code for this tutorial on GitHub. Use it if you run into any issues, or submit an issue if you run into problems.
Create and set up a Twilio SMS project
Open a shell, use the .NET CLI to create an empty web project named AzChatGptSms, and change into the project directory, using these commands:
The Twilio .NET SDK lets you communicate with Twilio's APIs without having to manually write the HTTP code. Add the Twilio .NET SDK using the following command:
The Twilio helper library for ASP.NET Core helps you integrate Twilio into ASP.NET Core. Add the helper library for ASP.NET Core using the following command:
Open the project in your preferred .NET IDE and update the Program.cs file to match the following code:
Here's an overview of the changes:
- The application configures server sessions to store the session data in memory. These sessions will be used to store the chat messages.
- The Twilio API client is registered as a service in the ASP.NET Core Dependency Injection (DI) container. Now the
ITwilioRestClientandTwilioRestClientcan be injected into constructors and methods supported by DI.
MapMessageEndpoint is an extension method that doesn't exist yet. Create a new file within your project directory named MessageEndpoint.cs and add the following code to it:
The MessageEndpoint.MapMessageEndpoint extension method maps the /message endpoint for HTTP POST requests to the OnMessage method.
The OnMessage method reads the form data from the request and extracts data from the form. The From parameter is the phone number that sent the message. The To parameter is the phone number that received the message, which will be your Twilio phone number. The Body parameter is the content of the message itself. The MessageResource.CreateAsync method sends a message back to the sender, repeating what the sender said.
You'll need to configure the Twilio Account SID and Auth Token before you can communicate with the Twilio API using the Twilio REST client. Since the Auth Token is a secret that you should not share, you should avoid hard-coding it such as putting it in your appsettings.json file — or any other way that it could end up in your source control history. Instead, use the Secrets Manager aka user-secrets, environment variables, or a vault service.
Run the following commands to initialize user-secrets:
Then, grab the Account SID and Auth Token from the Account Info panel of the Twilio Console and configure them using the following command, replacing [YOUR_ACCOUNT_SID] with your Account SID and [YOUR_AUTH_TOKEN] with your Auth Token:
Now, run your application using the following command:
In the application's output, you'll see a line similar to Now listening on: http://localhost:5209. Copy the HTTP URL and port, as you'll need it shortly.
Configure the message webhook on your Twilio phone number
Next, you'll need to configure the message webhook on your Twilio phone number. Before you can do that, you'll need to make your locally running application accessible to the internet. You can quickly do this using ngrok which creates a secure tunnel to the internet for you.
Leave your .NET application running, and run the following command in a separate shell, after replacing [YOUR_LOCALHOST_URL] with the URL and port which you copied previously:
ngrok printed the Forwarding URL to the output, which you'll need to publicly access your local application. Copy it, as you'll need it in just a moment.
Now, go back to the Twilio Console in your browser, and use the left navigation to navigate to Phone Numbers > Manage > Active Numbers. Then, click the Twilio phone number you want to test with. On the phone number configuration page, locate "A MESSAGE COMES IN" in the Messaging section. Underneath that, set the first dropdown to Webhook. Set the value of the text box next to the dropdown to the ngrok Forwarding URL which you just copied, and add /message at the end of the URL. Then click Save.
Now, text something to your Twilio phone number. You should receive an SMS back saying something like "You said: [whatever you said]".
Great job! You have an application that can receive SMS and send back SMS.
Create an Azure OpenAI instance
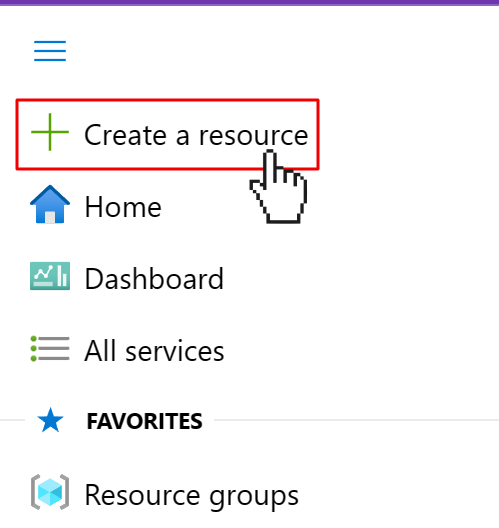
To create an Azure OpenAI Service, open a browser and navigate to the Azure Portal. Open the navigation on the left and click on Create a resource.
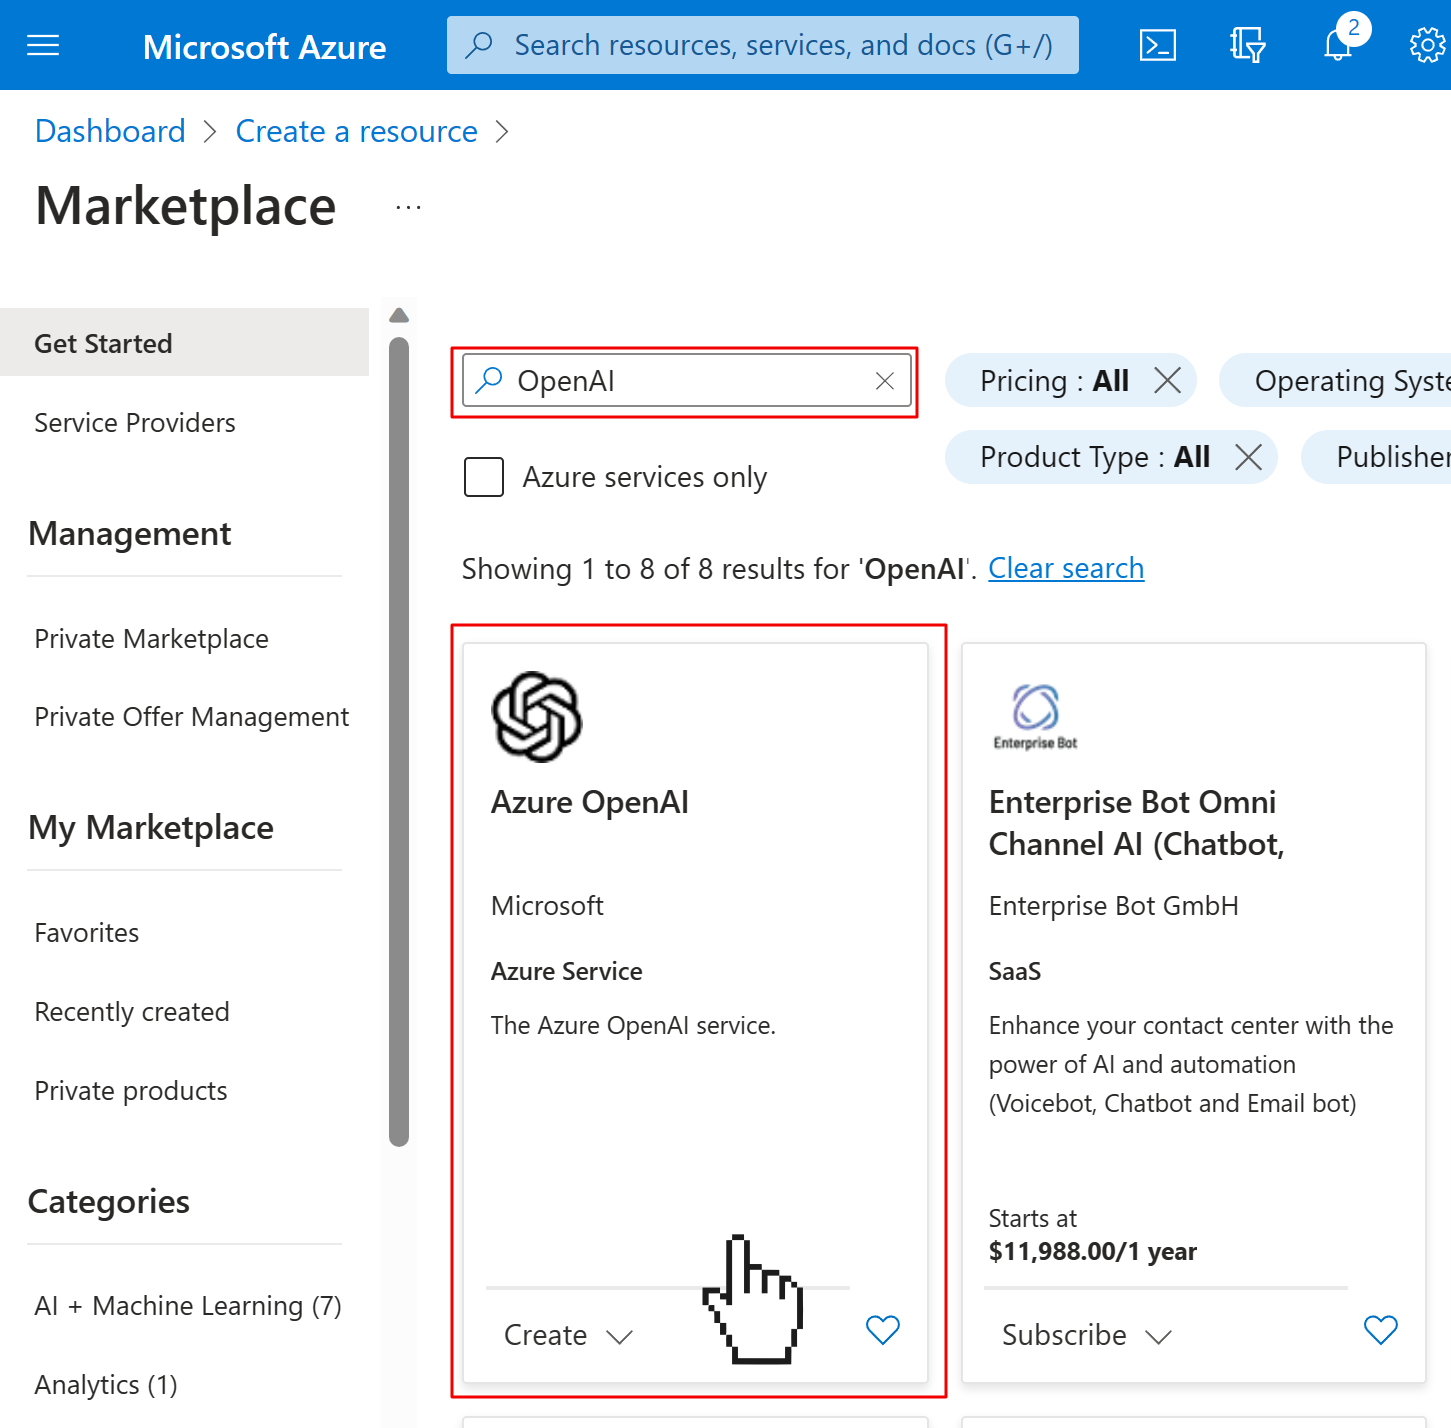
This will open the Azure Marketplace. Use the search box to search for "OpenAI" and click on the Azure OpenAI product.
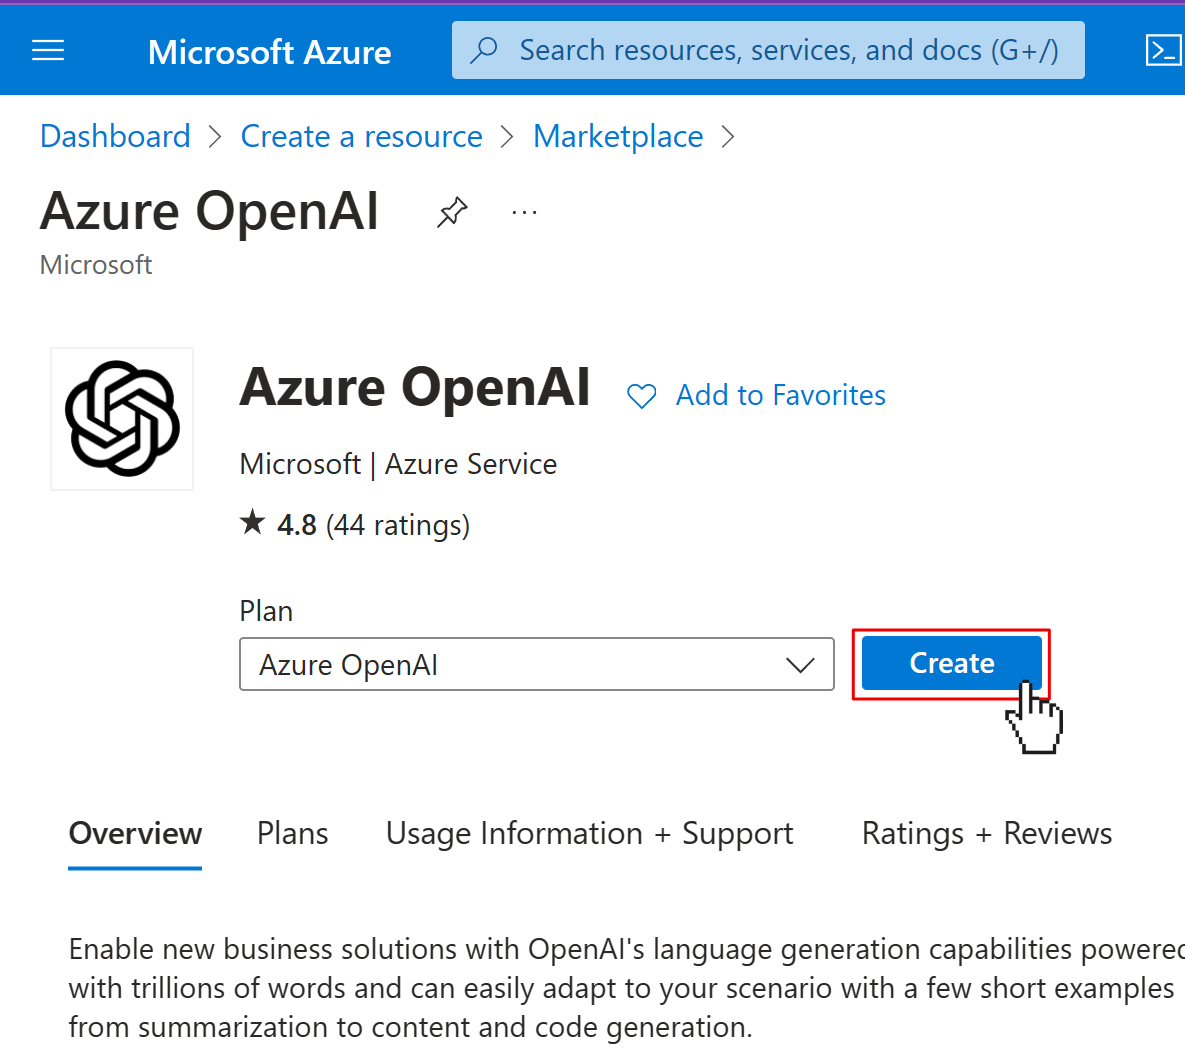
On the product page for Azure OpenAI, click on the Create button.
Select the resource group you want to use, or create a new one, give your OpenAI instance a globally unique name, and select any pricing tier (there's only one at the time of writing this). Then click Next.
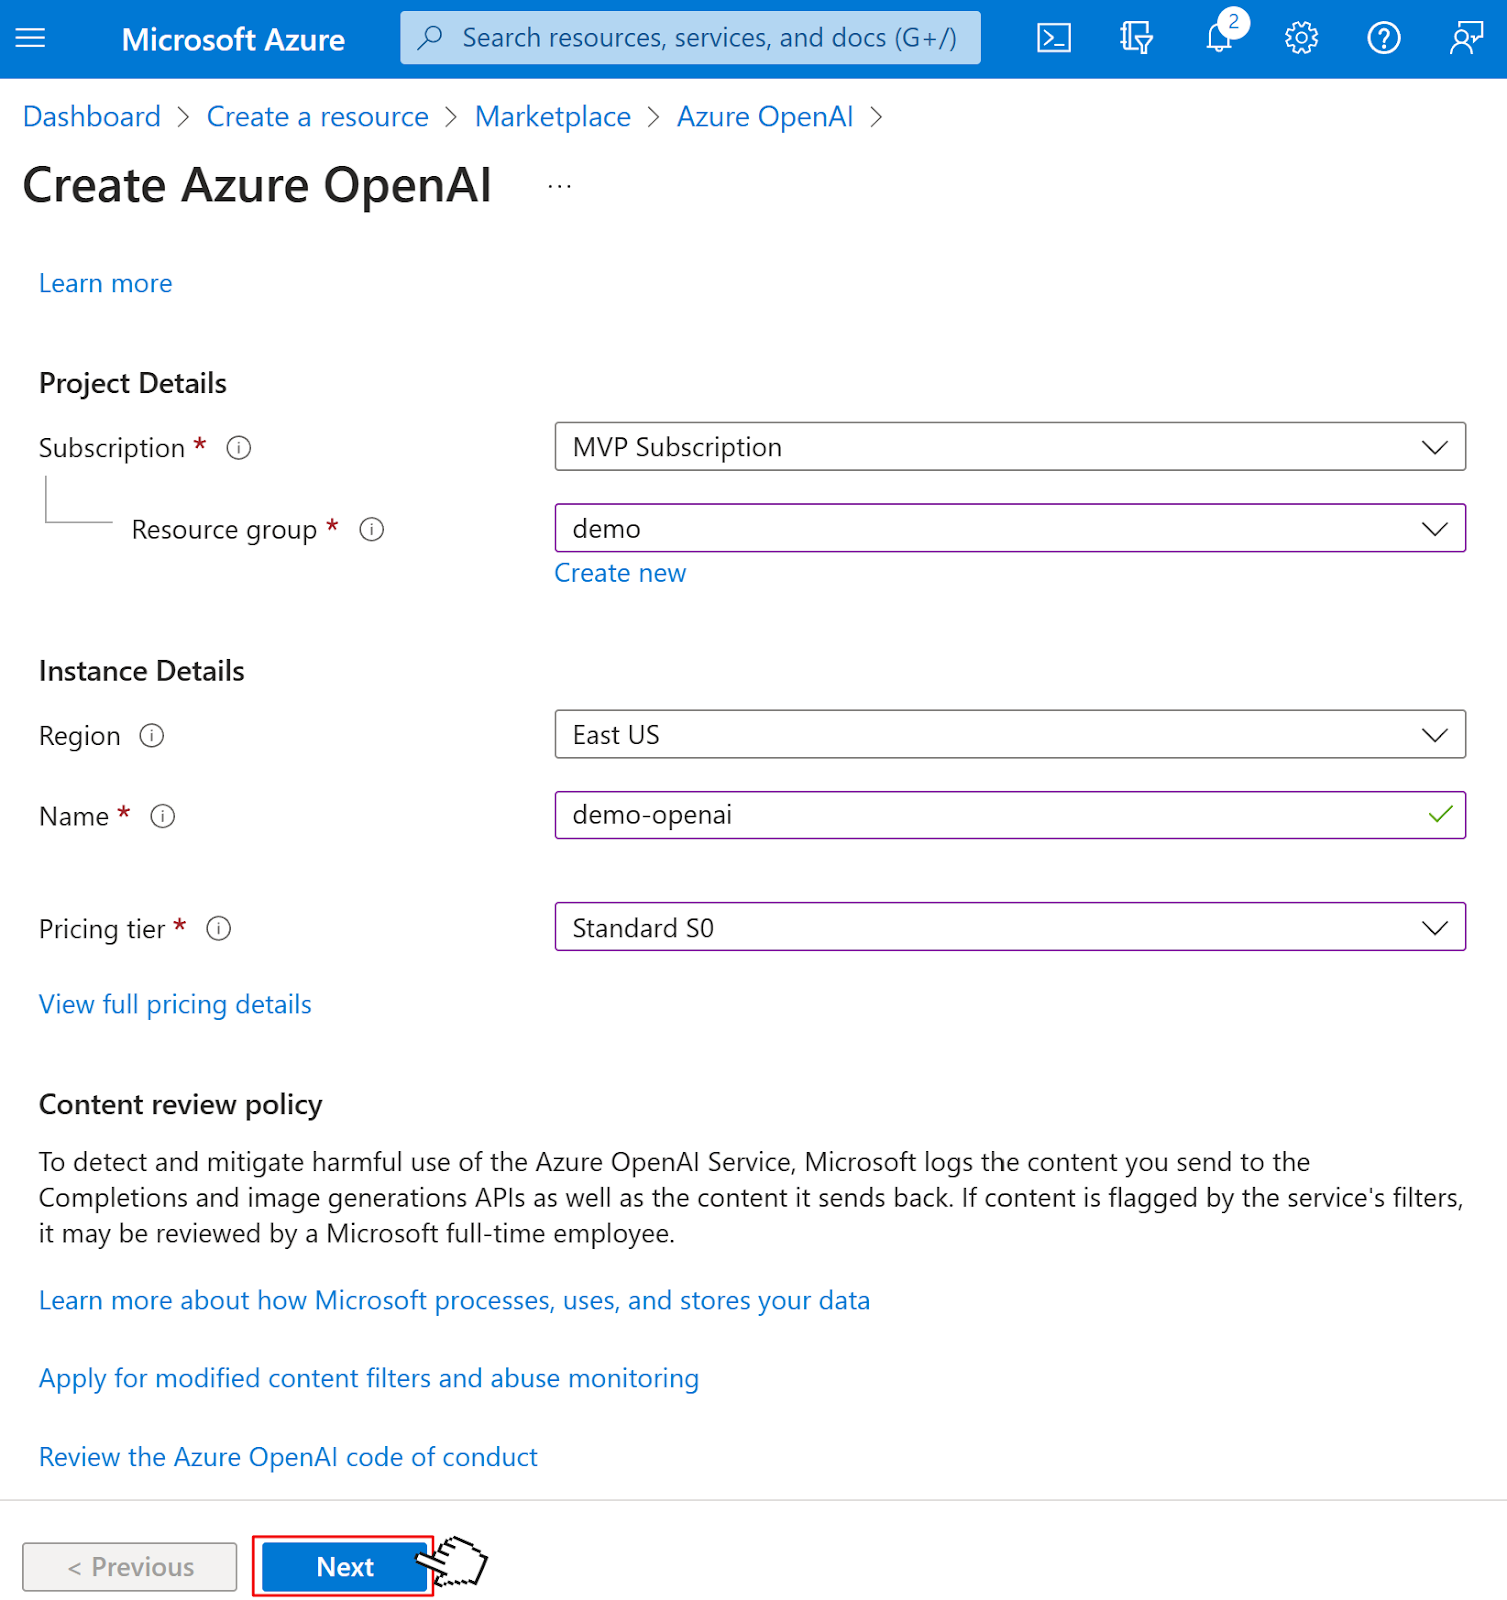
Leave the defaults on the Network and Tags page. Click Next until you reach the Review + submit page. Here you'll see an overview of what you're about to create. Click the Create button.
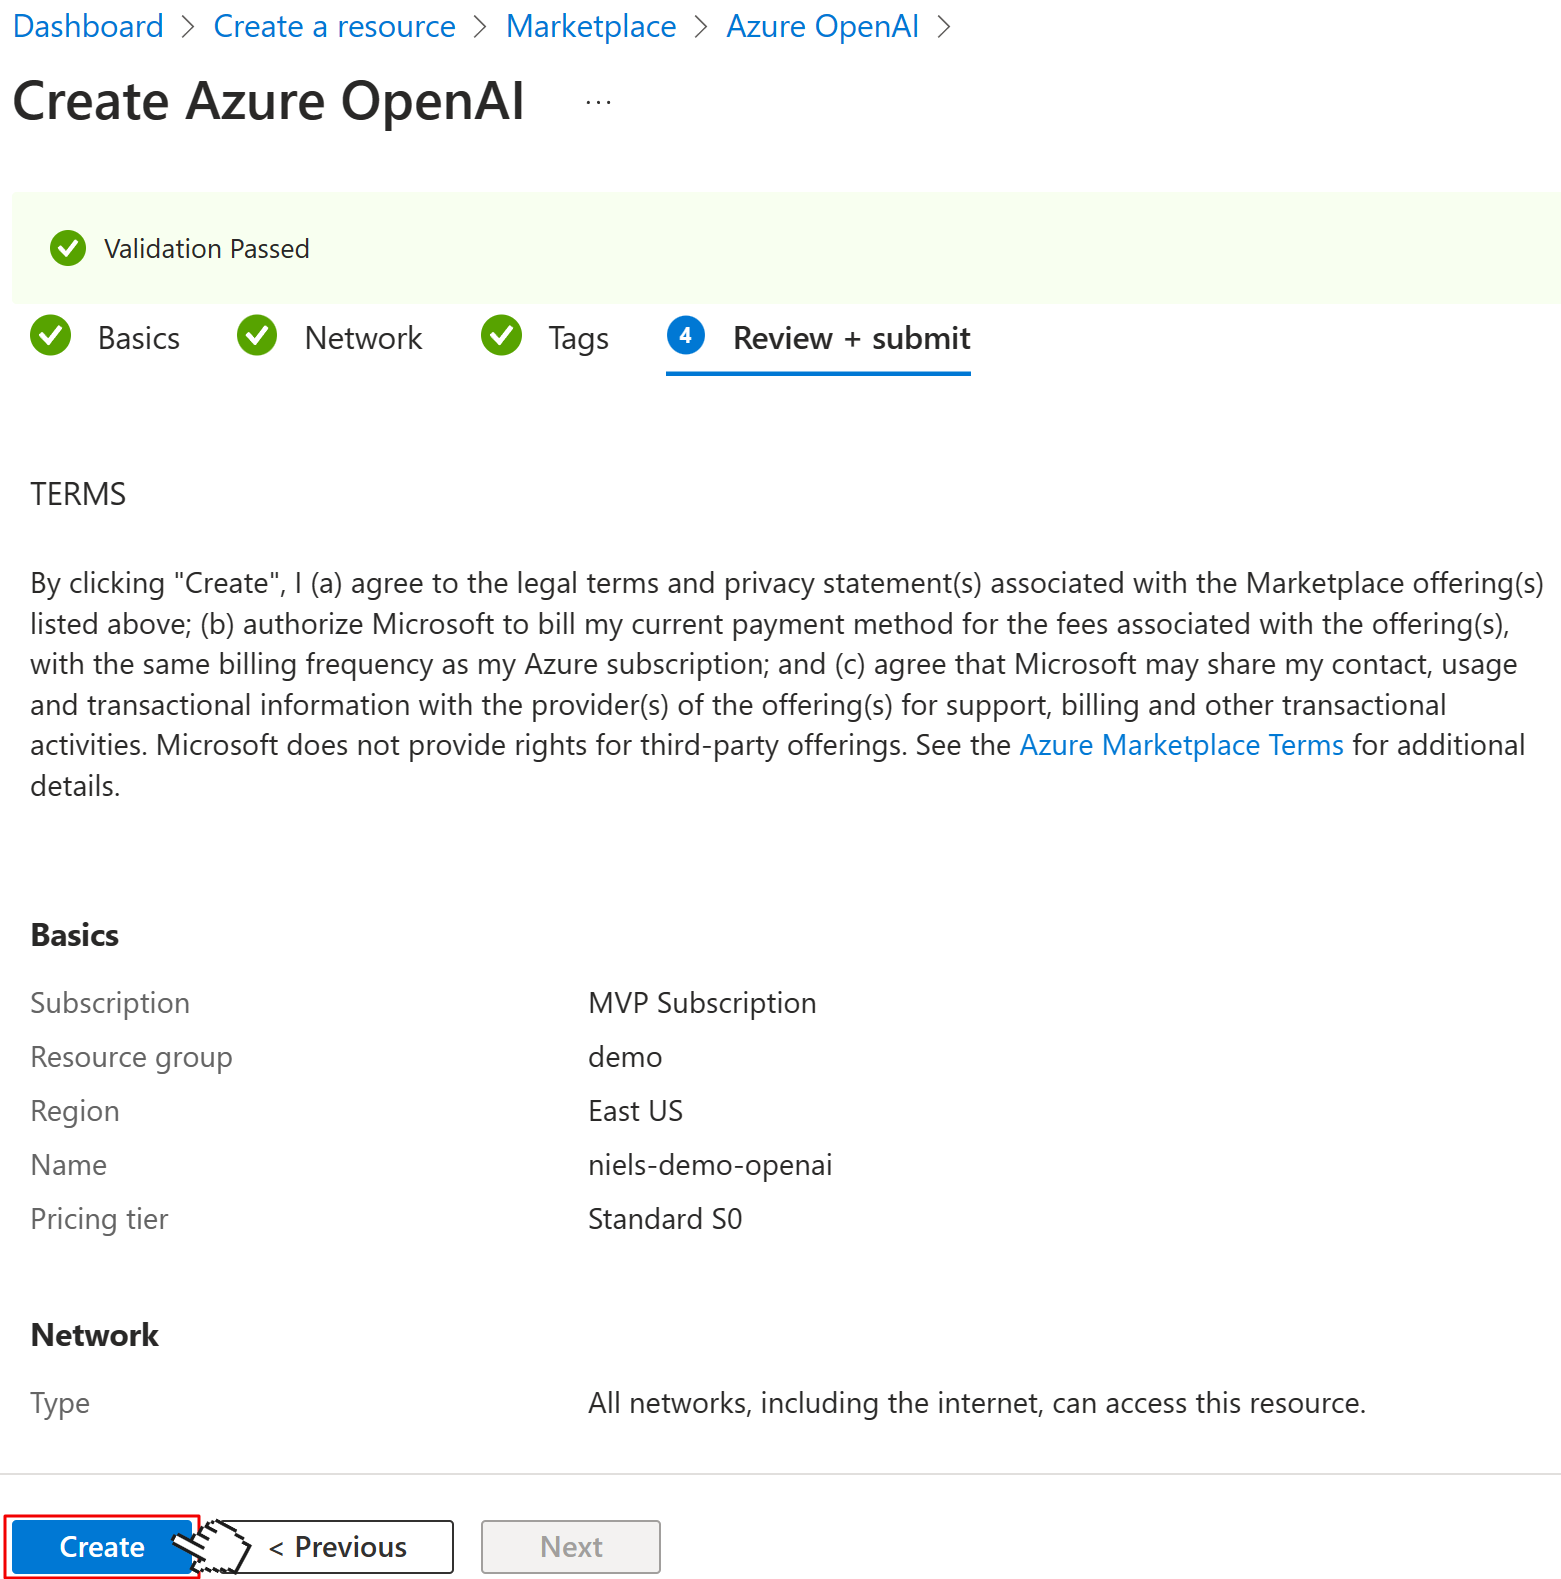
Now, Azure will provision your Azure OpenAI instance, which will take some time. It took about 10 minutes for me, so go make some coffee, or even better, some delicious tea. 😉

Once Azure says, "Your deployment is complete", click on the Go to resource button. Then in your OpenAI instance, click on the Model deployments tab in the left navigation, and then click the Create button up top.
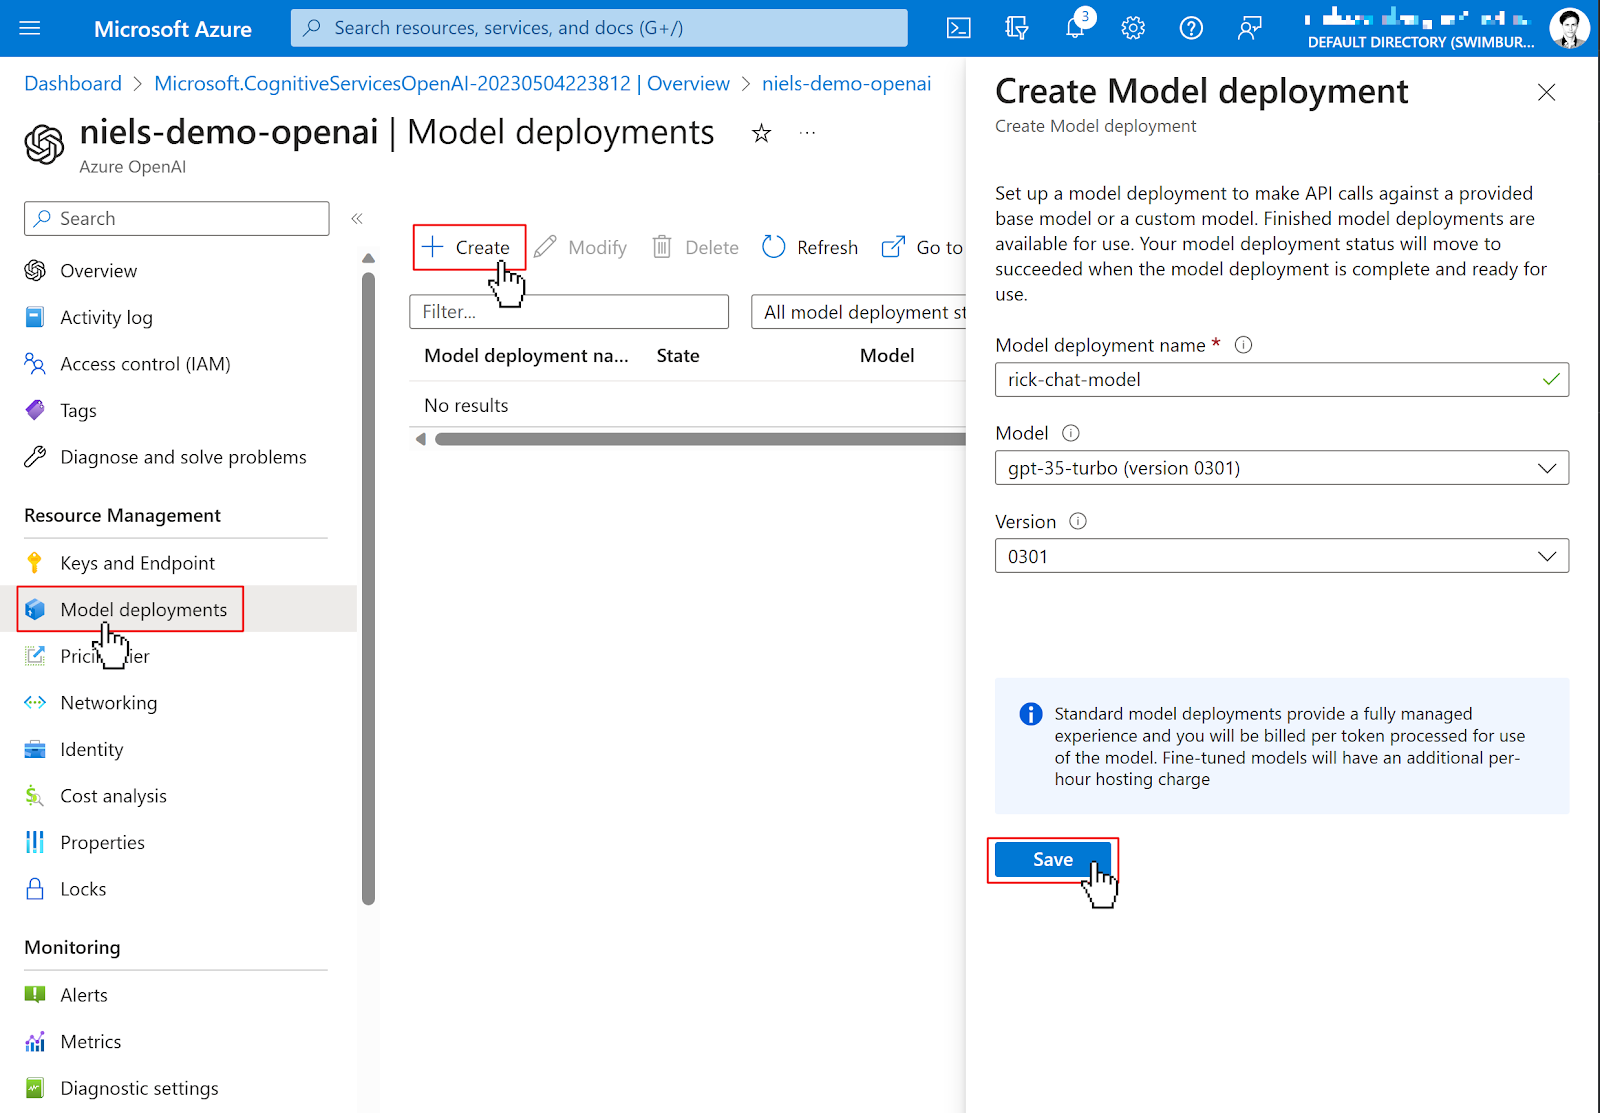
Give your model any name, select gpt-35-turbo (version 0301) as the Model, select 0301 as the name, and click Save.
Remember the name of your Model deployment, as you'll need this later in your .NET application.
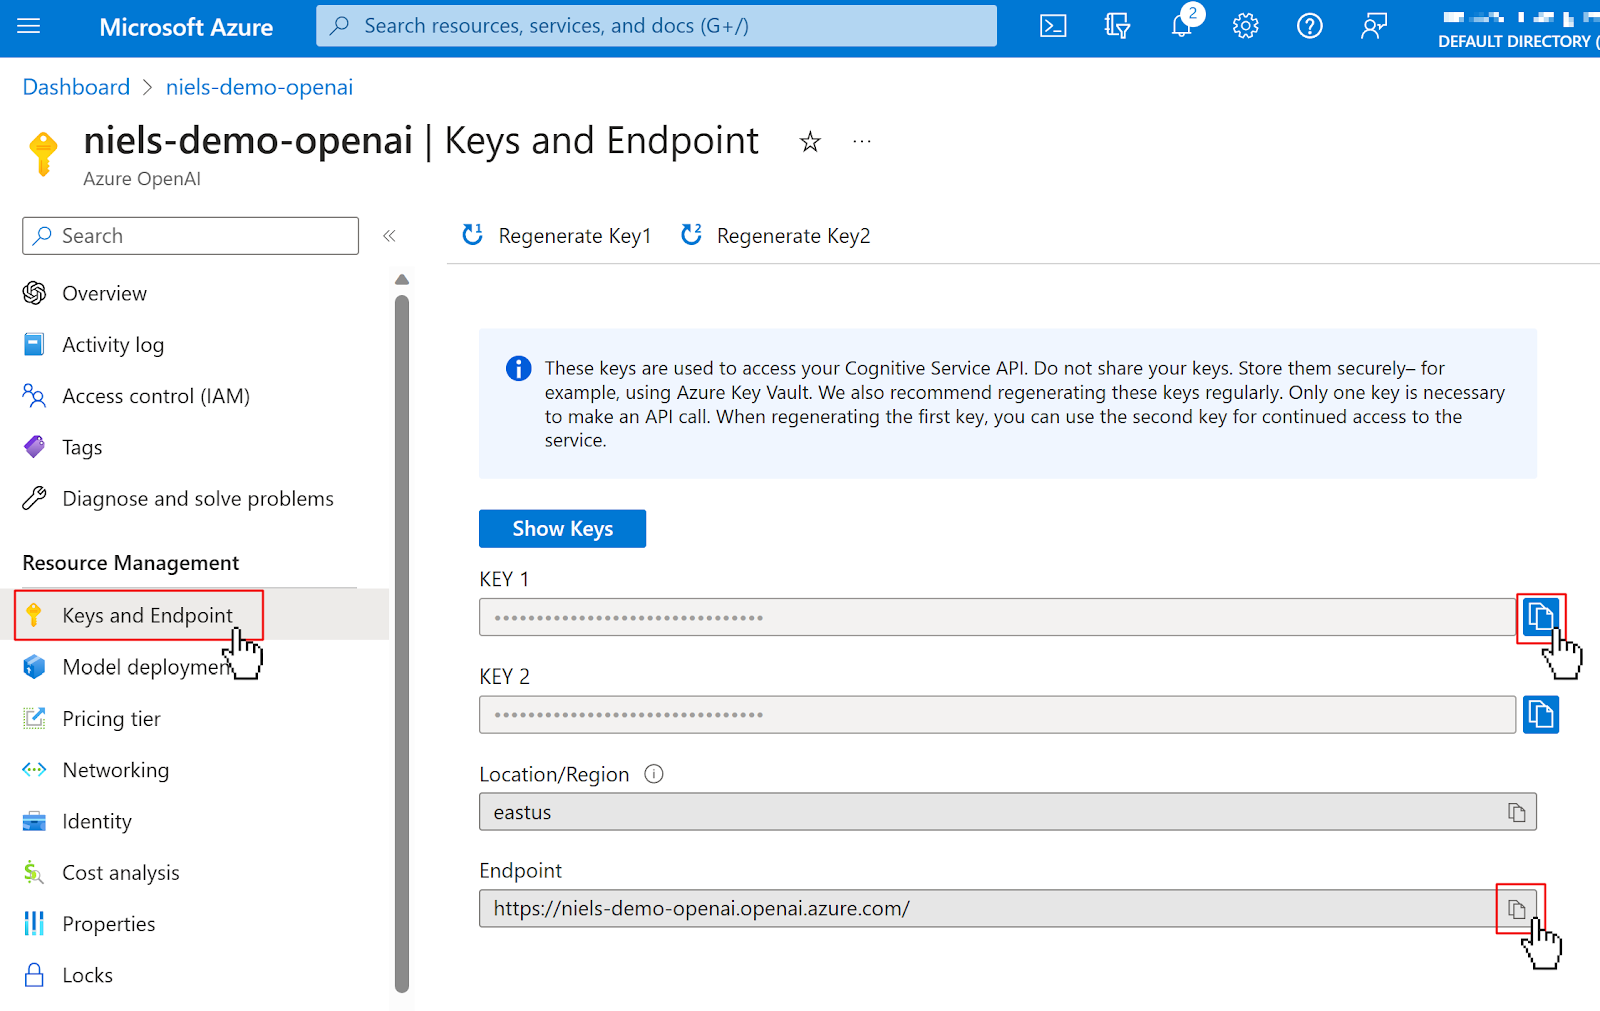
Now, click on the Keys and Endpoint tab in the left navigation and copy the KEY 1 and Endpoint somewhere safe. You'll need these two for your .NET application as well.
Communicate with Azure OpenAI
Azure provides their own client library or SDK to communicate with the Azure OpenAI service. To use the library, add the Azure OpenAI NuGet package using the .NET CLI:
To add the OpenAI client to ASP.NET Core's DI container, you'll also need to add the Microsoft.Extensions.Azure NuGet package:
Add the following namespaces to the top of the Program.cs file:
And add the OpenAI client to the DI container by adding the highlighted lines to Program.cs:
Next, configure all the Azure OpenAI configuration as user-secrets, replacing [YOUR_AZURE_OPENAI_ENDPOINT] with the ENDPOINT URL, [YOUR_AZURE_OPENAI_APIKEY] with the KEY 1, and [YOUR_MODEL_DEPLOYMENT] with the name of the Model Deployment you took note of earlier.
Next, update MessageEndpoint.cs with the following code:
The OpenAIClient is injected into the openAiClient parameter of the OnMessage method.
User is one of the optional parameters you can pass to the ChatGPT API. While it is optional, it helps ChatGPT monitor and detect abuse, so I recommend passing it in. The only data you have access to that uniquely identifies the current use is their phone number. Since a phone number is Personally Identifiable Information (PII), I decided not to hand that to OpenAI, but instead to hash it first using the SHA256 hashing algorithm.
Next, the endpoint will pass the SMS body to the chat completions API and retrieve the response. The response is then sent back to the sender using Twilio.
Run your application again using the following command:
Then, ask your chatbot anything by texting a question to your Twilio phone number.
I asked the chatbot for a joke about dogs, and it delivered a great joke, however, when I asked it for a follow-up joke about cats, without explicitly mentioning a joke, it just gave me information about cats.
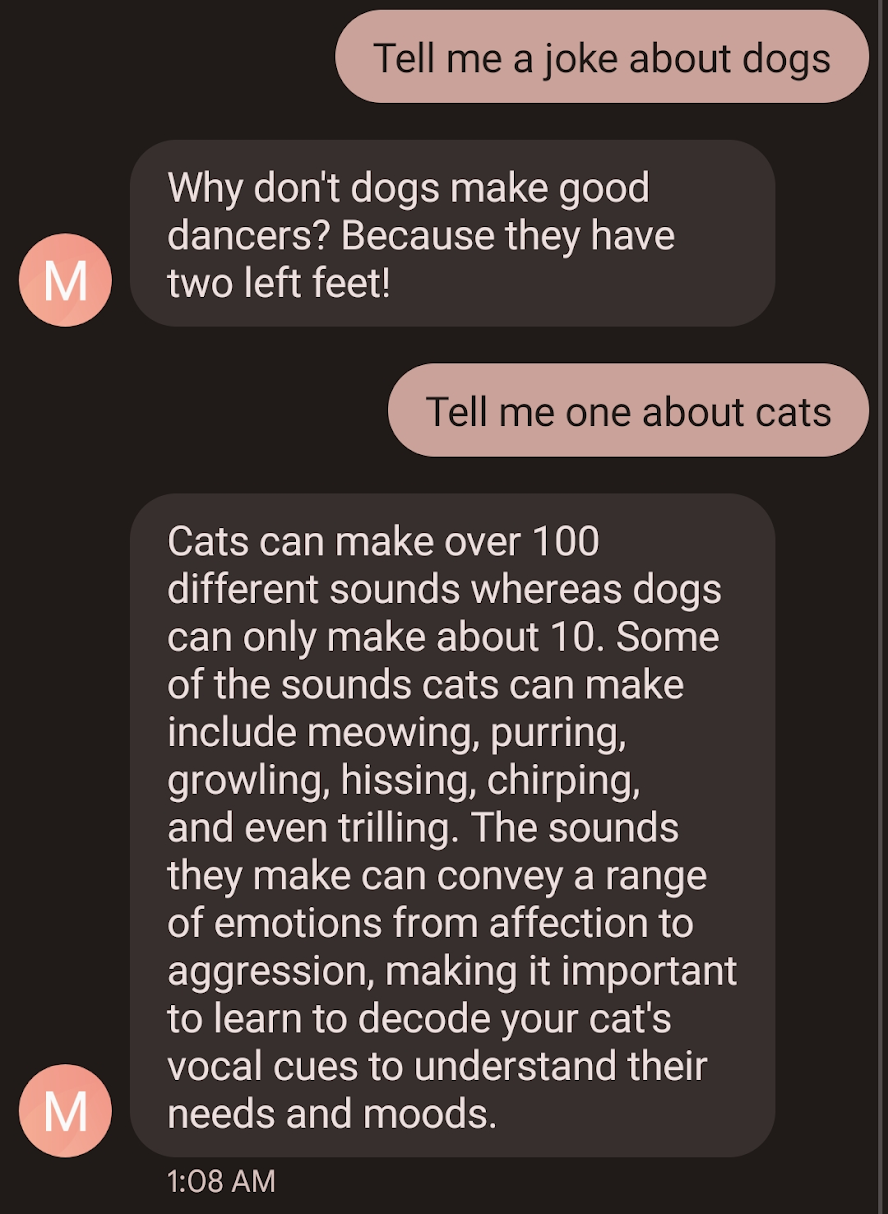
This is because the chat completions API does not maintain the context of the previous messages by default. Let's fix that.
Persist chat history as context
Since the chat completions API doesn't persist the history of the chat, it is not able to use the history as context to generate new responses. To solve this problem, you have to persist the history in your application, and pass the entire chat history to the chat completions API, for every new query.
In this tutorial, you'll store the history of the chat in ASP.NET Core's server session. Update the MessageEndpoint.cs like this:
Now the endpoint loads any previous chat messages from the session, and then adds the new SMS body. The whole conversation is passed to the chat completions API and the response is also added to the conversation, which is then persisted back into session.
Stop and start your application to try it out. Now, when I asked for a follow-up joke about cats, it knew I wanted a joke and not facts about cats.
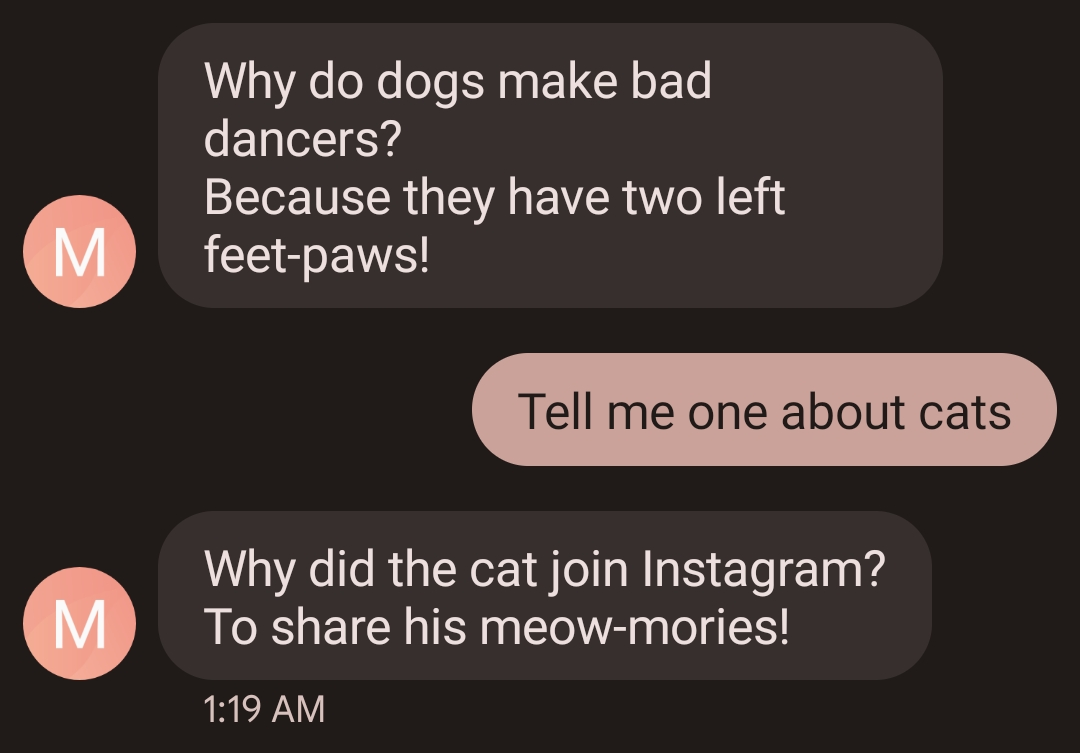
Now that the chatbot has the context of the entire chat history, it is much more useful. However, users may still want to start from a fresh slate. Update the start of the OnMessage method in the MessageEndpoint.cs file:
Now users can text "reset" and the chat history will be reset.
Maximize message delivery
You can only send messages using Twilio SMS that are shorter or equal to 1600 characters, but sometimes the chat completions response will exceed that limit. If so, you'd receive an error that would look something like this:
While Twilio will accept messages shorter than or equal to 1600 characters, Twilio recommends keeping your messages below or equal to 320 characters to maximize deliverability of your messages.
To ensure your application does this, update the OnMessage method again:
Then add these two static functions to the MessageEndpoint class:
The SplitTextIntoMessages method will split the text into paragraphs and add the paragraphs while not exceeding the recommended 320-character limit. The method returns a list of strings, each containing 1 or more paragraphs. If a paragraph is larger than 320 characters, the individual string will exceed the 320-character limit. So it doesn't guarantee each string will be less than 320 characters, but in most cases it will be.
The SendResponse method iterates over the list of strings and sends them out one by one with a one-second delay between each. Twilio cannot guarantee that the messages will arrive in the same order as they are created. However, by putting a one-second delay between each message the order is preserved most of the time. Alternatively, you could poll the message status and wait to send the next message until the current message is delivered.
Restart your application and try asking the bot a question that will have a long response. Here's a video that shows how the bot answers the question "How do I become a .NET developer?".
The video shows how the bot responds with multiple messages, with a delay between each message, but the messages are in the correct order.
Next steps
Fantastic job! You’ve integrated Azure OpenAI's APIs with Twilio SMS to create an SMS based ChatGPT bot.
Want to experiment more with OpenAI's APIs? Here's a tutorial on how to generate AI art with DALL·E 2 by texting a Twilio phone number, and a tutorial to create a ChatGPT bot that impersonates Rick from Rick & Morty for the console.
We can't wait to see what you build. Let us know!
Niels Swimberghe is a Belgian American software engineer and technical content creator at Twilio. Get in touch with Niels on Twitter @RealSwimburger and follow Niels’ personal blog on .NET, Azure, and web development at swimburger.net.
Related Posts
Related Resources
Twilio Docs
From APIs to SDKs to sample apps
API reference documentation, SDKs, helper libraries, quickstarts, and tutorials for your language and platform.
Resource Center
The latest ebooks, industry reports, and webinars
Learn from customer engagement experts to improve your own communication.
Ahoy
Twilio's developer community hub
Best practices, code samples, and inspiration to build communications and digital engagement experiences.


