Automating Appointment Reminders in C# using AWS Lambda
Time to read:
We’re joined today by Graham Else from Barts BioResource in London for this post on scheduling C# jobs with AWS Lambda.
Having developed my Call Centre Appointment Booking application in C# ASP.NET using the Twilio Voice APIs, my project sponsor asked me to add appointment reminders. “Of course,” I said – how difficult can that be? After reviewing the C# Twilio Appointment Reminders example, I wanted to find a lightweight solution that did not involve adding more external references to my existing project.
In this post, I’ll show you how to schedule recurring jobs in AWS Lambda, which you can use to automate appointment reminders without adding extra overhead to your existing application.
Prerequisites
Sign up for an AWS account
You’ll need an AWS account to access the Cloudfront console and generate credentials for the C# Lambda project. You should also create an IAM user id with the Lambda privileges you use for these credentials, rather than using the root login.
Because this solution is not specific to Twilio, you do not need a Twilio account to employ this mechanism – although you will need an account for the main appointment reminders app. Any permissions and logins you need will already be in the parent project.
Create an AWS IAM user
Go to the AWS Management Console and select IAM from the Services dropdown. Click on Users, and click the “Add User” button:
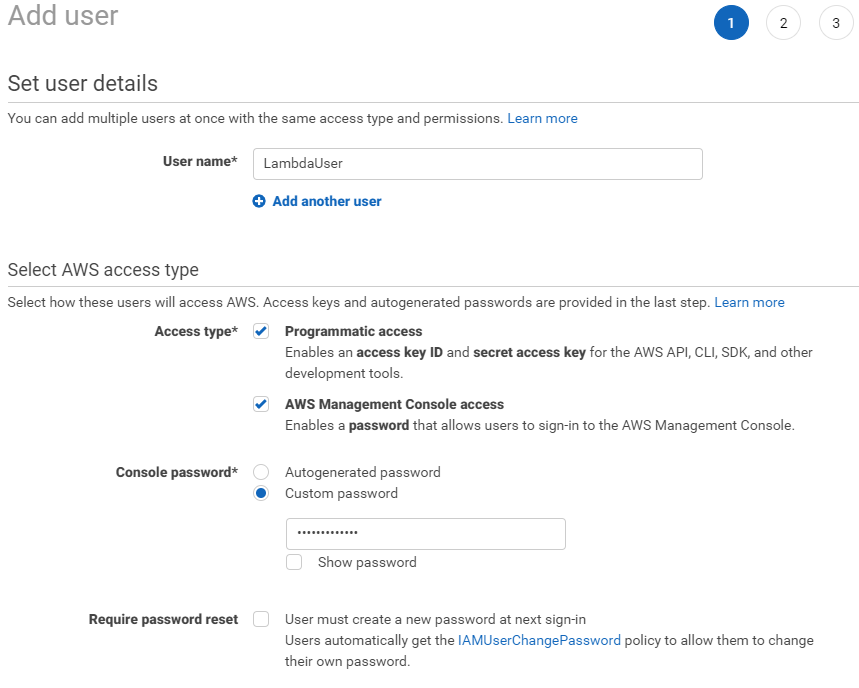
Pick any name you like. If they aren’t yet selected, click the checkboxes for Programmatic Access and AWS Management Console access (as seen in the picture).
You can either pick a password of your choice or allow Amazon to choose one for you.
Click “Next:Permissions”, then click the “Attach existing policies directly” button …
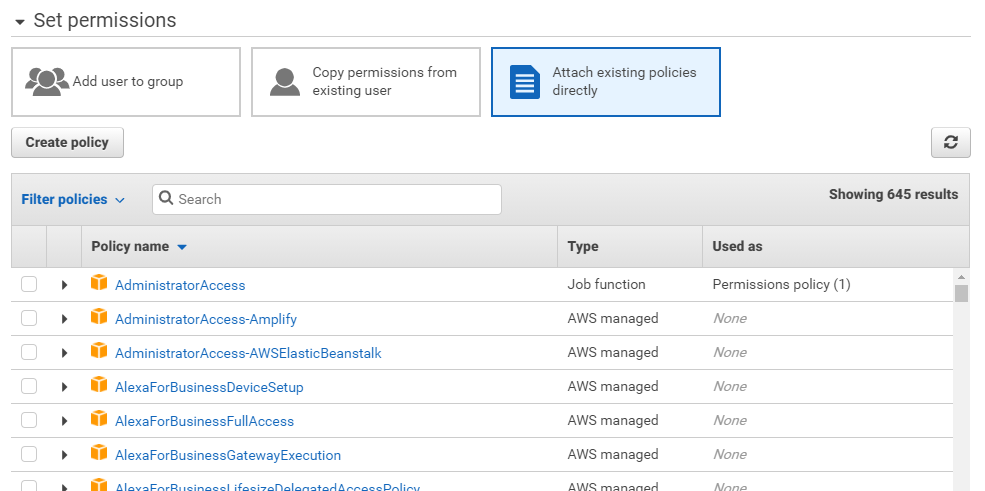
For the purpose of this exercise you could just select AdministratorAccess but, with experience, you could restrict that to specific Lambda and Cloudwatch AWS permissions.
Click through the Tags option to “Review” and then “Create User”…

Note the Access key id and Secret access key – you will use them in the next stage setting up the C# project. Use the link to download the CSV file so you’ve got a permanent record of the key pair.
Setting up the C# Lambda project
Next, open Visual Studio (VS). I’m using 2019 Community Edition, and used the Extensions manager to install the AWS SDK. (If you don’t yet have it installed, select the Extensions menu, then Manage Extensions. Search “AWS Toolkit” and you’ll see it).
Once the AWS Toolkit extension is installed, open VS and create a new AWS Lambda project…

...enter your project name and then select the empty template…
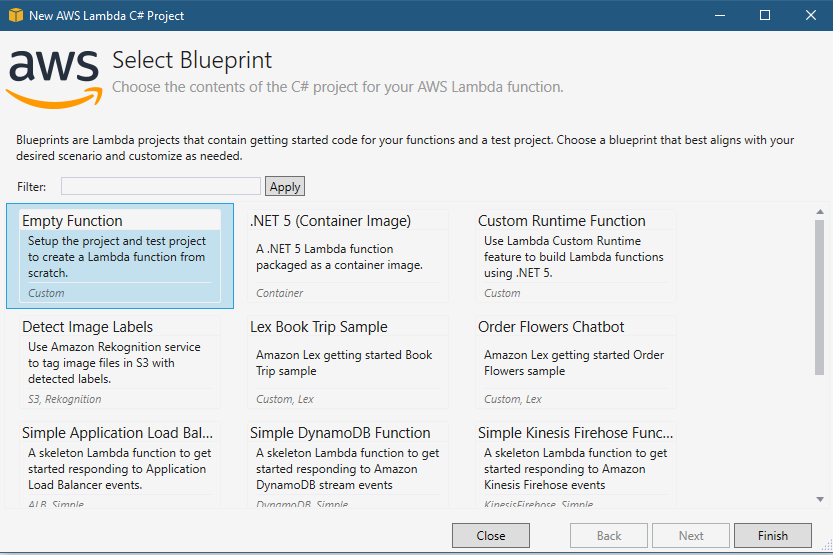
... then complete the credential form which aligns your project with the IAM user you’ve created…
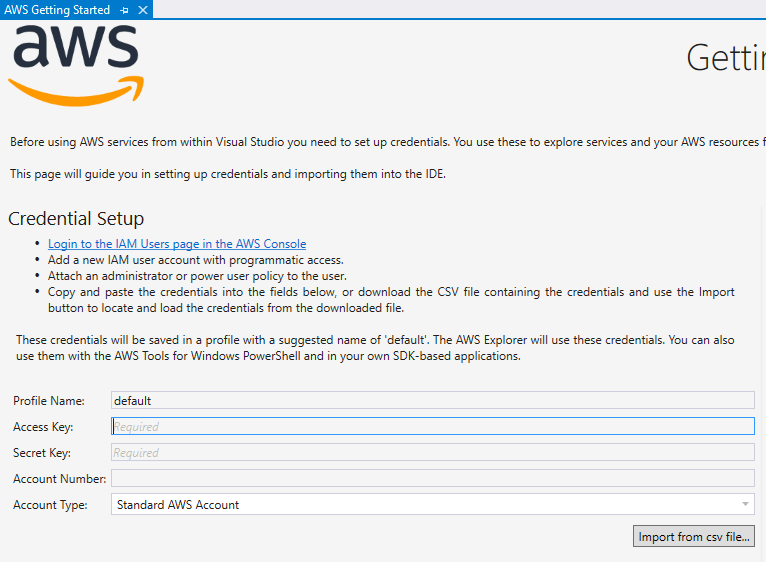
You can either copy/paste your credentials or import from the CSV file you downloaded.
Your project with the empty function.cs should now look like this…

Code the Lambda function
In the AWS environment, I’d read that the Cloudwatch service can trigger a Lambda function based on a schedule. It soon became clear that it would be impractical to do all the work in the Lambda function, replicating the database, Twilio integration, and email references in the original project – hardly achieving a lightweight solution! Instead, I created a Lambda that calls an API endpoint in my app to generate the reminders.
If it isn’t there yet, add using System.Net.Http; to the top of the file.
Replace the contents of the Function class with the following:
… and add a new empty class called EventType which is used to accept the parameter passed into the Lambda function itself.
I’ve added a single parameter to indicate whether this reminder is the First or Second, but you could expand this as you see fit. Also, note my usage of the “website” environment variable which I’ll describe later, as well as the returned string which is passed back to the Lambda caller from the API invocation.
The project is now all ready to be tested, but you need to add the API hook in your Web project beforehand.
Adding the API to your existing project
This part of the process is virtually the same as adding a Twilio API configured to use an HTTP Get function handler. Even though my base project is Web Forms, adding an API controller causes VS to add the required handlers automatically.
Add a Web API Controller by right-clicking the controllers folder and selecting Add - Web API Controller. This is created as a template with the standard API interfaces, which I’ve replaced with the following...
This version accepts the call from the Lambda function and stores the parameter info in a public debug function to verify the invocation.
Note the parameter path is Lambda: Reminderlevel to API: ReminderType.
Compile the project and upload it to your website to test the Lambda. You might want to initially test your version of the above independently (I invoked it via the browser) before using the Lambda test.
Testing the Lambda function
If your version of the Lambda function uses any environment variables to interact with your app, you need to set that before debugging the function. Go to “Project” -> “properties” and open the debug tab…
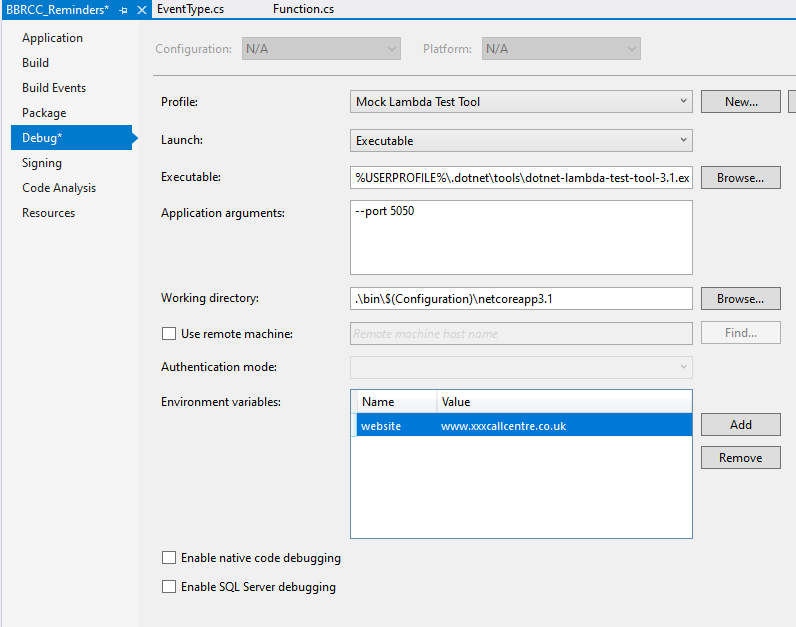
Add the variable with the name website – or whichever key you chose – as per the above, and close the Properties tab.
Invoking the Lambda test in VS is simply a case of clicking the Mock Lambda Test button…

… which takes you to the AWS Lambda test environment…
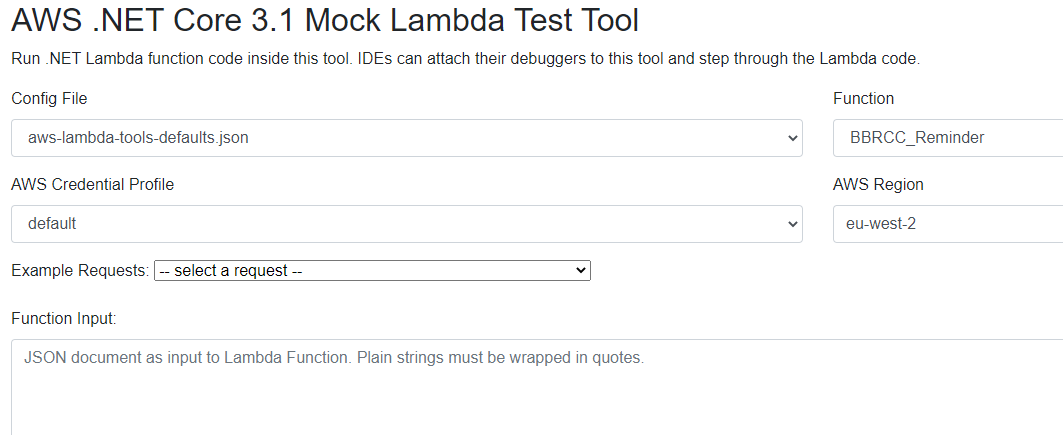
We need to pass the Reminderlevel parameter before invoking the test. This is entered in the Function Input box in JSON format, which, in this case would be …
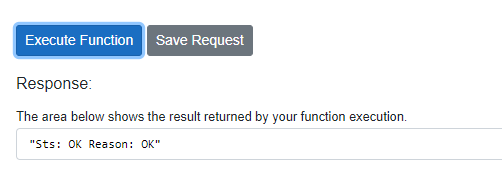
Click “Execute Function” and you should see your expected response below…
Publish the Lambda function
The SDK takes care of all the technicalities that go into publishing a Lambda function.
Right click the Project header in Solution Explorer, and select “Publish to AWS Lambda”. Leave all the entries at their default settings and click “Next”.
Use the “Add…” button on the next panel to set up your website environment variable, as shown below. As this function is so small, I also changed the memory to the lowest setting (128MB at the time of this post).
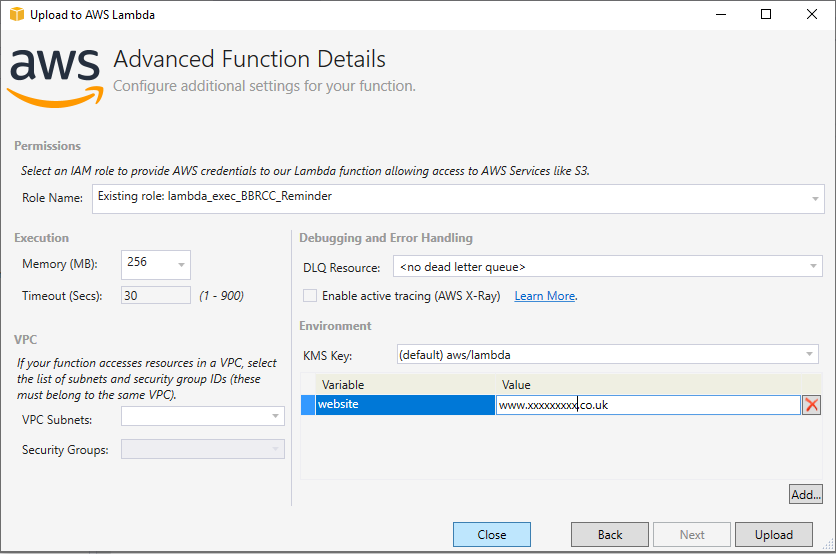
Click “Upload”.
Testing the Lambda Function on AWS
Log into the AWS management Console, and open the Lambda service. Select “Functions” from the left hand menu, where you should then see your new function listed.

Click on the function name to display the function details.

At this point, you can do a final test to ensure the function has transitioned to AWS successfully. Open the dropdown list next to the Test button and select “Configure Test events”.
Next, add a reminder test with JSON similar to what we used in the mock call:
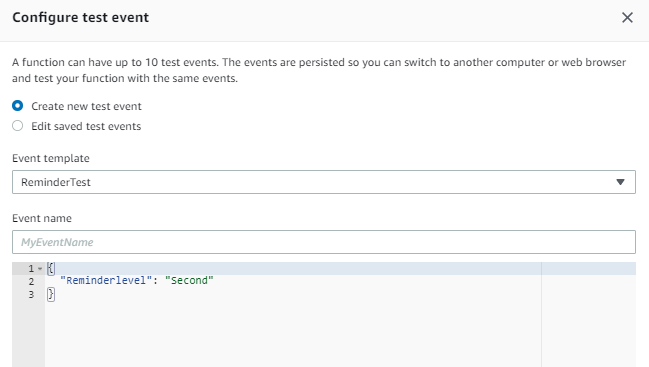
Fill in the event name and enter the JSON parameter. In my final version, I coded my API to accept First, Second, and All as possible values corresponding to:
- First - 5 days before the appointment if booking date was > 10 days before appointment
- Second - 1 day before if booking > 3 days before the appointment
- All - Trigger both First and Second reminders.
Click the “Create” button to store this event.
To test the Lambda, select the event you’ve just added and click “Test”. You’ll get a completion panel showing the results of the test – expand the ‘detail’ section, and you’ll see something like this:
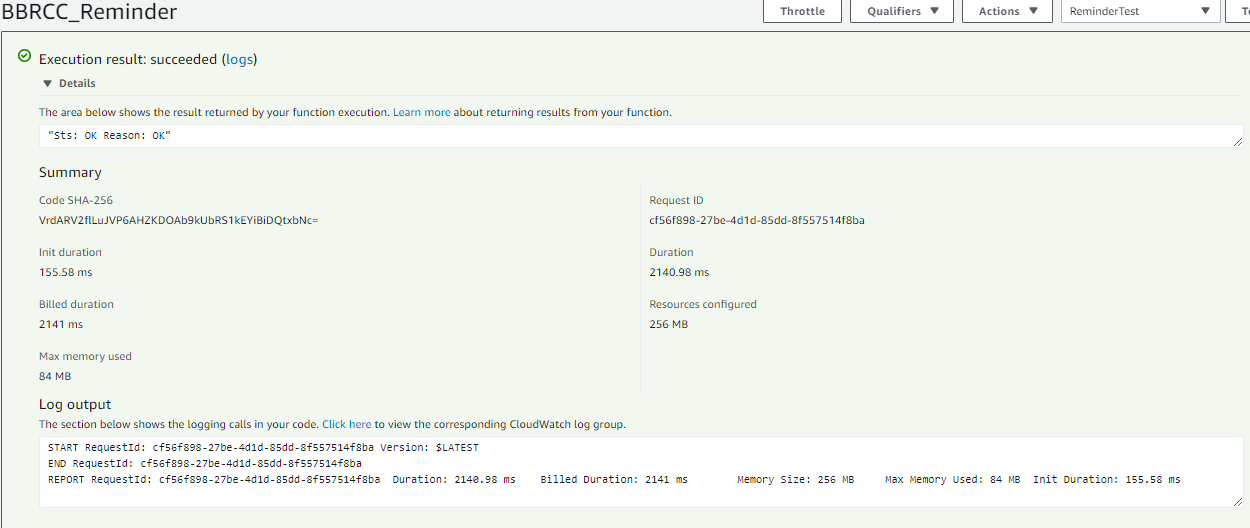
Note the billing information within the log. This will give you an indication of how many calls you can make within the Free Tier (at publish time it was 400,000 seconds of compute time per month). Most reminder configurations will not come anywhere near this limit.
Scheduling the Lambda Function
Open the Cloudwatch console, expand the Events menu and select “Rules”.
Inside the console on the left sidebar, click “Create Rule” and select the “Schedule” radio button. The Cloudwatch scheduler uses the AWS version of CRON to determine the frequency.
This shows the left hand side of the maintenance panel:
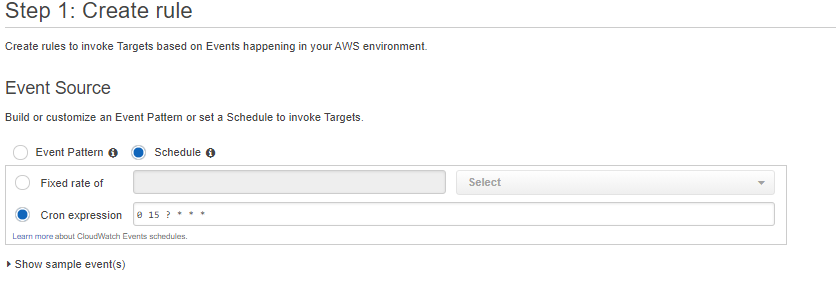
You can set the cron schedule here – I used “"0 15 ? * * *"”, which schedules a job for every day at 3:00 PM.
The right hand panel tells Cloudwatch what to do at that time. This next screenshot shows the entries after you select Lambda as the target:
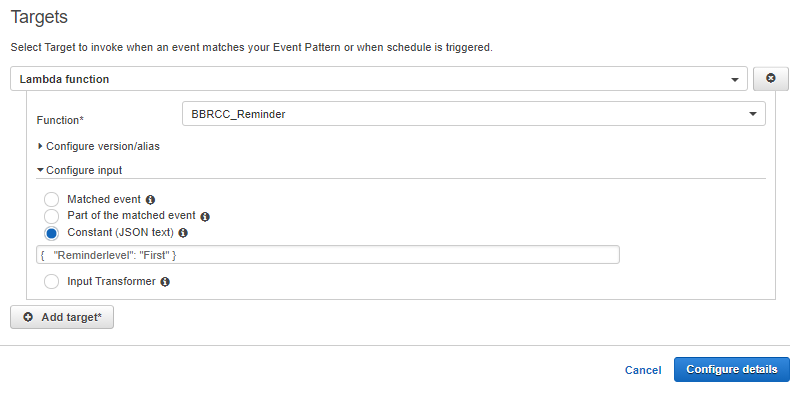
Confirm your entries with the Configure Details button and your new rule will appear:
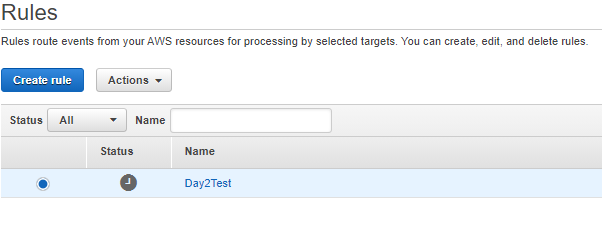
Your scheduler is now ready to run. You can enable or disable the rule using the “Actions” dropdown.
What’s next?
You can expand this simple framework in many ways, from adding new rules to trigger different reminders at other times of the day, to invoking other scheduled processes that have no bearing on reminders.
This example takes the code straight from creation to Release stage. If you want to try it out in another AWS test environment, create a Staging or Test Compilation version in VS, and register another set of AWS IAM user details to choose when you upload that version.
You could also remove the need to use the Cloudwatch console by including the appropriate SDK in your main application and add your own UI for system administrators to manage the rules.
Graham has been developing applications for a number of decades, and admits to using punched cards in his early career. He is currently working with Barts BioResource, a collaboration between St Bartholomew’s Hospital and Queen Mary University in London, developing a Cardiac Research platform on AWS exploring the integration of clinical data and DICOM studies.
Related Posts
Related Resources
Twilio Docs
From APIs to SDKs to sample apps
API reference documentation, SDKs, helper libraries, quickstarts, and tutorials for your language and platform.
Resource Center
The latest ebooks, industry reports, and webinars
Learn from customer engagement experts to improve your own communication.
Ahoy
Twilio's developer community hub
Best practices, code samples, and inspiration to build communications and digital engagement experiences.


