Understanding Windows Presentation Foundation Routed Events In .NET Core
Time to read:
This post is part of Twilio’s archive and may contain outdated information. We’re always building something new, so be sure to check out our latest posts for the most up-to-date insights.

Windows Presentation Foundation (WPF) is a very powerful framework for building desktop applications. Unlike Windows Forms, WPF provides the capabilities of nested UIElements, animation, layered presentation, and more. The focus of this tutorial is to demonstrate the aspects of Routed Events.
Routed Events are a construct specific to WPF that supports event routing. It allows for the processing of events in a very flexible fashion to meet a particular capability.
User interface elements (UIElements) have the ability to nest elements. A panel can contain a button which can contain a panel. Within that panel could be an image and some text. The user then clicks the mouse button. What element is expected to handle the event? Is it the text or the image? It could even be the panel that holds them or the button itself.
A common practice is to add a mouse click handler for a specific UIElement. The code may look something like this:
In this case, the application will route the click event for the button directly to the MyButton_Click method. This type of event routing is called Direct. It is more exactly RoutingStrategy.Direct. In this implementation, the concept of Routed Events is invisible to the developer.
Continuing with this example, if you wanted to handle the click for an image and a text block and the button with the same action, you could add handlers on the image, textblock, stackpanel, and the button, or you could use routed events.
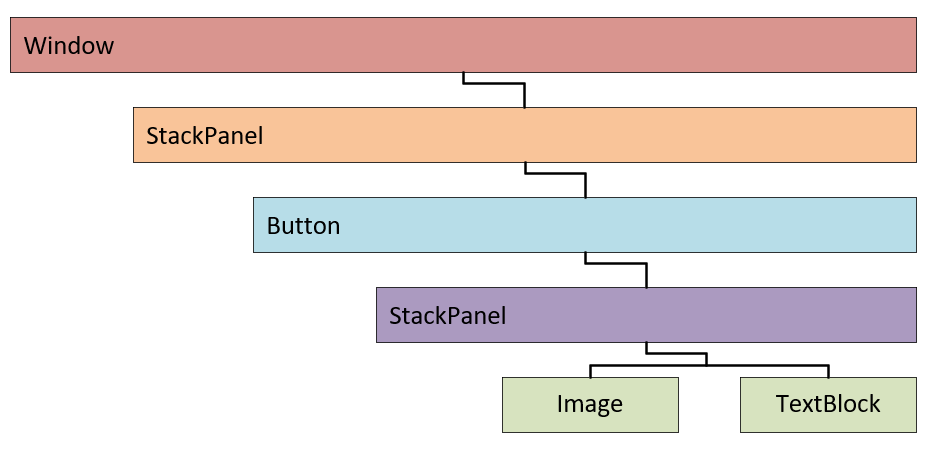
Looking further at this example, the elements are organized into a hierarchy:

The tutorial in this post will guide you through creating a project that will visually demonstrate the flow, or routing, of events. It is interesting to see the flow of events, both up and down the visual tree of the window.
WPF provides several mechanisms for the handling of events:
- Direct events
- Tunneling events
- Bubbling events
Direct events are most common and are used when you specify a handler on a specific UIElement. An example is when you handle the Click event on a button. The event will be handled by that specific handler.
Bubbling events are events that get routed up the element hierarchy from the source of the event to each successive parent element until the root element of the page, the base of the element hierarchy, is reached. If there is no handler event directly associated with an element the event “bubbles” upwards until it reaches a parent element with a handler method that can handle the event.
Tunneling events are those that start at the root of the element hierarchy and travel downwards through each successive child element until the element that invoked the event is reached. Tunneling events are also referred to as Preview events because of the naming convention used for handler methods, such as PreviewMouseDown and PreviewMouseUp. The Preview prefix helps differentiate in which direction the event will be handled.
Events are often created in pairs of bubbling and tunneling events, with the tunneling event having the Preview prefix on its method name. This is done to enable each input action to invoke both a bubbling and tunneling event. The tunneling event is invoked first, giving rise to its “preview” association, then the bubbling event is raised. For more information on how these pairs of events work together, see WPF Input Events in the WPF documentation on docs.microsoft.com.
Prerequisites
You’ll need the following tools and resources to build and run this project:
Windows 10 – It puts the Windows in Windows Presentation Foundation.
.NET Core SDK 3.1 – The SDK includes the APIs, runtime, and CLI.
Visual Studio 2019 with the following workloads and individual components:
- .NET desktop development workload (Includes C#)
- GitHub Extension for Visual Studio (If you want to clone the companion repository.)
You should have a general knowledge of Visual Studio and the C# language syntax. You will be adding and editing files, and debugging code.
There is a companion repository for this post available on GitHub. It contains the complete source code for the tutorial project.
Creating the project
Begin this tutorial by creating a WPF App (.NET Core) project for C# named RoutedEventsSpyGlass. You can put the solution and project folders wherever it’s most convenient for you.
In the MainWindow.xaml file, replace the content of the file with the following XAML markup:
The layout here is simple, as you can see from the rendered UI in the file’s preview pane: a grid with several rows, each containing a UIElement. At the bottom, a ScrollViewer is positioned that will be dynamically populated from code. Above that is the header for the data that will be in the scrollview. At the top are two buttons: one to clear the scrollview and one to trigger the demonstration.
In the MainWindow.xaml.cs file, which is nested under MainWindow.xaml in the Solution Explorer, add the following using statement to the existing list:
Replace the existing contents of the MainWindow class with the following code:
The code first iterates over a few of the selected elements and assigns various events to the DoEverythingEventHandler where most of the work is done. The purpose of the DoEverythingEventHandler is to dynamically add rows of information to the ScrollView. The information will reveal what the event is (RoutedEvent), who is processing it (Sender), where it originated (Source) and what type of routing strategy it is implementing (Routing). Several helper functions reduce duplication and make the output more readable.
Testing the completed application
Before building the application, note the Background color attribute of the btn button. This is to assist you in differentiating the button from the elements that it contains: the image and the text.
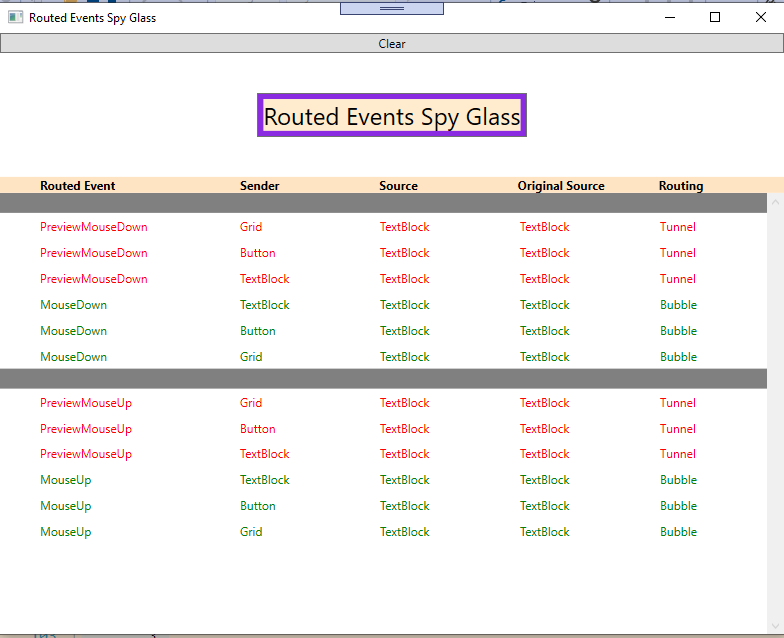
Build and run the application. You will see the large button at the top with the text “Routed Events SpyGlass”. Right-click on the text of the button and a stream of data will be added to the scrollview portion of the window. An example of the output is provided below. If your output looks different, you may have pressed the left mouse button, which will produce a different result which will be discussed later.

The data presented is interesting in how it makes it clear to see the sequence of events generated by user actions such as mouse clicks and keyboard strokes. First, you will see the PreviewMouseDown event being processed by the Grid, which is at the top of the visual tree. It will “tunnel” down to the Button and then the TextBlock. These tunneling events are named with the prefix of “Preview”. The events then change direction and “Bubble” back up the visual tree through the button and then the Grid. The events also get routed to the Window, but for simplicity it has been ignored in the example.
Every element in the tree associated with the Source has the opportunity to intercept and take action on the event.
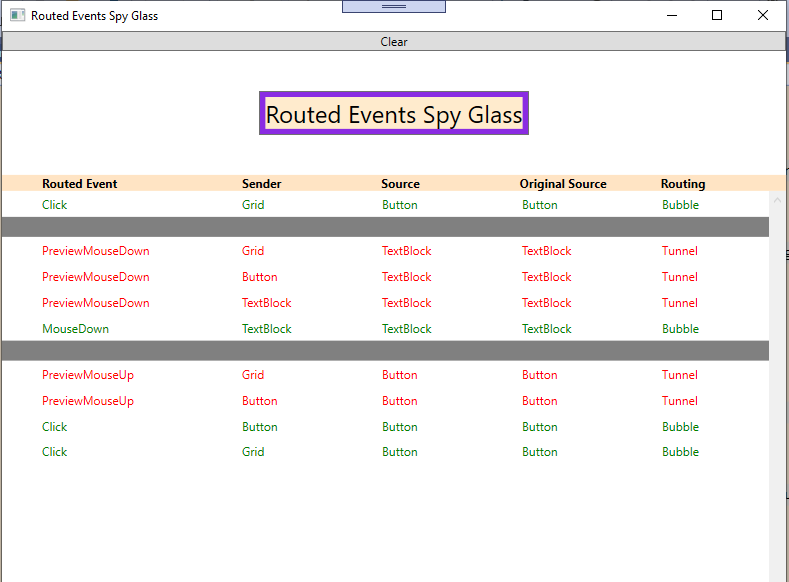
Try again. Clear the scrollview by clicking the Clear button at the top of the application window, and then left click on the button. The output will look similar to this:

The PreviewMouseDown event traverses the elements much as it did before when you right-clicked, but on the bubbling of MouseDown it stops. At the bottom you will notice the click events for the Button and the Grid but not for the TextBlock. The button processes the left mouse action differently and interprets it as a “Click”. It also marks the event as Handled, which stops the further routing of the event.
With the button in focus, try hitting keys on the keyboard and the corresponding data generated for those events will display.
The visual presentation of the sequence of events here is exclusively found within WPF. It is a very powerful mechanism that you can leverage, but it will seem invisible to the casual observer.
Routed events allow you to create an event handler anywhere with the visual tree of that element.
Installing and implementing a handler like this is convenient in situations where the event could originate from any of several child elements.
Potential enhancements
Mouse and keyboard events are not the only events possible here. On tablets you could experiment with stylus events. Focus and LostFocus are two additional events you could add and explore.
The application also demonstrates how to programmatically add and manipulate elements. XAML is a powerful tool, but anything that can be done in XAML can be done in code. In this case, the ability to use foreach loops made implementing the event handlers for the selected elements less repetitive.
Summary
The data presented visually in the project lends to a deeper understanding of how events get routed through the visual tree. Tunneling and Bubbling of events come to life a bit showing you exactly what is happening and in what order.
Additional resources
Routed Events Overview – This docs.microsoft.com article describes how routed events work in Windows Presentation Foundation (WPF).
Events and routed events overview – For a view of how events work in Universal Windows Platform (UWP) see this article, which provides background on event-driven code as a concept.
Using Twilio Lookup in .NET Core WPF Applications – Check out this blog post for a practical example of using Twilio Lookup in a WPF application to obtain phone number information.
TwilioQuest – If you’d like to learn more about programming C# and other languages, try this action-adventure game inspired by the 16-bit golden era of computer gaming.
Jeffrey Rosenthal is a C/C++/C# developer and enjoys the architectural aspects of coding and software development. Jeff is a MCSD and has operated his own company, The Coding Pit since 2008. When not coding, Jeff enjoys his home projects, rescuing dogs, and flying his drone. Jeff is available for consulting on various technologies and can be reached via email, Twitter, or LinkedIn.
Related Posts
Related Resources
Twilio Docs
From APIs to SDKs to sample apps
API reference documentation, SDKs, helper libraries, quickstarts, and tutorials for your language and platform.
Resource Center
The latest ebooks, industry reports, and webinars
Learn from customer engagement experts to improve your own communication.
Ahoy
Twilio's developer community hub
Best practices, code samples, and inspiration to build communications and digital engagement experiences.


