How to Send and Test HTTP Requests for Twilio SMS in Postman
Time to read:
Learning how to use a 3rd party API can be difficult especially when you need to visually see the calls you’re making. Perhaps you’re developing your own API and need to test it along the way. Thus, knowing a nifty API development tool such as Postman can make your life much easier!
In this post, I am going to demonstrate how to use Postman to make and send a request as well as test any API endpoint. We are going to POST to Twilio’s messaging API to send a text message from my Twilio phone number to my personal phone number.

Prerequisites
To complete this tutorial, you will need the following.
- Postman
- A Twilio account. If you are new to Twilio create a free account now. You can review the features and limitations of a free Twilio account.
- A Twilio Phone Number. If you need one, follow this tutorial.
- A verified non-Twilio phone number. This can be your personal phone number.
What is Postman?

Postman is a free, easy-to-use development tool that replaces sending calls through the terminal. This amazing tool offers a variety of features to help aid in API development.
As an intern at Twilio, I have used Postman in my day-to-day work to send and test my endpoints. Without Postman, we would have to use command line tools, like curl, to do so.
The use of Postman in this article will replace the code below:
Getting Started with Postman
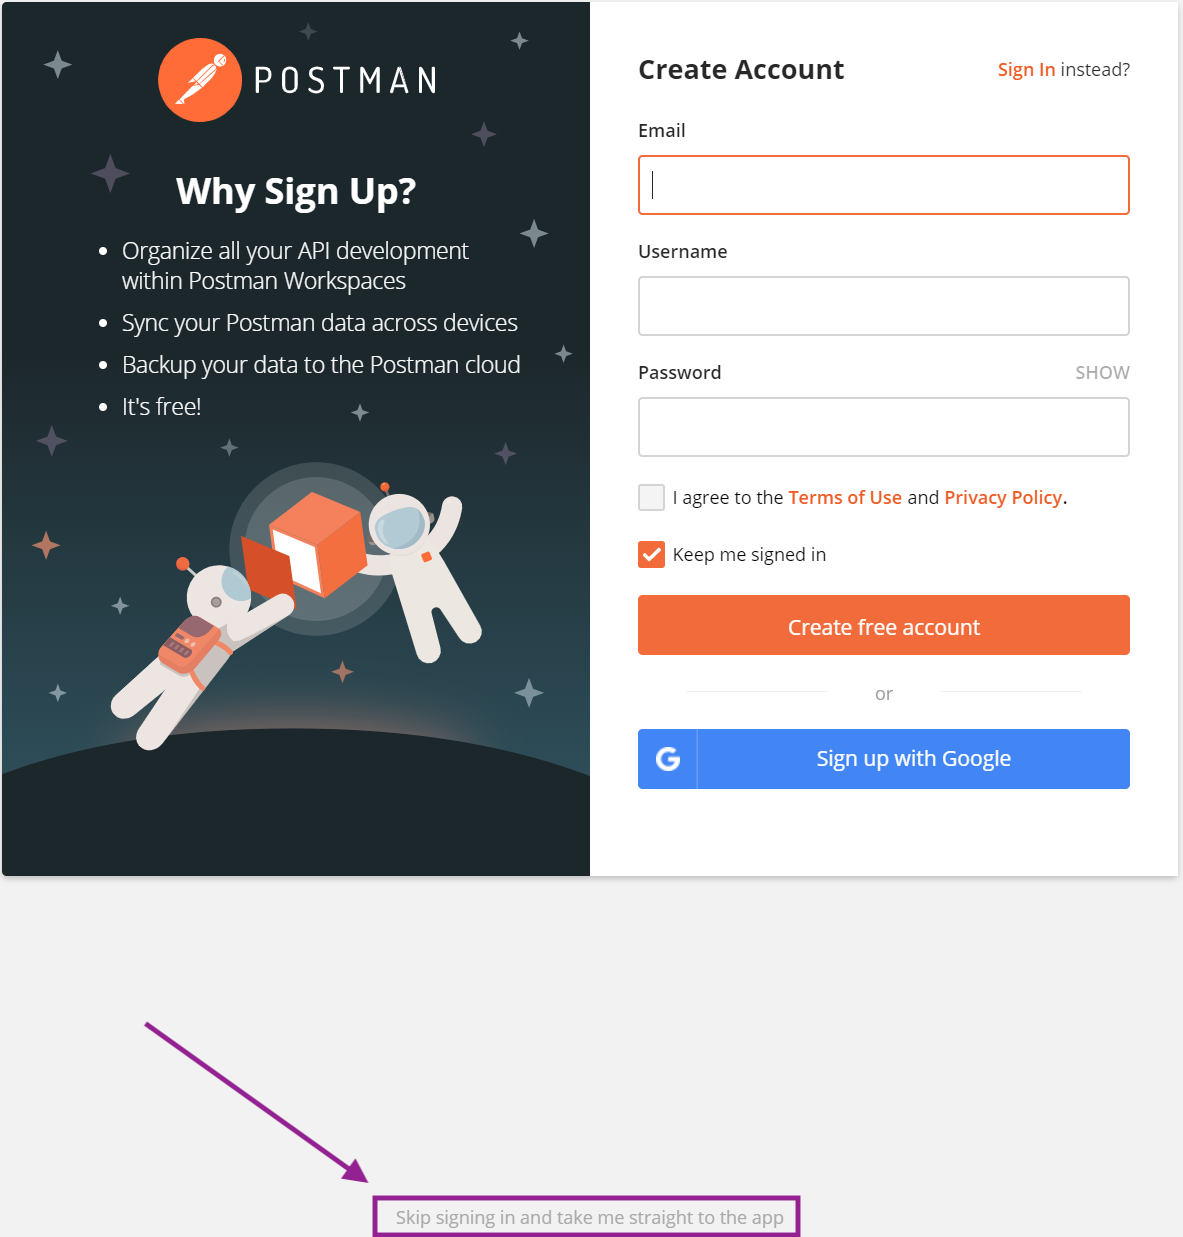
If you just downloaded Postman, you will be asked to create an account when you first open the application. Making an account is entirely optional. Feel free to click the Skip button at the bottom of the screen.
Setting Up Your Postman Environment
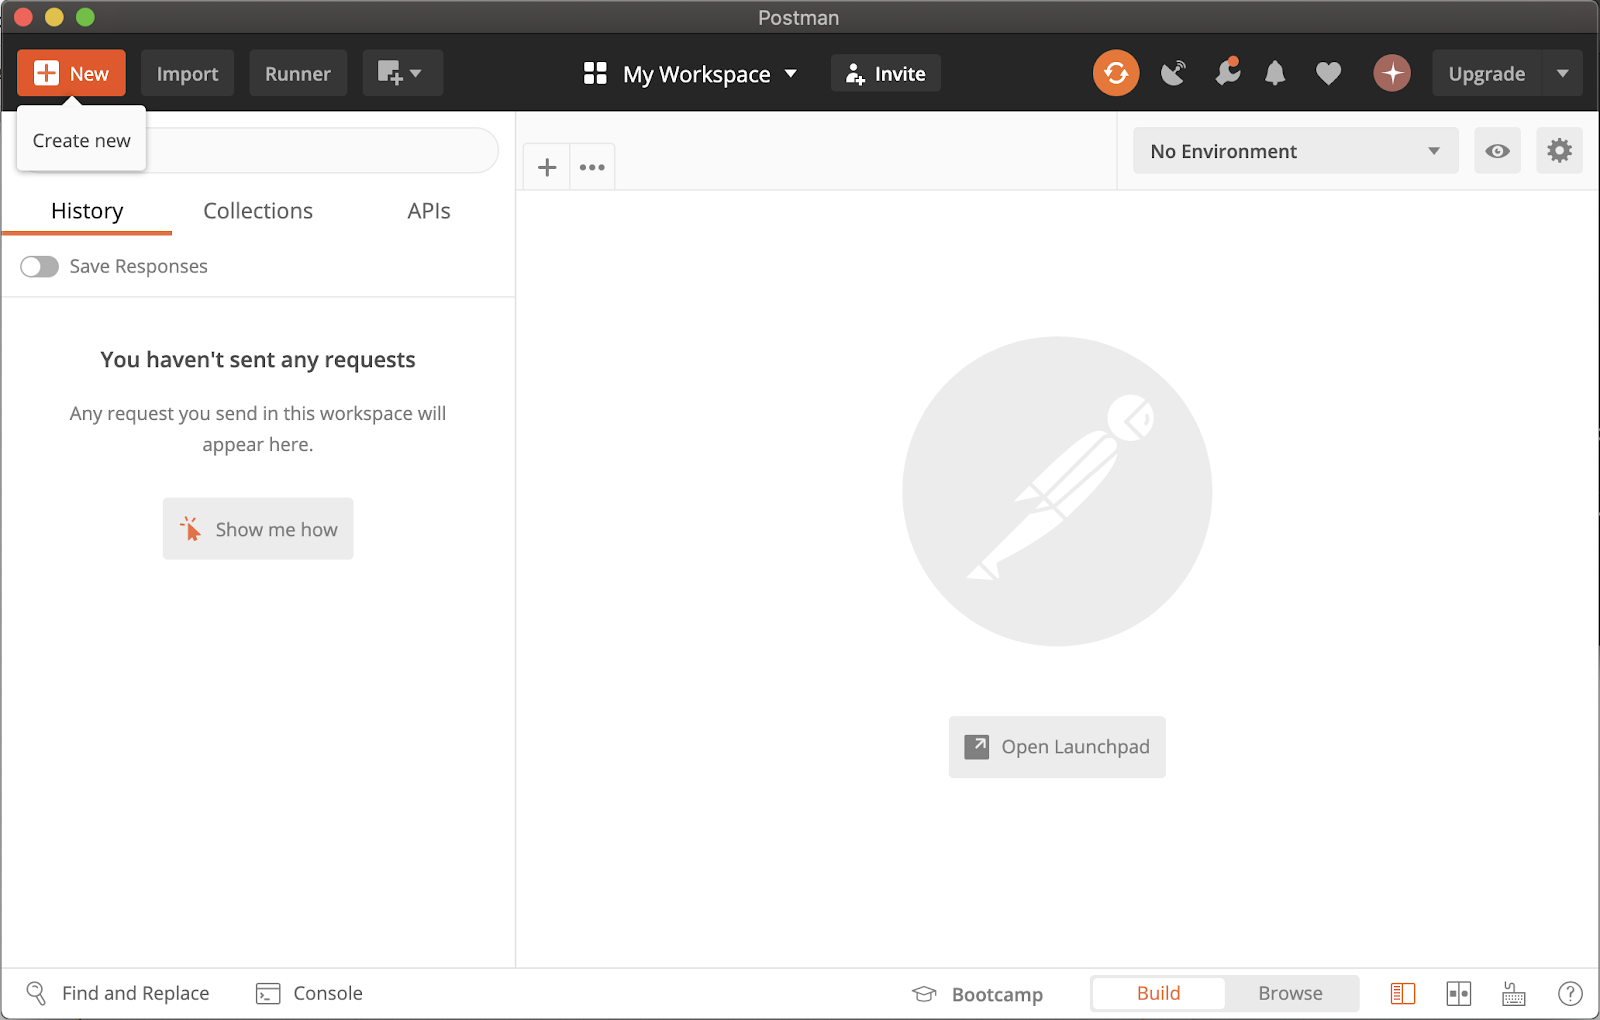
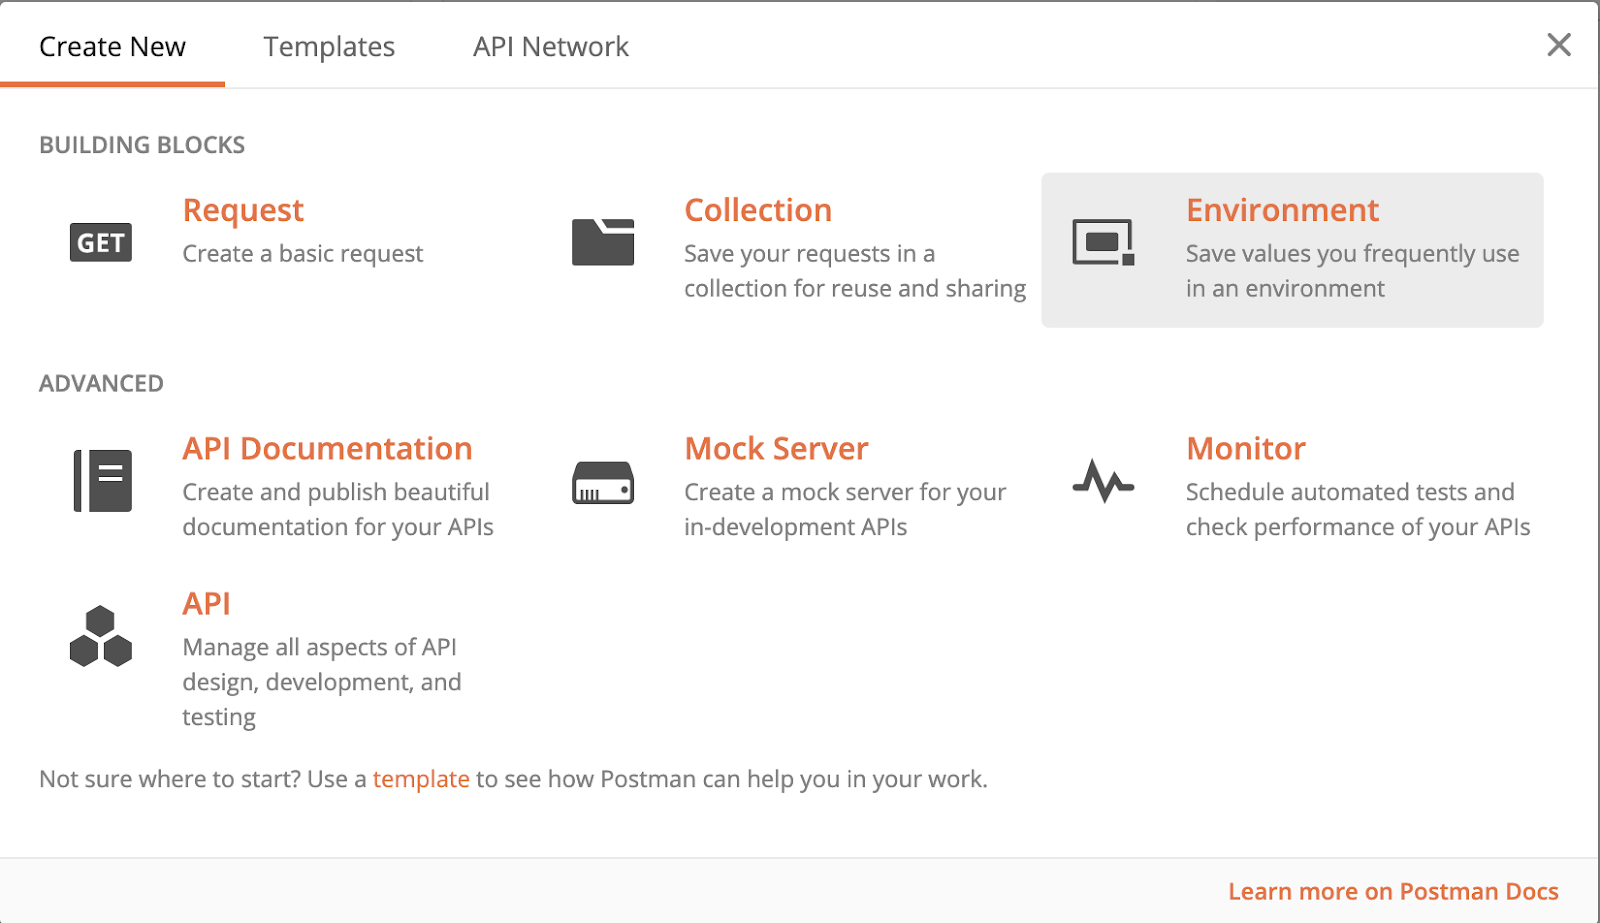
Create an environment on Postman to send the requests in. This environment is simply a group of related variables you can use when making calls. In the top left corner of the Postman window, click New and select “Environment” as seen in the screenshots below:
A popup should appear. Add a Name, (I named my Environment “Twilio Credentials”) in addition to any necessary variables and their values. Variables may include URLs, API keys, passwords, etc. For our purposes, we will need your Twilio ACCOUNT_SID, AUTH_TOKEN, TWILIO_PHONE_NUMBER, which you can find by logging on to your Twilio Console.
Add a verified, non-Twilio phone number as MY_PHONE_NUMBER to send your text to as well. Note that you will need to use E.164 format for phone numbers. (+1234567899)
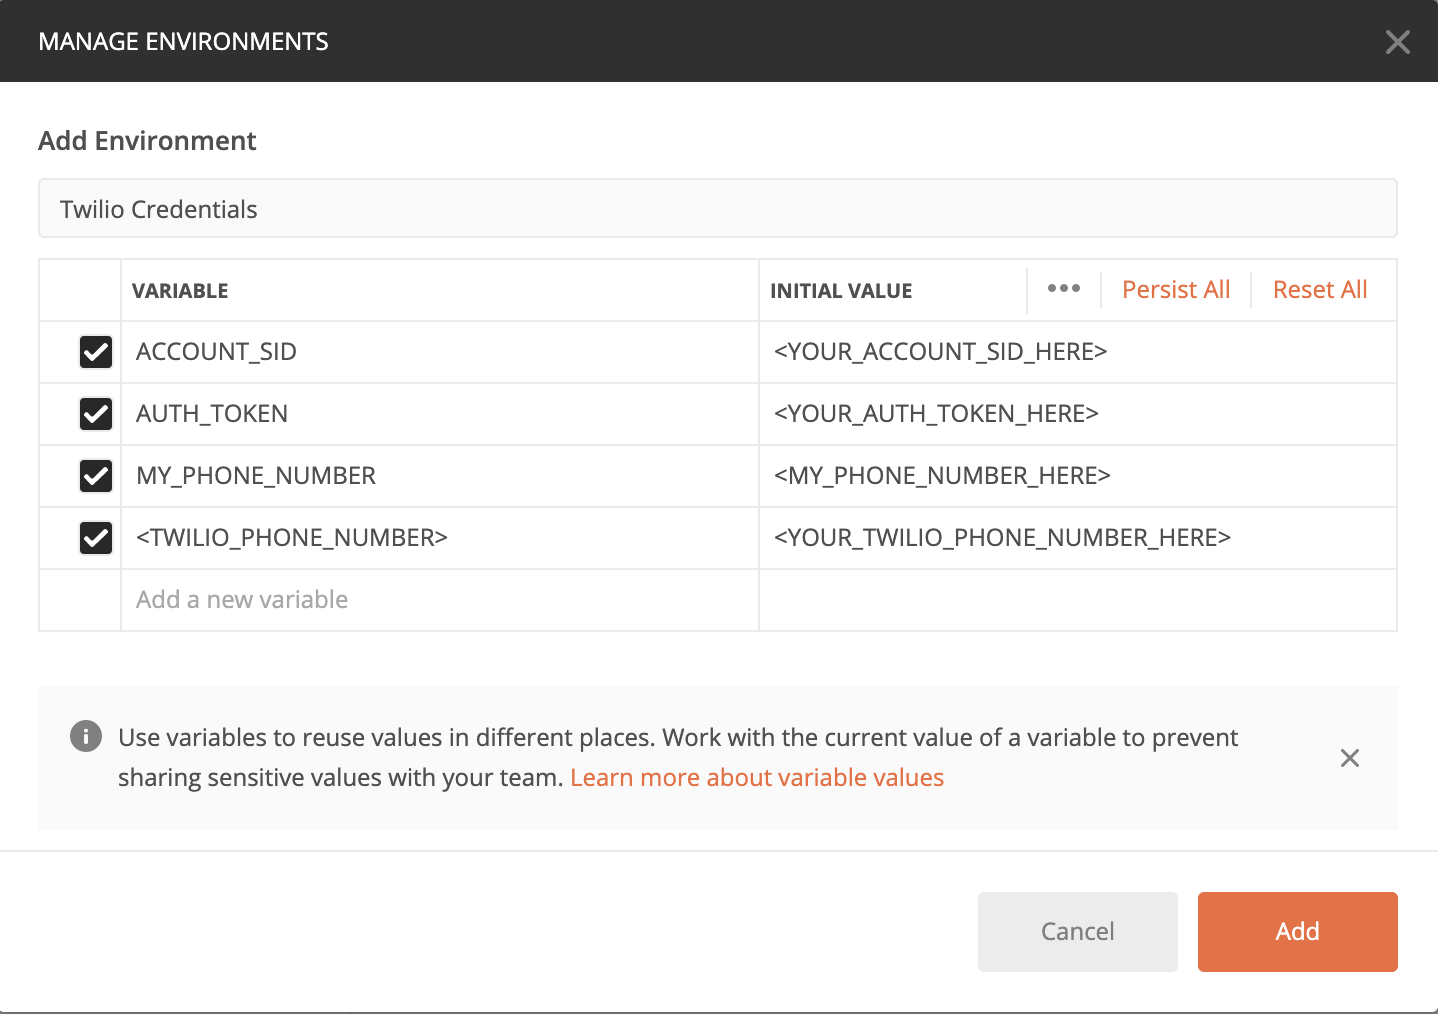
Now, you can reference these variables in Postman without typing out their values every time. Thank you environment variables for helping secure our data!

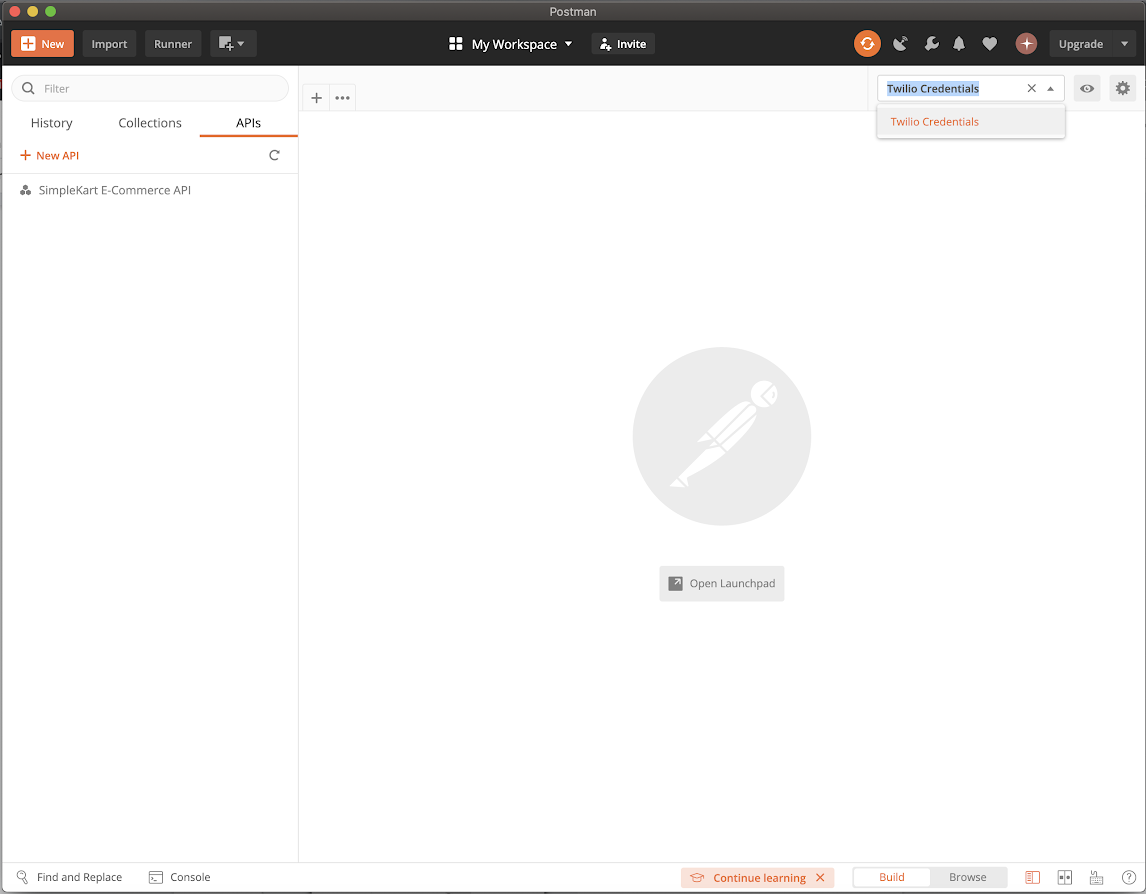
Once you are finished, click the Add button. Once you close out the new Environment window, you are now able to select your newly created environment in the dropdown in the top right corner. In my case, my environment is called “Twilio Credentials.”
Creating a Collection
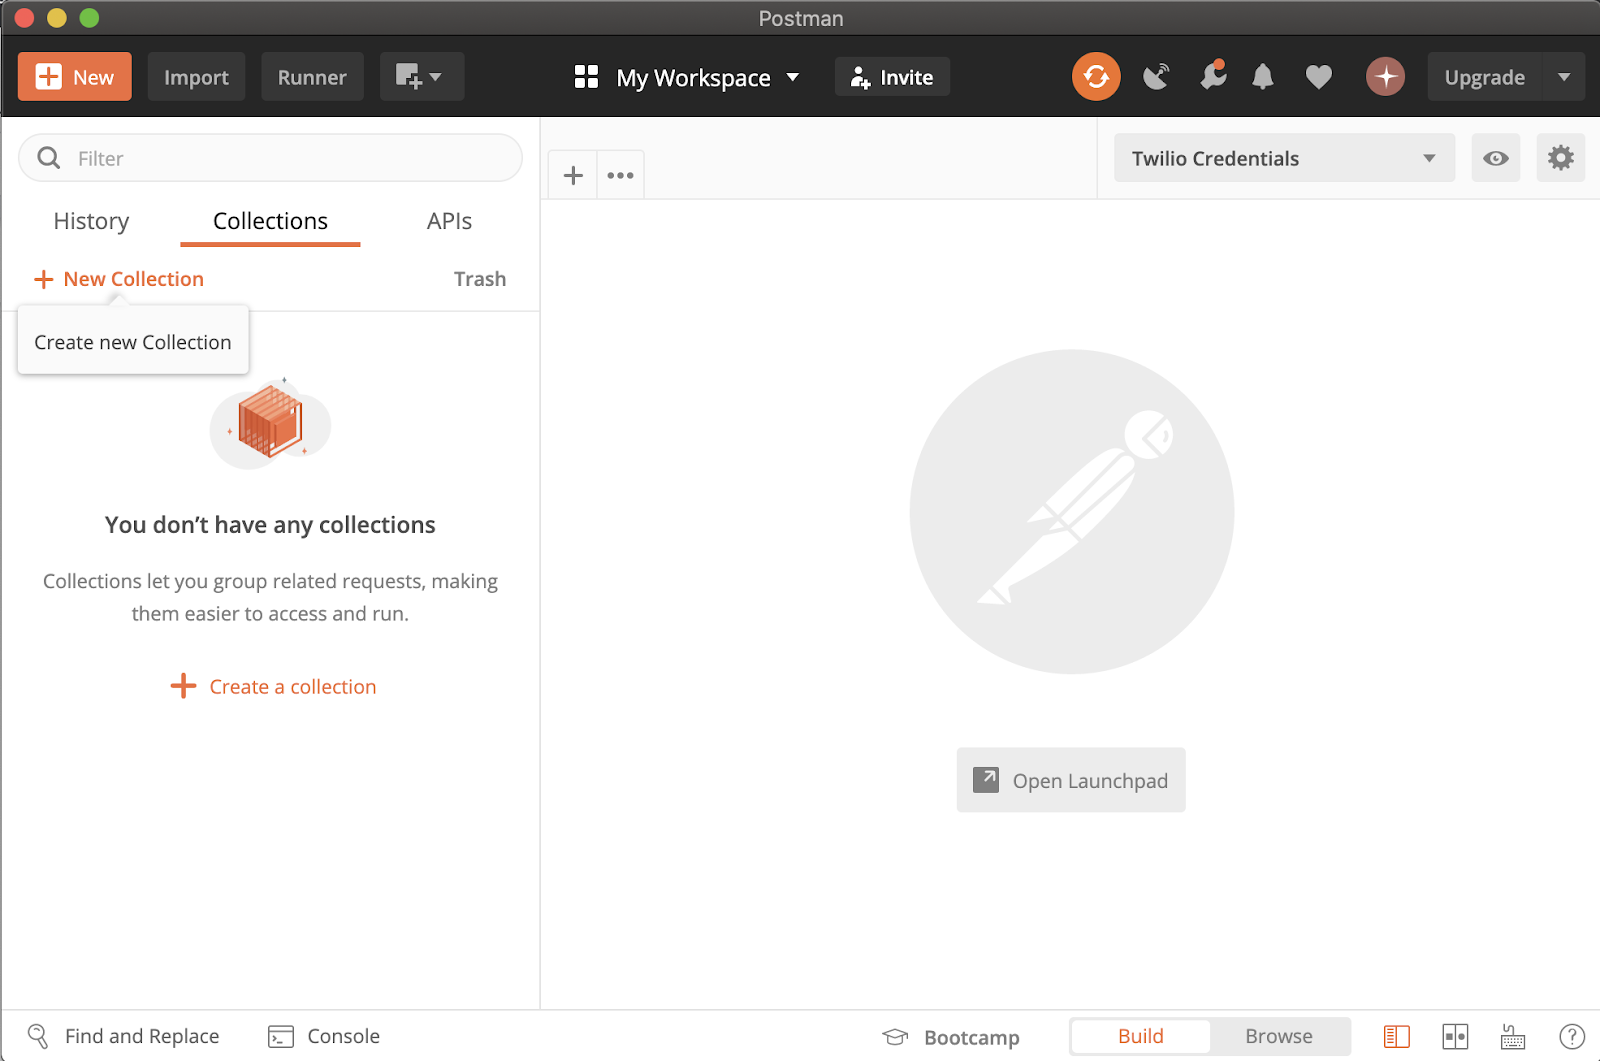
It is time to create a collection! Similar to the concept of environment, a Postman collection is a group of related requests. To begin, click on the Collections tab on the left panel and click New Collection.
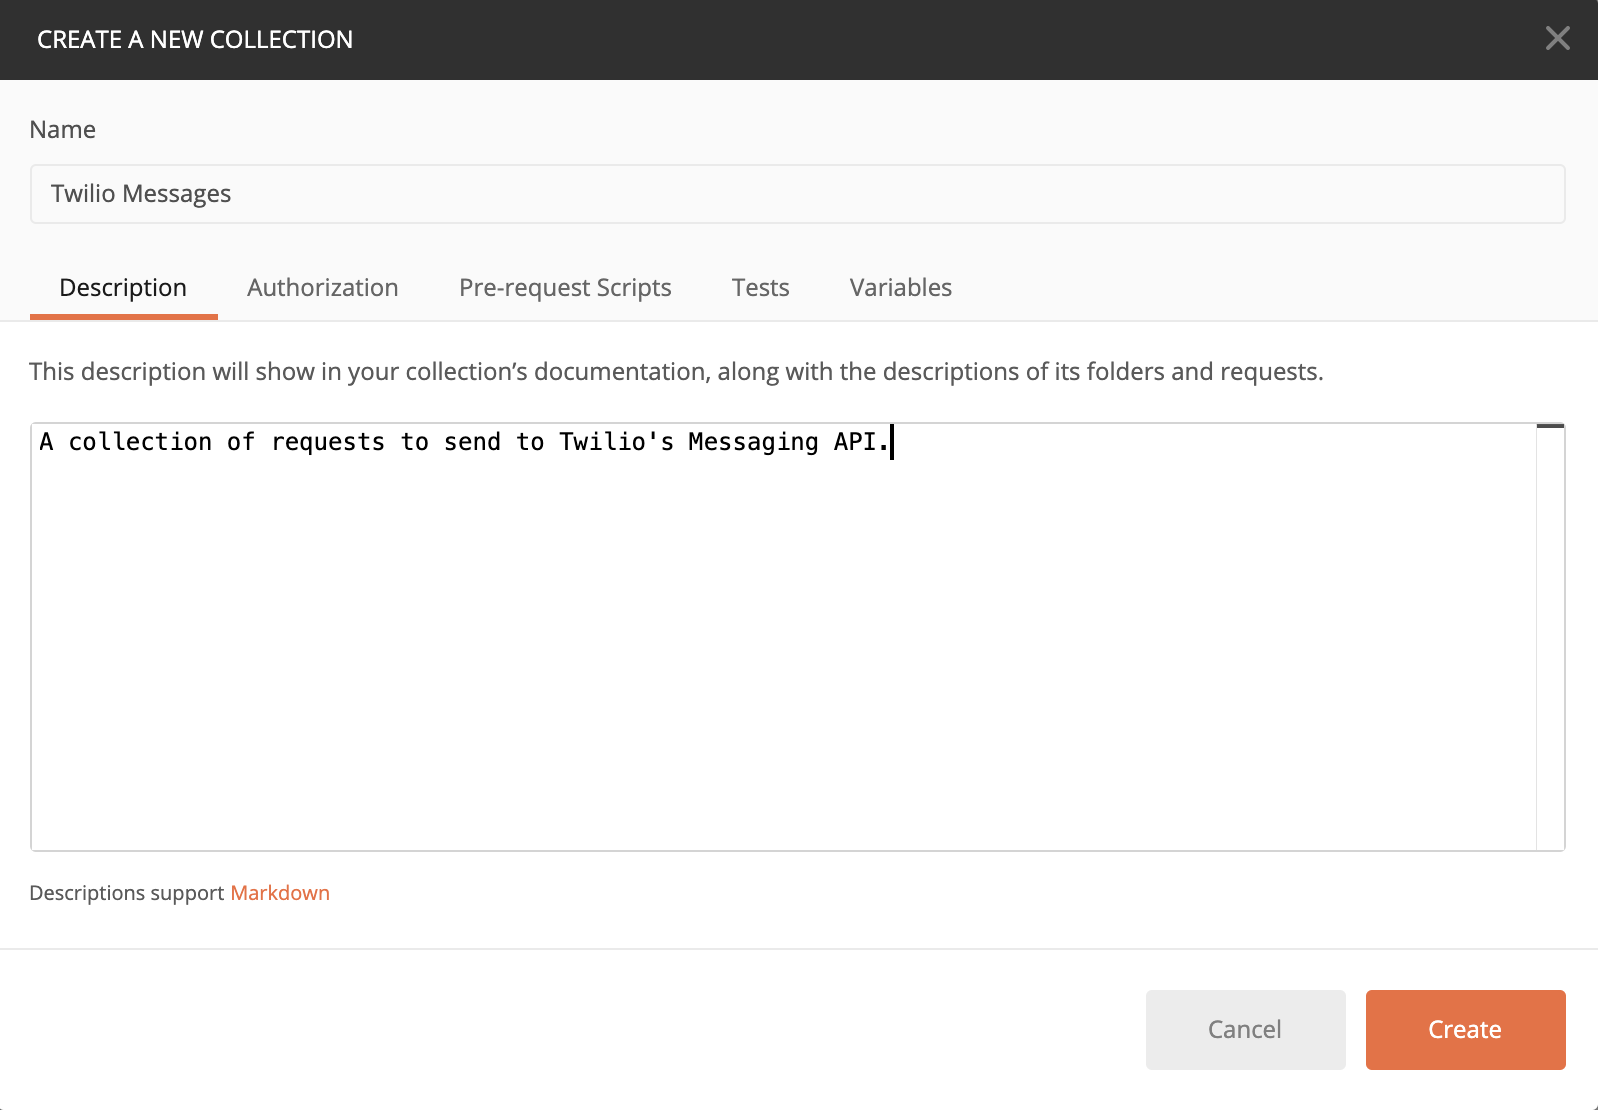
For the purpose of this article, we will name our collection “Twilio Messages.” Feel free to add a description! For this article, I added “A collection of requests to send to Twilio’s Messaging API.” to the description.
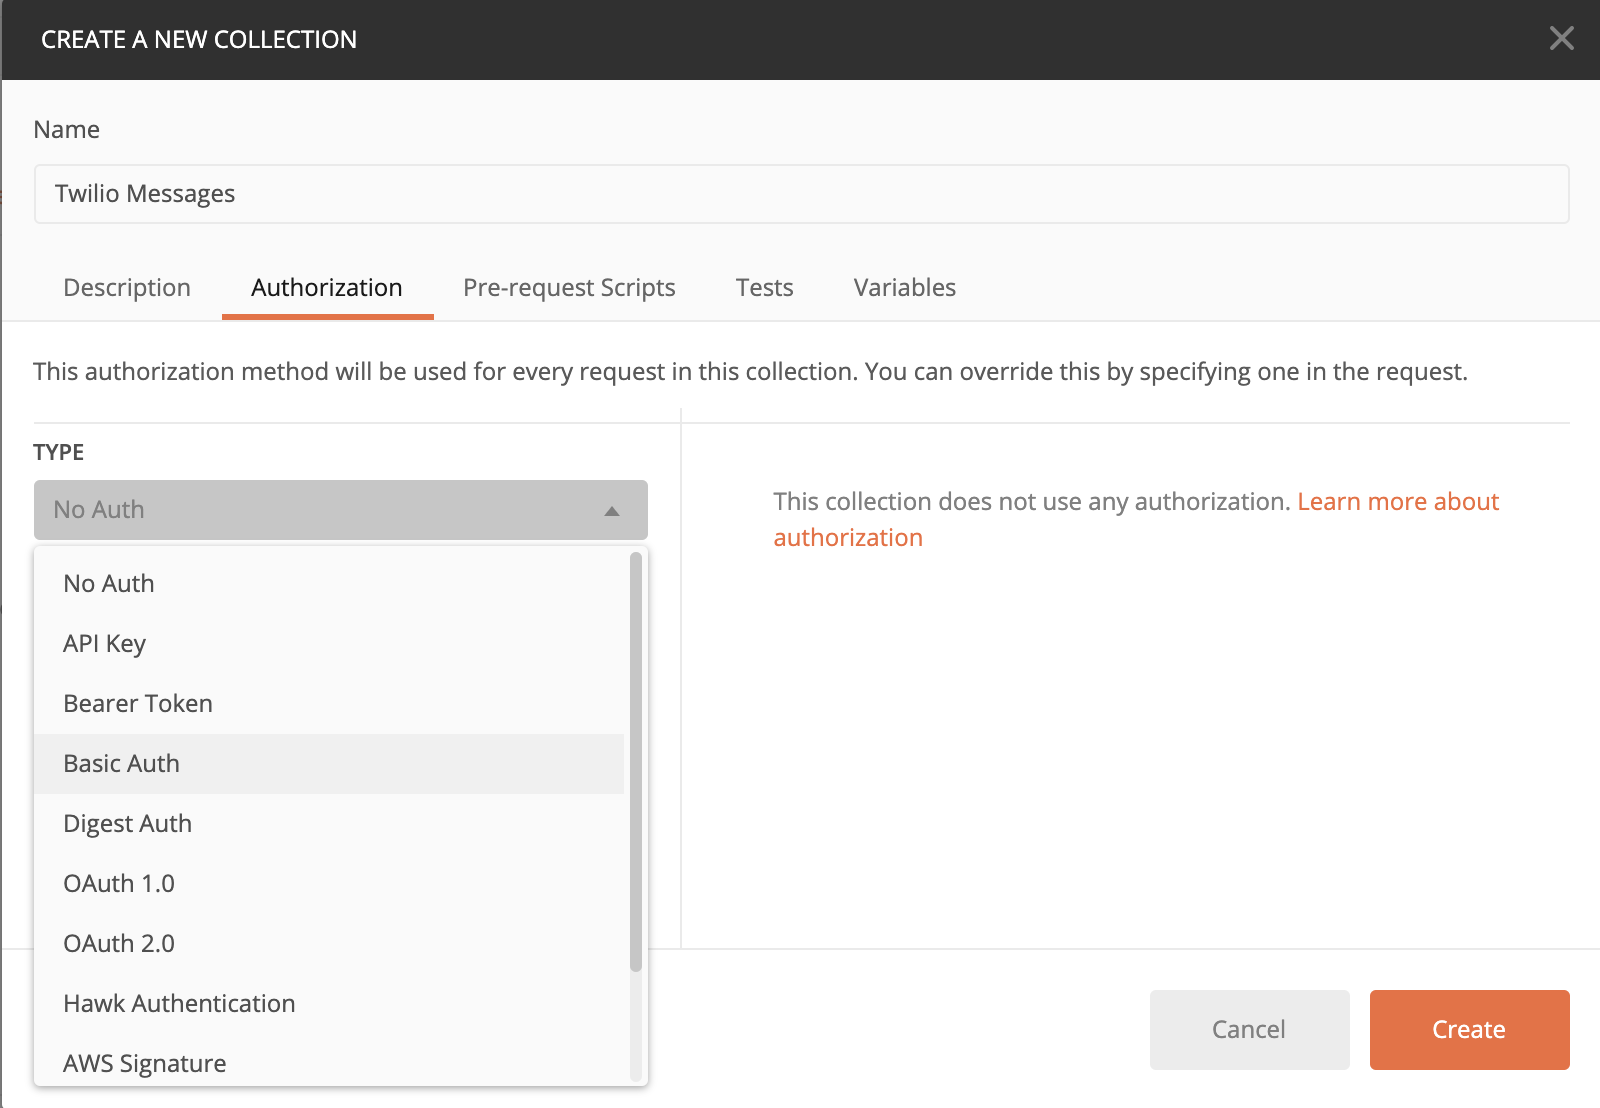
Click on the Authorization tab since our request needs to be authenticated in order to send it to Twilio. Twilio supports Basic Auth, which uses username and password schemes. In the dropdown, select “Basic Auth.”
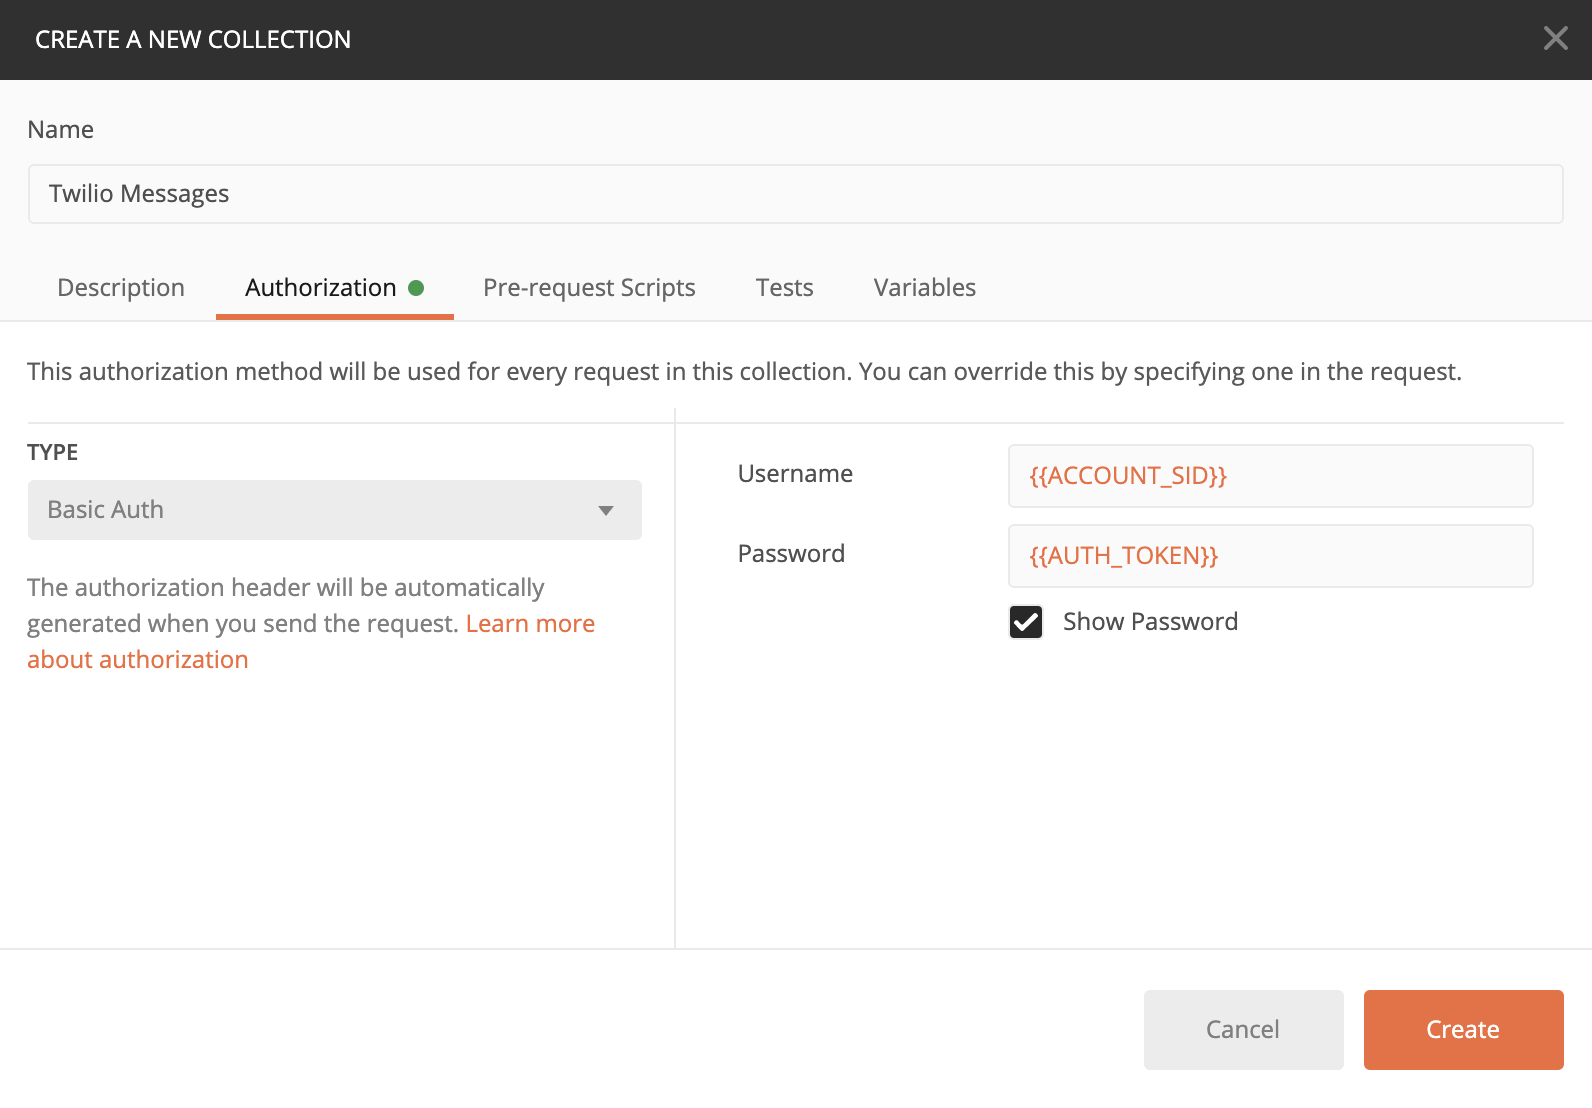
Per Twilio’s documentation, use the ACCOUNT_SID for our username and AUTH_TOKEN for our password. Since we have already defined these variables in our environment, you can reference them as {{ACCOUNT_SID}} and {{AUTH_TOKEN}} for their respective fields as seen in the following screenshot. Make sure to click Show Password to ensure that you have entered your auth token variable correctly.
Setting Up Your Request
Adding a Request to your Collection
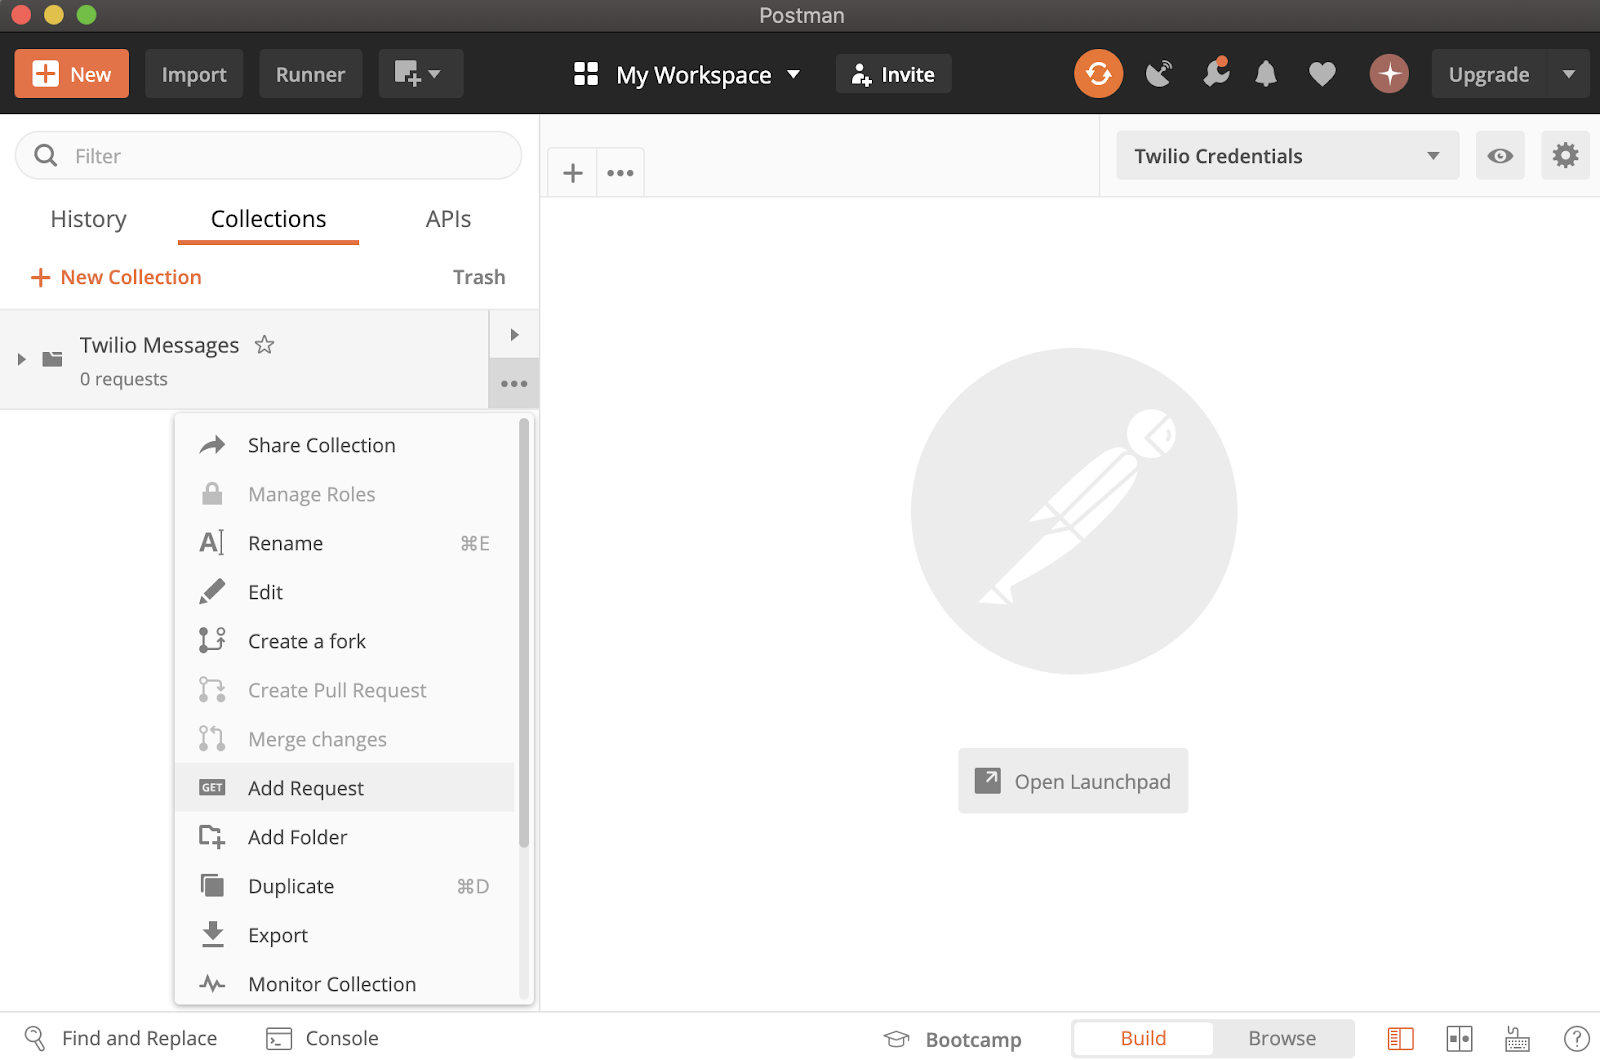
Click on the three dots to the right of the “Twilio Messages” collection and select “Add Request.”
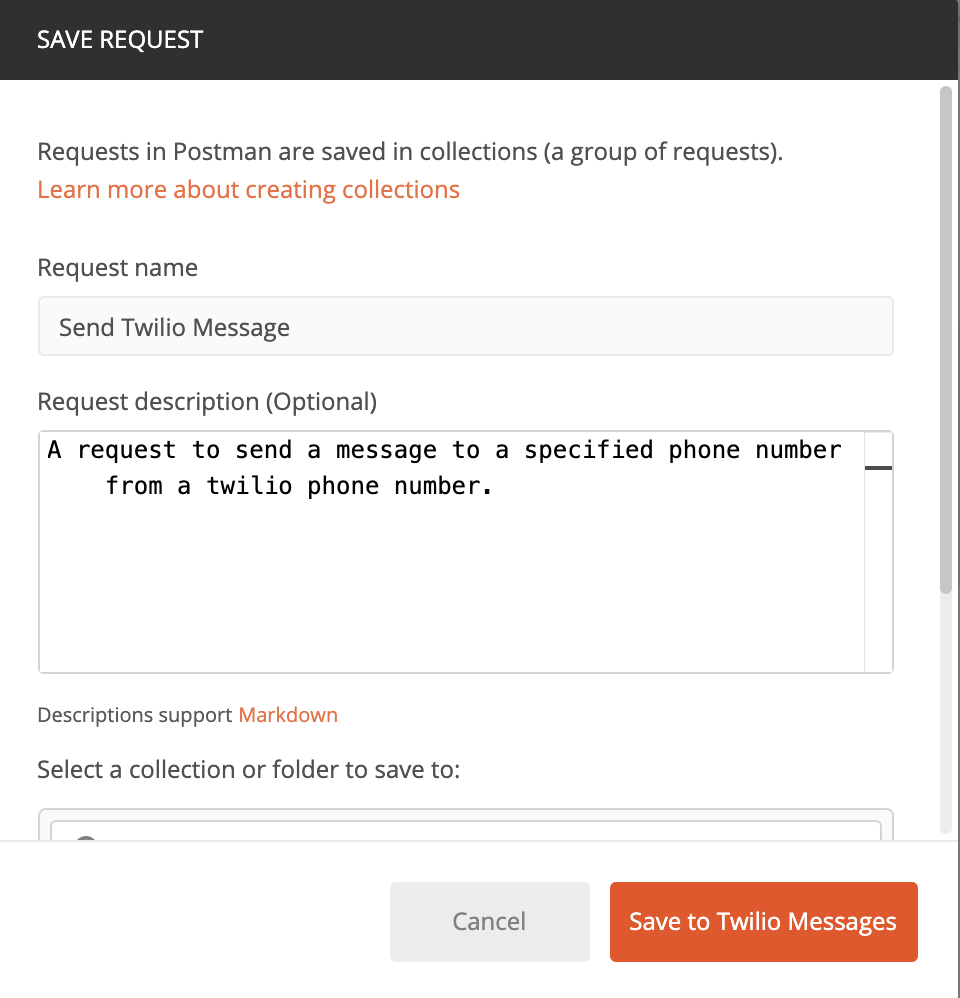
Add “Send Twilio Message” for the Request name field and “A request to send a message to specified phone number from a twilio phone number” for the Request description. Once you are done, select Save to Twilio Messages.
After you saved your request, click on the dropdown on the “Twilio Messages” collection to see this new request. Click on the request to see all the request options show up on the main portion of the window.
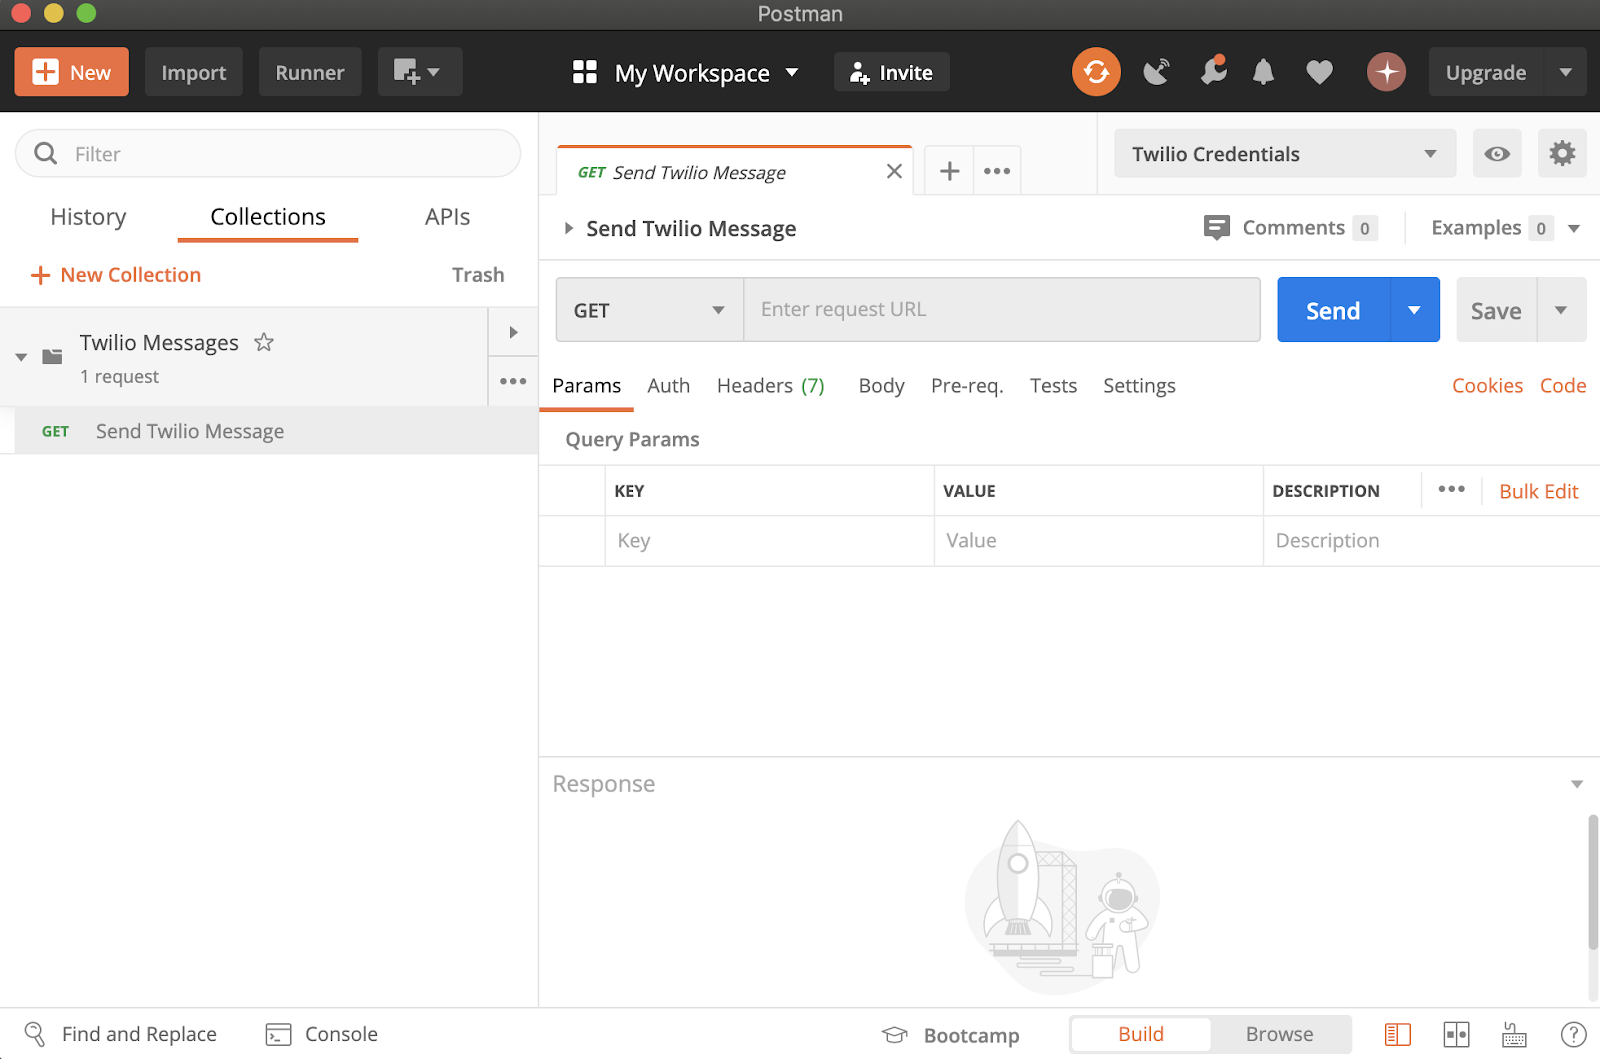
Adding Request Type and URL
At the top of the application, we can specify what type of request we want to send by editing the method type and the URL. For this article, we will be using POST for our method type but feel free to explore the many others! Then, we will use the following resource URI from Twilio’s SMS API. Copy and paste the following URI into the text field for the POST request:
https://api.twilio.com/2010-04-01/Accounts/{{ACCOUNT_SID}}/Messages
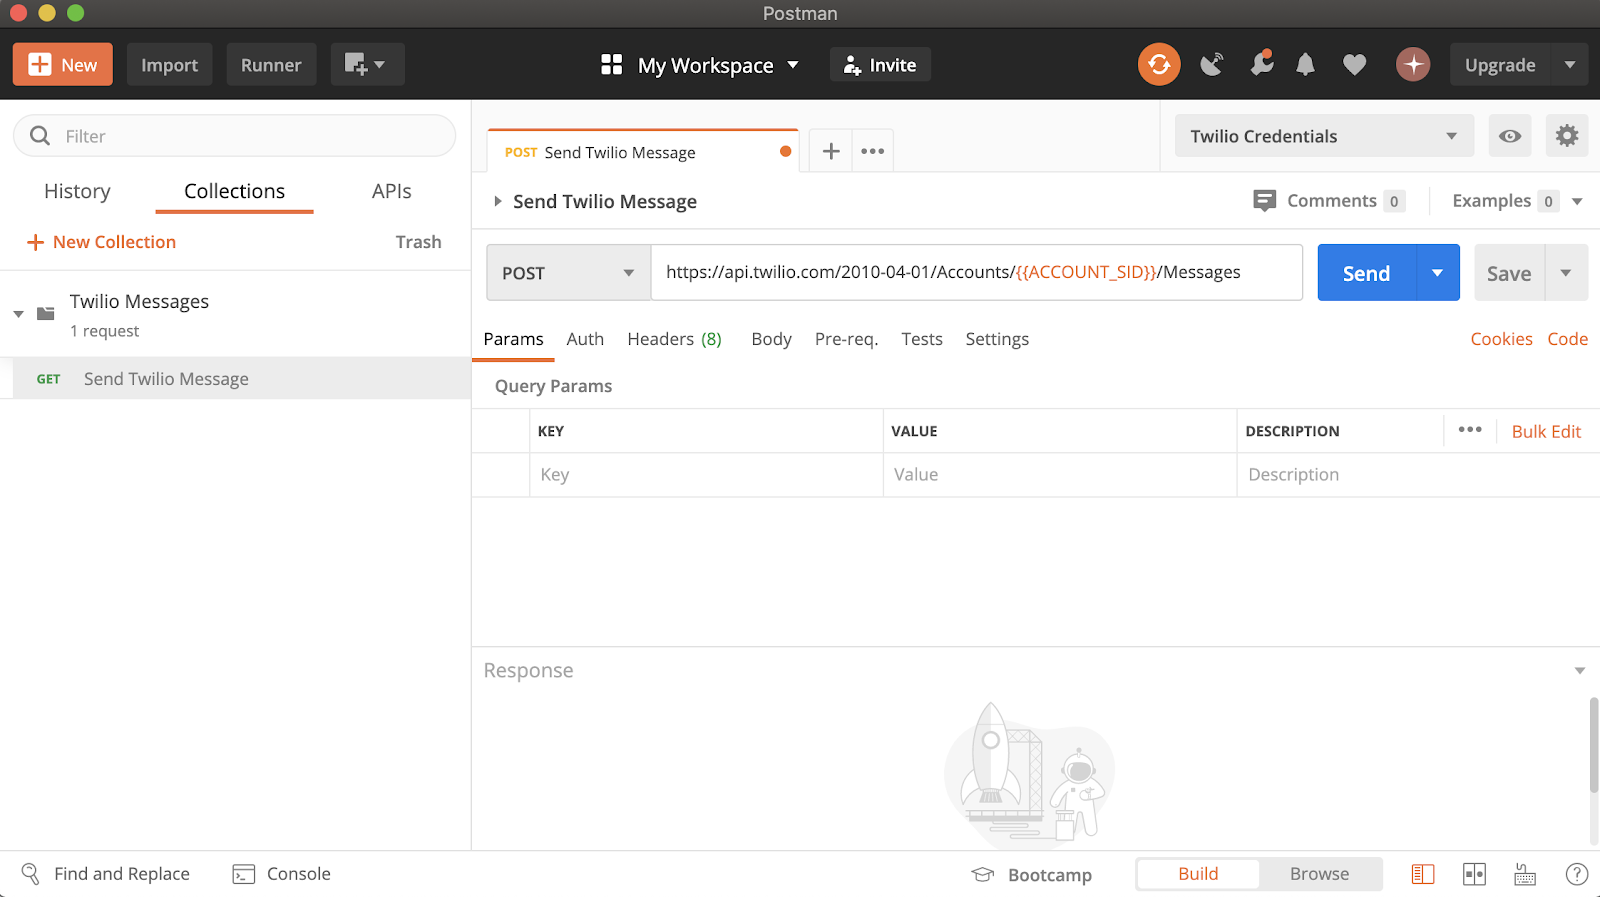
Adding a Request Body
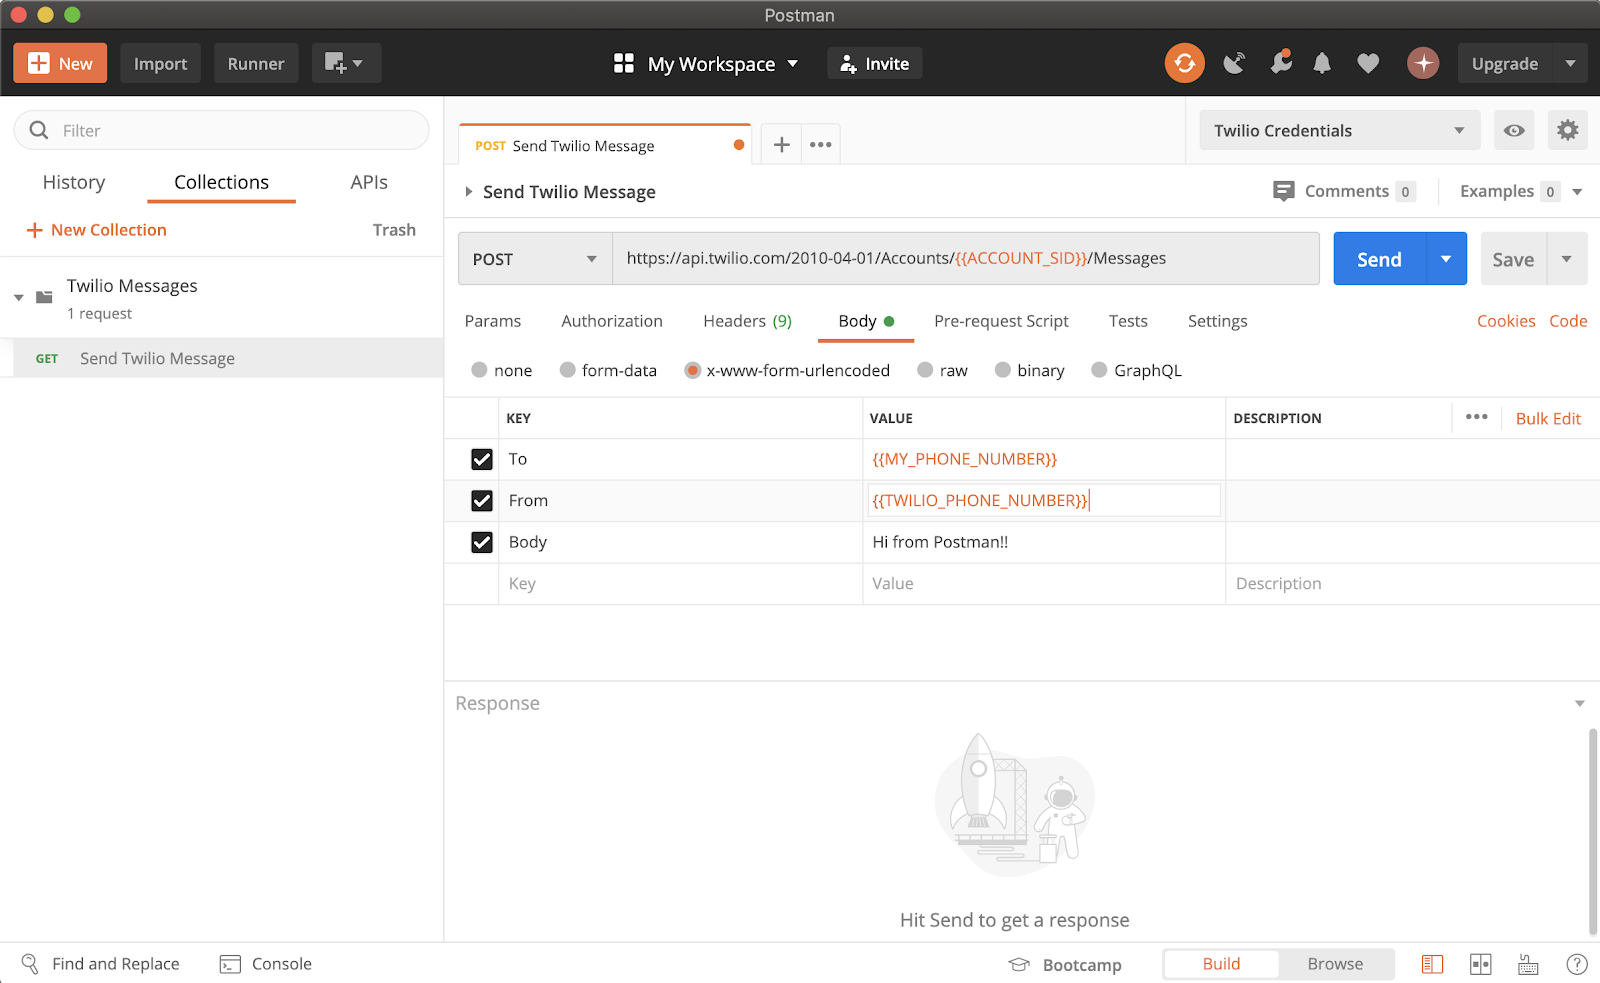
Click on the Body tab of the request options. The body of a request is the data we want to send. Twilo’s documentation gives us a full list of parameters we can send in our request body.
To keep our tutorial simple, we will just send the required variables: “To”, “From”, and “Body.”
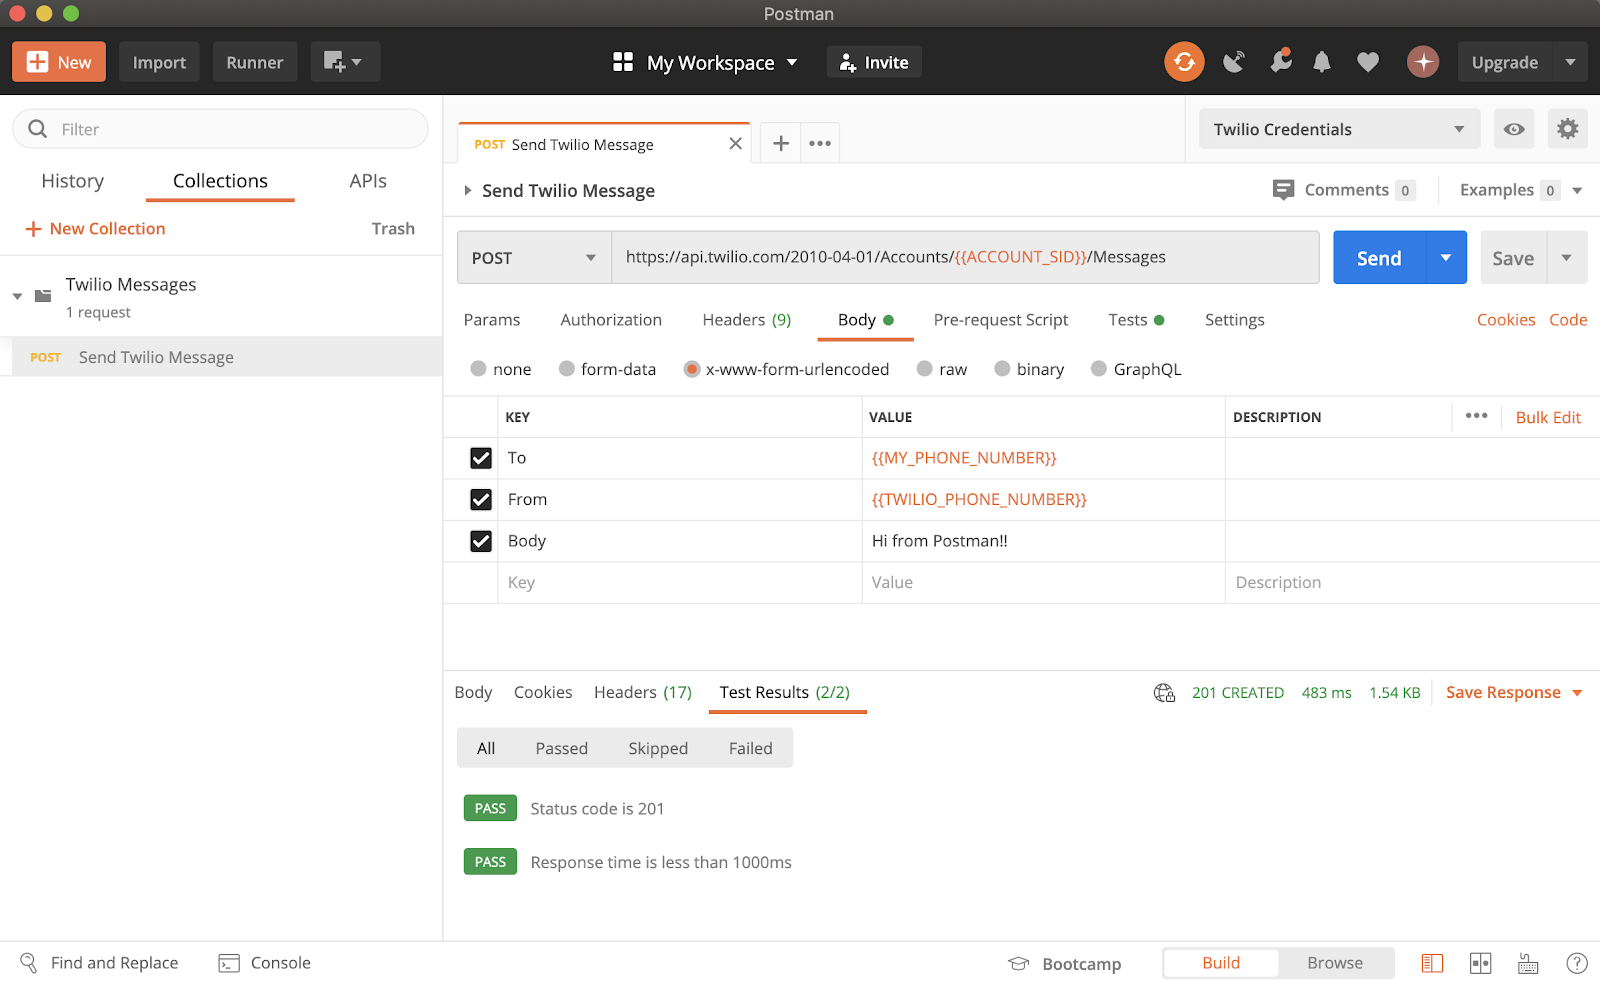
As seen below, there are many different formats we can use to send our data. Today, we are going to select the option x-www-form-urlencoded.

But wait, how did I know I wanted this type?
Looking at the curl code used in the beginning, I see that the --data-urlencode flag was used to add data to the body of the request. While Url-encoding and form-data look very similar in Postman, here is a great resource explaining the different use cases. Essentially, since we have a small payload, we can use the url-encoded option. After this tutorial, you can go back and try using form-data to format your data for fun. The request will still work!
Add the keys “To,” “From,” and “Body” and their corresponding values to the form.
“To” is the number you are sending the text too. In our case, the verified, non-twilio phone number. “From” is the number we are sending the text from. Make sure this is your Twilio phone number. “Body” is the message body. Type in whatever you want in this field!
NOTE: The variables are case-sensitive so make sure the key values are capitalized!
Sending Your Request
Now for the fun part, sending your request! Press the blue Send button at the top right and off your HTTP request goes!

Postman will show your response body, cookies, headers, and test results!
As a bonus, the phone number you entered in the “To” field should receive a fun text message!

Adding Tests
Of course we want to test the behavior of our endpoints, especially when we created them. Postman makes this very easy for us to do! Every time we send our request, Postman runs our tests and returns the results.
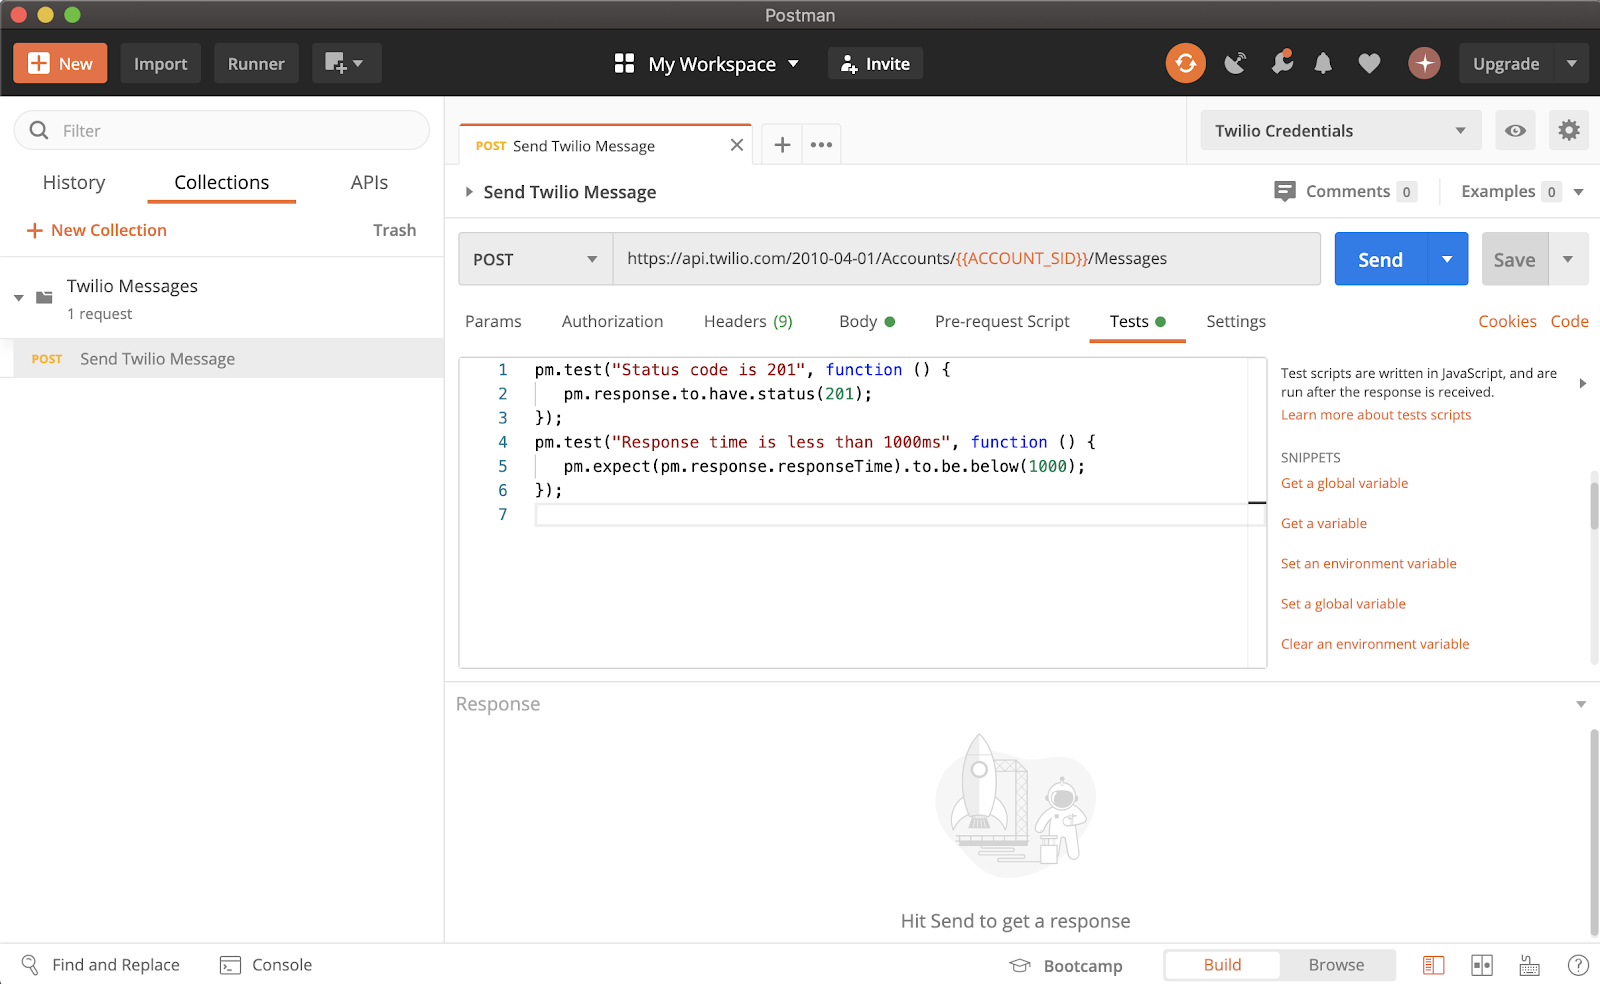
To begin, click on the Tests tab. You will see a blank editor. Postman tests are written in JavaScript. Do not worry if you do not know JavaScript, Postman has a solution!

You can use the Snippets tool on the right side panel. If you click on a test you want, Postman will automatically write a generic test in the editor. Feel free to explore more about all the different tests you can write. For simplicity, I choose tests to confirm the response status code and the response time (two tests I use a lot as a developer).
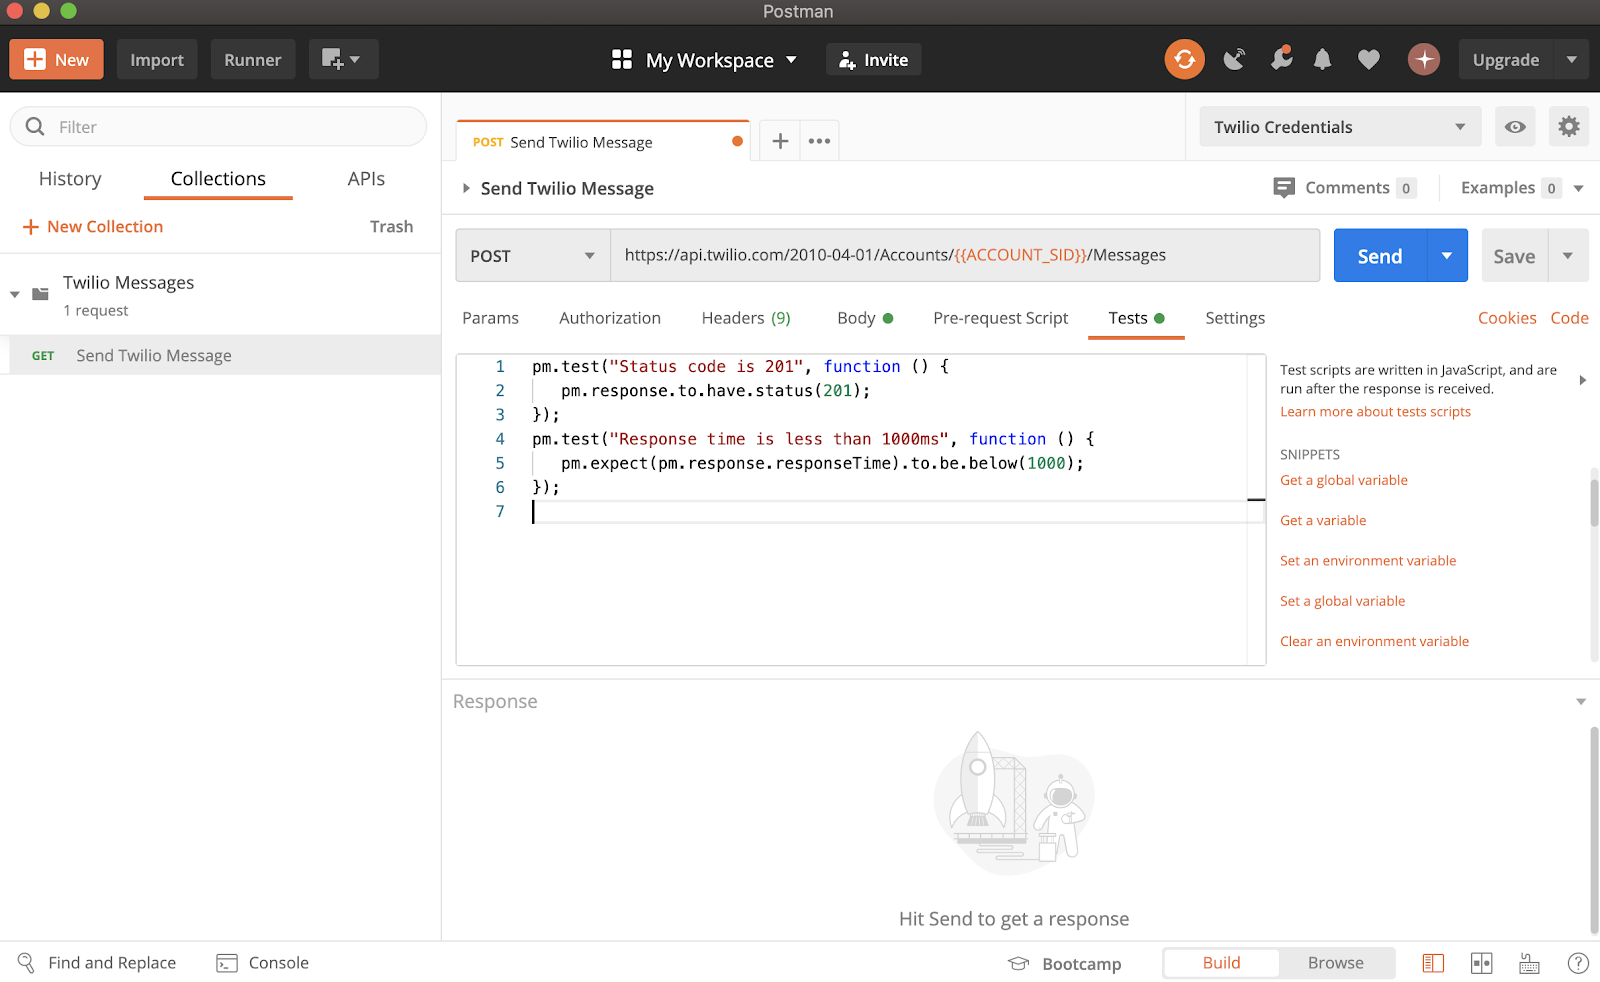
Now, if you send your request again, you should be able to see the results.
Click on the Test Results(2/2) tab and you should see two green buttons that say “PASS” with some text such as “Status code is 201” and “Response time is less than 1000ms” as seen in the screenshot below:
Saving Your Request
After all the work you have done, it is time to save your request! This way, you do not have to repeat this process above every time you want to make a request. To the right of the blue Send button, press Save.
Conclusion
Time to celebrate! You used the power of Postman to easily send an HTTP request and test the results.
.

Since this article briefly touches on the capabilities of Postman, I encourage you all to check out these great resources!
Here is a list of ideas to expand on what you just learned:
- Experiment by sending more variables in the body of this request. In particular, try sending a MediaUrl parameter.
- Explore Twilio’s messaging API and add more requests to the collection we created. Try using GET to fetch messages associated with your account.
Mallory Butt is a Software Engineer intern on the Twilio Login team. She is a rising senior at the University of Texas studying Computer Science. To contact her, connect with her on LinkedIn or email her at mbutt [at] twilio.com.
Related Posts
Related Resources
Twilio Docs
From APIs to SDKs to sample apps
API reference documentation, SDKs, helper libraries, quickstarts, and tutorials for your language and platform.
Resource Center
The latest ebooks, industry reports, and webinars
Learn from customer engagement experts to improve your own communication.
Ahoy
Twilio's developer community hub
Best practices, code samples, and inspiration to build communications and digital engagement experiences.


