How to Integrate Amazon Cognito Authentication with Hosted UI in ASP.NET Core
Time to read:
Amazon Cognito is a fully managed service providing users with Authentication and Authorization services for web, mobile, and native applications. With Cognito, developers can focus on their applications, and leverage Cognito to provide scalable resilient authentication across multiple applications. Cognito has generous free tier pricing that does not expire after the first year.For low-traffic websites, Cognito will be free, or low-cost.
By following this blog post, you will integrate Cognito with a custom ASP.NET Core web application. You will create a new web application, set up a Cognito user pool, and then integrate your user pool into your ASP.NET Core application. You will finish by testing the login functionality by following the signup and login flows.
In conjunction with this blog post, all source code is available on my GitHub repository.
Prerequisites
To follow along with this tutorial, you'll need the following things:
- .NET 7 SDK (earlier and newer versions may work too)
- A code editor or IDE (I recommend JetBrains Rider, Visual Studio, or VS Code with the C# plugin)
- AWS account, a free tier account is fine.
- Experience with ASP.NET Core MVC web applications.
- Prior experience with Amazon Web Services (AWS) is helpful.
Create your Web Application
You will start by creating a new ASP.NET Core MVC web application. Open a command prompt and type the following commands:
This creates a new MVC application in the CognitoDemoApp folder, and change directories to the new project folder.
Run the new application:
In .NET 7, the application doesn't run on HTTPS by default. In that case, run the application https launch profile:
Now, make a note of the HTTPS URL your application is listening too. You will need this later. This URL is printed to the output and looks like https://localhost:7014.
If you run your application from an IDE, it will automatically open the application in your browser, in which case you can copy it from the URL bar.

Here, the application has configured the application to run on port 7014. Your application port will differ from the one configured on my application.
Set up Amazon Cognito
For the next section, you will create an Amazon Cognito user pool that will provide Authentication into your application.
Log into the AWS Console. From the console, select the Amazon Cognito service. You can choose this from the service list, or type "Cognito" into the search bar at the top of the AWS Console. If you do not currently have any Cognito user or identity pools set up, you will see the Cognito Welcome screen.
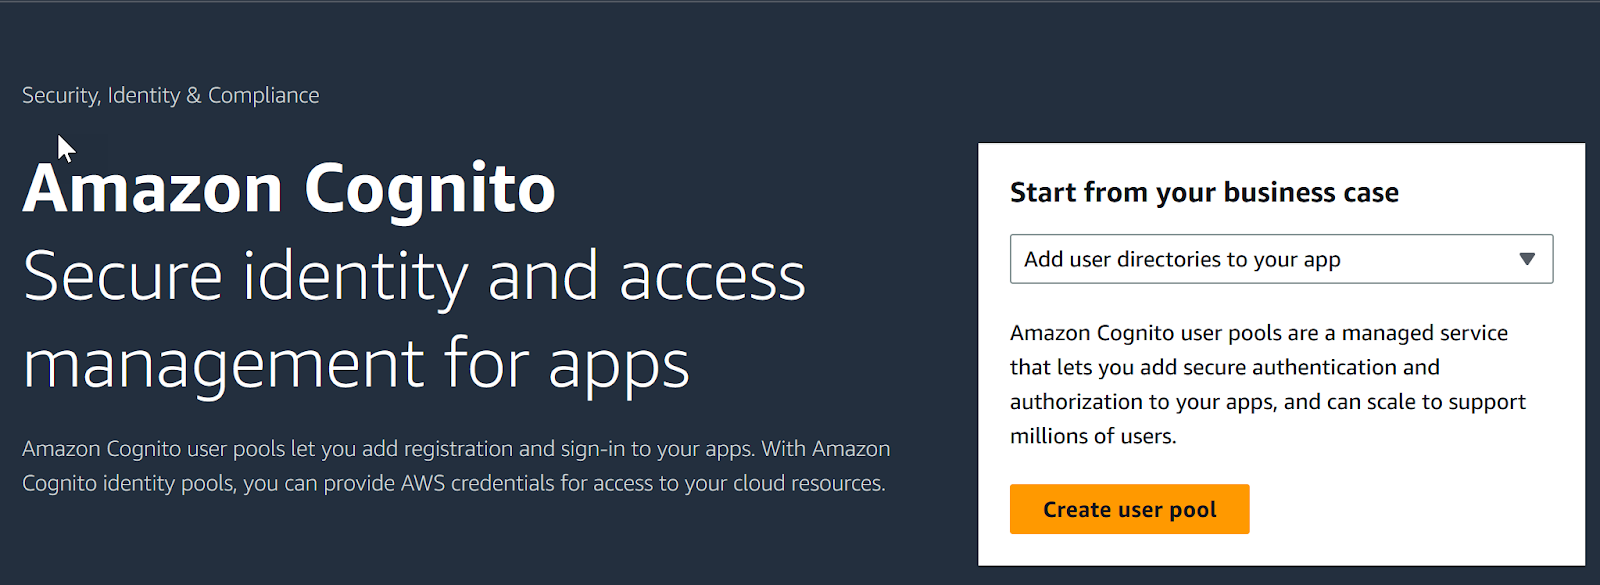
Click Create user pool on the right-hand side.
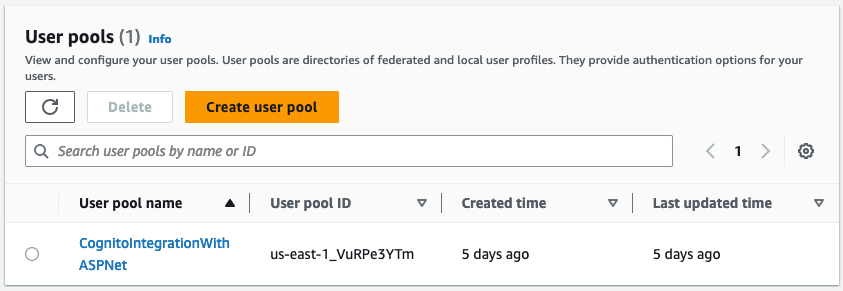
If you already have a Cognito user pool created in your account, you will see the list of user pools when you click on Cognito instead of the welcome screen, if this is the case, click Create user pool above the list to create a new user pool for your application.
With the new user pool, you will need to tell Cognito how you intend users to sign in to your application. For this sample, select the options User name, Email, and Phone number. Do not select the option for Federated Identities.
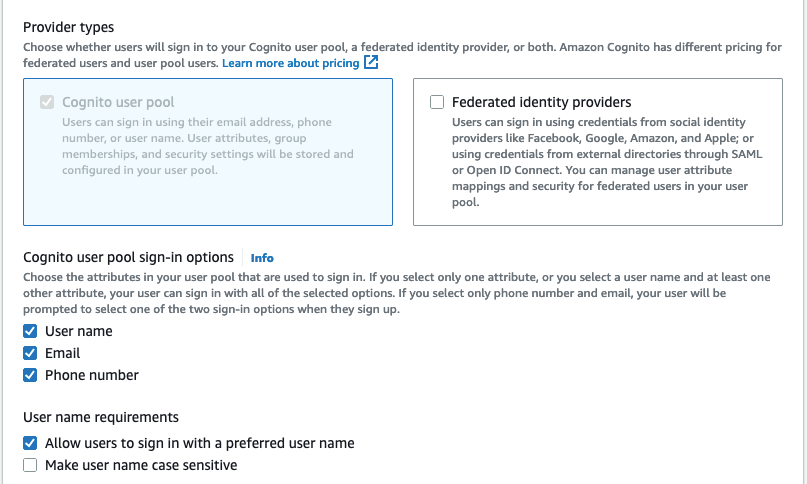
Click Next to move onto the next screen in user pool creation.
Cognito allows you to set rules around password policies. The Default policy requires a mix of numbers, upper and lowercase letters, and special characters. Accept the default password policy.
Cognito allows you to require multifactor authentication for your users. For this blog post only, select the option for No MFA as it will make the testing process easier. For production applications, it’s a best practice to require multifactor authentication. If you choose to use this user pool for your application beyond this blog post, change this setting later to require MFA for your users.
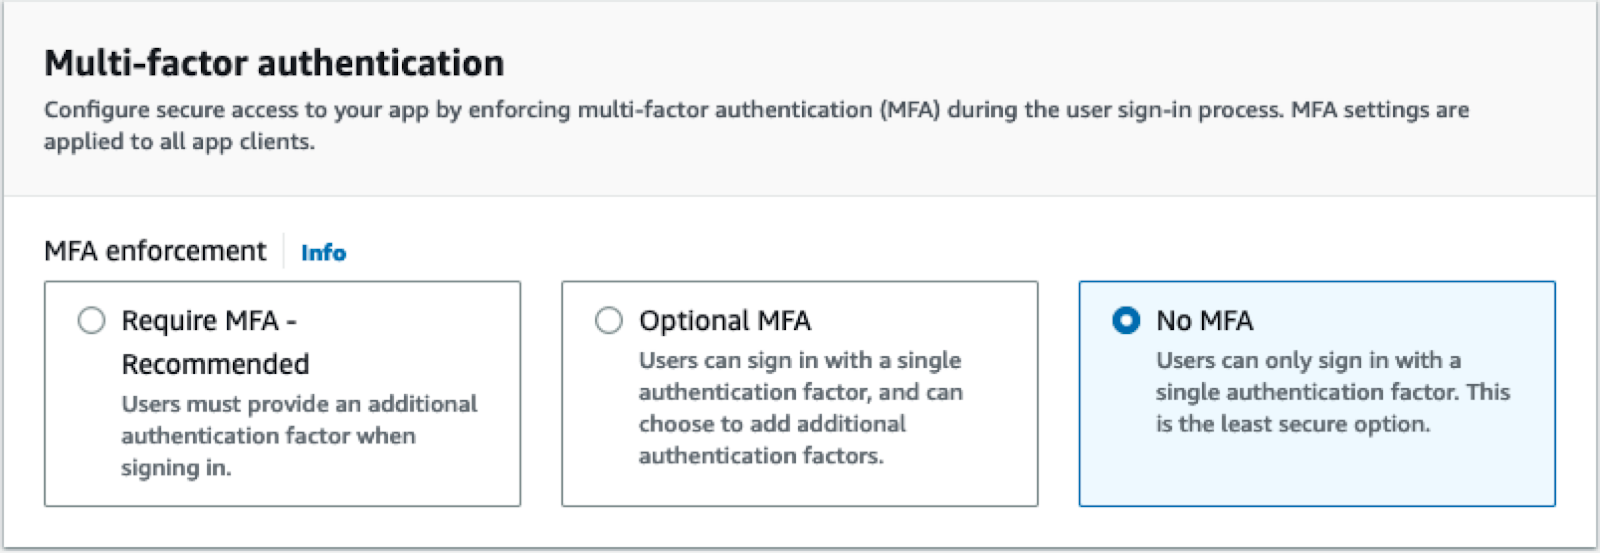
Accept the defaults for the rest of this page and click Next.
On the next page, accept all the default options for self-service sign-up, attribute verification, and required attributes. Click Next.
You will need to configure how Cognito will send emails for verification. In a production application, use the default option for sending emails via Amazon SES. Amazon SES has additional setup procedures to have your account fully set up. For this test application, since you will not have many users signing up, you can switch the email delivery to Cognito emails. Using Cognito avoids the setup procedure for SES, but your account is limited to 50 emails per day.

Next, you will configure permissions for Cognito to send SMS messages for your application. AWS grants permissions to services via Identity and Access Management (IAM) Roles. This step is required even if you are not currently sending SMS messages through Cognito. Select the option to "Create a new IAM role" and provide a name for your IAM role to be created.
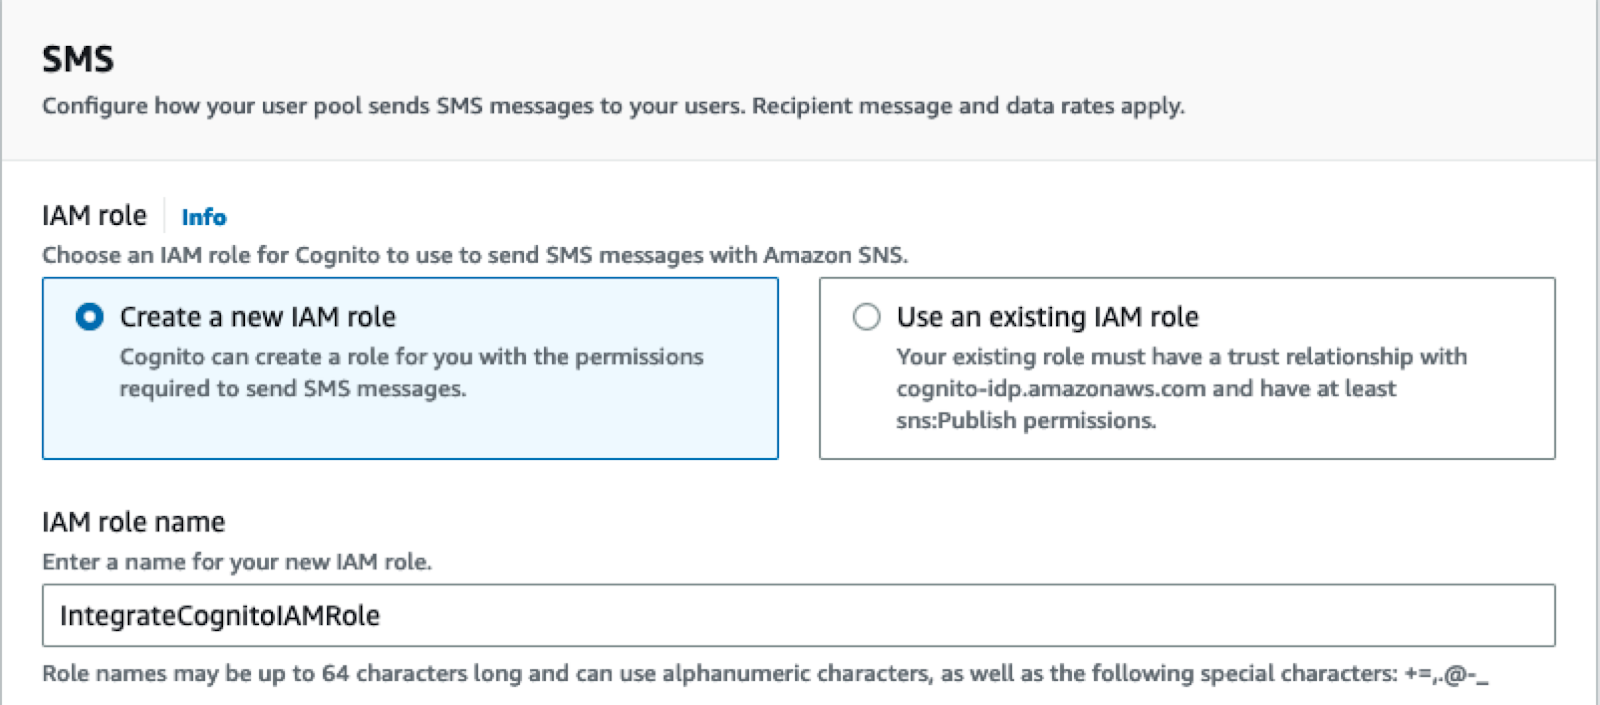
Give your role a name that aligns with your application name, or user pool name, so that you can find the role later to clean up. Click Next to continue.
On the "Integrate your app" setup page, you will configure the integration for your application. Provide a name for your user pool. To log in via Cognito you need to present the users with a login user interface. You can choose to create the UI yourself, or Cognito can provide you with a hosted UI. For this blog post, you will select Use the Cognito Hosted UI. Next, enter a unique Cognito domain name for your login page.
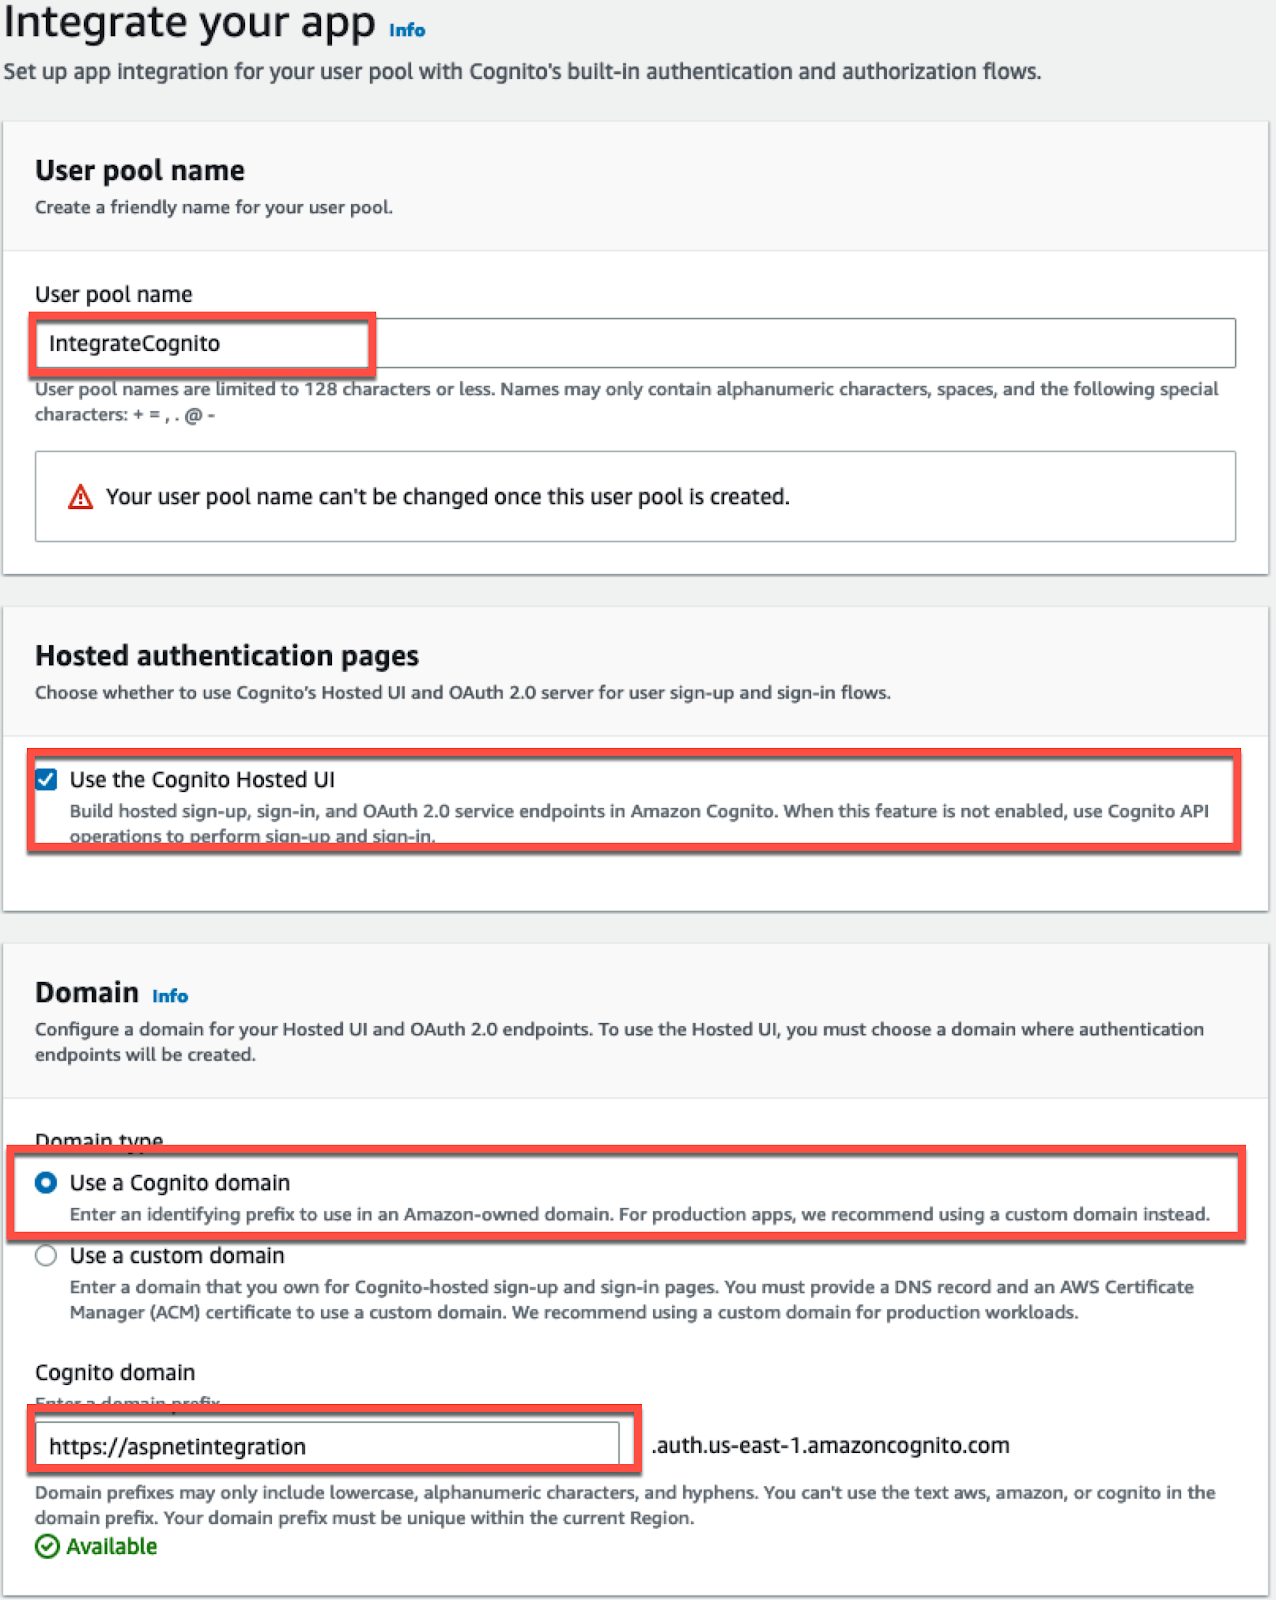
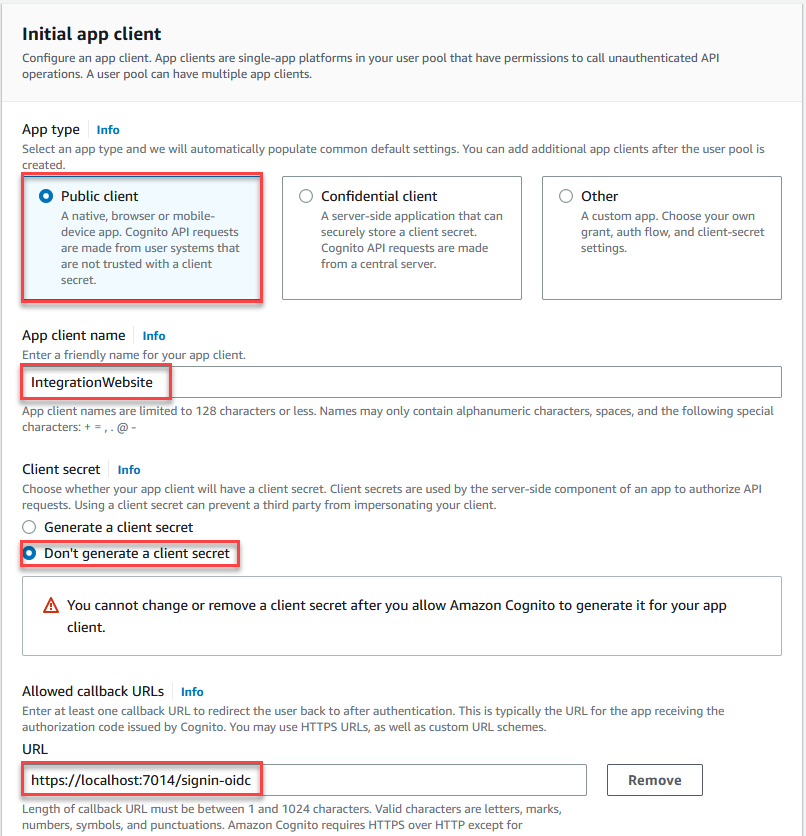
You can connect multiple applications to a single Cognito user pool, allowing users to share the same credentials across multiple related applications. At this point in the setup process, you will create the initial application client for your web page. You can configure additional client applications later, in the Cognito console, by editing your User Pool.
Since your application will be a public web page, select the option for a Public client. Provide your application a name "IntegrationWebsite". Accept the default option "Don’t generate a client secret". For "Allowed callback URLs" enter the localhost HTTPS URL that your application is using that you noted earlier, and add "/signin-oidc" to the URL.
Expand the Advanced app client settings section in the creation UI. Scroll down to the OpenID Connect scopes section. Click the down arrow to select the Profile scope, adding it to your configuration.
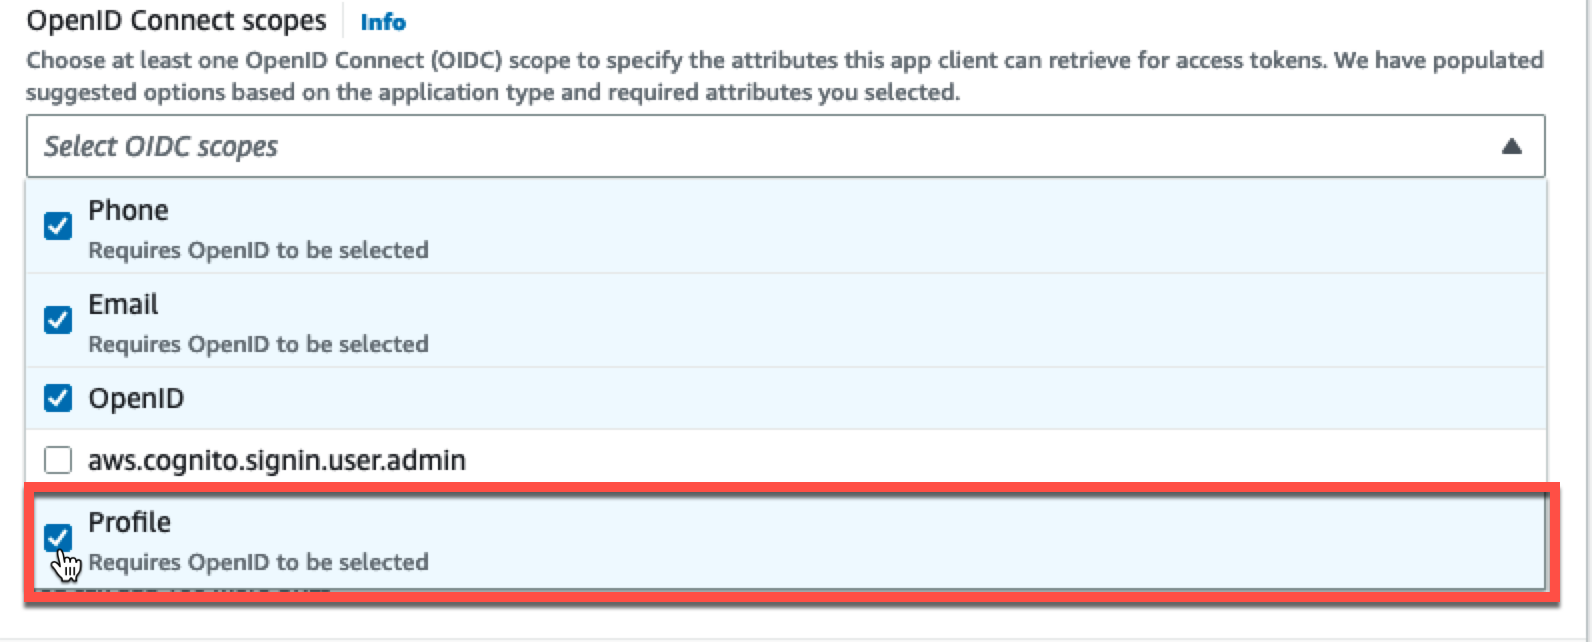
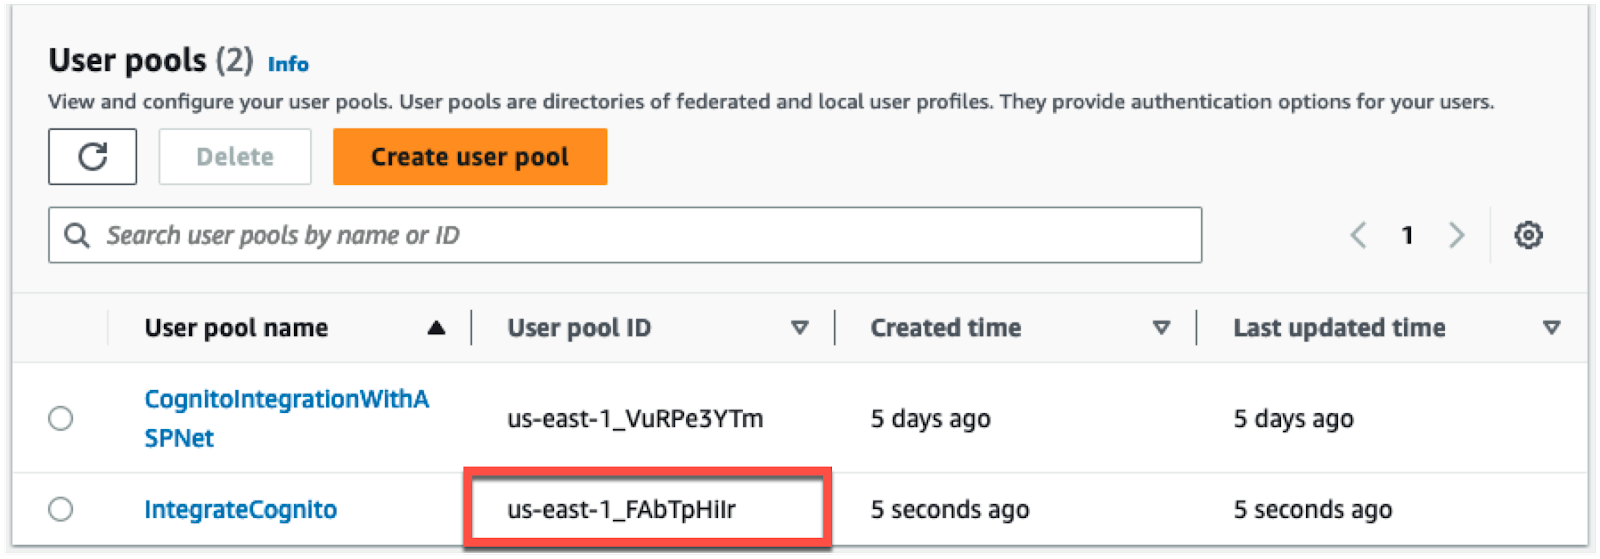
Click Next. You will now see a confirmation page for your user pool. Click the Create user pool button to complete the creation process. When Cognito finishes creating your user pool, you will return to the list of user pools in your account. Note down the User pool ID then click on the name to open the user pool so that you can copy the remaining values you need to integrate Cognito with your application.
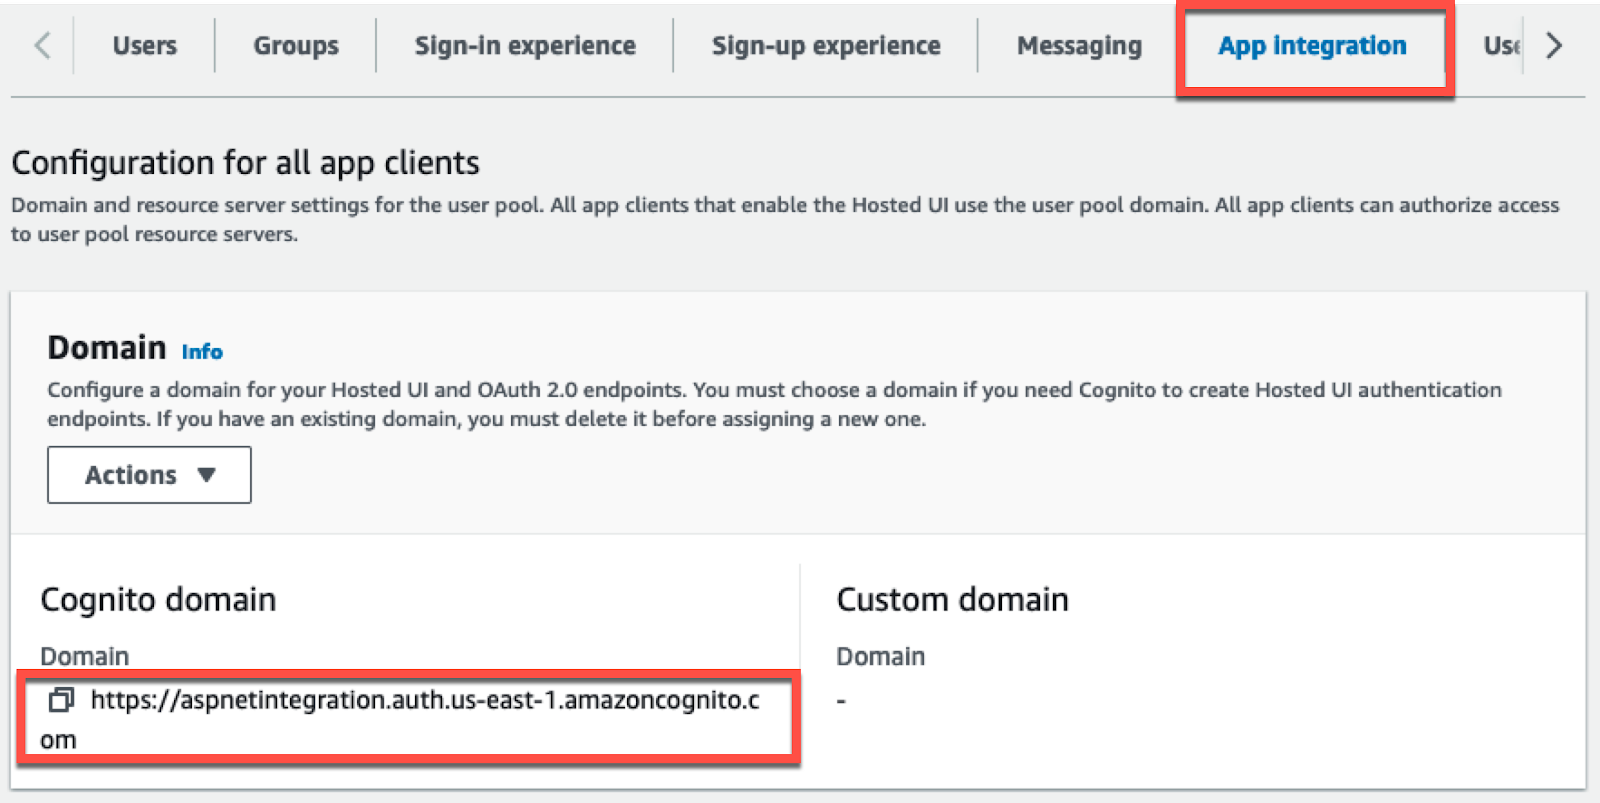
Click on App Integration. Note the Cognito Domain for your user pool.
Scroll to the bottom of the page and find your configured app client. Note the Client ID for your web page.

Integrate Amazon Cognito
Finally, you will integrate the new Cognito User Pool with your ASP.NET Core app. You will accomplish the integration using Open ID Connect. Add the OpenIdConnect NuGet package using the .NET CLI:
Then, open the project in your preferred IDE, and add the following Cognito configuration to your project’s appsettings.json file.
The JSON contains placeholders you should replace with the values you noted in the previous section.
| [Client_ID] | The application Client ID for your web app. E.g. ‘3ea1pnudn4rhqc1q8n6fvd58tr’ |
|---|---|
| [Region] | The region that your User Pool was created in. E.g. ‘us-east-1’ |
| [User_Pool_ID] | The User pool ID. E.g. ‘us-east-1_FAbTpHiIr’ |
| [Cognito_Domain] | The custom Cognito domain created for your user pool. E.g. ‘https://aspnetintegration.auth.us-east-1.amazoncognito.com’ |
Open your Program.cs file and make the following modifications.
Add the highlighted code:
Then, add the following line before app.UseAuthorization();:
Next, you will add a controller to your application that requires authentication. Create a new file, Controllers/AuthenticatedController.cs, with the following code for your new controller:
After creating the controller, you need to add a view for your index action. Create a file at Views/Authenticated/Index.cshtml and add the following Razor code:
This completes the code necessary to get Cognito integrated with your website. You can now test the integration.
Test Authentication
Start your application (with HTTPS) using your IDE or the .NET CLI:
Once the application is running, click into the address bar and browse to the /Authenticated path. This will force your application to navigate to the AuthenticatedController that requires authentication because of the [Authorize] attribute.

Once you have updated the URL in the browser, you will be automatically redirected to the Cognito hosted UI.
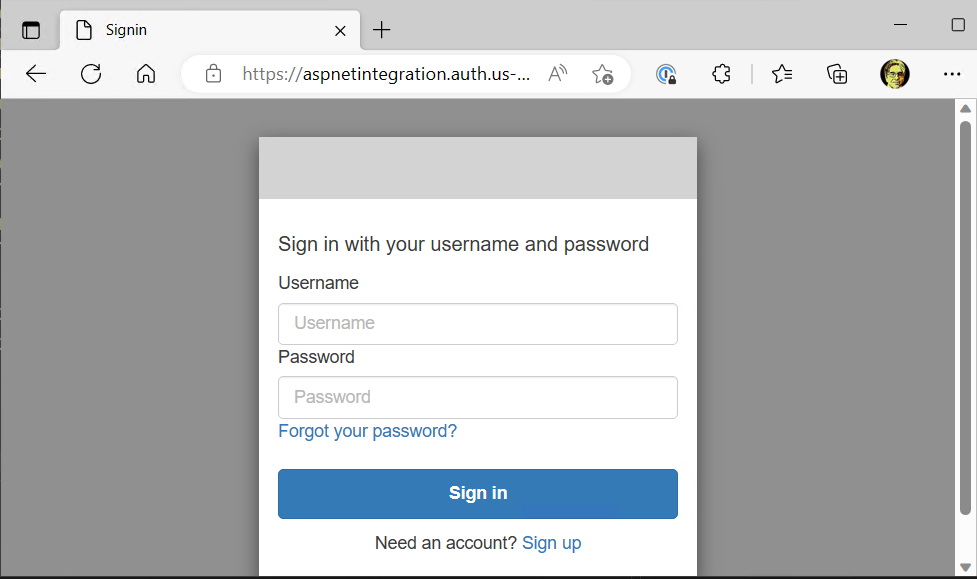
The Hosted UI contains all of the functionality you would expect from a user management perspective. You can log into your website if you have a valid account. There is self-service password recovery for users who have forgotten their password.
Click the Sign up link to go through the process of creating a user account. Provide your preferred username, email, and password, then click Sign Up.
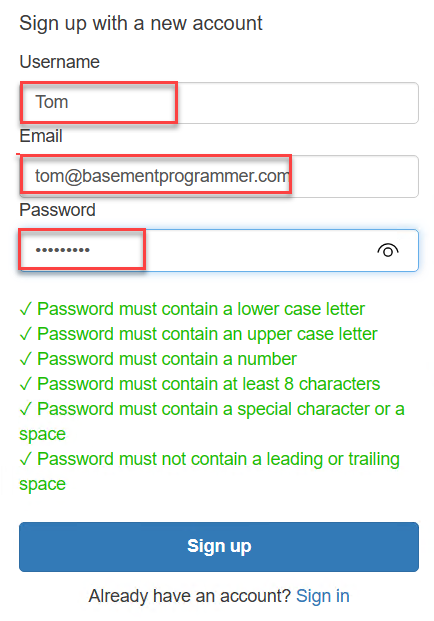
Once you click the Sign up button, you will be prompted to verify your email address. The confirmation code will be sent to the email address provided at registration. Find the verification code in your email inbox and enter it into the Cognito Hosted UI.
Finally, you will be redirected to the page that requires authentication.
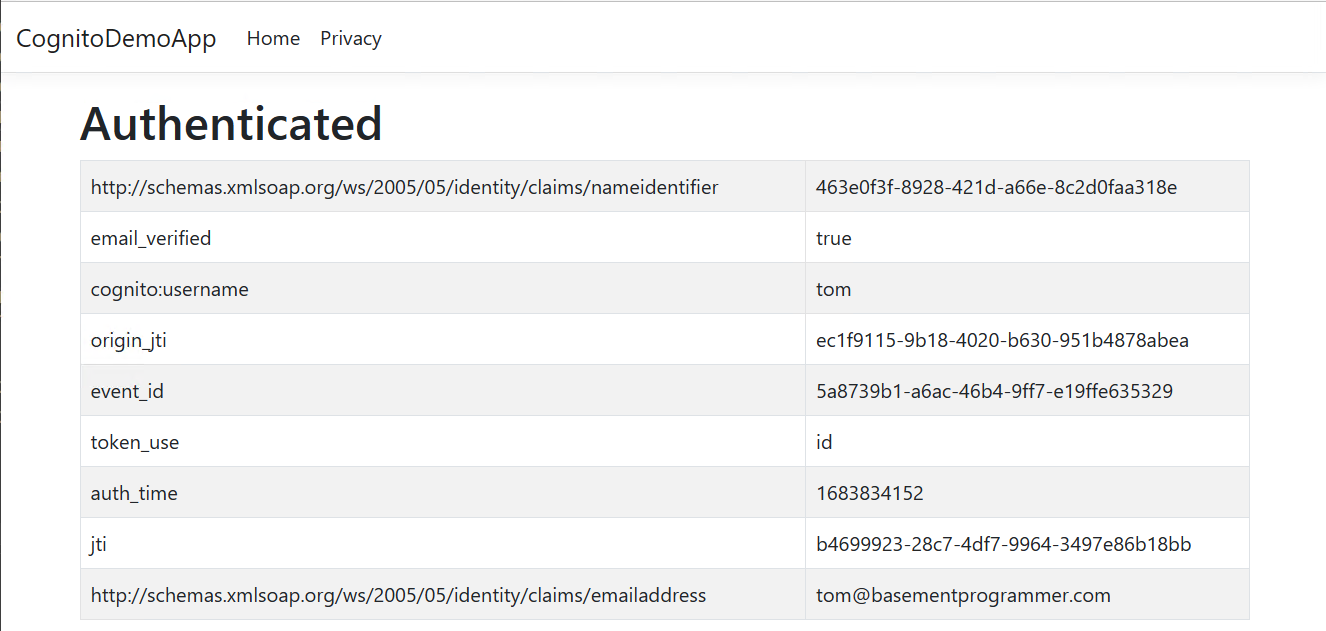
The page will list all of the attributes (also called claims) for the user that are stored in Cognito.
You can view the user accounts that have been created for your application in the Cognito console.

Clean up
Following this blog post, you have created a Cognito User Pool. You should delete this from your account when no longer needed. As part of the user pool creation, you will have created an IAM user role for Cognito to use in order to send text messages, delete that role in the IAM console.
Conclusion
By following this blog post, you were able to integrate Cognito authentication into an ASP.NET Core application. You can now follow the same process to integrate Cognito with your own application. You can choose to either use the user pool you created in this blog post or create a new user pool. If you choose to continue using the same user pool, you will want to make some of the suggested changes, like enabling Multi-Factor Authentication and configuring SES in your account.
Want to keep learning about .NET and AWS? Check out this tutorial on how to respond to phone calls and SMS's using AWS Lambda and .NET.
Tom Moore has been developing .NET software since the early betas of the .NET Framework. Tom speaks at user groups and events talking about developer topics. He also runs the Basement Programmer Podcast. You can keep up with Tom’s other content on https://basementprogrammer.com and on Twitter as @BasementProgra1
Related Posts
Related Resources
Twilio Docs
From APIs to SDKs to sample apps
API reference documentation, SDKs, helper libraries, quickstarts, and tutorials for your language and platform.
Resource Center
The latest ebooks, industry reports, and webinars
Learn from customer engagement experts to improve your own communication.
Ahoy
Twilio's developer community hub
Best practices, code samples, and inspiration to build communications and digital engagement experiences.


