Build a Video Chat Application with Python, JavaScript and Twilio Programmable Video
Time to read:
August 26, 2026
Written by
Reviewed by
Video chat has become a core part of how we work, learn, and get care. Telehealth visits, remote financial advice, online tutoring, and distributed teams all lean on real-time video, and there is a lot to be said for embedding it directly into your own application instead of sending people out to a third-party tool.
In this article we are going to look at a video conferencing solution, but instead of turning to a third-party system we are going to take the do-it-yourself approach and build our own. Our system is going to run on modern desktop and mobile web browsers, so participants will not need to download or install any software on their computers. The server-side portion of the project is going to use Python and the Flask framework, and the client-side is going to be built in vanilla JavaScript, with some HTML and CSS sprinkled in the mix for good measure. On top of video we will also add text chat, powered by Twilio Conversations, and screen sharing.
If you are worried that this is going to be a long, difficult and obscure tutorial let me set your mind at rest. The magic that will allow us to build this project comes from the Twilio Programmable Video service, which does the heavy lifting.
Below you can see a test call in which I was connected with my laptop and my mobile phone.
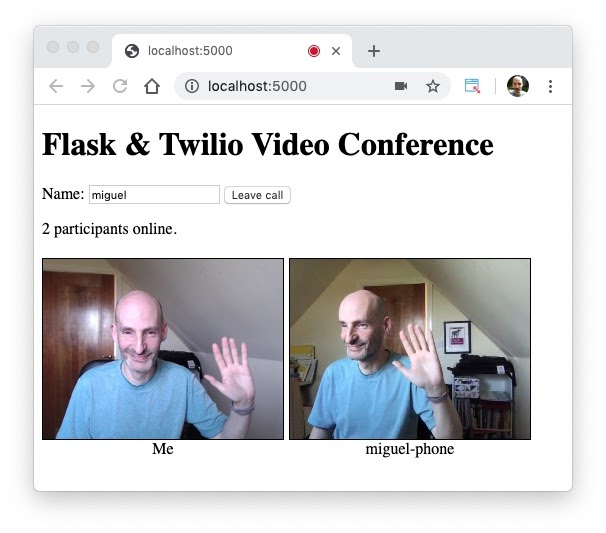
This article goes over the implementation of the project in detail, so that you can follow along and build it on your computer. If you are interested in downloading the complete project instead of building it step-by-step, you can find it in this GitHub repository: https://github.com/donaltoomey/flask-twilio-video.
Tutorial requirements
To build the project you will need:
- Python 3.11 or newer. If your operating system does not provide a Python interpreter, you can go to python.org to download an installer.
- A Twilio account. If you are new to Twilio get your free account now!
- A web browser that is compatible with the Twilio Programmable Video JavaScript library (see below for a list of them). Note that this requirement also applies to the users you intend to invite to use this application once built.
- ngrok. We will use this handy utility to connect the Flask application running on your system to a public URL that Twilio can connect to. This is necessary for the development version of the application because your computer is likely behind a router or firewall, so it isn’t directly reachable on the Internet. If you don’t have ngrok installed, you can download a copy for Windows, MacOS or Linux.
Supported web browsers
Since the core video and audio functionality of this project is provided by Twilio Programmable Video, you have to use a web browser that is supported by this service. Here is the current list of supported browsers:
- Android: Chrome and Firefox
- iOS: Safari
- Linux: Chrome and Firefox
- MacOS: Chrome, Firefox, Safari and Edge
- Windows: Chrome, Firefox and Edge
Check the Programmable Video documentation for the latest supported web browser list.
Project structure
Let’s begin by creating the directory where we will store our project files. Open a terminal window, find a suitable parent directory and then enter the following commands:
Following the most basic Flask application structure, we’ll now create two sub-directories, static and templates to store the files that will be served to the client.
Setting up your Twilio account
Log in to your Twilio account to access the Console. In this page you can see the “Account SID” assigned to your account. This is important, as it identifies your account and is used for authenticating requests to the Twilio API.
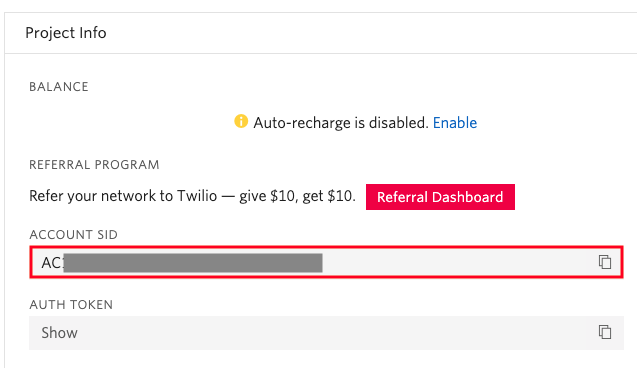
Because we are going to need the Account SID later, click the “Copy to Clipboard” button on the right side. Then open a new file named .env in your text editor (note the leading dot) and write the following contents to it, carefully pasting the SID where indicated:
The Programmable Video service also requires a Twilio API Key for authentication, so in this step you will add one to your Twilio account. To begin, navigate to the API Keys section of the Twilio Console.
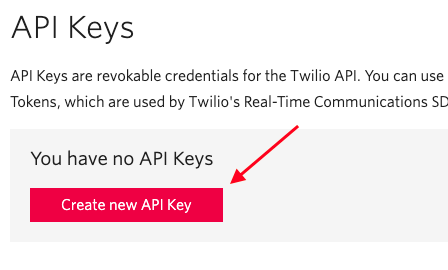
If you’ve never created an API Key before, you will see a “Create new API Key” button. If you already have one or more API Keys created, you will instead see a red “+” button to add one more. Either way, click to create a new API Key.
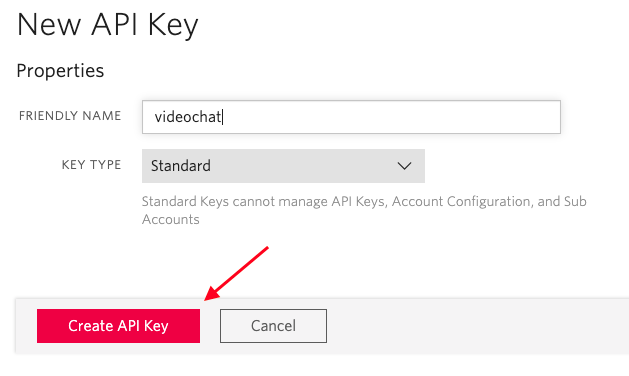
Enter videochat as the name of the key (or any name you like), leave the key type as “Standard” and then click the “Create API Key” button.
Now you will be presented with the details of your newly created API Key. The “SID” and “SECRET” values are used for authentication along with the Account SID value that we saved earlier.
Open the .env file again in your text editor, and add two more lines to it to record the details of your API key:
Once you have your API key safely written to the .env file you can leave the API Keys page. Note that if you ever lose your API key secret you will need to generate a new key.
The information contained in your .env file is private. Make sure you don’t share this file with anyone. If you plan on storing your project under source control it would be a good idea to configure this file so that it is ignored, because you do not want to ever commit this file by mistake.
Create a Python virtual environment
Following best practices, we are going to create a virtual environment where we will install our Python dependencies.
If you are using a Unix or MacOS system, open a terminal and enter the following commands to do the tasks described above:
For those of you following the tutorial on Windows, enter the following commands in a command prompt window:
The last command uses pip, the Python package installer, to install the three Python packages that we are going to use in this project, which are:
- The Twilio Python Helper library, to work with the Twilio APIs
- The Flask framework, to create the web application
- Python-dotenv, to import the contents of our .env file as environment variables
For your reference, at the time this tutorial was released these were the versions of the above packages and their dependencies:
Creating a web server
Our project is going to be designed as a single page application. It will be driven by a web server that will serve the HTML, CSS and JavaScript files to clients, as well as respond to asynchronous requests issued from the JavaScript code running in the browser.
We'll start with the web server since it is such a core piece of the project. Once we have the web server running we’ll start adding all the other pieces that we need.
As mentioned in the requirements section, we will be using the Flask framework to implement the logic in our web server. Since this is going to be a simple project we will code the entire server in a single file named app.py.
Below you can see the first version of our web server. Copy the code into a app.py file in the project directory.
The app variable is called the “application instance”. Its purpose is to provide the support functions we need to implement our web server. We use the app.route decorator to define a mapping between URLs and Python functions. In this particular example, when a client requests the root URL for our server, Flask will run our index() function and expect it will provide the response. The implementation of our index() function renders a index.html file that we are yet to write. This file is going to contain the HTML definition of the main and only web page of our video chat application.
Even though it is still very early in the life of our project, we are ready to start the web server.
You should see something like the following output once the server starts:
At this point you have the web server running and ready to receive requests. We have also enabled Flask’s debug mode, which will trigger the web server to restart itself whenever changes are made to the application, so you can now leave this terminal window alone while we begin to code the components of our project.
If you try to connect to the application from your web browser you will receive a “template not found” error, because we haven’t yet written the index.html file referenced by our main and only route. We will write this file in the next section and then we will have a first running version of the application.
Application page layout
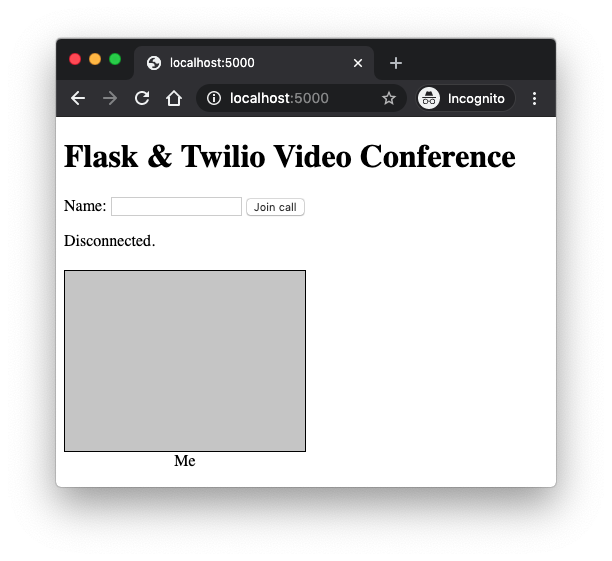
Our page design is going to be very simple. We’ll include a title, a web form where the user can enter their name and join or leave video calls, buttons to share the screen and toggle the chat panel, and then the content area, where the video streams for all the participants will be shown alongside a chat panel. For now we’ll add a placeholder video for ourselves.
Here is how the page will look:
To create this page we need a combination of HTML and CSS. Below you can see the templates/index.html file.
The <head> section of this file references a styles.css file. We are using the url_for() function from Flask to generate the correct URL for it. This is nice, because all we need to do is put the file in the static directory and let Flask generate the URL. If you were wondering what is the difference between a template file and a static file this is exactly it; template files can have placeholders that are generated dynamically when the render_template() function you’ve seen above runs.
The <body> section of the page defines the following elements:
- An
<h1>title - A
<form>element with name field and three buttons: join/leave, share screen and toggle chat. The last two start out disabled and are enabled once you are connected. - A
<p>element where we’ll show connection status and participant count A <div id="root"> that holds two panels side by side: a container <div> with one participant identified with the name local where we'll show our own video feed, and a chat <div> for the text chat. More participants will be added dynamically to the container as they join the video call.
Each participant's <div> contains an empty <div> where the video will be displayed and a second <div> where we'll display the name.
Links to the JavaScript files that we'll need: the official releases of the twilio-video.js and twilio-conversations.js libraries and a app.js that we will write soon.
The contents of the static/styles.css file are below:
These CSS definitions lay out the page as a two-column grid when the chat panel is visible (the withChat class), and as a single full-width video area when it is not. The video container is structured as a flexbox so that participants are automatically added to the right and wrapped to the next line as needed according to the size of the browser window. The .participant div video:not(.trackZoomed) definition constrains the size of each video to 240x180 pixels. We also have a lighter background and a black border, just so that we can see a placeholder for the video window. The Zoomed and Hidden helper classes let us expand a single tile to fill the screen when it is clicked. Feel free to adjust these options to your liking.
With the HTML and CSS files in place, the server should be able to respond to your web browser and show the basic page layout you’ve seen above. While the server is running, open your web browser and type http://localhost:5000 on the address bar to see the first version of the application running.
Displaying your own video feed
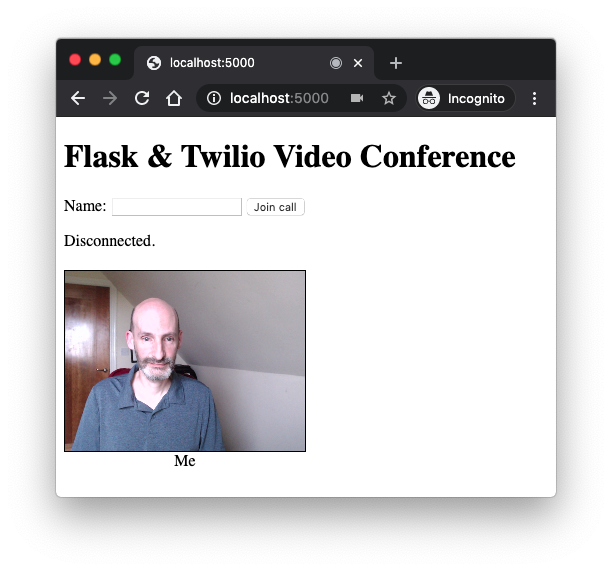
If you looked in the browser’s network log you likely noticed that the browser tried to load the app.js file that we reference at the bottom of index.html and this failed because we don’t have that file in our project yet. We are now going to write our first function in this file to add our own video feed to the page.
Create the file and add the following code to static/app.js:
We have a number of global variables declared at the top. Most of them are for convenient access to elements in the page, such as the name entry field, the submit button in our web form and so on. The connected boolean tracks the state of the connection, mainly to help decide if a button click needs to connect or disconnect. The room variable will hold the video chat room object once we have it, and the chat, conv and screenTrack variables will hold the Conversations client, the conversation, and the screen-sharing track that we will add later.
The addLocalVideo() function uses the Twilio Programmable Video JavaScript library to create a local video track. The createLocalVideoTrack() function from the library is asynchronous and returns a promise, so it can be used with await.
The return value is a LocalVideoTrack object. We use its attach() method to add the video element to the first <div> child of the local element. In case this is confusing, let’s review the structure of the local participant from the index.html file:
You can see here that the local element has two <div> elements as children. The first is empty, and this is the element to which we are attaching the video. The second <div> is for the label that appears below the video.
You can refresh the page in the browser and you should have your video displayed. Note that most browsers will ask for your permission before enabling the camera.
Generating an access token for a participant
Twilio takes security very seriously. Before users can join a video call, the application must verify the user is allowed and generate an access token for them. The tokens must be generated in the Python server, as the secrets we stored in the .env file are required for this process.
In a real-world application, this is the place where the application would authenticate the user wanting to join the call. The connection request in such an application would likely include a password, authentication cookie or some other form of identification in addition to the user’s name. An access token to the video chat room would only be generated after the user requesting access to the video call is properly authenticated.
Because we are also adding text chat, the token we generate needs to grant access to two Twilio products: Programmable Video and Conversations. The updated app.py file is shown below.
As mentioned above, we need the three secrets we stored in the .env file earlier, so we call the load_dotenv() function from the python-dotenv package to import those secrets, and then we assign them to variables for convenience. We also create a Twilio REST Client, which we'll use to manage the conversation used for text chat.
The get_chatroom() helper looks for a Conversation with the friendly name "My Room" and returns it, creating one if it doesn't exist yet. This way everyone who joins shares the same conversation.
The token generation happens in a new route that we are going to invoke from the JavaScript side, attached to the /login URL. The function will receive the username in a JSON payload. Because this is a simple application, the only authentication we are going to perform on the user is that the username is not empty. If validation fails, a 401 error is returned to indicate that the user does not have access to the video call. As discussed above, a real-world application would implement a more thorough authentication mechanism here.
Before minting the token we add the user as a participant of the conversation, so they can send and receive chat messages. Twilio returns a 409 error if the user is already a participant, which we deliberately ignore so that reconnecting is not treated as an error.
The token is generated using the AccessToken helper class from the Twilio Python Helper library. We attach a video grant for a video room called “My Room”. A more complex application can work with more than one video room and decide which room or rooms this user can enter.
The token, along with the conversation SID, is returned in a JSON payload in the format:
Handling the connection form
Next we are going to implement the handling of the connection form in the web page. The participant will enter their name and then click the “Join call” button. Once the connection is established the same button will be used to disconnect from the call.
To manage the form button we have to attach a handler for the click event. The updated static/app.js is shown below.
The function is somewhat long, but it mostly deals with validating that the user entered a name and updating how the buttons look as the state of the connection changes. If you filter out the form management you can see that the actual connection and disconnection are handled by two functions connect() and disconnect() that we are going to write in the following sections. Notice that once we are connected, the Share screen button is enabled.
Connecting to a video chat room
We now reach the most important (and also most complex!) part of our application. To connect a user to the video chat room the JavaScript application running in the web browser must perform two operations in sequence. First, the client needs to contact the web server and request an access token for the user, and then once the token is received, the client has to call the twilio-video library with this token to make the connection. Add the connect() function shown below after connectButtonHandler() in app.js.
The connection logic has two steps as indicated above. First we use the browser’s fetch() function to send a request to the /login route in the Flask application that we created above.
Then, we decode the JSON payload returned in the response into the data variable, and call the connect() function from the twilio-video library passing our newly acquired token.
The video connection call is also a promise, so once again we await it. The return value is a room object, which represents the video room and is stored in a global variable, so that the rest of the application can access this room when needed.
The room.participants array contains the list of people already in the call. For each of these we have to add a <div> section that shows the video and the name. This is all encapsulated in the participantConnected() function, so we invoke it for each participant. We also want any future participants to be handled in the same way, so we set up a handler for the participantConnected event pointing to the same function. The participantDisconnected event is also important, as we’d want to remove any participants that leave the call, so we set up a handler for this event as well.
At this point we are fully connected, so we can indicate that in the connected boolean variable. The final action we take is to update the <p> element that shows the connection status to show the participant count. This is done in a separate function because we’ll need to do this in several places. The function updates the text of the element based on the length of the room.participants array. Add the implementation of this function to static/app.js.
Note that the room.participants array includes every participant except ourselves, so the total number of people in a call is always one more than the size of the list.
Connecting and disconnecting participants
You saw in the previous section that when a participant joins the call we call the participantConnected handler. This function needs to create a new <div> inside the container element, following the same structure we used for the local element that shows our own video stream.
Below you can see the implementation of the participantConnected() function along with the participantDisconnected() counterpart and a few auxiliary functions, all of which also goes in static/app.js.
The participantConnected() callback receives a Participant object from the twilio-video library. The two important properties of this object are participant.sid and participant.identity, which are a unique session identifier and name respectively. The identity attribute comes directly from the token we generated. Recall that we passed identity=username in our Python token generation function.
The HTML structure for a participant is similar to the one we used for the local video. The big difference is that we now need to create this structure dynamically using the browser’s DOM API. This is the markup that we need to create for each participant:
At the start of the participantConnected() function you can see that we create a participantDiv, to which we add a tracksDiv and a labelDiv as children. We finally add the participantDiv as a child of container, which is the top-level <div> element where we have all the participants of the call.
The second part of the function deals with attaching the video and audio tracks to the tracksDiv element we just created. We run a loop through all the tracks the participants export, and following the basic usage shown in the library’s documentation we attach those to which we are subscribed. The actual track attachment is handled in a trackSubscribed() auxiliary function that is defined right below.
In more advanced usages of this library a participant can dynamically add or remove tracks during a call (for example if they were to turn off their video temporarily, mute their audio, or even start sharing their screen). Because we want to respond to all those track changes, we also create event handlers for the trackSubscribed and trackUnsubscribed events, which use the attach() and detach() methods of the track object to add and remove the HTML elements that carry the feeds.
Disconnecting from the chat room
The counterpart of the connect() function is disconnect(), which has to restore the state of the page to how it was previous to connecting. This is a lot simpler, as it mostly involves removing all the children of the container element except the first one, which is our local video stream.
We disconnect from the video room and, if a chat client exists, gracefully shut it down. As you can see here we remove all children of the container element starting from the end and until we come upon the <div> with the id local, which is the one that we created statically in the index.html page. We also use the opportunity to update our connected global variable, change the text of the connect button and refresh the <p> element to show a “Disconnected” message.
Zooming a participant's video
Earlier we attached a click handler to every video element that calls zoomTrack(). This lets a user click any video to expand it to fill the window, hiding the others, and click again to return to the grid. Add the zoomTrack() function to static/app.js:
When a video is clicked, we add the trackZoomed class to it and the participantZoomed class to its tile, while hiding all the other tiles with participantHidden. Clicking again removes those classes to restore the normal grid. These classes map to the CSS rules we defined earlier.
Sharing your screen
Twilio Programmable Video lets a participant publish more than one video track, which is exactly what we need to share a screen: we capture the screen as a video track and publish it into the room alongside the camera. Add the shareScreenHandler() function to static/app.js:
The handler toggles screen sharing on and off. To start sharing, we call the browser's navigator.mediaDevices.getDisplayMedia() function, which prompts the user to pick a screen or window and returns a media stream. We wrap the stream's track in a Twilio.Video.LocalVideoTrack and publish it to the room with room.localParticipant.publishTrack(), so all other participants see it as an additional video track. We also listen for the track's onended event, which fires if the user stops sharing through the browser's own controls, so we can toggle back cleanly. To stop sharing, we unpublish and stop the track.
Adding text chat
Now we'll wire up the text chat using the Twilio Conversations JavaScript SDK. Recall that our server already added the user as a participant of the "My Room" conversation and returned its SID along with the token. On the client, we create a Conversations client, look up that conversation, render its message history, and listen for new messages. Add the connectChat() function and its helpers to static/app.js:
The connectChat() function creates the Conversations client from the same access token we used for video. Once the client emits its initialized event, we look up our conversation by SID with getConversationBySid(), subscribe to its messageAdded event so incoming messages are appended to the chat panel, and load the existing message history with getMessages(). When everything is ready we enable the Toggle chat button. The addMessageToChat() helper appends a message to the chat panel and scrolls it into view, toggleChatHandler() shows and hides the chat panel by toggling the withChat class on the root element, and onChatInputKey() sends the contents of the input box as a new message when the user presses Enter.
Wiring up the event handlers
The last thing our app.js file needs is to run addLocalVideo() on load and attach all of our handlers to their respective elements. Add these lines at the very bottom of static/app.js:
This shows our own video feed as soon as the page loads, and connects the join/leave button, the share-screen button, the toggle-chat button, and the chat input box to the functions we wrote above.
Running your video chat server
If you started your web server in the early stages of this tutorial, make sure it is still running. If it isn’t running, start it one more time with the following command:
With the server running you can connect from the same computer by entering http://localhost:5000 on the address bar of your web browser. But of course, you very likely want to also connect from a second computer or a smartphone, or maybe even invite a friend to join your video chat. This requires one more step, because the server is only running internally on your computer and is not accessible from the Internet.
There are a few different ways to expose the server to the Internet. A quick and easy way to do this is to use ngrok, a handy utility that creates a tunnel between our locally running server and a public URL on the ngrok.io domain. If you don’t have ngrok installed you can download a copy for Windows, MacOS or Linux.
With the Flask server running, open a second terminal window and start ngrok as follows:
Your terminal will now show something similar to this screen:
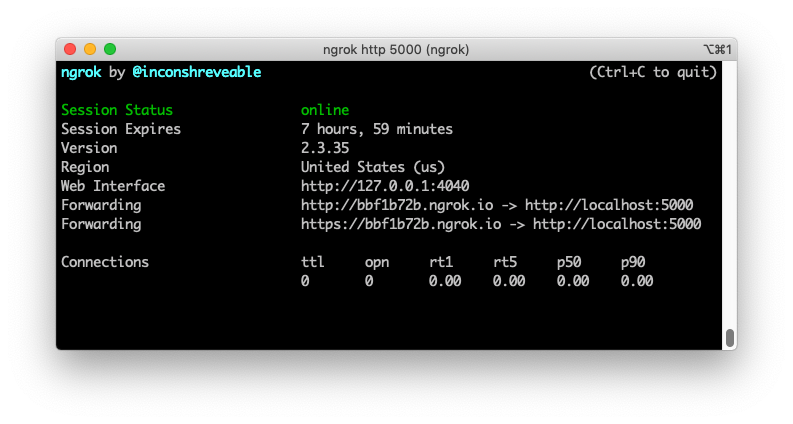
Find the Forwarding lines to see what is the public URL that ngrok assigned to your server. Use the one that starts with https://, since many browsers do not allow unencrypted sites to access the camera and the microphone. In the example above, the public URL is https://bbf1b72b.ngrok.io. Yours is going to be similar, but the first component of the domain is going to be different every time you start ngrok.
While having both the Flask server and ngrok running on your computer you can use the public https:// URL from ngrok to connect to your server from other computers and smartphones, so you are now ready to invite your friends to video chat with you! Open the app in two different browsers or devices, join with a different name in each, and you can try out all three features: a live video call, screen sharing (click Share screen), and text chat (click Toggle chat and type a message).
Note: each participant must join with a unique name. Twilio identifies participants by the identity in their token, so if two people join with the same name, the second connection replaces the first and they won't see each other.
Conclusion
I hope this was a fun and interesting tutorial. If you decide to use it as a base to build your own video chat project, you should know that the Twilio Programmable Video API has many more features that we haven’t explored, including the option to:
- record calls
- share custom data tracks
- and more.
I can’t wait to see what you build!
Additional resources

Related Resources
Twilio Docs
From APIs to SDKs to sample apps
API reference documentation, SDKs, helper libraries, quickstarts, and tutorials for your language and platform.
Resource Center
The latest ebooks, industry reports, and webinars
Learn from customer engagement experts to improve your own communication.
Ahoy
Twilio's developer community hub
Best practices, code samples, and inspiration to build communications and digital engagement experiences.