Build an AI Voice Assistant with Twilio Voice, OpenAI’s Realtime API, and Python
Time to read:
August 28, 2025
Written by
Reviewed by
Build an AI Voice Assistant with Twilio Voice, OpenAI’s Realtime API, and Python
We're so excited for our friends at OpenAI, who launched their awesome Realtime API to generally availability. Exposing the multimodal capabilities of their GPT Realtime model, the Realtime API enables direct Speech to Speech, or S2S, functionality.
S2S models promise to improve latency, partially by avoiding a speech-to-text (SST) or text-to-speech (TTS) step. That means we can build applications that offer fluid AI conversations that feel just like human interaction – and we’re thrilled to provide one in this launch integration in collaboration with OpenAI.
In this tutorial, I’ll show you how to build an AI voice assistant using Twilio Voice and the OpenAI Realtime API, powered by Python and the FastAPI web framework. We’ll set up a Twilio Media Stream server to receive audio from a phone call, process it using the OpenAI Realtime API, and then send the AI’s audio response back to Twilio and on to the caller. Once you build it, you’ll be able to talk to your assistant, ask it for facts and jokes, and whatever else you can imagine!
Let’s build it.
Prerequisites
To follow along with this tutorial, you will first need:
- Python 3.9+. (I used version 3.9.13 to build the tutorial)
- A Twilio account. If you don’t have one, you can sign up for a free trial here.
- A Twilio number with Voice capabilities. Here are instructions to purchase a phone number.
- An OpenAI account and an OpenAI API Key. You can sign up here.
- OpenAI Realtime API access. Check here for more information.
- (Optional) ngrok or another tunneling solution to expose your local server to the internet for testing. Download ngrok here.
Ensure you have the above ready before moving forward – then, let’s go…
Set up the Realtime API speech-to-speech Python project
In these next steps, I’ll walk through setting up our project, installing the dependencies we’ll need, and writing the server code. I’ll go step by step, and try to explain the interesting parts.
Alternatively, you can find our repository here. We also have a video version of the tutorial you can find here:
Step 1: Initialize the project
First, let's set up a new Python project and create a virtual environment so we don’t clutter up things on your development machine. On your command line, enter the following:
Step 2: Install dependencies
Next, we need to install the required dependencies for the project. Run this command – I’ll explain in a second:
We’ll need the websockets library to handle websockets with Twilio and OpenAI, python-dotenv to read our environment variables, and twilio to structure our instructions to Twilio.
fastapi is the Python web framework I built this tutorial with – other popular choices in the Python community are Flask, Django, and Pyramid.
We’ll use uvicorn as our server. It’s a minimal server that’s great for asynchronous applications – as I think you’ll agree after testing this!
Step 3: Create the project files
Now we’ll create a file named main.py for our main code and server logic, and a .env file to store our OpenAI API Key. (You can learn more about this method in our Python Environment Variables post).
Step 3.1: Create the main.py File
Run this command:
Step 3.2: Create the .env File
First, create the .env file:
Then, using your text editor, open the file and add your OpenAI Realtime API key:
(Of course, please swap your key in where I wrote your_openai_api_key_here!)
Step 4: Write the Server Code
You’ve got your scaffolding ready now.
We'll build up the server code in multiple steps. Each step will include the relevant code, then I’ll do my best to provide a brief explanation of the trickier parts of the code.
Step 4.1: Import dependencies and load environment variables
At the top of the main.py file, we import the required modules and then set up and load the environment variables from our .env file.
Paste the following code at the top of your main.py:
Step 4.2: Define constants and initialize FastAPI
Next, we define constants for the system message, the AI response voice, and events to log. We also initialize the FastAPI app.
Here's what you should paste next in your file:
Here, the SYSTEM_MESSAGE configures the behavior and personality of the AI. Feel free to mix it up using your own instructions!
The VOICE constant controls the AI’s voice for responses. At launch, you can choose alloy (like I have here), echo, or shimmer.
The TEMPERATURE constant controls how random the AI's responses will be for a given prompt, where higher is more random.
Finally, LOG_EVENT_TYPES determines which events from the OpenAI API we want to log. See OpenAI’s Realtime API documentation for more details.
We also initialize a FastAPI application instance and check for the presence of the OpenAI API key.
Step 4.3: Define Routes for Incoming Calls and the Root Endpoint
Next, we define two routes: the root route to check if the server is running (we won’t use it in the final demo, but you might find it useful in testing to see signs of life - this is at the path /) and another route to handle incoming calls and return TwiML instructions to Twilio.
Paste this into main.py:
The /incoming-call route handles incoming calls from Twilio, responding with TwiML instructions, a special dialect of XML that lets Twilio know how to handle our call. We’re using the Twilio Python Helper library here to make the code simpler.
This particular TwiML response instructs the caller to wait, then tells Twilio to connect to our /media-stream WebSocket endpoint. Feel free to play with how it works.
Step 4.4: Handle WebSocket connections for Twilio Media Streams and OpenAI
In the next bit of code, we will set up the WebSocket route for Media Streams and connect to both the Twilio and OpenAI WebSockets. This code is long, so I'll explain some interesting things we’re doing right after the block.
Paste this code below the route definitions:
The /media-stream websocket endpoint will handle the connection from Twilio (during the phone call). After that, we do some work to proxy audio between the two websockets.
Connect to the OpenAI Realtime API
We establish a WebSocket connection to the OpenAI Realtime API:
websockets.connect(...): this code connects to the OpenAI Realtime API using the provided endpoint and headers, which include the OpenAI API key (see their documentation for more).send_session_update(openai_ws): This sends the initial session update configuration to OpenAI after establishing the connection. It’s where we pass some of the constants defined in the section above – but I’ll explain in the section below.
Proxy audio between Twilio and OpenAI
The receive_from_twilio coroutine listens for audio data from Twilio, processes it, and sends it to OpenAI. Its counterpart send_to_twilio listens for response.audio.delta events from OpenAI and sends them back to Twilio (logging other event types – the ones you control in the LOG_EVENT_TYPES constant – to the command line).
Step 4.5: Send Session Update to OpenAI
Finally, we define the function to send a session update to the OpenAI WebSocket. (This is what we called in the section above.)
Paste this at the end of your main.py:
This function sends the initial configuration for the OpenAI Realtime API session. I’m only showing you a few possible settings (see more, here). Here’s what’s happening:
- Turn Detection: Enables server-side Voice Activity Detection (VAD), which controls how the AI knows when to respond.
- Audio Formats: Specifies input and output audio formats. audio/pcmu is supported by Twilio.
- Voice: The AI VOICE we set in our app.
- Instructions: Sets the AI's behavioral instructions. You can change the
SYSTEM_MESSAGEin the constant section. See OpenAI's Realtime Prompt Guide for more details and best practices. - Output Modalities: Enables audio response capabilities.
Step 4.6: Prepare the server
Finally, we add the server's entry point to start the FastAPI server and listen on the specified port. Paste this at the end of main.py:
Step 5: Run the server
If you followed along properly, it’s time! Run the server with:
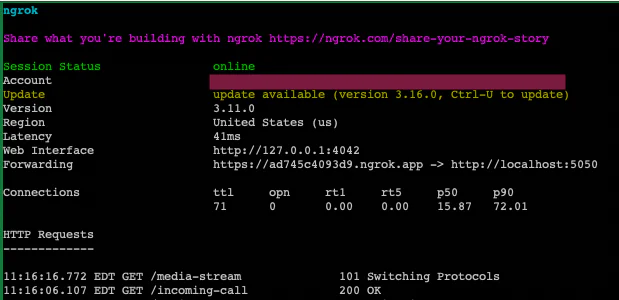
If everything is set up correctly, you should see a message similar to mine:
We’re getting really close now! Just a few more steps and you can place a phone call.
Finish your setup
Step 6: Use ngrok to expose your local server
Twilio needs instructions on how to handle incoming calls. For that it needs the TwiML we discussed above, but first it needs a public URL to reach your server where you’ll provide that TwiML!
Download and install ngrok if you haven’t yet, then run the following command. If you have changed the port from 5050, be sure to also update it here:
Here’s how mine looked after running the command:
Step 7: Configure Twilio
We’re so close now my fingers are heating up. It’s time to work on the Twilio side.
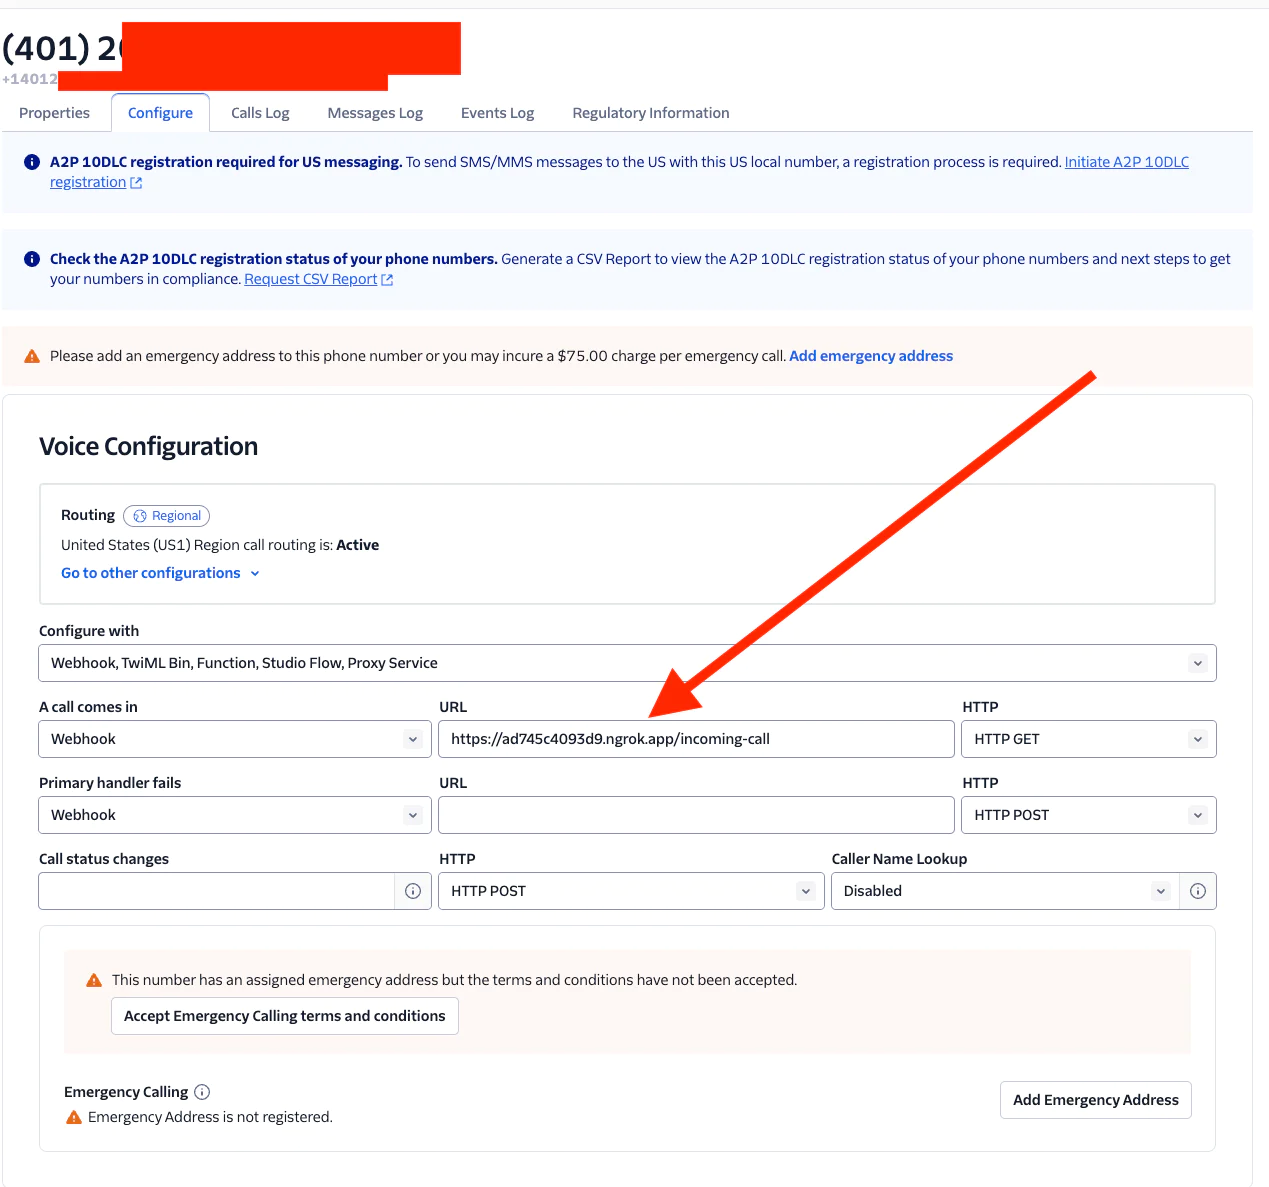
Open the Twilio Console, then find your Voice-enabled number.
Under Voice & Fax on that screen, set the A CALL COMES IN webhook to your ngrok URL (in the Forwarding line, ( https://ad745c4093d9.ngrok.app in my screenshot) appending /incoming-call. For example, in my case, I enter https://ad745c4093d9.ngrok.app/incoming-call.
Okay, hit Save. We’re ready!
Test your setup!
Make sure your ngrok session is still running and your server is up. Now, make a call to your Twilio number using a cell phone or landline.
The server should handle the call, deliver the introductory messages we added, and then connect the OpenAI Realtime API with the Twilio Media Stream WebSocket. Start talking – you should hear the AI's response in real-time! Have a great chat.
Common issues and troubleshooting
If your setup isn’t working (but your server is still running), check these points first:
- Is ngrok running? Ensure that the URL properly appears in the Voice Configuration under A Call Comes In.
- Are there Twilio errors? You can debug Twilio errors in a few ways - there’s more info in this article.
- Is there something in your server logs? Ensure that your server is running without errors.
- Is your code calling OpenAI correctly?
Conclusion
And there you have it – you just successfully built an interactive AI voice application using Twilio Voice and Media Streams and the OpenAI Realtime API in Python.You now have a low-latency, interactive voice assistant you can talk to anytime. You’re ready to add your business logic and guardrails, productize, and then scale this solution – and we can’t wait to see you do it.
Happy building!
Next step:
- Check out the Twilio documentation and OpenAI API documentation for more advanced features.
- See OpenAI’s documentation on concepts.
Paul Kamp is the Technical Editor-in-Chief of the Twilio Blog. He had a lot of fun talking to OpenAI’s Realtime API while building this tutorial – and even more fun letting his daughters talk. You can reach him at pkamp [at] twilio.com.

Related Resources
Twilio Docs
From APIs to SDKs to sample apps
API reference documentation, SDKs, helper libraries, quickstarts, and tutorials for your language and platform.
Resource Center
The latest ebooks, industry reports, and webinars
Learn from customer engagement experts to improve your own communication.
Ahoy
Twilio's developer community hub
Best practices, code samples, and inspiration to build communications and digital engagement experiences.