Build an AI Voice Assistant with Twilio Voice, OpenAI’s Realtime API, and Node.js
Time to read:
August 28, 2025
Written by
Reviewed by
Build an AI Voice Assistant with Twilio Voice, OpenAI’s Realtime API, and Node.js
We're so excited for our friends at OpenAI who released their Realtime API. The API opens up Speech to Speech (S2S) capabilities for their GPT Realtime multimodal model, which supports direct audio input and output – avoiding translating back and forth from text with a speech-to-text (SST) or text-to-speech (TTS) step.
What does that mean for you? S2S models improve latency – OpenAI's Realtime API unlocks fluid conversations that feel like real human dialog... as I'm sure you'll agree. That's why we're thrilled to provide this launch integration in collaboration with OpenAI.
In this tutorial, I’ll show you how to build an AI voice assistant using Twilio Voice and the OpenAI Realtime API, powered by Node.js. Once you build the tool, you’ll be able to talk to your assistant just as you would a human, and ask it for facts (or jokes!). Together, we’ll set up a Twilio Media Stream server to receive audio from a phone call, process it using the OpenAI Realtime API, and pass the AI’s response back to Twilio to keep the conversation going.
Buckle up – let's get started!
Prerequisites
To follow along with this tutorial, you will first need:
- Node.js 18+ (I used
18.20.4for this tutorial; you can download it from here) - A Twilio account. If you don’t have one yet, you can sign up for a free trial here.
- A Twilio number with Voice capabilities. Here are instructions to purchase a phone number.
- An OpenAI account and an OpenAI API Key. You can sign up here.
- OpenAI Realtime API access. Check here for more information.
- (Optional) ngrok or another tunneling solution to expose your local server to the internet for testing. Download ngrok here.
- A cell phone or landline that can make outgoing phone calls.
And with that, you can start the build!
Set up the Realtime API speech-to-speech Node project
In these next steps, I’ll walk you through setting up your project, installing dependencies, and writing the code you’ll need to proxy websocket connections between Twilio and OpenAI.
Alternatively, you can find our repository here. We also have a video version of this tutorial you can find here:
Alright, let’s get started for real!
Step 1: Initialize the Project
First, set up a new Node.js project:
Step 2: Install dependencies
Next, install the required dependencies for the project. We’ll be using the web framework Fastify, and we’ll need websocket support. We’ll also be storing our sensitive environment variable in a .env file.
Step 3: Create the project files
We will create a file named index.js for our main code. We’ll also have that .env file to store environment variables. You can find more information on this strategy here.
In this case, you’ll only need your OpenAI API key in the .env – double check it has Realtime API access.
Step 3.1: Create the .env File
First, create the .env file:
Then – in your favorite text editor – add your OPENAI_API_KEY on the first line:
S tep 3.2: Create the index.js File
Next, create a new file called index.js in your project directory:
Step 4: Write the server code
Great stuff – now we’re ready to get down to the tutorial. I’ll break down the index.js code into multiple steps and provide explanations for each part – but feel free to switch over to the Code Exchange app or the repo if you’d like to fast forward!
Step 4.1: Import dependencies, load our Environment Variable, and initialize Fastify
There’s nothing out of the ordinary here – we start by importing required modules, setting up the path resolution, and loading the environment variables from our .env file.
Paste the following code in your index.js:
Step 4.2: Define some constants
Next, we define constants for the system message, voice, and server port. We’ll also choose the OpenAI events to log to the console.
Here’s what you should paste next in your file:
Here, the SYSTEM_MESSAGE sets the tone and behavior for the AI during the conversation, which we will eventually pass as instructions to OpenAI. By customizing this message, you can control the AI's personality and interaction style. In a few sections, you'll see how we pass it to OpenAI to influence our conversation. For more details on the prompt, see OpenAI's Realtime Prompting Guide.
The VOICE constant controls how the AI will sound. You can choose a voice from here.
TEMPERATURE controls how random the LLM's replies will be (higher is more random).
The PORT constant controls which port your application will open. We'll discuss this more in the ngrok section below.
Finally, LOG_EVENT_TYPES are the types of events from OpenAI we’ll display on the command line. You can find the whole list in OpenAI’s Realtime API documentation.
Step 4.3: Define two routes
Now, we get down to the heart of the code! We define a root route (primarily a health check…) and a route to handle incoming calls. The /incoming-call will return TwiML, Twilio’s Markup Language, to direct Twilio how to handle the call – more on that in a second.
Paste this into index.js after we set the constant list for LOG_EVENT_TYPES:
As with all TwiML, we start with the XML version and open a <Response> tag. We then have Twilio say a brief message to the caller – have fun with it! –, pause for 2 seconds, then ask the caller to start talking.
The <Connect> verb works together with the <Stream> noun to open a bidirectional stream using Twilio’s Media Streams. This is where the magic of the demo happens – in the next step, I will show you how we’ll proxy audio between two websockets.
Step 4.4: Handle WebSocket connections
Now we need to set up the WebSocket route for media streaming (the route we give Twilio in the above section), and set up websockets with Twilio and OpenAI. This code is a bit long, but I’ll explain what’s happening right after the code block.
Paste this code below where we defined the routes:
As you can see, first we set up a WebSocket route (/media-stream) to handle media streaming between Twilio and OpenAI. This is the route we referenced in our TwiML, above. The next two areas require more explanation.
Set up the OpenAI Realtime API Session and Conversation
Next, we set up our Session configuration with OpenAI. This configuration is sent to the OpenAI WebSocket as a JSON object after the connection opens, after a slight delay.
Next, we use the sendSessionUpdate() function to define how the AI interacts and responds. You can read more about the options I chose in the OpenAI Realtime API documentation.
The sendSessionUpdate function also configures the OpenAI session attributes:
type: here we tell OpenAI we are using realtimemodel: we are using the spt-realtime modelaudio.input.turn_detection: Enables server-side Voice Activity Detection (VAD) with server_vad.audio.input.format.type/audio.output.format.type: Specifies audio formats, which we changed toaudio/pcmudue to Twilio requirements.- audio.output.voice : The model VOICE we set above.
instructions: Influences AI interaction usingSYSTEM_MESSAGE.output_modalities: Enables audio communication.
Proxy between the Twilio and OpenAI WebSockets
The following lines proxy audio data (using Twilio-supported G.711 u-law format) between the Twilio Media Stream and OpenAI Realtime AI WebSocket connections. When the call starts, this is where the caller's voice is processed, and the AI-generated audio is streamed back.
Here's a detailed walkthrough of how we are proxying between OpenAI Realtime and Twilio:
startevent: Captures the stream's unique ID (streamSid).mediaevent:mediaevent: Processes and forwards audio data payloads from the ongoing call to OpenAI.response.output_audio.delta: Handles AI-generated audio data from OpenAI, re-encodes it, and sends it to Twilio.- Twilio WebSocket
closeevent: Handles client disconnection and closes streams.
Step 4.5: Prepare the server
And finally, we start the Fastify server and bring it home (using the port we passed in or defined). Paste this below what you have, and we’re ready to roll!
Run the server
Exit back out of the file.
You can now run the server with the following command:
If the server starts successfully, you should see the message Server is listening on port 5050 (or the port you specified) in your terminal.
Finish your setup
Now it’s time to provide instructions to Twilio and finish the wiring! We’ll cover using the reverse proxy ngrok to make your server public.
Step 5: Expose your server to Twilio using ngrok
Now, you need to use ngrok or a similar service (or a virtual private server, etc.) to expose your local server to the public internet. Twilio requires a public URL to send requests to your server and receive instructions from you.
Download and install ngrok if you still need to, then run the following command. If you have changed the port from 5050, be sure to update it here:
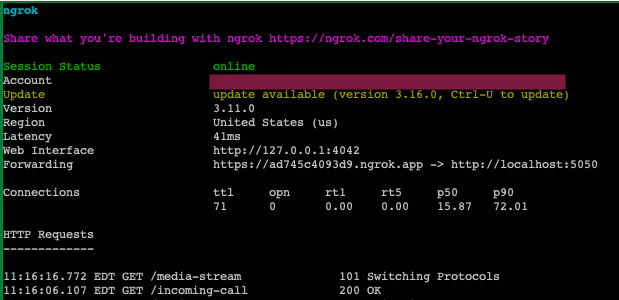
This will give you a public URL (e.g., https://abc123.ngrok.io) that you can use for testing. Here’s how it looked for me:
Step 6: Configure Twilio
We’re so close now, can you feel it?
Go to the Twilio Console and select your Voice-enabled number.
Under Voice & Fax, set the A CALL COMES IN webhook to your ngrok URL (in the Forwarding line, ( https://ad745c4093d9.ngrok.app in my screenshot) appending /incoming-call. For example, in my case, https://ad745c4093d9.ngrok.app/incoming-call.
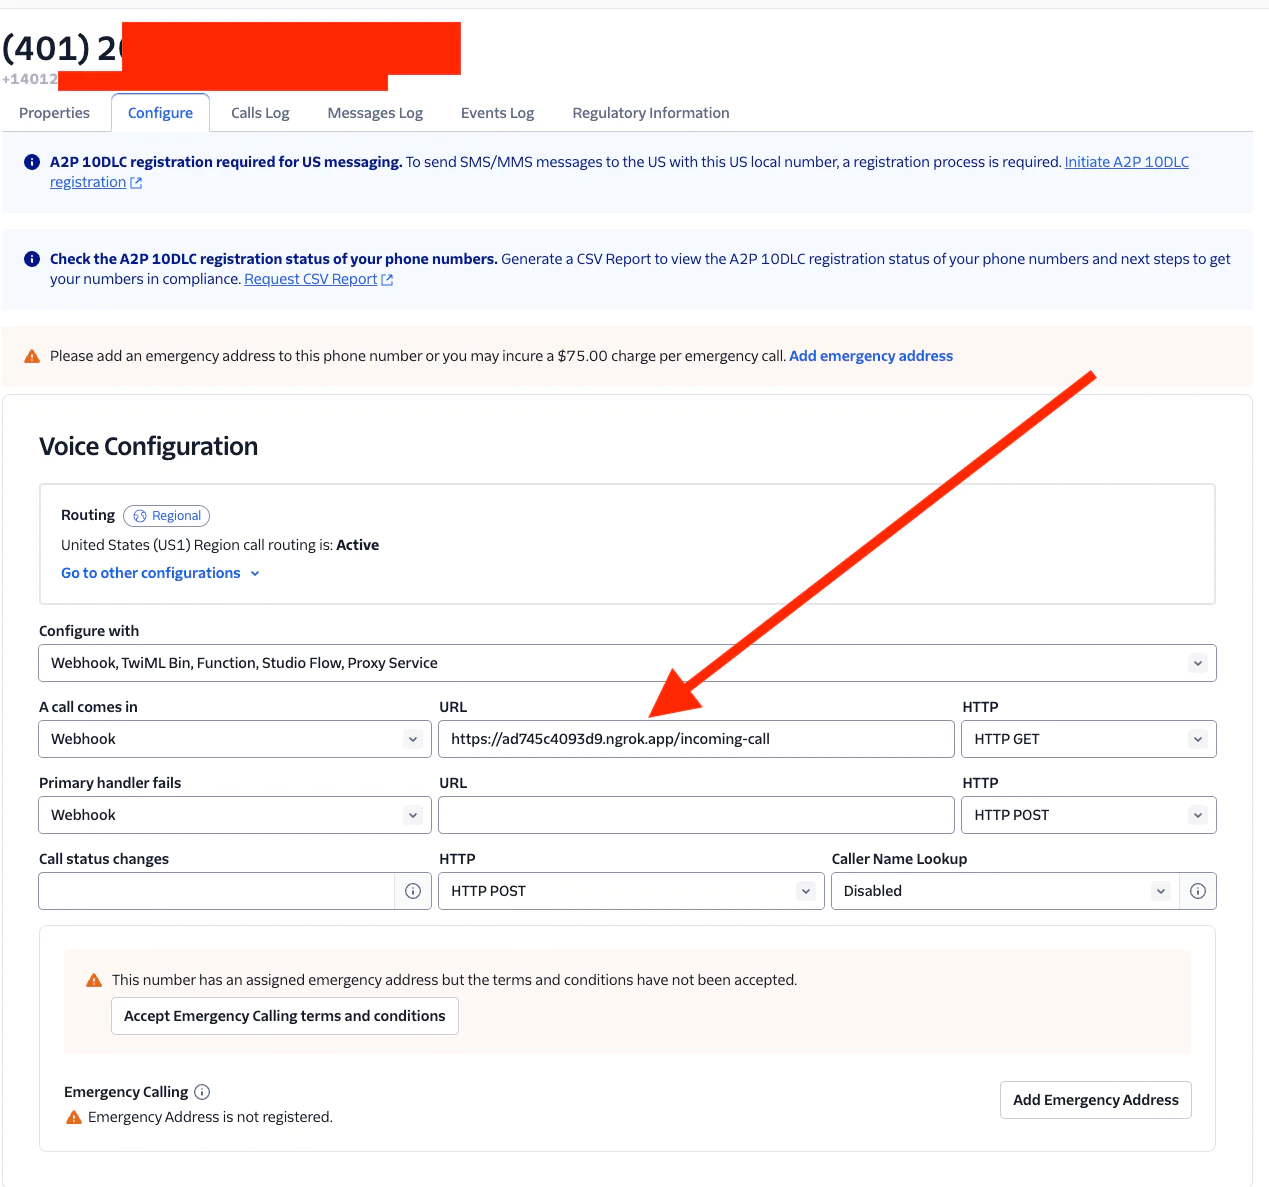
Save your changes - you’re at the final step!
Test your setup!
Make sure your ngrok session is still running and your server is up. If it is, it’s time – you can now make a call to your Twilio number using a cell phone or landline.
The server should handle the call (providing your TwiML to Twilio), then proxy the OpenAI Realtime API and Twilio WebSockets together. Start talking – you should now hear the AI-based system message and be able to interact with it!
Common Issues and Troubleshooting
If your setup isn’t working (but your server is running), there are a few places to check first:
- Is ngrok running? Is the URL properly set in the Voice Configuration -> A Call Comes In section?
- Was there an error with Twilio, possibly in your TwiML? You can debug Twilio errors in a few ways - there’s more info in this article.
- Is your code calling OpenAI correctly? See more information in their documentation.
Conclusion
Isn’t that amazing? You’ve now successfully built an AI voice assistant using Twilio Voice and the OpenAI Realtime API. This setup allows for dynamic, low latency, interactive voice applications that can respond to user input in near real-time - and gives you a voice you can reliably call on, whenever you need.
We can’t wait to talk to what you build.
Next step:
- Check out the Twilio documentation and OpenAI's Realtime API docs for more advanced features.
- See OpenAI’s documentation on concepts.
Paul Kamp is the Technical Editor-in-Chief of the Twilio Blog. You can reach him – or, possibly, his AI Assistant – at pkamp [at] twilio.com.
Dominik Kundel works on Developer Experience at OpenAI.
Related Posts


Related Resources
Twilio Docs
From APIs to SDKs to sample apps
API reference documentation, SDKs, helper libraries, quickstarts, and tutorials for your language and platform.
Resource Center
The latest ebooks, industry reports, and webinars
Learn from customer engagement experts to improve your own communication.
Ahoy
Twilio's developer community hub
Best practices, code samples, and inspiration to build communications and digital engagement experiences.