Using Data Binding in Xamarin Applications
Time to read:

Xamarin is a powerful tool for building cross platform apps for Android and iOS devices. You can use Xamarin without leaving the comfort of your Visual Studio development environment and you don’t have to buy and connect a bunch of mobile phones to test your apps: Xamarin includes emulators to give you a real feel for how your user interface will look and work.
One of the time-saving and powerful aspects of Xamarin is Xamarin.Forms, a toolkit for building user interfaces with eXtensible Application Markup Language (XAML) to define how a user interface component in a Xamarin app will look and behave. Xamarin XAML (try saying that five times fast) works in concert with code-behind C# classes, a structure you may be familiar with if you’ve worked with ASP.NET or ASP.NET Core.
Xamarin.Forms includes Data Binding, a way of keeping a user interface synchronized with its underlying data without having to write code for every aspect of managing those interactions. Data binding makes it possible to create rich user interface experiences for data-driven applications without writing a lot of code.
This post will give you a quick introduction to data binding with an example project that you can build on and extend to learn about additional features on your own. You’ll also gain experience using emulators to preview and test your user interface features.
What is data binding?
Often when developing UI for a mobile app, the components on the page are not in isolation. You want them to be linked somehow so changes in one update another, or multiple, components. This can be achieved through the power of data binding.
The simple counter app from the companion repository is the perfect candidate to be enhanced with extra features that can use data binding.
Sometimes, when keeping count, you don’t want to increment the value by 1. For example, if you are playing basketball, you might score 1, 2, or 3 points depending on where on the court the shot was thrown. So, in this post you’ll add a slider to the user interface that will change the amount the count increments when clicking the Increment! button. Data binding will make this app much easier to write, with fewer lines of code, as you won’t have to write code that tells the button that the value of the slider has changed and what to do in response.
Another good example of data binding would be fetching data from a data source of some kind, like a database or REST API on a website. If you have multiple parts of your app that use that data, you don’t want to have to write code to update each of them. Instead, you want them to “automagically” update when new data has been fetched.
A binding can be created either in XAML or code, so you have a choice, just like with the UI, of which you use. In this post you will use XAML and edit the existing code in the counter app.
Understanding the case study project
This post focuses on the basics of how data binding works in Xamarin. To get you into the topic faster, there’s a companion repository on GitHub that provides a pre-built Visual Studio solution containing a Xamarin project. The tutorial below will walk you through the steps required to add data binding to the project.
The app is a simple counter app with a label and a button. The partial class or code-behind for the XAML page then has properties which update the label when the button is clicked.
If you’re totally new to developing Xamarin apps you may want to read the introductory post in this series to get started. You’ll also want to learn about how to deploy and run your project on an Android or iOS mobile device. The second post explains that.
- Building Your First Mobile App with C# .NET and Xamarin
- Deploying and Running Your First C# Xamarin Mobile App
If you follow the tutorial steps in these posts you’ll end up with the same Visual Studio solution provided in the companion repository. But if you want to skip ahead, all you need to do is clone the repo, as explained below.
Prerequisites
You’ll need the following resources to build the solution presented in this post:
Visual Studio 2019 for Windows or Visual Studio for Mac (The Community edition is free.)
Your Visual Studio configuration should include the Mobile development with .NET workload, which includes:
- Xamarin
- .NET Framework 4.7.2 development tools
- C# and Visual Basic
- IntelliCode
- Android SDK setup (optional, if you’re going to test on the latest version of Android)
If you plan on cloning the companion repository it will be helpful to have the GitHub Extension for Visual Studio installed.
Creating the Xamarin project
Clone the Counter Visual Studio solution from the following GitHub repository to a local path where you’d like to work on the project:
https://github.com/LuceCarter/CounterTwilio
When the clone operation is finished, switch the Solution Explorer to solution view if it’s in folder view. You should see three projects under the Counter solution:
Counter
Counter.Android
Counter.iOS
Updating the user interface for data binding
Open the MainPage.XAML file in the Counter project folder. This contains all the code to define how your UI will look, in this case it will simply be a label, a slider, a label showing the slider value, and a button.
You will want to use a special syntax that tells the components that some of their properties are bound to a value. Change the StackLayout element in your MainPage.xaml file to the following:
In Xamarin.Forms XAML, when you set a property to use data binding you use the special {Binding <propertyname>} syntax inside the "". This replaces the hard-coded value and instead tells the control to look at the named property for its value and bind to it. For this reason, it is important that you remember to initialize your property with a value.
You may see that your IDE warns you that the property doesn’t exist. You will create the property in later steps.
The second label component has some strange looking binding code in the text attribute as well. This is what is called view-to-view binding. The first part says that the source of the text to use is the component on this page called IncrementSlider, the path for your binding will be the value of this slider. Then it applies some formatting to the text from this slider so it has no decimal places.
Now you can go ahead and create the new properties for the page. Open MainPage.xaml.cs, which is the code-behind file for the MainPage.xaml content page. Replace the code for the class with the following:
There are a few things of note in this code. In the constructor, you will notice the statement BindingContext = this;. This line is vital to data binding. This code tells the UI where to look for the properties you are binding to by setting the BindingContext property of the BindableObject class of the Xamarin.Forms namespace. In this case you have said that the properties are in this class. But this isn’t the only option. For now though, keeping the properties inside the code-behind class is just fine.
You have also added a property for SliderValue with a private backing field. You will see that this is the name of the property you bound to for the Value attribute of the slider you added in the MainPage.xaml file above. The setter has some clever code happening here. It says that if the value of the slider changes, update the property to have that value, then call OnPropertyChanged with the name of the bound property that has changed, to let anything bound to that value know it has changed.
This OnPropertyChanged method is actually part of the INotifyPropertyChanged interface in System.ComponentModel, part of the classes that are used to implement the run-time and design-time behavior of components and controls. However, you will see that the class doesn’t implement that interface. This is because of inheritance. Much higher up the tree, the Xamarin.Forms ContentPage class implements this interface, so it is available as a method with no extra work. Excellent!
The click handler method IncrementCounterClicked then tells the app to update the count by the value of the SliderValue property bound to the slider on the page, then update the label with a string derived from the current count value.
Now you have a counter app with dynamic value increments!
Testing the app
Now it’s time to go ahead and run the app and see how it looks! This project will work for both iOS and Android, due to the cross-platform nature of Xamarin. So which platform you pick is down to personal preference.
Once you have decided which platform you wish to view it on, right-click the Counter.Android or Counter.iOS project in Solution Explorer and click Set as Startup Project from the menu.
Depending which platform you have selected, you should something similar to the following at the top of your Visual Studio window:


You can then go ahead and click the Play button on the left and it will startup your project on the selected emulator.
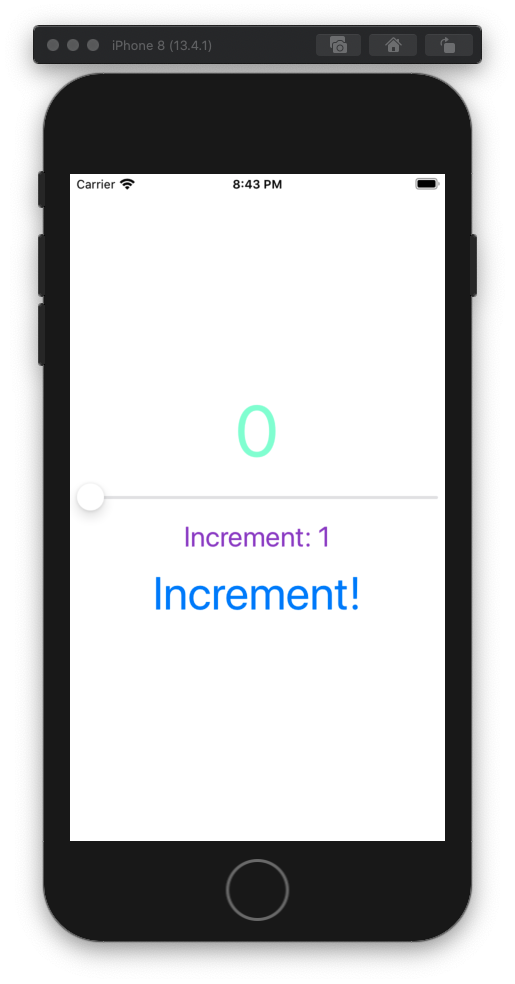
You should see something like the following when the app finishes loading.
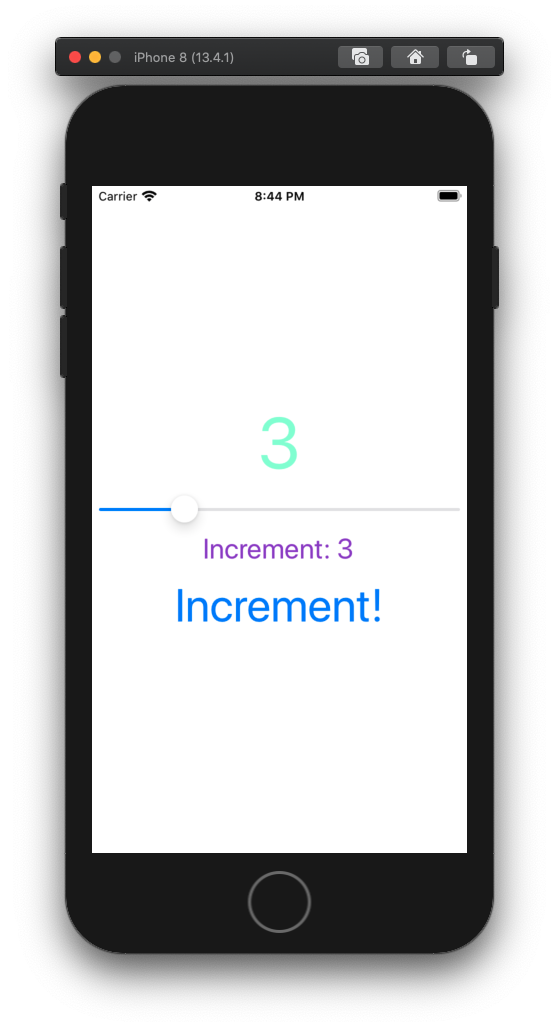
Try moving the slider. The value for the “Increment:” label should change as you move the slider.

Click the Increment! button. You should see the count increase by whatever amount is selected with the slider.

Pretty cool stuff!
Other data types
In the counter app you have written, you are binding to an integer value from the slider. There are also other data types supported by data binding:
- String
- Double
- Float
- Boolean – A common attribute on Xamarin.Forms components to which you would often apply data binding is the IsVisible attribute, which is a boolean. You might want to show or hide a component if the application is doing something in the background, such as fetching data.
- IEnumerable – A perfect example of this is as the source of a collection component, whether that is a ListView, CollectionView, or other type. You will bind to a property with a data type that supports IEnumerable, such as a List or an ObservableCollection. IEnumerables are often updated by another method, such as a method in a service class that fetches data from the internet.
Binding value converters
Data binding is fairly straightforward when the target and source types are the same, such as string-to-string. Sometimes, though, you might want to do some clever conversions on this data, and that is where a value converter comes in. If you want to learn about how binding value converters can be used, and see some great examples, read the Microsoft Docs page Data Binding Basics.
Learning more
Data binding is very powerful and allows for dynamic UI’s that your users will come to expect. But data binding is rarely used in isolation. The most common architectural pattern for Xamarin.Forms, one you will likely use in more advanced applications, especially apps with multiple pages, is Model-View-ViewModel (MVVM).
In the next post in this series, you will learn what MVVM is, and how it can be paired with data binding to make dynamic, maintainable applications.
Summary
In this post you have learned:
- What Xamarin data binding is
- How to use the Binding property in your XAML content pages
- How to create properties in your code that call the OnPropertyChanged event to ensure any changes are shared with the XAML page
- Other data types that you can use with data binding
Luce Carter is a Software Developer, currently working as QA at dunnhumby by day, Microsoft MVP and Twilio Champion by night. She is also the face behind the scenes, editing content for@JamesMontemagno, ensuring editorial quality in his blogs and episode descriptions on his podcast network,@soundbitefm. She can be found at@LuceCarter1 on Twitter, LuceCarter on Github and blogs on her ownwebsite. She writes C# in her day job, working mainly on an ASP.NET backend but Xamarin is her passion. When not writing apps for fun she can be found speaking around the UK or Europe on her two favorite Microsoft technologies, Xamarin and Cognitive Services. She has also started streaming weekly on her Twitch channel CodingwithLuce where she mainly covers Twilio and/or Xamarin related content.
Related Posts
Related Resources
Twilio Docs
From APIs to SDKs to sample apps
API reference documentation, SDKs, helper libraries, quickstarts, and tutorials for your language and platform.
Resource Center
The latest ebooks, industry reports, and webinars
Learn from customer engagement experts to improve your own communication.
Ahoy
Twilio's developer community hub
Best practices, code samples, and inspiration to build communications and digital engagement experiences.


