Offer a Unique Gift for Christmas with Typeform, Glitch, JavaScript, and Twilio SMS API
Time to read: 10 minutes
Now is the time of year where everything around us turns into red and green sparkles meaning the Holiday Season has officially started! This also means that you only have a few remaining days to figure out what to give to your loved ones. If you are like me, this is usually a stressful last-minute rush fueled by adrenaline. Perhap this year, technology can give you a hand to make things a bit more fun and original.
Using Javascript, Typeform, Glitch, and Twilio Programmable SMS API, you will be able to build a unique gifting experience! No need to get in line at the store; it’s (almost) all digital!
Tutorial Requirements
- A Typeform account, you can create one and get a month trial following this link.
- A free or paid Twilio account. If you are new to Twilio, get your free account now! (If you sign up through this link, Twilio will give you $10 credit when you upgrade.)
- A Glitch account, it’s free to create one.
- A free PassSource account to create a digital wallet file.
- Some craft skills ;)
What are we building
Last year for Christmas my wife received two tickets to see her favorite band (KISS 🤘) in concert. More than the gift itself, it was the whole experience of delivering the gift that made this unique.
It first started with a puzzle in a box. Once assembled, the puzzle formed a QR code that linked to a Glitch app. The app then redirected her to a Typeform with riddles. Only after solving all the mysteries was she able to receive an SMS with the concert tickets.
Here's the puzzle in the box, as well as the solved puzzle:
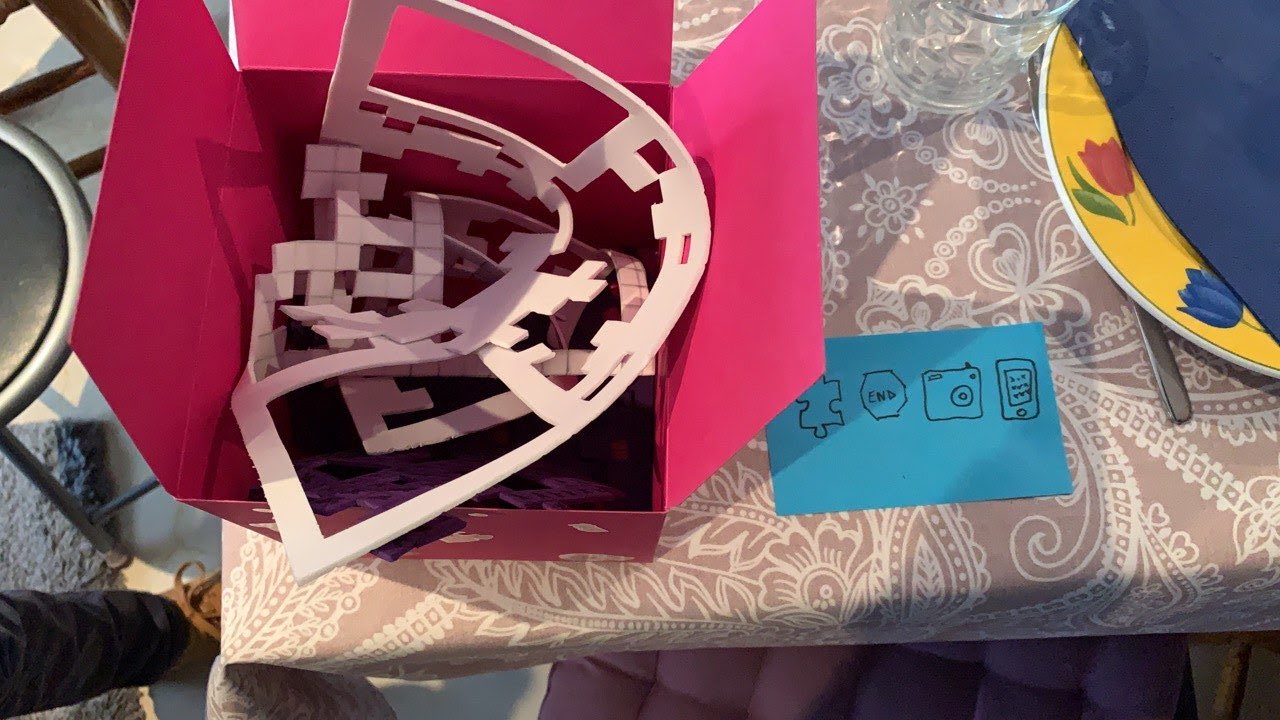
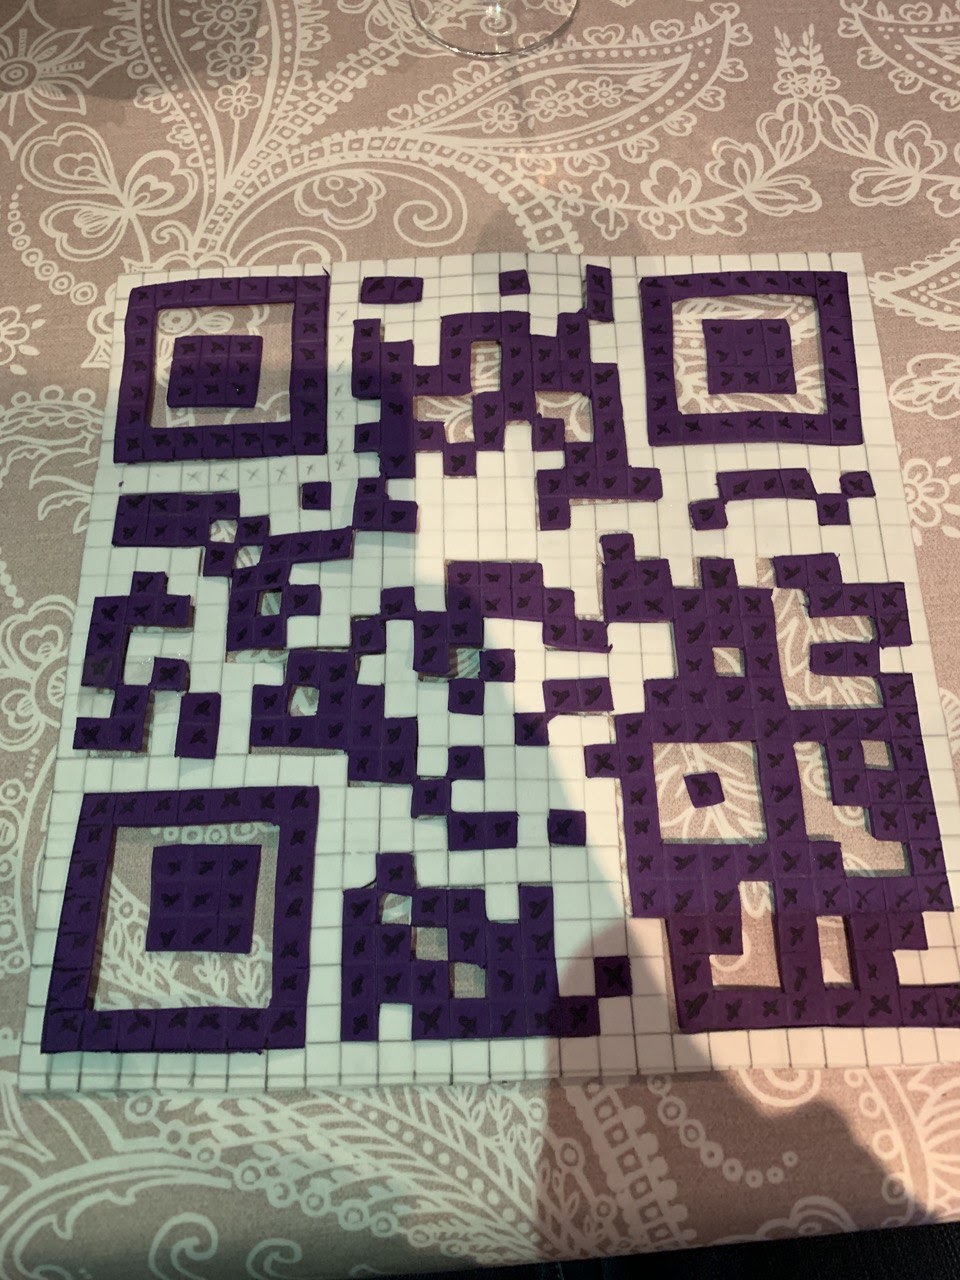
Solved puzzle
Lucky for you, Santa’s elves were friendly enough to share their secrets and told me how they built this original experience.
Create the typeform
The elves are hackers, but sometimes, like all of us, they like to take a break from code and use an off the shelf solution. It’s probably why they used Typeform as a way to ask three riddles and only deliver the gift if answered correctly.
If you are not familiar with Typeform, it’s a conversational form solution. Using drag and drop, you can build quizzes for classes, surveys for user research, or even an ordering form for your small e-commerce shop.
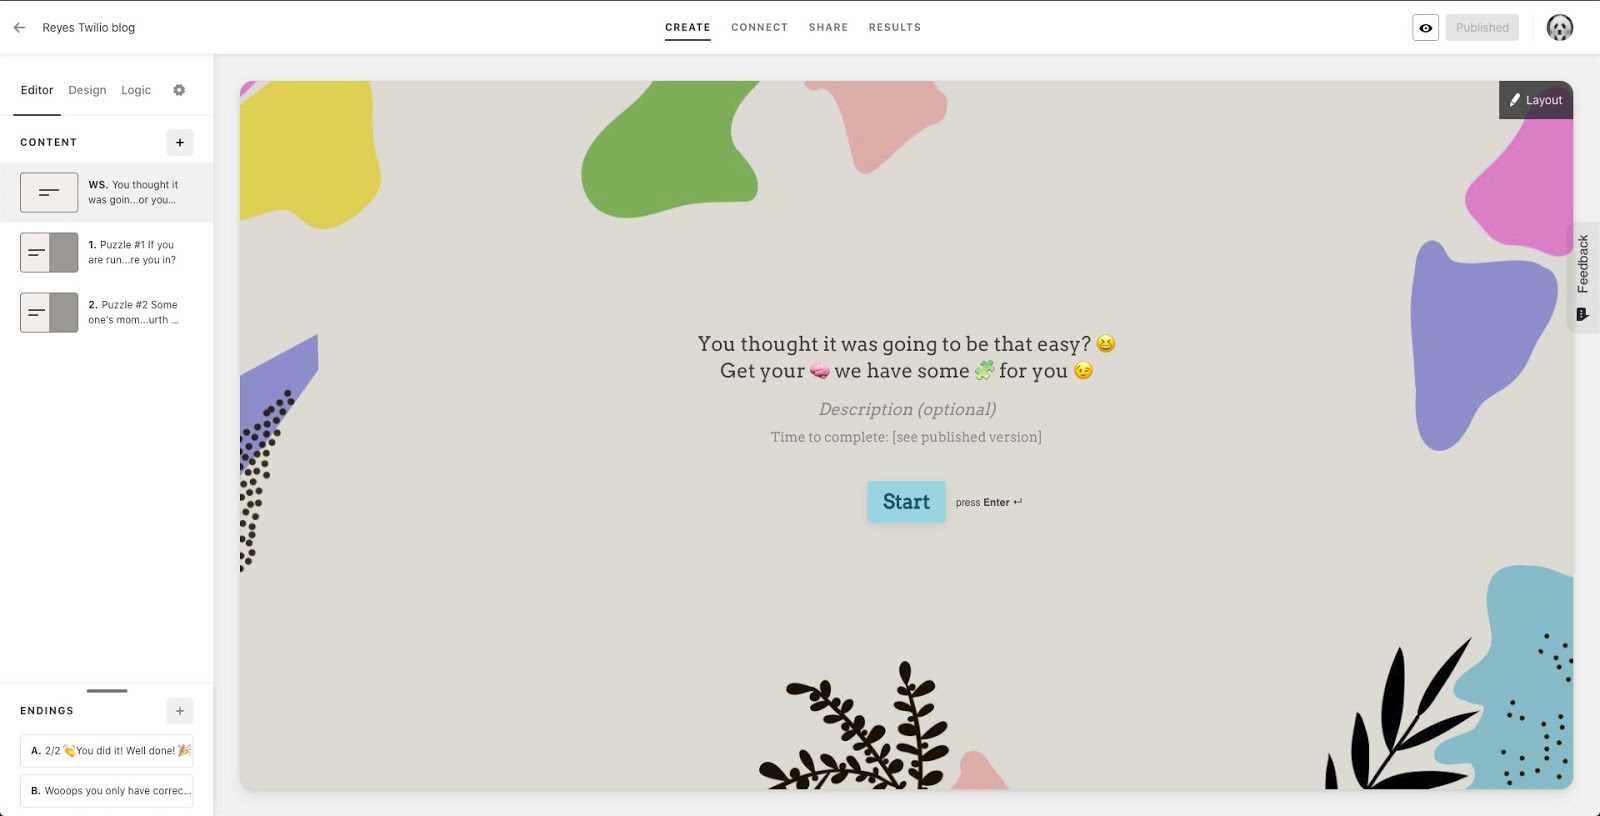
To build the riddle form, you can copy this template. It creates a new form on your Typeform account with the same structure. The screenshot below is how the page should look like after importing the template:
If you are creating this form from scratch, go to the Typeform workspace dashboard and click on the New typeform option. Click on the Start from scratch button on the top right corner and give it a name such as "meaningful gift".
On the left sidebar, you should see the option to add new question types to the typeform. I use a Welcome Screen (WS) to introduce the respondents to the events that are about to happen (answer riddles and get a prize). Feel free to change the wording as your wish.
For the puzzles, I use two open-ended short text questions. Click on the + button and select the Short text option for the first question. Name this block "Puzzle #1" and paste in the following riddle for the typeform. "If you are running in a race and pass the person in second place, what position are you in?". Feel free to include an image to accompany the question. Finish this off by toggling the question as required in the question settings.
Follow the same instructions for the second question, naming the block "Puzzle #2" and pasting the following riddle for the typeform: Someone's mom has four sons North, East and West. Can you guess the name of the fourth son?"
Add two more question types and select Thank You Screen for both of them. These text boxes display the appropriate message to the friend, depending on whether they got both puzzles correct or not. For Thank You Screen A, type in a nice message such as "2/2. You did it! Well done!". For the second screen, type a message announcing failure.
Here's an example preview of question 1 on a mobile screen:
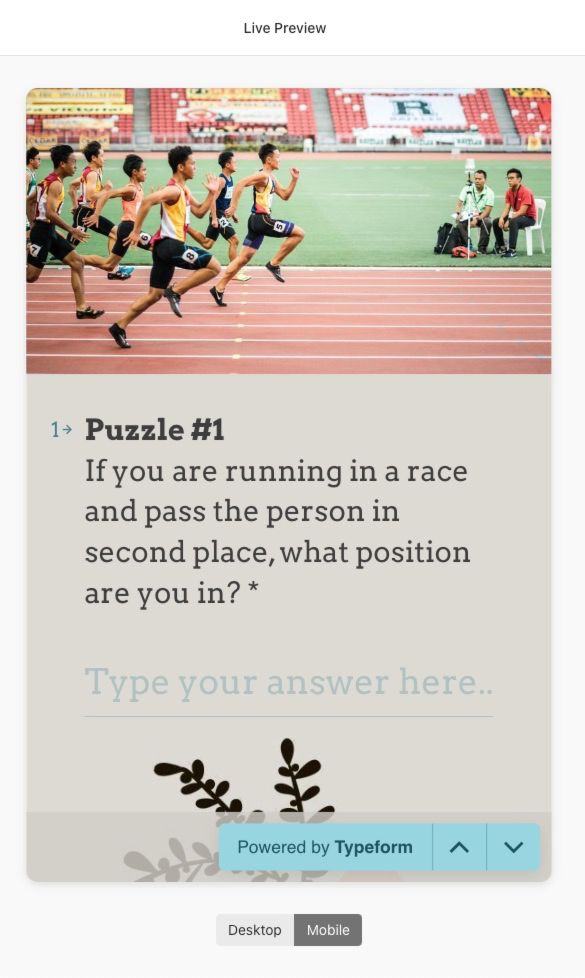
If you go through the form, you realize that it does not matter what you answer to the questions. It leads to the “success” ending.
Of course, we want to make sure that our friend only gets their present if they answer correctly to the riddles. Let’s implement logic in this typeform!
Add logic to the typeform
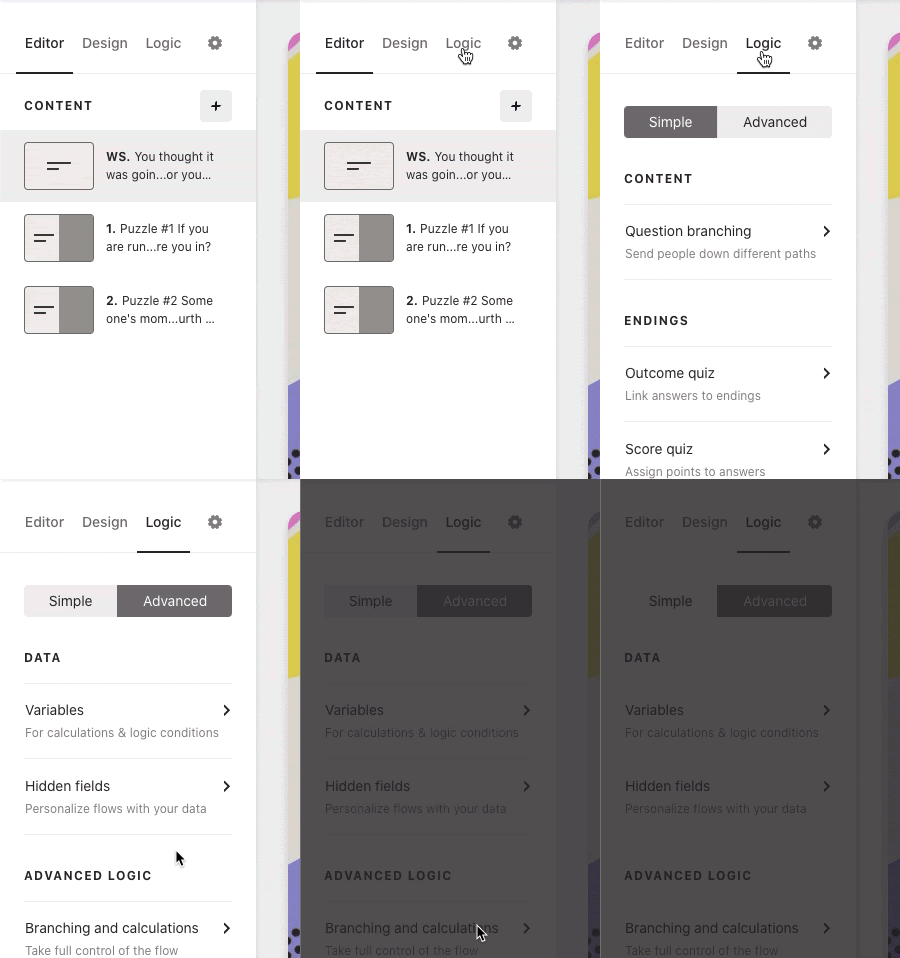
Under the Logic tab, select the Advanced option and scroll down to the Branching and calculations option.
You should now see the following screen. On this screen, you will set up the logic for each puzzle.
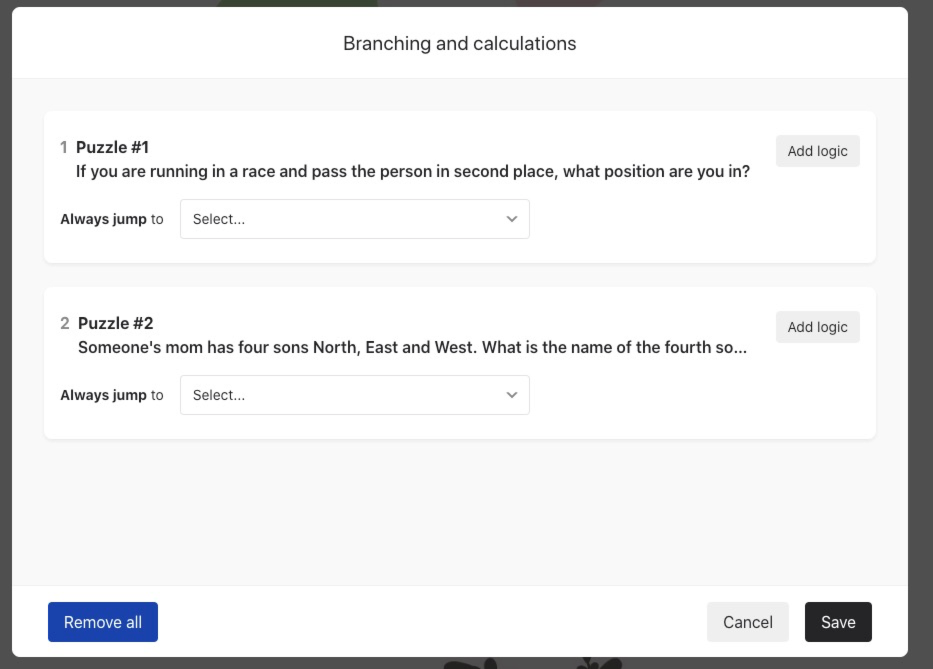
Let’s start with Puzzle #1; if you are running in a race and pass the person in second place, in what position are you? I'll let you think about the answer for a minute...
In the meantime, you can click on the Add logic button. It will add a condition of the type if answer to Puzzle #1 equals the correct answer to the riddle, which is 2. On the then line, you can define the action that will happen if the condition is true. In our case, a good answer gives you one point. We want to add 1 to the score variable.@score is a default variable in every Typeform, so there's no need to create it. We will use this variable to keep track of the respondent’s score.
Go ahead and set the appropriate values to the logic for Puzzle #1. The full sentence should say "If [Puzzle #1] is equal to two then add "1" to @score." Look at the screenshot below for reference on how to define the first condition.
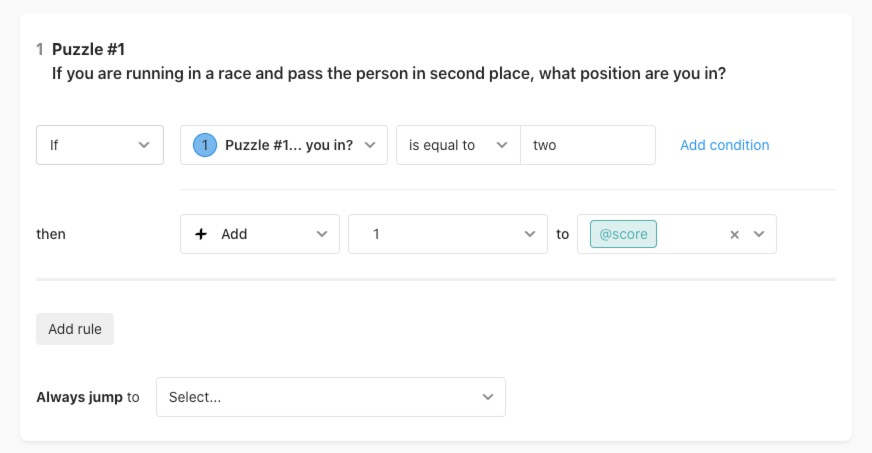
For questions of type short text, conditions are case sensitive. I would recommend adding more conditions to cover the many ways someone can answer this question. Some examples of what the user will answer are: two, 2, second, Two. As you are defining conditions, make sure to select Or operator. Check out the screenshot below to see the full logic for Puzzle #1.

Once you have defined all the different logic for the first puzzle, you can follow the same steps for the second puzzle.
We also need to create the branching to show either a success or a failure screen depending on our respondent’s score. This branching should happen on the last question asked before revealing the results. In our case, this will be on Puzzle #2.
In the Branching and calculations screen, add a new rule to Puzzle #2 logic. In the condition, select the @score variable, select equals to, and type "2" (if you have only two puzzles). As an action, choose Jump and set the success ending as a destination.
To show the failure screen, add a new rule on the @score variable. This time, change the logic statement to is lower than and Jump to the failure ending.
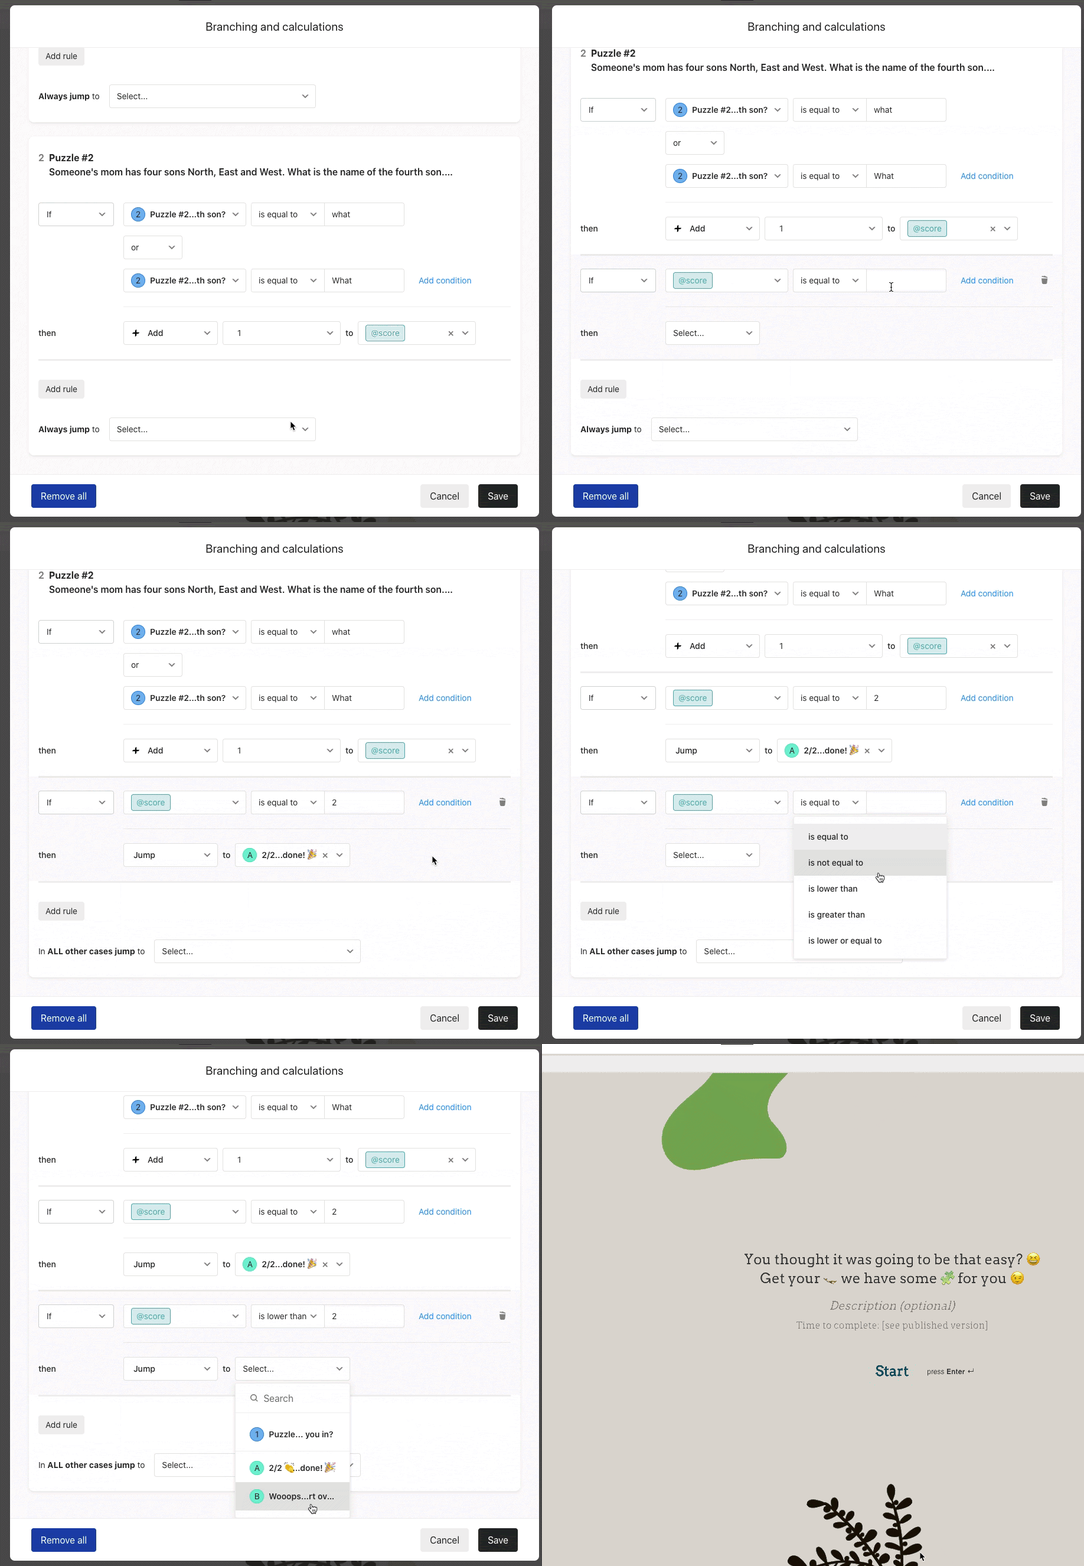
Finally, click the Save button to save all the logic you have just created.
To visualize and test the typeform, you should use the Preview mode by clicking on the 👁 (eye) icon. The Preview mode is available to both trial and upgraded accounts. If your account is upgraded, then you can click the Publish button at the top right corner to see it live while previewing how the form looks on mobile and desktop. click the Publish button on the top right corner. Then, use the Preview mode by clicking on the 👁 (eye) icon. There you will see how the form looks on mobile and desktop.
You now have a working typeform asking riddles!
Create the wallet file containing tickets
My first idea to deliver the concert tickets was to send the pass file via SMS. It turns out it’s way more complicated than I thought. I got lost in many pages of documentation that explained how to generate and sign wallet files. The clock was ticking - I had no time to go that deep. When I was about to give up, I discovered PassSource, which lets you visually design Apple wallet files. I would just add the link to this file in the SMS.
To create your pass, log in on your PassSource account and click on Create Pass. They offer many templates to guide you. I picked the generic Event, mainly because I wanted to personalize the look of it.
To make it more real, you can upload visuals.
This was my end result, pretty realistic, right?
The QR code on this file does not lead anywhere, but it does not matter.
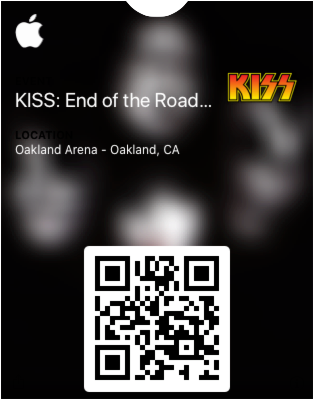
Once you are happy with your pass’s design, you should click on the big Add to Apple Wallet button. It will download a .pkpass file. Keep it handy - we will need it later.
Create a Twilio number to send SMS
If you don’t yet have a Twilio number with SMS capabilities, you need to buy one.
To do so, login into your Twilio console, and under Numbers select Buy a number. There you can choose the country of your choice and check the SMS box.
Once you bought the number, keep it handy as we will need it later.
Create the Glitch app
To connect everything together, we need to create an app. This app is hosted on Glitch, an online IDE, and a hosting solution. The great thing about Glitch is that each app comes with a unique URL that is already public. Thus, we don't have to think about deploying the app anywhere.
Glitch apps mainly use JavaScript and Express framework. However, the community has built support for other languages like Python or Go, so this should not stop you if you are not familiar with JavaScript.
This app takes care of a few things for us. First, it provides the URL where the physical puzzle’s QR code is redirecting. It’s also where we write the code for our friend to receive the SMS with the final gift.
To give you a head start, here is the project directory that you should replicate in your Glitch account.
Set up environment variables
As you may have seen, the app won’t launch because some environment variables are not defined yet.
You can see all the environment variables by clicking on the .env file on the left sidebar.
Our app will be using the Twilio API to send SMS, so we need to authenticate to it. In your Twilio Console, find your Account SID and Account Token and copy values into both the TWILIO_ACCOUNT_SID and TWILIO_ACCOUNT_TOKEN variables respectively.
Replace TWILIO_NUMBER with the Twilio number you bought earlier. And replace DESTINATION_NUMBER with the phone number of your friend. If you don’t want to spoil the surprise, maybe start by putting your number first during testing. Both numbers should not contain any space or hyphens but start with a + sign and the country code. (ex: +1415… ).
The variable TYPEFORM_URL should contain the URL of the typeform you created earlier. It should be of the form https://form.typeform.com/to/{a random string of text}.
TYPEFORM_WEBHOOK_SECRET variable is used to verify the integrity of Typeform webhook payload. It should be a non-guessable secret. I usually assemble a few results from a request to Random.org to create such secrets.
Finally, the PASS_LINK variable will contain the URL of the passfile you created earlier. To get this URL, you should first upload it in the assets folder of your Glitch app. Click on the assets folder in the sidebar and then on the Upload a new assets button.
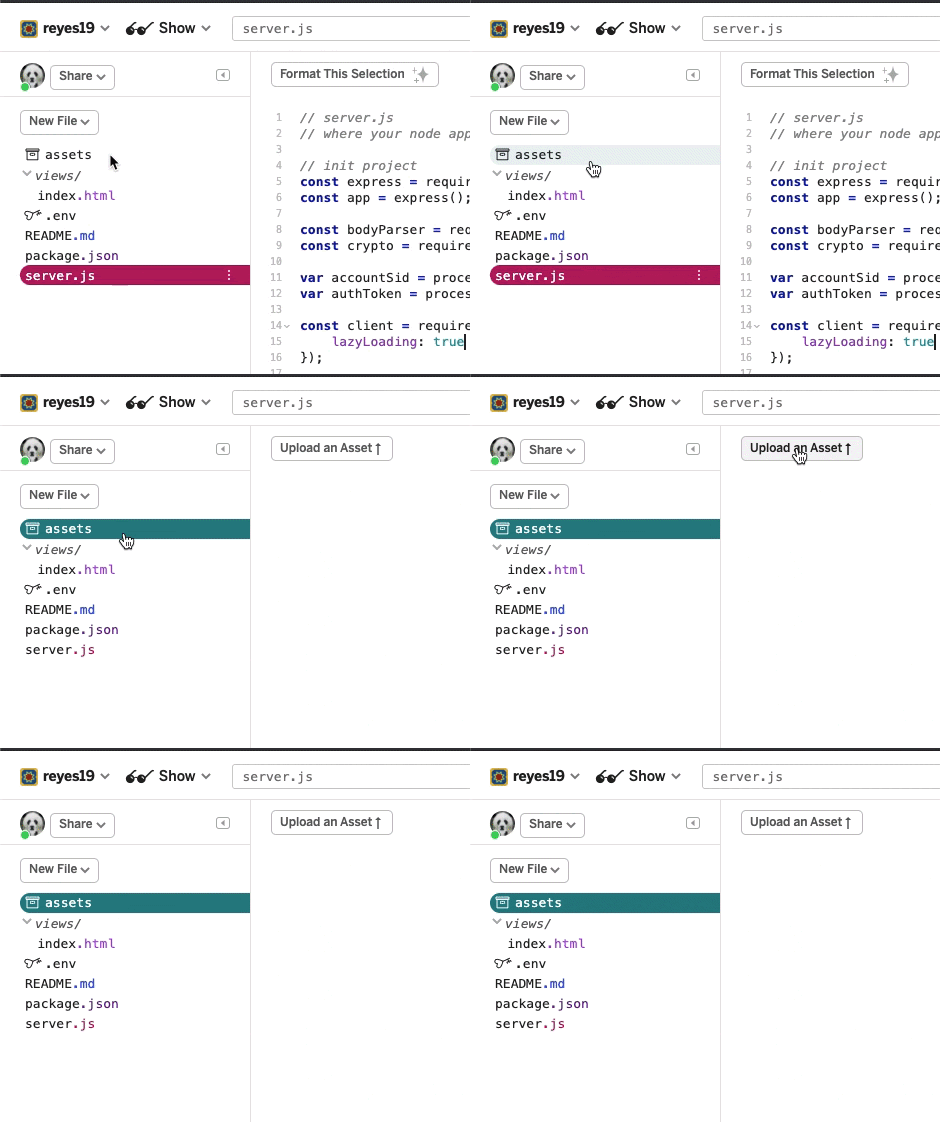
This should open a filesystem window to select the file to upload. Once uploaded, you can click on the new file and copy its URL, it should start with https://cdn.glitch.com.
With all those environment variables now defined, your project should be starting fine.
Take a look at the server.js file. You should see that our app has two endpoints. First, GET / route at the root, which will redirect our respondent to the typeform.
You can test to see if respondents are redirected to your Typeform by clicking on the Show button on the top left corner and select In a New Window. It should first open your Glitch app URL and then redirect to your typeform.
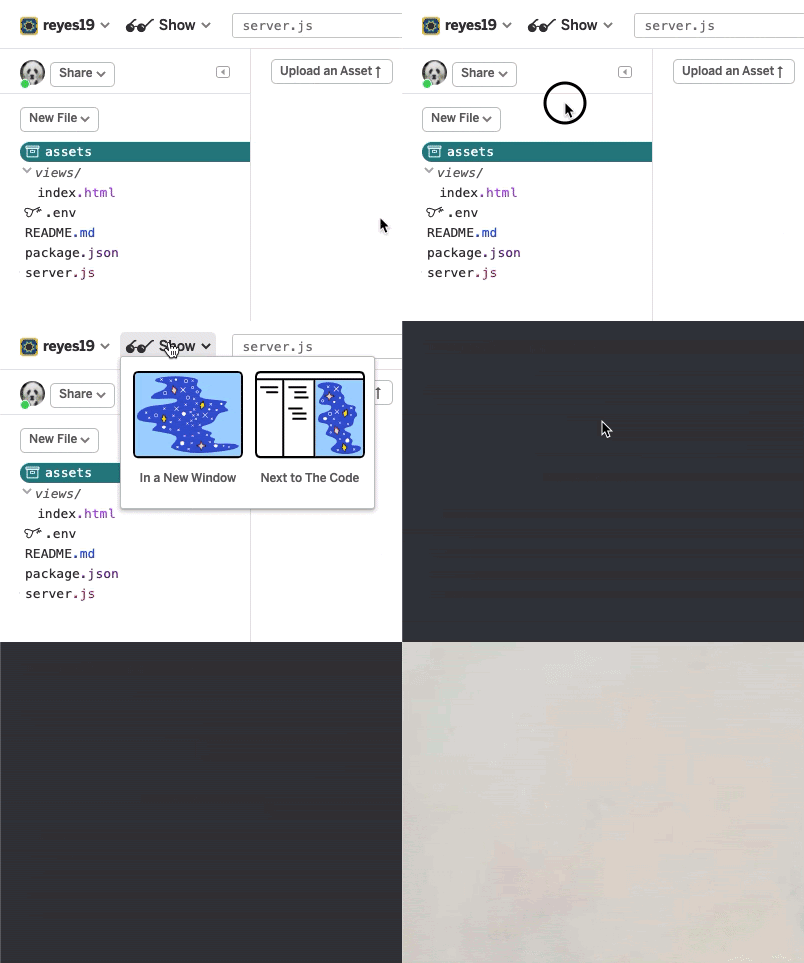
Then we have a POST /hook endpoint inside of the server.js file with the following code:
This endpoint is triggered by the Typeform webhook when the form is submitted. It extracts the score from the payload and makes sure all the puzzles are solved. And only then, does it send an SMS using Twilio SDK with the link to the wallet file.
But at the moment, we haven’t defined the webhook on Typeform’s side yet.
Before moving to the next step, make sure to get the URL of your Glitch app by clicking on the Share button and copy the URL for Live App.
Create the Typeform webhook
Going back to Typeform, we need to connect our puzzle form to our app, so that it sends an SMS when the puzzle is solved. To achieve this, we will use webhooks. Webhooks are a way to send a notification to our app that we have received a new response on our form.
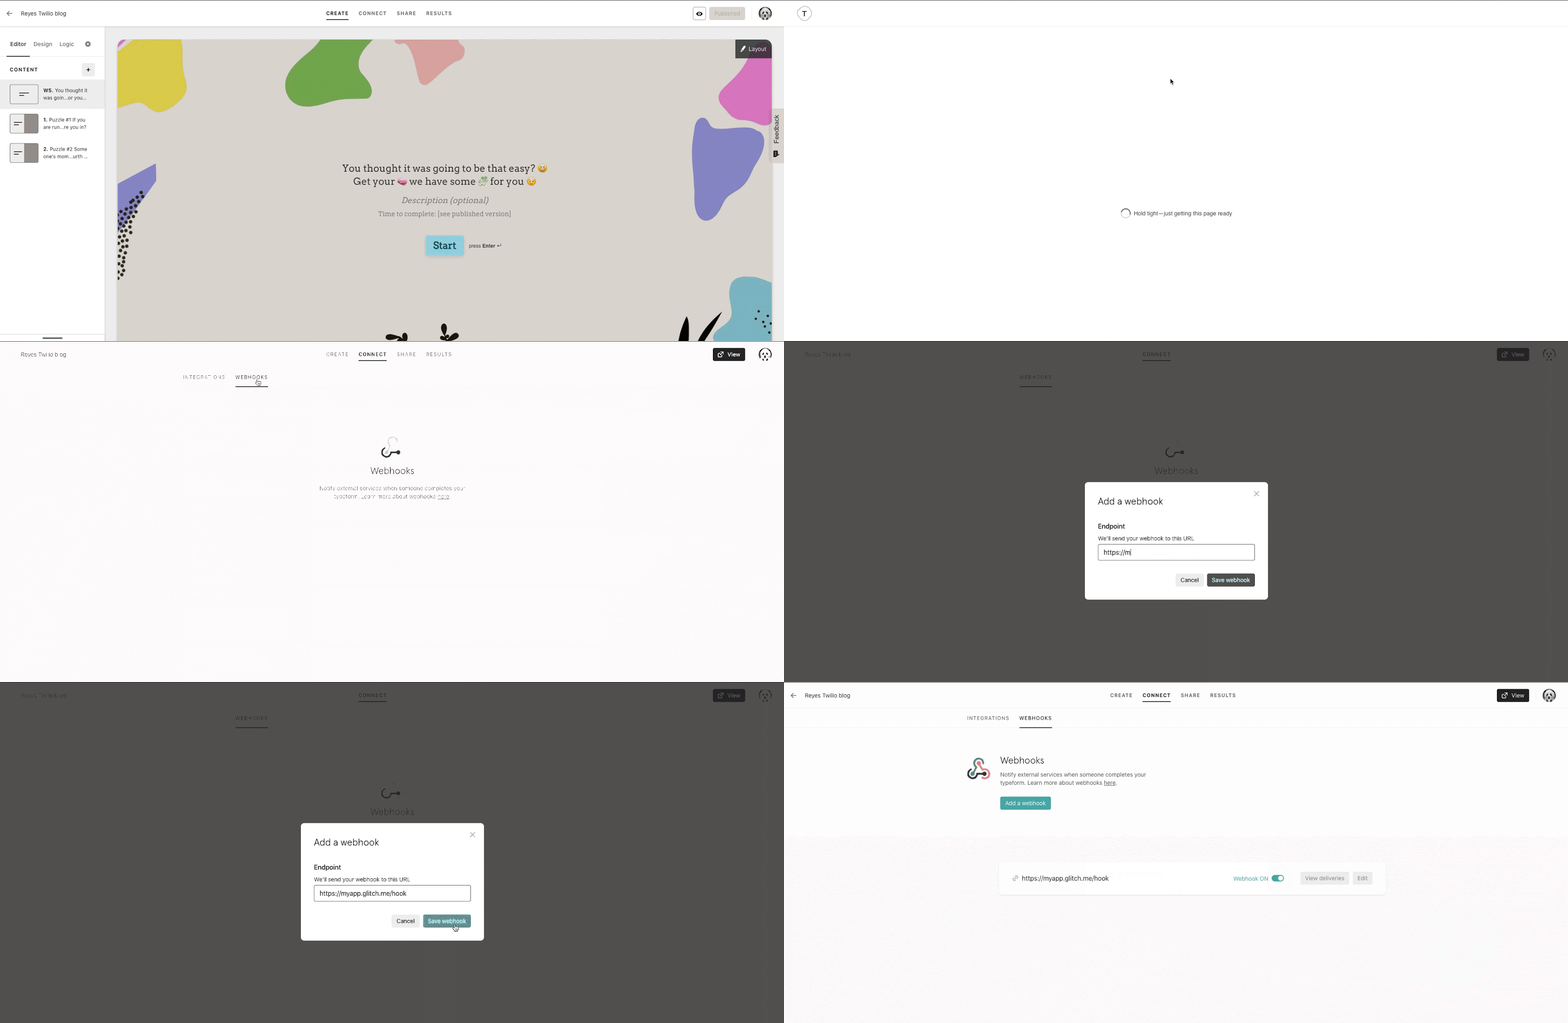
To create a new webhook, go back to the Typeform dashboard and find the Connect tab. Click on the Connect panel and select Webhooks. There you can click on Add a webhook. It will ask you for a URL; this should be the URL of the Glitch app pointing to the /hook endpoint. (ex: https://<YOUR_GLITCH_PROJECT_NAME>.glitch.me/hook).
Once the webhook is created, don’t forget to turn it on by clicking on the toggle. After you enable the webhook, it will send to it every single response to the typeform.
To make the communication between Typeform and your app more secure, we can sign the webhook payload. The app will verify the signature and reject everything that does not match, it only accepts requests coming from Typeform.
On the webhook, click Edit, and add the secret you have defined earlier. Click save to apply the changes.
You should now have connected your puzzle typeform with your app! To test it out, you should open your Typeform and answer the riddles. You should only receive an SMS when you score 100%.
Conclusion: Building a Unique Gift for Christmas
Sure, I could have just printed these tickets out and handed it to my wife in an envelope—a bow and wrapping paper around for the sake of anticipation. But we would not have had this family experience, where everybody contributed and participated. This experience created lifetime memories for all the people in the room.
Of course, the concert was a blast! The show was on March 6th. On March 7th, the Shelter In Place started in the Bay Area. This concert is the last activity we did in 2020.
Technology does not need to be all serious; it can also spark joy around you and give life to the silliest ideas you may have.
I hope you can explore those ideas and build more meaningful hacks!
Nicolas Grenié is a Developer Advocate at Typeform. He loves to connect things together using APIs and build fun side projects like his cheese delivery site: sfcheeseparty.com. He can be reached at nicolas.grenie [at] typeform.com or Twitter.
Related Posts
Related Resources
Twilio Docs
From APIs to SDKs to sample apps
API reference documentation, SDKs, helper libraries, quickstarts, and tutorials for your language and platform.
Resource Center
The latest ebooks, industry reports, and webinars
Learn from customer engagement experts to improve your own communication.
Ahoy
Twilio's developer community hub
Best practices, code samples, and inspiration to build communications and digital engagement experiences.

