Understanding Windows Presentation Foundation (WPF) Data Binding with the DataContext Class In .NET Core
Time to read:

The Windows Presentation Foundation (WPF) framework allows you to develop desktop applications with amazing graphic capabilities, but it does not stop there. An application needs to display data of some sort and connecting UIElements to underlying data structures needs to be flexible. That is where DataContext comes into play.
DataContext works hand-in-hand with data binding to provide hierarchical data presentation. It is what connects the front end to the code-behind and enables changes made to data in the user interface to update the data source, and conversely, while maintaining the order of your data structure. You’ll see examples of this in the case study project for this post.
This tutorial will guide you through building a WPF application where you can explore DataContext at work. You will create a data dashboard that visualizes data from different simulated sources.
Prerequisites
You’ll need the following tools and resources to build and run this project:
Windows 10 – It puts the Windows in Windows Presentation Foundation.
.NET Core SDK 3.1 – The SDK includes the APIs, runtime, and CLI.
Visual Studio 2019 with the following workloads and individual components:
- .NET desktop development workload (Includes C#)
- GitHub Extension for Visual Studio (If you want to clone the companion repository.)
You should have a general knowledge of Visual Studio and the C# language syntax. You will be adding and editing files, and debugging code.
There is a companion repository for this post available on GitHub. It contains the complete source code for the tutorial project. The code uses the dependency injection features of .NET Core, but you won’t need extensive knowledge of it to understand the WPF features that are the focus of this post.
Creating the project
Begin this tutorial by creating a WPF App (.NET Core) project for C# named DataContextExamples. You can put the solution and project folders wherever it’s most convenient for you.
Adding Simulation Data
In this project you will simulate a couple of tanks in a fictitious industrial setting along with environmental data such as temperature and humidity. This data will be used to show the relationships between view-models and object models
WPF has the ability to show data but needs to be notified when the data changes. The INotifyPropertyChanged interface does just that. To implement the interface, declare a PropertyChangedEventHandler and create a way to invoke it. By placing code that will be used in several places into a base class, the code will be more maintainable.
In the project, add a folder under the DataContextExamples project root and call it Models. You do this by right-clicking on the DataContextExamples project in the Solution Explorer and selecting Add > New Folder.

In the Models folder, add a class and name it DataBaseClass.cs. Replace the entire contents with the following C# code:
This will create a class that will be used as a base class for the other data classes required. It implements the needed INotifyPropertyChanged interface and also implements a method NotifyPropertyChanged. The parameter defined in the method is a string called propName which, in itself, is not interesting, but it is decorated with CallerMemberNameAttribute. This obtains the property name of the caller and allows code to be written like:
Without the CallerMemberName attribute you’d have to hard-code the property name, which is a code smell:
The elimination of the property name in the method will be automatically added, reducing errors.
Next you will add several classes that will be used for data. In the Models folder, add a class and name it TankData.cs. Replace the template-generated code in the new file with the following:
The TankData class has four properties that define the characteristics of a storage tank. Notice that NotifyPropertyChanged is called by each property whenever the property value is changed. The base class DataBaseClass provides access to that method through class inheritance. An Initialization method takes three parameters; a name, a minimum value, and a maximum value. The Initialize method sets the configuration parameters of the class. The minimum value and the maximum value have default values defined that will be used unless specified in the calling method. After storing the min and max values in the Minimum and Maximum properties, a timer is created that calls the OnTimedEvent method every second. This will change the DataValue every second as a way to simulate changing data.
Since dependency injection is going to be implemented, a parameterless constructor has to be provided. In the absence of one explicitly defined in the class, the compiler creates one automatically.
In the Models folder add another class and name it EnvironmentData.cs. Replace the boilerplate code in the new file with the following:
This class is similar to TankData and will simulate environmental data. The frequency of the timer in this case is 2 seconds.
Adding ViewModels
A ViewModel is a design pattern that provides data to a view. It is a class that either directly or indirectly holds or has access to data. The view-model does not have access or knowledge of the view (or specifically the presentation in WPF).
In the project, add another folder and call it ViewModels.
In the ViewModels folder, add a class file and name it TankViewModel.cs. Replace the code in the generated file with the following:
This is the view-model for the tanks. It holds references to two tanks: Tank1 and Tank2. Notice how the constructor makes reference to two TankData objects which will be constructed via dependency injection. You will hook that up next.
For the purposes of illustration, another view-model will be added to hold the environmental data. In the ViewModels folder add another class file and name it EnvironmentViewModel.cs. Replace the default code in the new file with the following:
Adding Dependencies
You need to add a NuGet package to this project so it can implement dependency injection. Add the following package:
Dependency Injection (DI) provides a cleaner way to manage dependencies. To implement it, open App.xaml.cs and replace the content with the following:
This block of code initializes dependency injection and configures the objects that will be injected. You will be injecting singleton versions of the TankViewMode, EnvironmentViewModel and MainWindow objects. A singleton object is one where there is only one instance of it for the application.
The EnvironmentData and TankData objects will be transient objects. Transient objects are constructed as needed in code.
The OnStartup method is a handler for the Startup event. This will be the entrance to the running code where the MainWindow will be shown. In order to invoke the OnStartup method, a change must be made to the App.xaml file.
Find the following attribute of the Application element:
Change it to:
This tells the application to invoke the OnStartup handler instead of executing the code in the MainWindow.xaml file. It will be the OnStartup method that will show the MainWindow. Note that you’re changing the reference from a URI to a method, so StartupUri changes to Startup.
One piece remains to be completed, the MainMindow user interface which was created when the project was created. MainWindow.xaml is the view in this application and will pull all the pieces together. MainWindow.xaml.cs is the code behind file and will contain the C# code, while MainWindow.xaml will hold the XAML code.
Starting with MainWindow.xaml.cs, replace the content of the file with the following code:
Note that three of the object references will lint. Don’t panic; you’ll add those references when you create the user interface markup next.
After the defining fields for the view-models, the constructor injects the view-models into the constructor where they are stored for later use. The constructor then sets the DataContext for the panels that will be defined in the XAML.
Open MainWindow.xaml and replace the contents of the file with the following code:
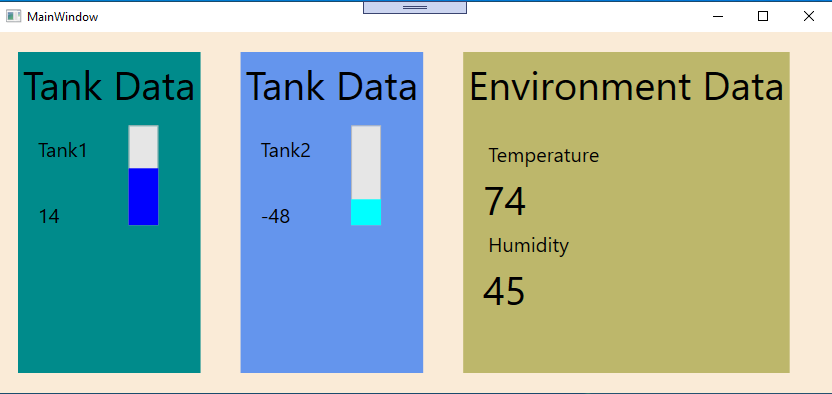
The window is organized into three panels:
- Tank1StackPanel
- Tank2StackPanel
- EnviroStackPanel
As you can see in MainWindow.xaml.cs, the DataContext for the tank panels is found in TankViewModel class Tank1 and Tank2 properties.
The DataContext is associated with the stackpanel and therefore available to all child elements. In this case the Name and DataValue are implemented within the TextBlock and ProgressBar elements.
The third panel is implemented slightly differently. In MainWindow.xaml.cs the DataContext for the EnviroStackPanel is the whole EnvironmentViewModel. In this case the TempPanel in the XAML code is bound to the EnviroData within the view-model. The TextBlocks can then access the Temperature and Humidity properties. Without the binding for the TempPanel stackpanel, those properties would not be visible directly.
Note the following code:
The StackPanel does not have a fontsize property, but by specifying that TextElements contained within it are to have a certain font size the property is applied to all child elements.
Testing the completed application
Build and run the application. You should see a window presenting the data that is being simulated. All of the values should be updating every couple seconds.

Potential enhancements
Much of the code is focused on simulating data. Try adding additional properties and displaying them. Embellishments to the UI can always be made to make the display prettier.
Summary
A DataContext class defines a data source, while the bindings associate what specific data is shown and how. The nesting hierarchical nature of WPF both in terms of visual components and data is very powerful and enhances the flexibility of the framework. Some of this can be seen in the routing of events, the routing of commands and the propagation of properties as seen above with the TextElements.
Additional resources
The following resources will enable you to dive deeper and fly higher with the technologies discussed in this post:
Getting Started with Windows Presentation Foundation (WPF) in .NET Core – The first post in this series introduces the basic concepts of WPF and walks you through creating a working example.
Understanding WPF Routed Events In .NET Core – The sophisticated event handling system in WPF is one of its many strengths. This post introduces you to event handling concepts like bubbling and tunneling.
How to: Implement Property Change Notification – This article in the docs.microsoft.com Desktop Guide describes how to set up OneWay and TwoWay binding and provides a code sample.
Events and routed events overview – Although this article is written for UWP rather than WPF, the fundamental concepts of event handling and routing are similar. Read for conceptual understanding and refer to WPF-specific pages for functional reference material. (Note that as of this writing the .NET 5.0 documentation for WPF is a work in progress.)
Using Twilio Lookup in .NET Core WPF Applications – Learn how to use the Twilio Lookup API to verify phone numbers and find caller information for numbers entered in a WPF application.
TwilioQuest – If you’d like to learn more about programming C# and other languages, try this action-adventure game inspired by the 16-bit golden era of computer gaming.
Jeffrey Rosenthal is a C/C++/C# developer and enjoys the architectural aspects of coding and software development. Jeff is a MCSD and has operated his own company, The Coding Pit, since 2008. When not coding, Jeff enjoys his home projects, rescuing dogs, and flying his drone. Jeff is available for consulting on various technologies and can be reached via email, Twitter, or LinkedIn.
Updated 2020-10-26
Related Posts
Related Resources
Twilio Docs
From APIs to SDKs to sample apps
API reference documentation, SDKs, helper libraries, quickstarts, and tutorials for your language and platform.
Resource Center
The latest ebooks, industry reports, and webinars
Learn from customer engagement experts to improve your own communication.
Ahoy
Twilio's developer community hub
Best practices, code samples, and inspiration to build communications and digital engagement experiences.


