How to Make a Spotify Email Notification System Using SendGrid and FastAPI
Time to read:
June 06, 2024
Written by
Reviewed by
In this article, you'll learn how to develop an email notification system for Spotify playlist updates. It's beneficial for keeping your followers informed about new additions or removals from your playlists. It involves utilizing Twilio SendGrid for sending emails, Spotify API for authorizing your Spotify account and making playlist changes, and FastAPI for building the API.
Prerequisites
Below are the prerequisites for setting up the email notification system for Spotify playlist updates:
- Twilio SendGrid Account: Sign up for a Twilio SendGrid account to handle email sending functionality.
- Spotify Developer Account: Obtain credentials (Client ID and Client Secret) from the Spotify Developer Dashboard to access the Spotify API.
- Python 3.6 or newer: You can download it from here .
- ngrok: Download and set up ngrok , a tool for exposing local servers to the internet securely.
Set up the Twilio SendGrid account
In this section, you’ll set up your SendGrid account to obtain an API key and configure sender identity on SendGrid.
Obtain SendGrid API key
To use Twilio SendGrid API, you need to obtain an API key. For this, login to your SendGrid account and navigate to API Keys option under Settings menu. Click on Create API Key and enter API Key Name and API Key Permissions.
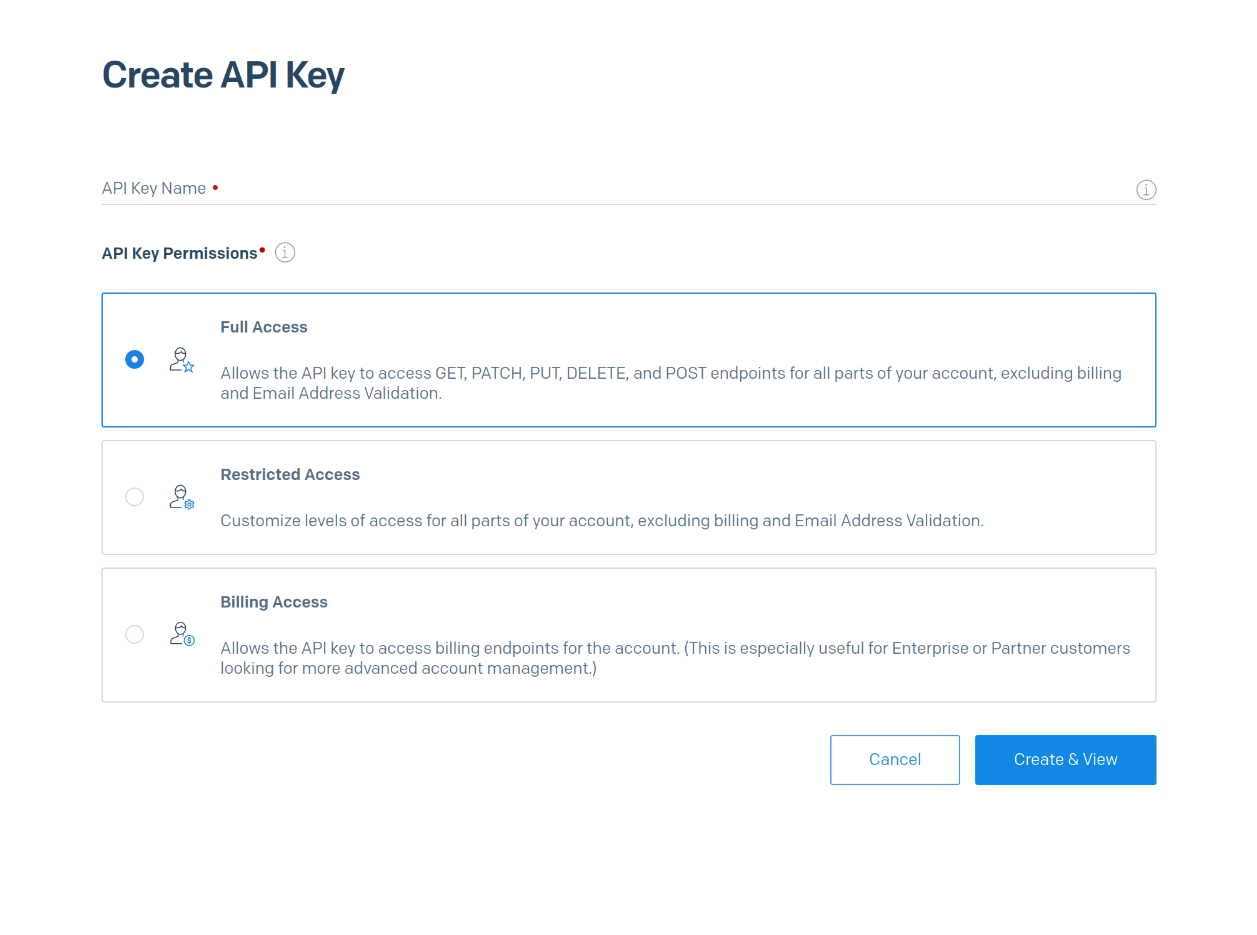
On clicking Create & View, your API key will appear on the screen. For security reasons, you won’t be able to see your API key on the platform again. So make sure to copy and save your key.
Create a Sender Identity on SendGrid
Create a sender identity on your SendGrid account to set up an email address for the SendGrid API.
Click on the Create sender identity button and fill in your details.
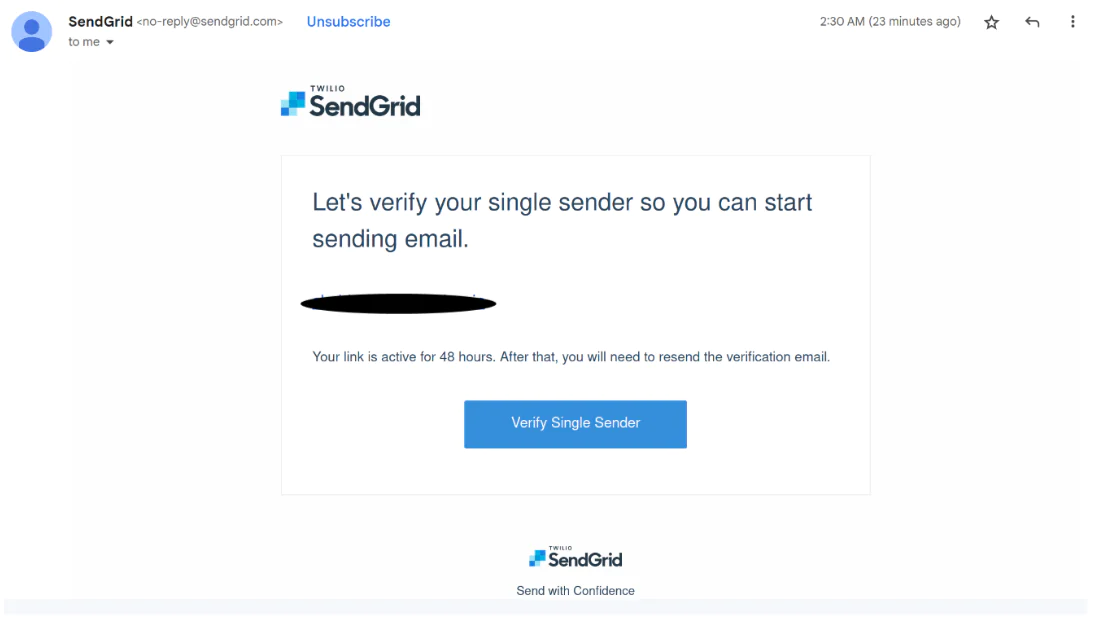
This would trigger a verification email on the sender email address you have added. Click on the Verify Single Sender button in the email received to verify your email address.
Build the Spotify email notifications app
In this section, you'll explore detailed, step-by-step instructions for constructing this application.
Install the following Python dependencies:
FastAPI: Builds fast and scalable APIs.
DotEnv: Manages environment variables in Python.
Requests: Sends HTTP requests to APIs.
Uvicorn: SGI server implementation for FastAPI
You can download these by running the following command on your terminal:
pip install fastapi python-dotenv requests uvicorn
Obtain the Spotify API credentials
To use Spotify APIs, you need to obtain Client ID and Client Secret from the Spotify Developer Dashboard. To achieve this, follow the steps:
Login to the Spotify Developer dashboard.
Initiate an application creation by clicking on Create app.
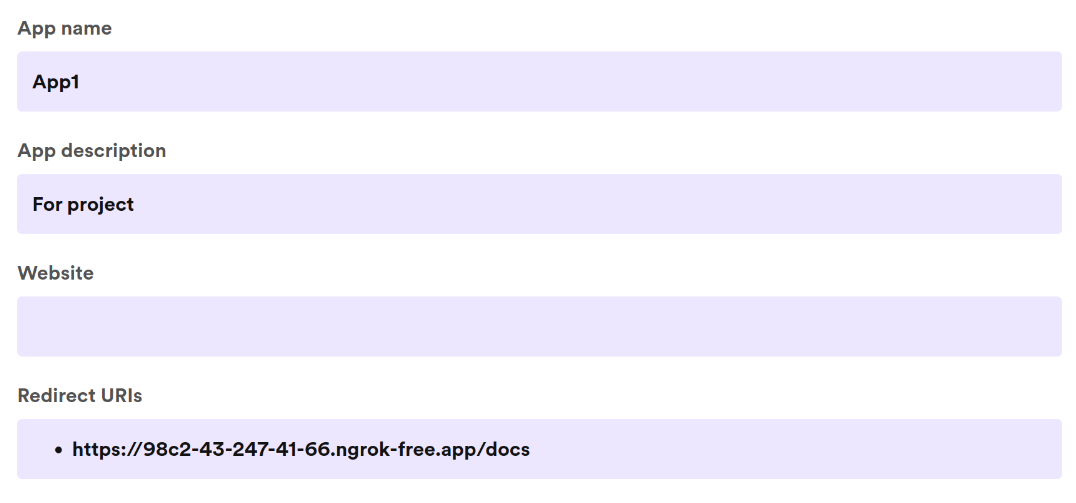
Fill your application details such as App name, App description, Website, and Redirect URI.
A redirect URI is the URL where the users can be redirected after authentication success or failure. It's crucial for handling the response from the authentication server, whether the authentication was successful or not. For now, you can add an arbitrary redirect URI, and update it when you create your application endpoints.
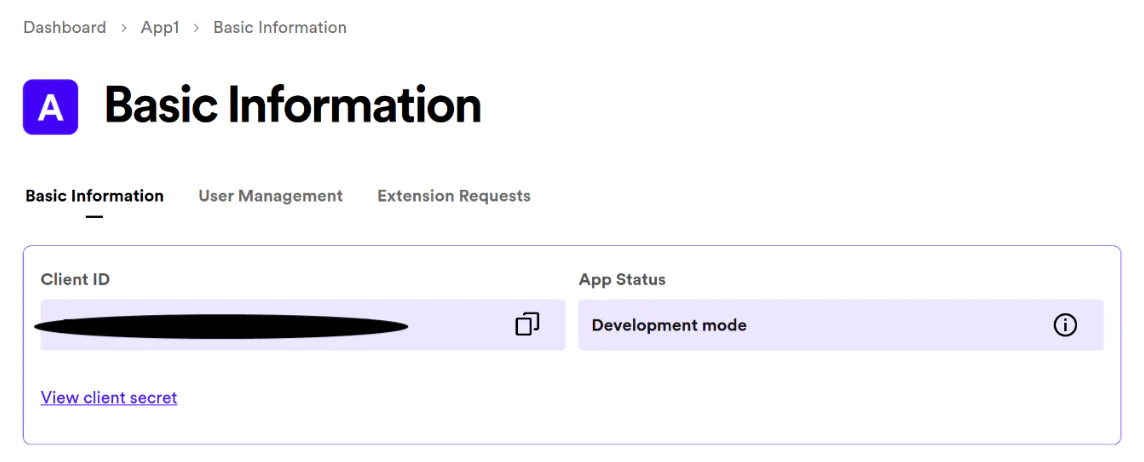
The newly-created application name will now be displayed on your dashboard.
Once you open your application settings, you will be able to see your Client ID and Client Secret which is required in the .env file in the next section.
Set up the Project Directory
Set up a project directory with the following files:
.env: Stores environment variables
email_notifier.py: Contains code for sending emails and creating APIs for playlist updates
spotify_authorization.py: Includes code for authorizing the user's Spotify account
Configure the Environment Variables with .env File
The .env file is a text file used to store environment variables for an application. It allows developers to manage sensitive information such as API keys, credentials, and configuration settings outside of the main codebase.
To create a .env file, create a new text file named .env in your project directory. Inside this file, you can define your environment variables in the format VARIABLE_NAME=VALUE.
Configure the .env file for this project as follows:
Make sure to replace the keys with your actual credentials. These environment variables will be read and loaded into your application during runtime, allowing you to access them securely without hardcoding sensitive information into your code.
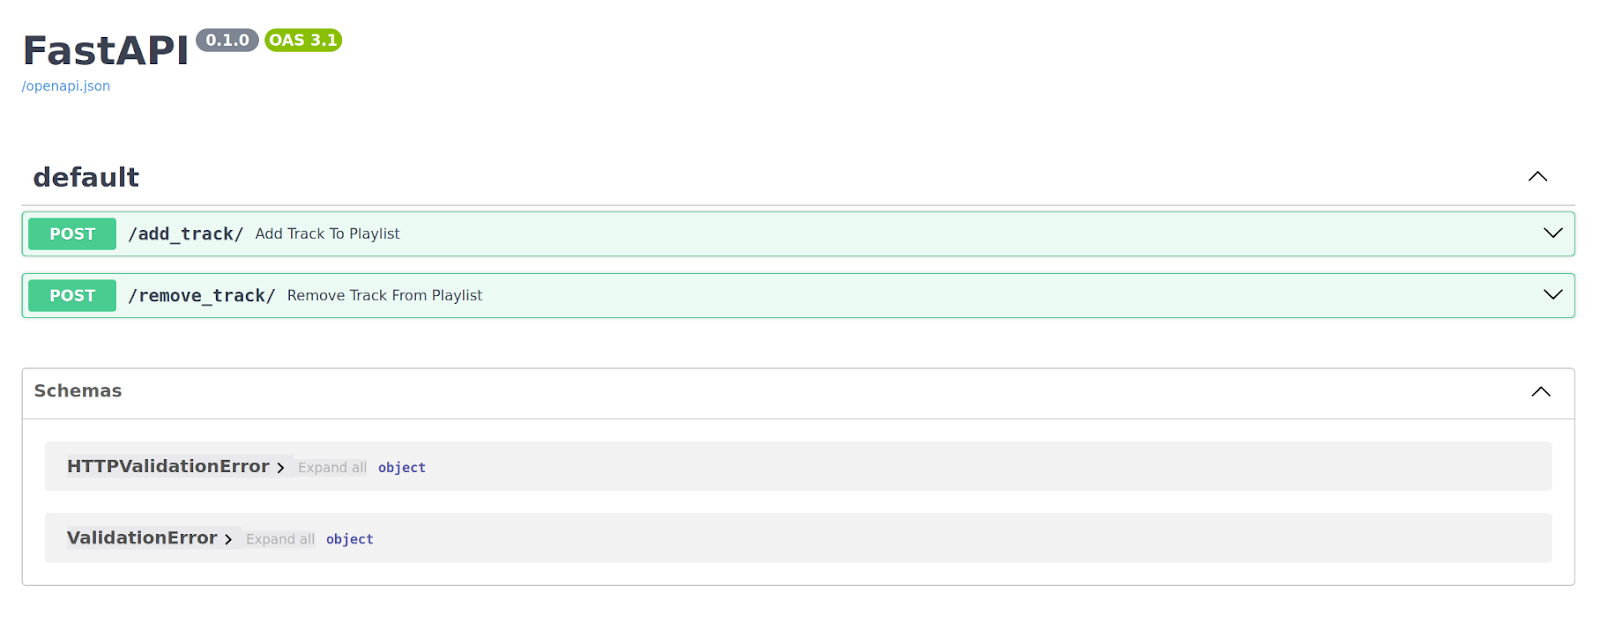
Create APIs to add and remove playlist tracks with FastAPI
Within your project directory, create a Python file named email_notifier.py. This file will house the code for creating APIs and sending emails via SendGrid. The following instructions offer a step-by-step guide for implementing the code within this file.
Import the modules to build the API
Import the necessary Python modules to build the API and handle exceptions. FastAPI is imported for creating ASGI applications and HTTPException for handling HTTP errors. requests is imported for making HTTP requests to external APIs. os is imported for interacting with the operating system, and load_dotenv is imported from dotenv to load environment variables from a .env file.
Utilize the load_dotenv() function to load environment variables from a .env file into the environment. Establish a FastAPI instance to define API endpoints.
Create an endpoint to add a track to the playlist
The endpoint requires the following inputs:
playlist ID: A unique identifier assigned by Spotify to every playlist on their platform. You can find it by going to the Spotify playlist page and extracting the string of characters that appears after "playlist/" within the URL. For example, in the URL https://open.spotify.com/playlist/37i9dQZF1DWWxPM4nWdhyI, the playlist ID is "37i9dQZF1DWWxPM4nWdhyI".
track ID: A unique identifier assigned by Spotify to every track on their platform. You can find it by going to the Spotify track page and extracting the string of characters that appears after "track/" within the URL. For example, in the URL https://open.spotify.com/track/7qiZfU4dY1lWllzX7mPBI3, the track ID is "7qiZfU4dY1lWllzX7mPBI3".
the email IDs of followers: The email IDs of followers, separated by spaces, who you want to be notified about your playlist updates.
A Spotify access token would be required to make the modifications in the Spotify playlist. During the spotify authorization in Authorize the Spotify user to use the app section, the access token will be written to the access_token.txt file. Read the Spotify access token from the access_token.txt file when the user executes the endpoint.
Issue a POST request using the track ID, playlist ID, and the authorization token to add a track to the specific playlist. An email will be sent to the followers after the POST request is executed.
Make a GET request to the respective spotify APIs with the authorization token in the header to fetch the name of the playlist and the track. The send_email_notifications function utilizes Twilio SendGrid to send emails to the followers, a process elaborated in Send email notifications with Twilio SendGrid section.
Keep in mind that the Spotify access token has not been created yet until Authorize the Spotify user to use the app section. The token will be necessary for adding and removing song tracks.
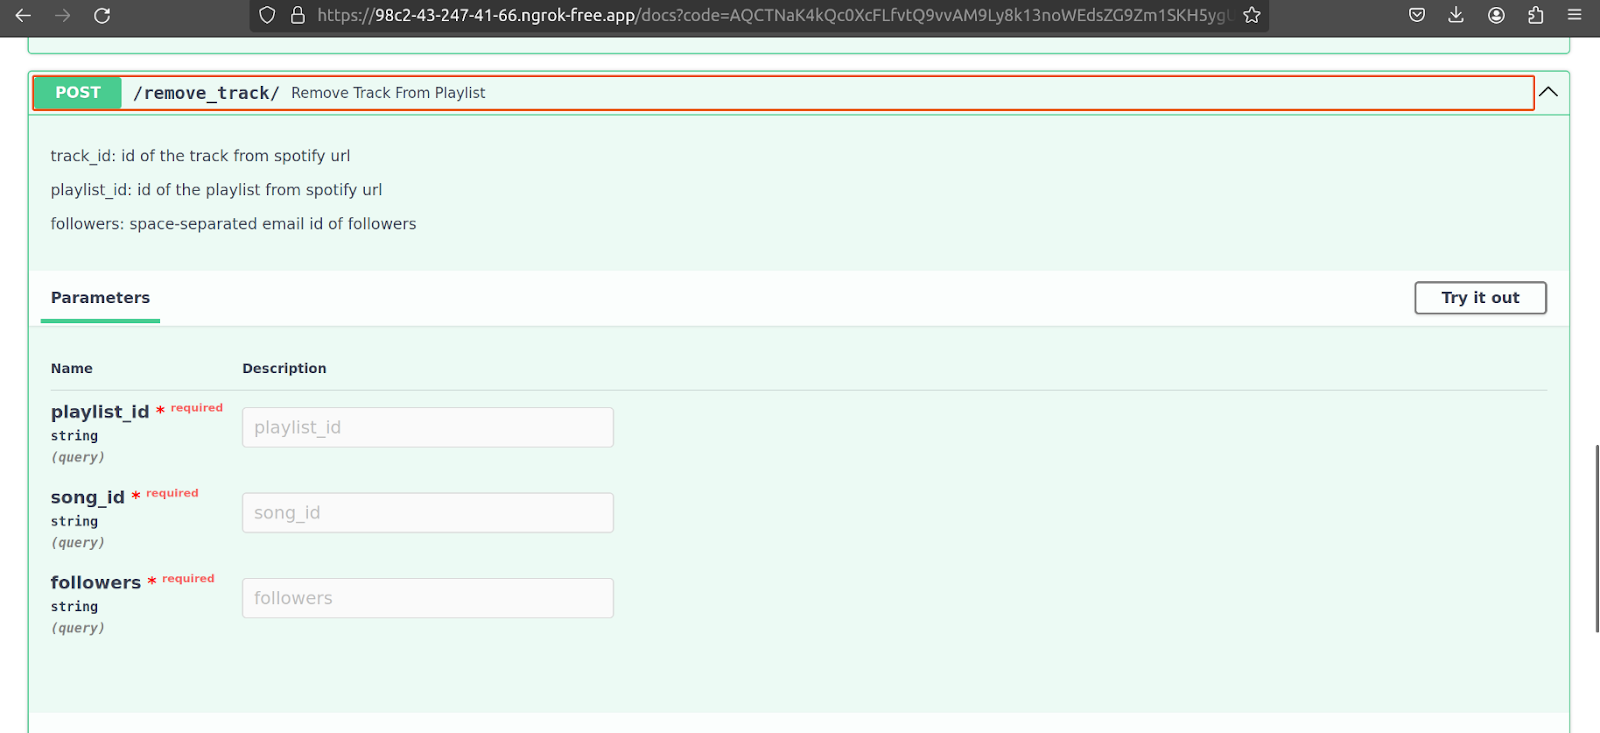
Create an endpoint to remove a track from the playlist
This endpoint operates similarly to the add_track endpoint. The only distinction lies within issuing a DELETE request to remove the specified track from the playlist, in contrast with the POST request used in the add_track endpoint.
Send email notifications with Twilio SendGrid
Make sure that your API keys are secured as environment variables so that the SendGrid API can be used in this project. You will also need to specify the SendGrid URL endpoint responsible for transmitting emails: https://api.sendgrid.com/v3/mail/send
Now, let's dive into the send_email_notifications function. Here, you'll configure an authorization header using your API key. This header serves as a form of authentication, allowing your application to interact securely with the SendGrid API.
Next, define the email settings in JSON format. These settings include crucial details such as the recipient email IDs, the sender's email address, the subject of the email, and the message content. Note that the sender’s email address should be the same as the email address you used while creating a sender identity on Twilio SendGrid.
Once the email settings are configured, it's time to initiate a POST request to the SendGrid API endpoint. This request includes both the authorization header and the email settings JSON payload. Upon execution, SendGrid processes the request and attempts to deliver the email to the specified recipients.
Handle errors in the email notification app
In the event that email delivery encounters an issue, such as network errors or invalid recipient addresses, it's essential to handle these errors gracefully. To achieve this, employ error handling mechanisms such as raising an HTTPException. This ensures that any issues with email delivery are detected and managed appropriately, preventing potential disruptions to your application's functionality.
It is essential to ensure that the sender's email address is properly configured and verified within your SendGrid account. To ensure this, make sure that the sender email address is the same as the email address you entered when creating a sender identity on SendGrid. To check this, log in to your Twilio SendGrid account and navigate to the Sender Authentication page. You will now be able to see your configured email addresses as shown below.
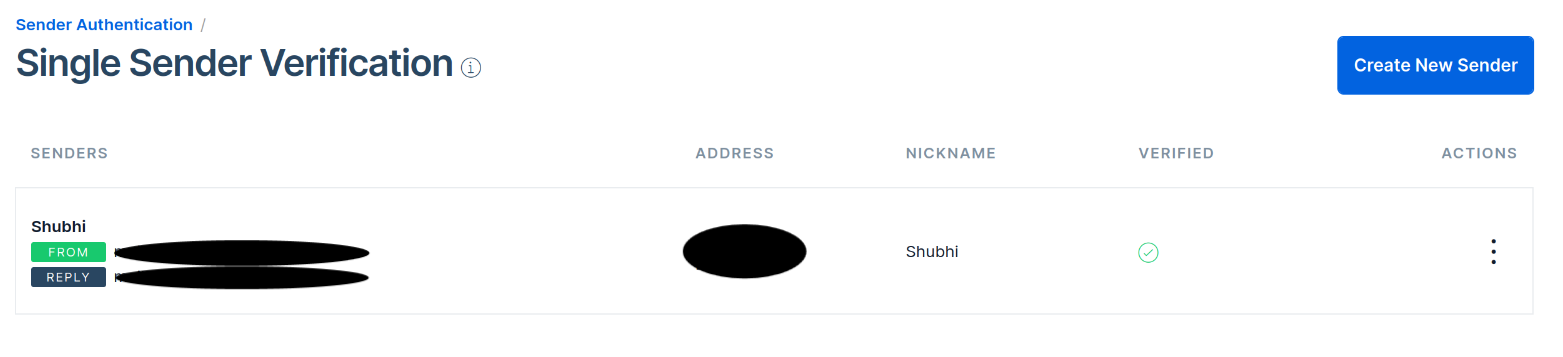
If you want to add a new sender email address, click on the Create New Sender button and fill your details as described earlier in the Set Up the Twilio SendGrid account section.
Navigate to the email_notifier.py file and add the following code implementing the send_email_notifications and error handling functionality. Make sure to replace YOUR_EMAIL_ID with your SendGrid sender email address.
Now that your application is prepared, the next step involves acquiring a link to access it. You can achieve this by either deploying the application to a hosting service or running it locally and utilizing ngrok to expose it to the internet. This URL with /docs endpoint will serve as the redirect URI for the Spotify user authorization step.
Make sure the email_notifier.py file is running at this point to generate the redirect URI.
Now, open another terminal, and run the following command to expose your application to the internet ngrok http 8000
Note that 8000 is the port number where your application is running. If your application is running on some other port number, use that port number instead.

ngrok will generate a URL for you. FastAPI applications offer a /docs endpoint, providing access to the APIs. The ngrok URL with the /docs endpoint will be your redirect URI. For example, the obtained ngrok URL is https://98c2-43-247-41-66.ngrok-free.app, then your redirect URI will be https://98c2-43-247-41-66.ngrok-free.app/docs. Incorporate the redirect URI into your .env file.
REDIRECT_URI=redirect_uri
Add the same redirect URI in your application settings on the Spotify Developer dashboard. To do this, enter your application and click on Settings. Edit the Redirect URIs field from the available options.
Authorize the Spotify user to use the app
With your APIs in place, there's a crucial step remaining. Users must be authorized to access their tracks and playlists. But wait, wasn't this already covered with the Spotify client ID and client secret? Actually, no.
The client ID and client secret are for the Spotify Developer account, meant for developers like yourself. However, the end users of this notification system could be anyone. Therefore, to enable access to their playlists and tracks, user authorization is necessary for users to log in.
To initiate Spotify User Authorization, create a new Python file named spotify_authorization.py and include the following code:
This code triggers an API call to Spotify's authorization endpoint using your credentials. This triggers the Spotify login page. After the user logs in, they are redirected to your FastAPI app via the specified redirect URI. The redirected URL contains a code parameter, which is the user's authorization code. This code needs to be entered into the terminal. The code is then exchanged for an access token, which is subsequently written to a file named access_token.txt.
NOTE: It is crucial to ensure that the REDIRECT_URI environment variable exactly matches the redirect URI configured in your app on the Spotify Dashboard. Failure to do so may result in authentication errors and disrupt the functionality of your application.
Run the Spotify email notification application
The code for this project can be accessed on GitHub. In the email_notifier.py file, make sure to replace YOUR_EMAIL_ID with your SendGrid sender email address
Open a terminal and navigate to your project directory using cd command. Run your application using the following command: uvicorn email_notifier:app --reload

Your application is now running on the local server.
Open another terminal and run the ngrok command as specified in Build the Spotify email notifications app section to generate your redirect URI. Add this redirect URI in your .env file and Spotify application settings.
Your application is now operational. You can follow the below procedure for using the application.
Open a third terminal and execute the following command in your project directory: python3 spotify_authorization.py

You will be prompted to go to the spotify authorization URL in the terminal. Click on that URL. A Spotify login page will appear.
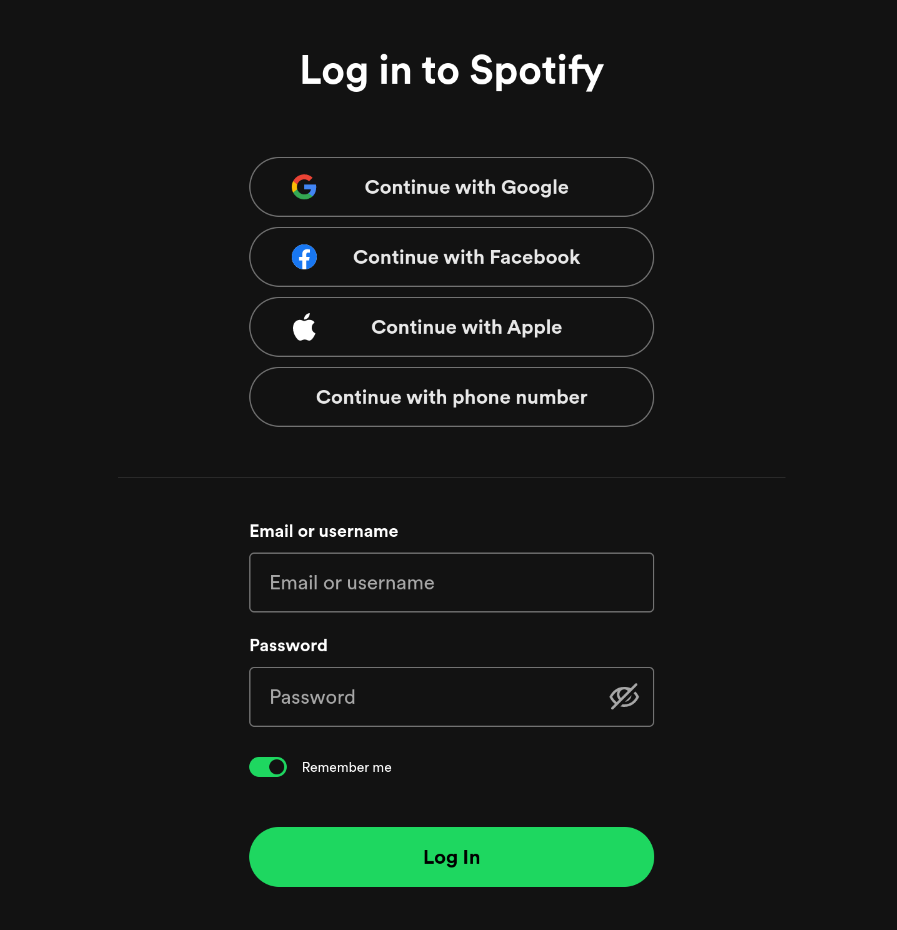
Log in to your Spotify account, and you'll be redirected to your application.
In the redirected URL, you'll notice an authorization code within the code query parameter. For example, the redirected URL is https://98c2-43-247-41-66.ngrok-free.app/docs?code=BTPc1euP3Z_dIicFD4vQ7NWRnjQ0ooC09Sz1Tp4sU3XSc9iQekHDdA, then your code parameter value will be "BTPc1euP3Z_dIicFD4vQ7NWRnjQ0ooC09Sz1Tp4sU3XSc9iQekHDdA". Enter this code in your terminal prompt, where you executed the spotify_authorization.py file.
With the authorization completed, you can now access and utilize the add_track and remove_track APIs directly from the link provided by Spotify during redirection.

When you execute the above APIs, the respective addition/deletion will be done to the Spotify playlist and and an email will be sent to the followers in the following format:

What's next for email notifications with SendGrid?
In this tutorial, you have learned how to develop an email notification system for Spotify playlist updates using Twilio SendGrid, FastAPI, and Spotify API. This application allows users to add and remove tracks from their playlists and notifies their followers via email about these changes.
You can explore adding more advanced notification features, such as customizing email templates, scheduling notifications, or implementing push notifications via mobile apps. Additionally, consider expanding the notification capabilities by integrating with alternative music streaming platforms like Apple Music or Google Play Music.
Check out some other cool Spotify projects from the Twilio blog:
Build a collaborative playlist over WhatsApp with Rails, Twilio, and Spotify
Build a Digital Jukebox for WhatsApp using Spotify, Python and Twilio
Shubhi Singhal is a software engineer and tech enthusiast, passionate about exploring diverse areas within the tech industry.


Related Resources
Twilio Docs
From APIs to SDKs to sample apps
API reference documentation, SDKs, helper libraries, quickstarts, and tutorials for your language and platform.
Resource Center
The latest ebooks, industry reports, and webinars
Learn from customer engagement experts to improve your own communication.
Ahoy
Twilio's developer community hub
Best practices, code samples, and inspiration to build communications and digital engagement experiences.