Share Your Pride With Twilio MMS and Pridefy.com
Time to read:
July 02, 2015
Written by
This post is part of Twilio’s archive and may contain outdated information. We’re always building something new, so be sure to check out our latest posts for the most up-to-date insights.

Last week, the Supreme Court gave us a fantastic reason to celebrate, legalizing gay marriage in the U.S. At Twilio HQ, we celebrated alongside our friends and co-workers, in spirit with hundreds of thousands of men and women across the country and abroad.
Twitter put out a super easy way to add the signature rainbow heart to your tweet with the hashtag #LoveWins. Facebook offered an easy to add a rainbow photo filter on your profile picture. Now, Abe Diaz created another way you can show your pride.
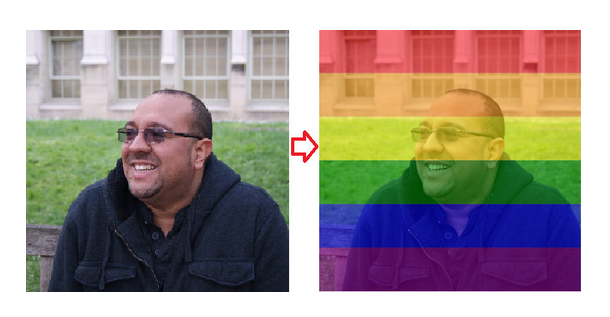
Using Twilio MMS, you can text in any photo to 415 360 2438 and Abe’s service PrideFy will send you that photo back with a rainbow filter added.
We’re happy (and humbled) to syndicate Abe’s post below. Check out the original post on Abe’s blog here.
Sharing Your Pride via Twilio MMS with PrideFy
Inspired by the decision of the Supreme Court of the United States to declare same sex marriage a constitutional right and the celebratepride tool that Facebook launched on that same day, I decided to create an MMS ( Twilio powered) version of the same for those who (and I’m not sure why) do not have a Facebook account yet. Here are the steps I followed to make this happen; if you want to see the demo go to Pridefy.com
Step 1: Change Opacity
First I needed to find a way to change the opacity of the rainbow flag; a 50% seemed like the right choice here but I made this option part of the input for the method, just in case you want to play with this in the future. Check this article for some more details into this.
I tried this method and got some results, but not quite what I wanted. See what I mean here:

Background Image with Overlay at 50%
Step 2: Scale Image
I wanted like the rainbow flag to cover the whole image, So I tried making both images the same size and this is what I got:

Stretched with Uniform Ratios
This didn’t turn out like I wanted it. I needed to scale the image using ratios horizontally but needed to retain the same vertical height.
Check the results now:

Step 3 – Putting it all together for Image Manipulation
When I receive an MMS message what I get is not the actual file (binary) but a link to the media file in Twilio’s servers. Therefore I needed to do a webrequest to get the media file (this is the MediaUrl0 parameter). I grabbed the flag image from a public Flickr url.
I then do the scaling, overlay and return the (in memory) image to the main controller.
Step 4 – The MMS Controller
I created an MVC controller to handle the incoming images and return back TwiML markup (Note: This controller must inherit from TwilioController in order to be able to send that TwiML markup back). You can do the same with a WebAPI controller, Node, etc. I just went for simple here
The same way that Twilio sends images via MMS, I needed to send them back; this means I had to save the image somewhere and then send the URL to that media file back. To do this I used Azure Blob Storage; again nothing fancy here, check this tutorial for a quick how to. I created a container for my images,created a blob and uploaded the image to that blob.
Warning: don’t forget to set the Content-Type for the blob, failure to do this will serve the blob as “application/octet” which Twilio won’t be able to handle.
Hopefully you enjoyed this little project, I surely did. Feel free to reach out if you have any questions with this demo.


Related Resources
Twilio Docs
From APIs to SDKs to sample apps
API reference documentation, SDKs, helper libraries, quickstarts, and tutorials for your language and platform.
Resource Center
The latest ebooks, industry reports, and webinars
Learn from customer engagement experts to improve your own communication.
Ahoy
Twilio's developer community hub
Best practices, code samples, and inspiration to build communications and digital engagement experiences.