Setting up a Twilio Programmable Wireless SIM Card for SMS and Phone Calls
Time to read:
This post is part of Twilio’s archive and may contain outdated information. We’re always building something new, so be sure to check out our latest posts for the most up-to-date insights.

With Twilio Programmable Wireless you can deploy and manage fleets of cellular connected devices, power connectivity for the Internet of Things and enable highly customized communications use cases.
A couple of weekends ago, I attended the MAGFest video game music festival and had a blast! My friend Mikhail from Russia visited because his band Marshall Art was playing the festival (hint: they ruled). When he got to the States I let him use the Twilio Programmable Wireless SIM card that I was hacking around with because I had already configured it for voice and SMS.

Programmable Wireless isn’t meant to be used as replacement to your cell phone provider, but it was a fun way to help out a friend with a small amount of code and a great first step for future projects.
Acquiring and registering a SIM card
Before moving on, you need to have a Twilio Programmable Wireless SIM card to use for this tutorial. If you do not already have one registered with your account, you can follow this guide on how to order and register your first SIM.
This is required before moving on. Make sure you select a Rate Plan that has Voice and Messaging enabled.
Sending text messages and making phone calls
So you have a Twilio Programmable Wireless SIM card that’s registered. That’s great! Before being able to configure your SIM, you’ll need a Twilio phone number to link it up to. You can buy a phone number here.
Get started by pointing your web browser to the SIMs section of the Console. Now follow these steps:
- Select the SIM you wish to configure (take note of the Sid in the Configure tab as we will need this later)
- Click on the Programmable Voice & SMS tab
- Click on the drop-down to the right of SMS URL under the Programmable SMS section
- Select TwiML
- Click the red + button to the left of the SMS URL
- You should see a popup appear with a TwiML template for routing messages as seen in this image:
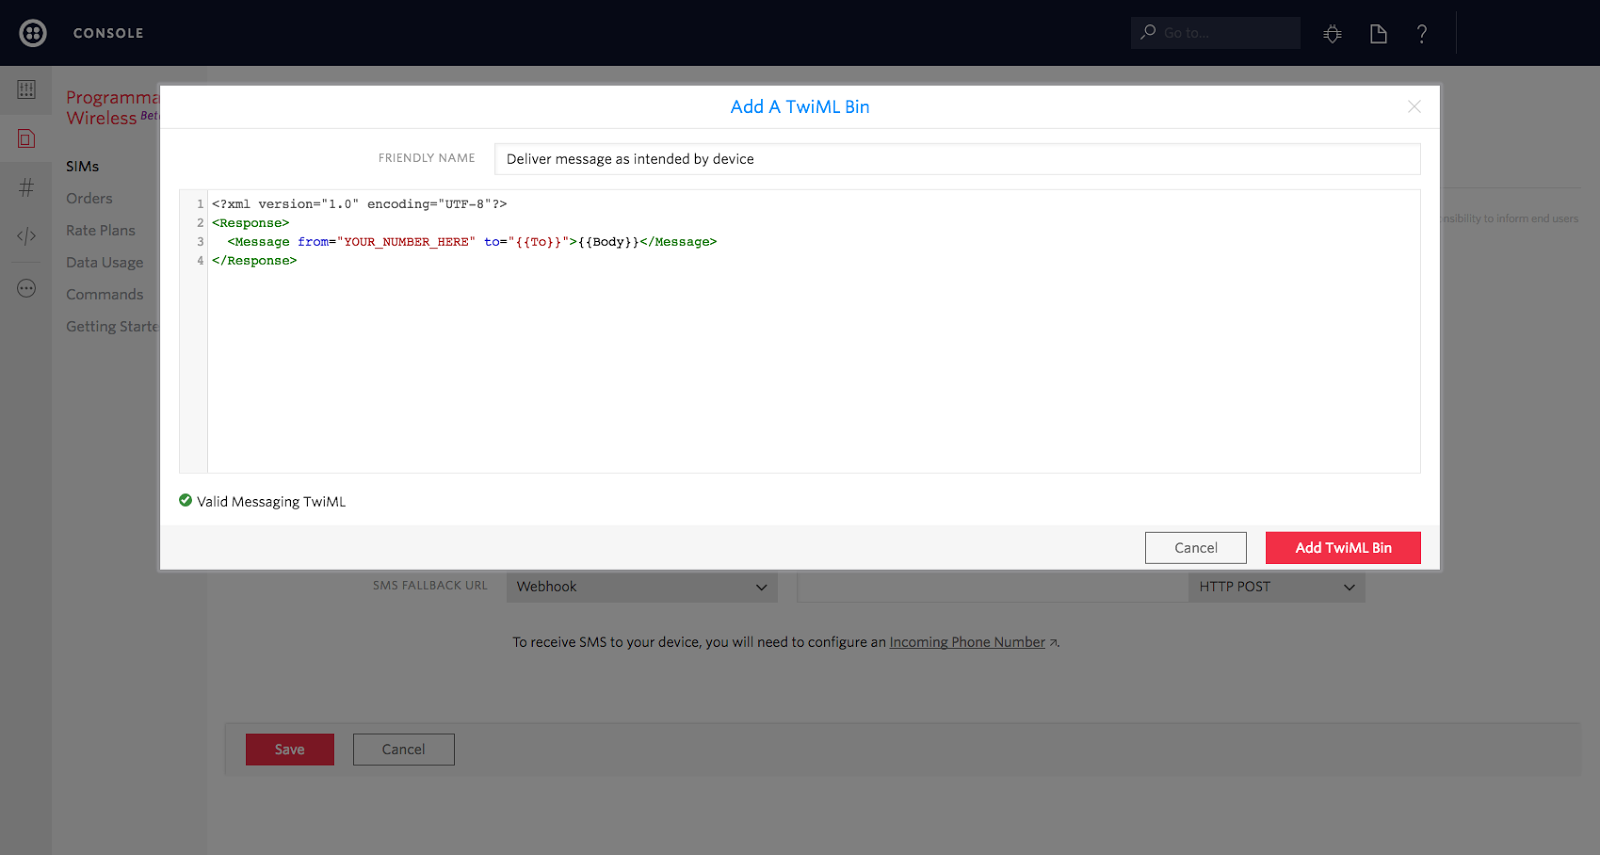
- Replace
YOUR_NUMBER_HEREwith your Twilio phone number - Click Add TwiML Bin
- Click Save
You can now send text messages from your phone. Now do the same with the Programmable Voice section:
- Click on the drop-down to the right of Voice URL under the Programmable Voice section
- Select TwiML
- Click the red “+” button to the left of the Voice URL
- You will see a popup appear with a TwiML template for routing calls that are made by the phone.
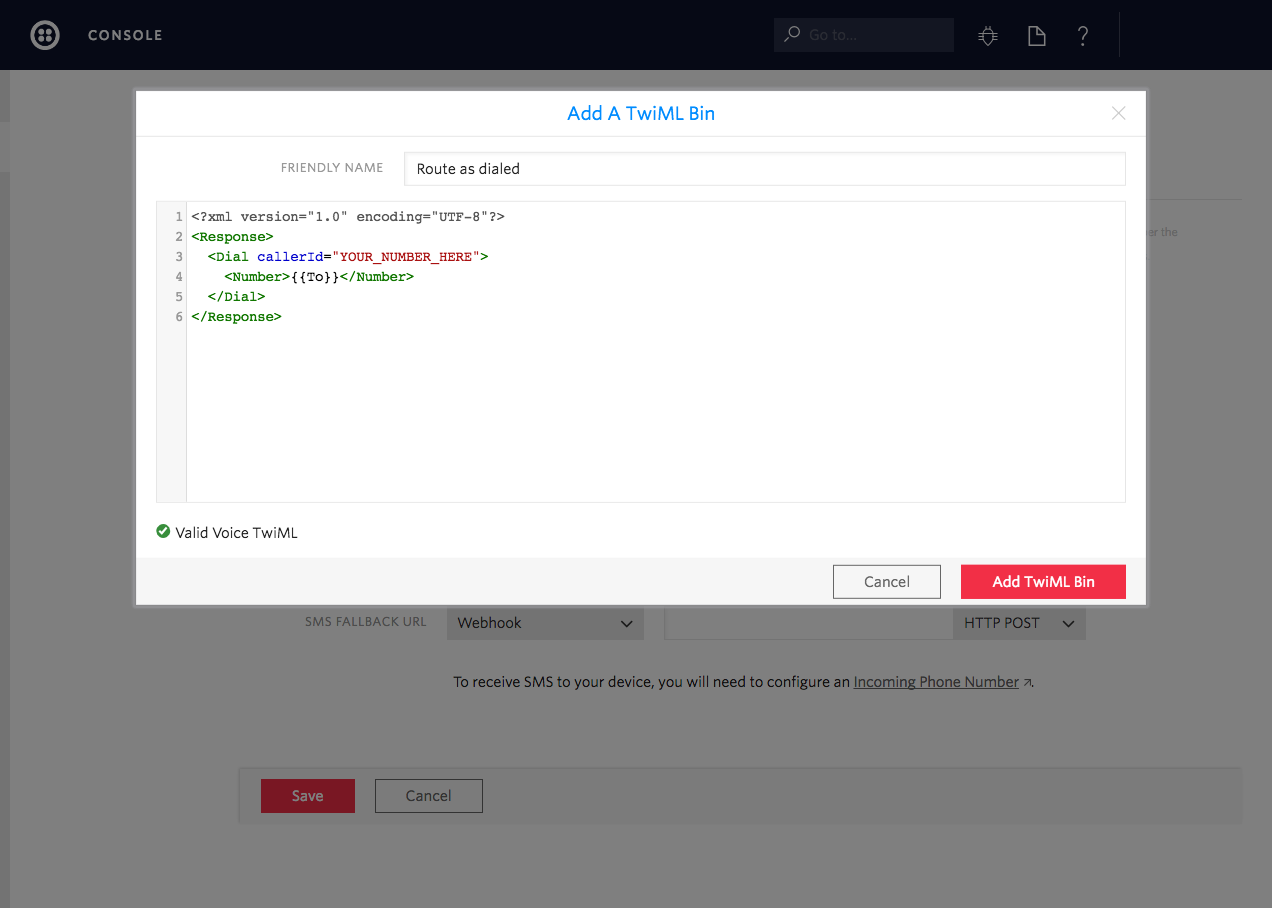
- Replace
YOUR_NUMBER_HEREwith the phone number from the previous section - Click Add TwiML Bin
- Click Save
Now you can send SMS messages and make phone calls!
Receiving text messages and phone calls
To begin, open the TwiML section of the Console and enter a name in the Friendly Name input field.
Enter the following TwiML in the input box:
Enter the SIM Sid in place of YOUR_SIM_SID_HERE and click Save.
- You can find your SIM Sid in the SIMs section.
- The SIM Sid begins with the DE prefix
- Note the
toattribute starts with “sim:”
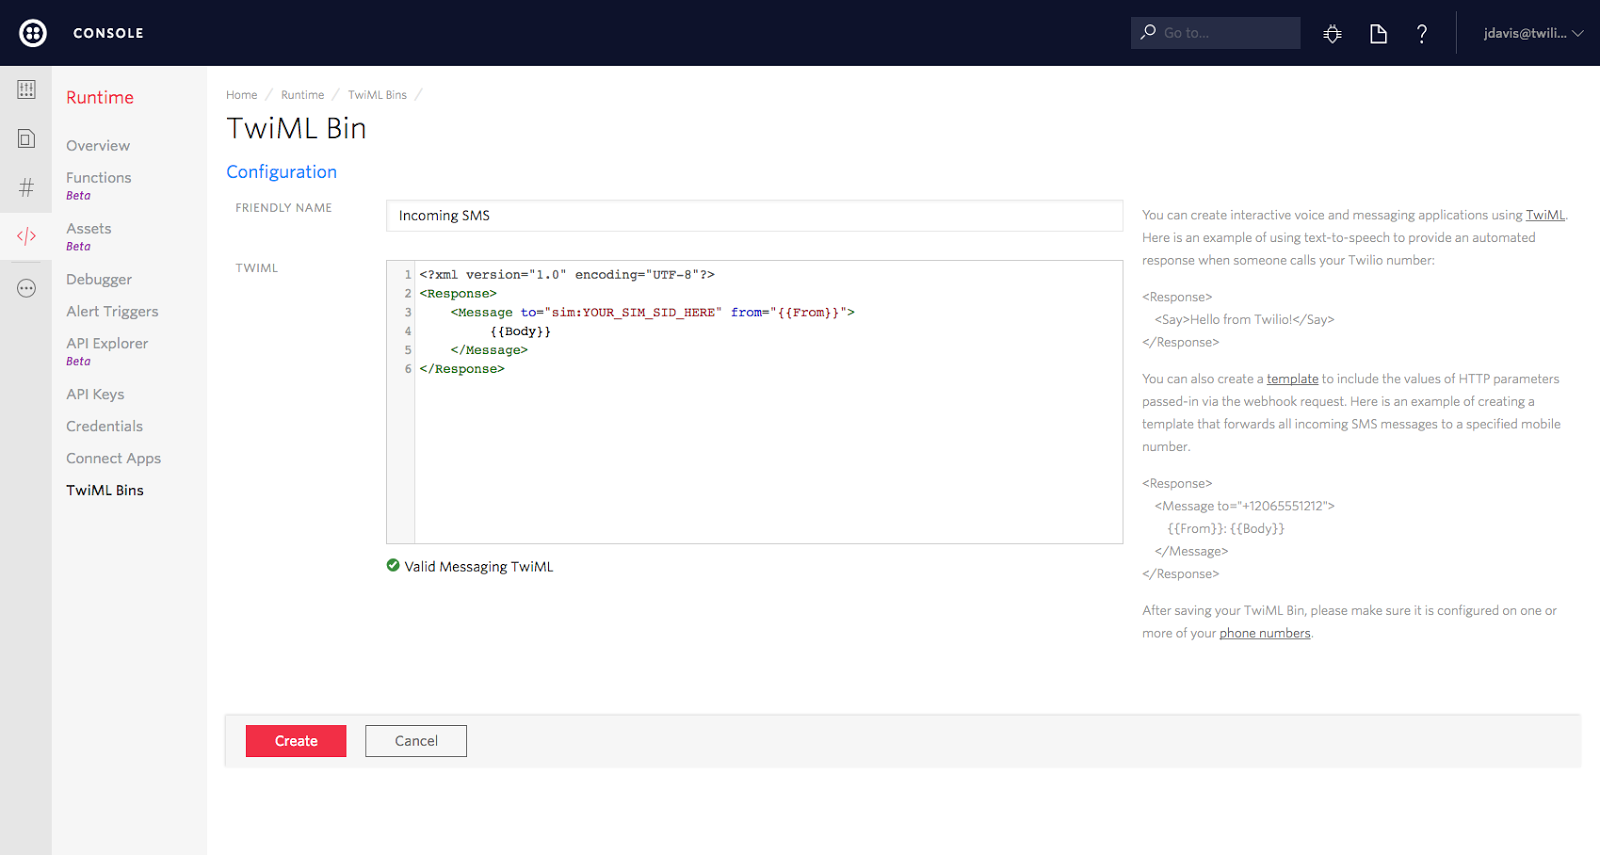
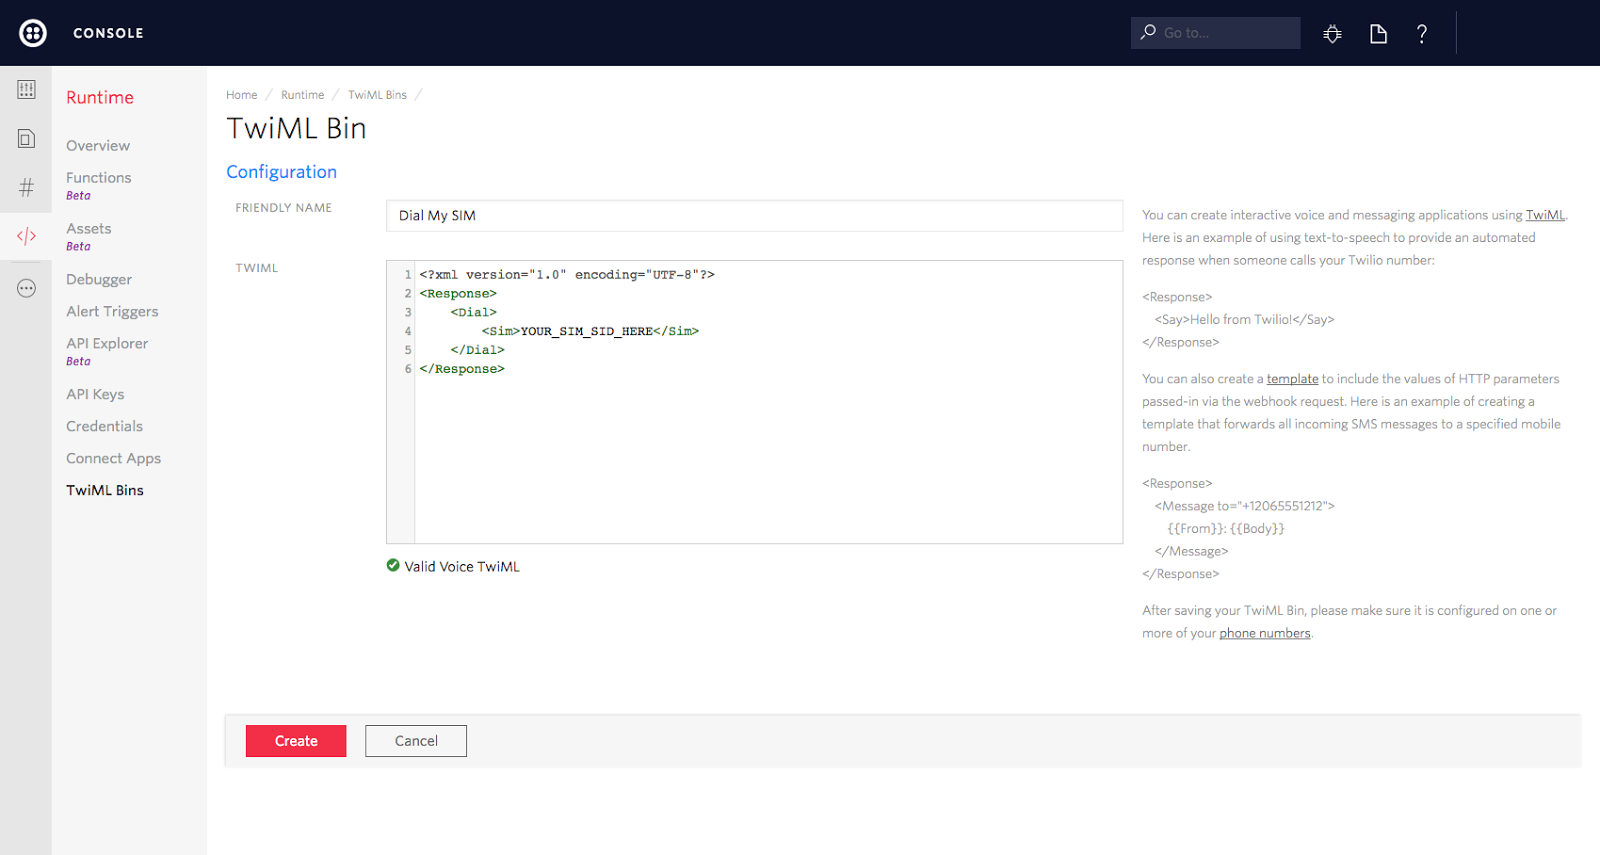
Now create another TwiML bin and enter another friendly name. Enter this TwiML in the input box:
Enter the SIM Sid in place of YOUR_SIM_SID_HERE again and click Save. It should look like this:
Next you need to associate these TwiML bins with your Twilio phone number. Open the Phone Numbers section of the Console and select the number you used earlier.
To receive SMS:
- Select TwiML from the A message comes in dropdown under Messaging
- Select the Friendly Name of the TwiML you created in the previous section
- Click Save
To receive phone calls:
- Select TwiML from the A call comes in drop-down under Voice & Fax
- Select the Friendly Name of the TwiML you created in the previous section
- Click Save
Your phone number screen should now look something like this:
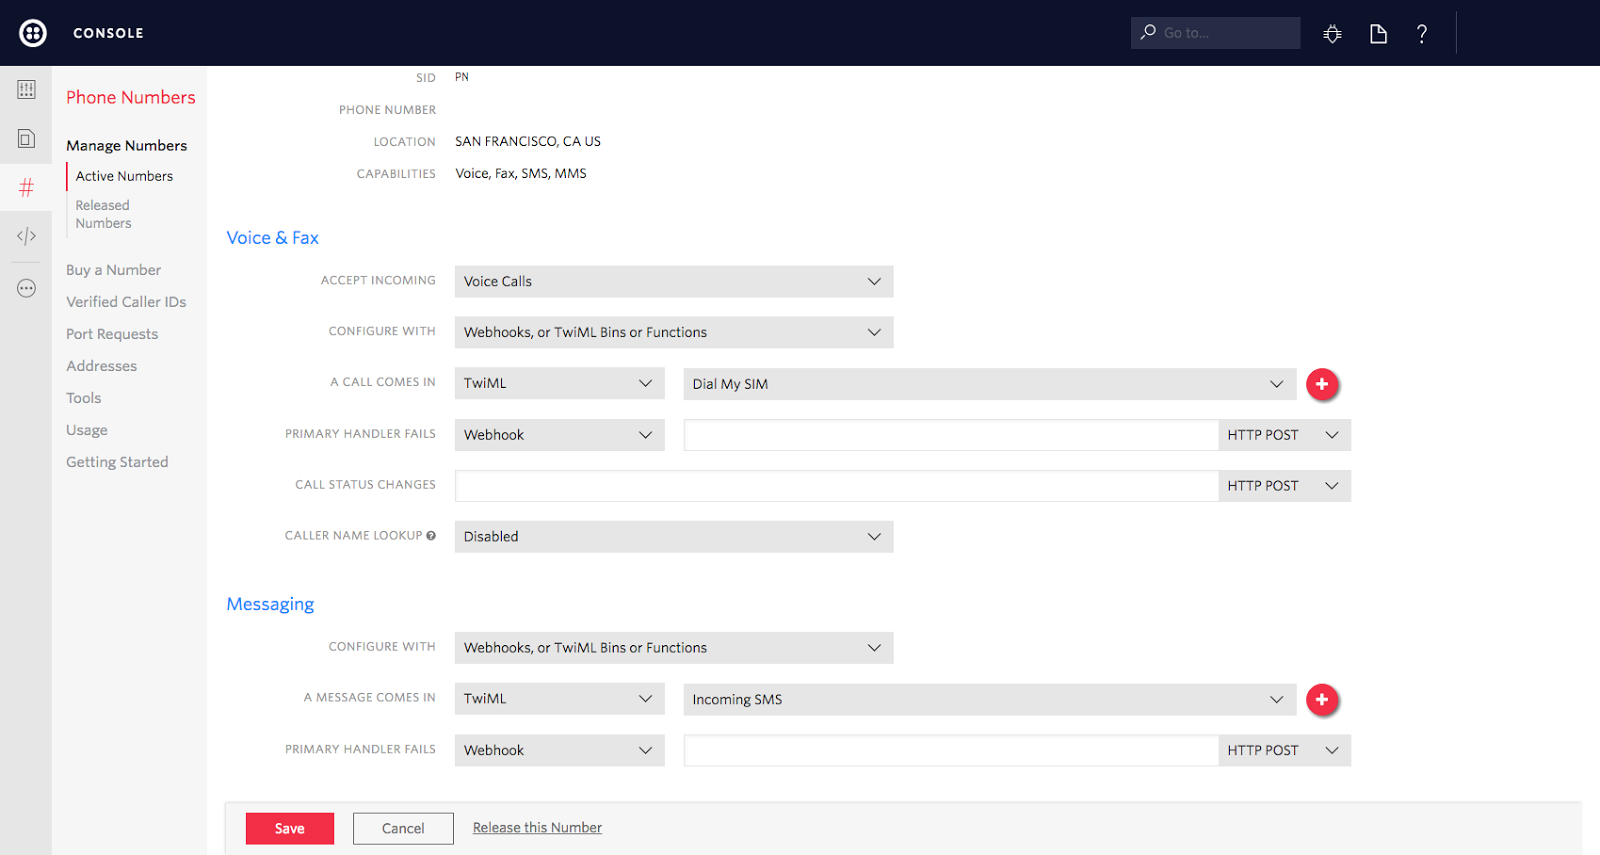
You should now be able to send and receive text messages and make and receive phone calls from your Twilio phone number!
Get hacking!
Now that you know how to send and receive SMS messages and phone calls on your Twilio SIM, you can use it for all kinds of IoT projects. Looking for inspiration? Check out Wireless Blueprints and follow our guide on sending machine-to-machine SMS commands.
Feel free to reach out if you have any questions or comments or just want to show off the cool stuff you’ve built.
- Email: sagnew@twilio.com
- Twitter: @Sagnewshreds
- Github: Sagnew
- Twitch (streaming live code): Sagnewshreds
Related Posts
Related Resources
Twilio Docs
From APIs to SDKs to sample apps
API reference documentation, SDKs, helper libraries, quickstarts, and tutorials for your language and platform.
Resource Center
The latest ebooks, industry reports, and webinars
Learn from customer engagement experts to improve your own communication.
Ahoy
Twilio's developer community hub
Best practices, code samples, and inspiration to build communications and digital engagement experiences.


