Sending Emails in Node.js with Twilio SendGrid Dynamic Templates
Time to read:
April 08, 2025
Written by
Reviewed by
Sending Emails in Node.js with Twilio SendGrid Dynamic Templates
If you're building a notification service or a marketing campaign, sending professional and dynamic emails can become tedious and time-consuming. Twilio SendGrid’s Dynamic Templates solves this by allowing you to design emails visually, embed dynamic data and make updates without touching HTML through our Design Editor. And if you prefer designing with HTML, our Design Editor supports that too.In this tutorial, we’ll dive into how you can send Dynamic Templates from a Node.js application. You’ll learn how to create and update templates in our Design Editor and how to integrate dynamic content when sending templated emails from your Node.js application.
Prerequisites
For this tutorial, you’ll need the following:
- Node.js and npm installed.
- A free SendGrid account with a verified sender identity.
Create a Dynamic Template
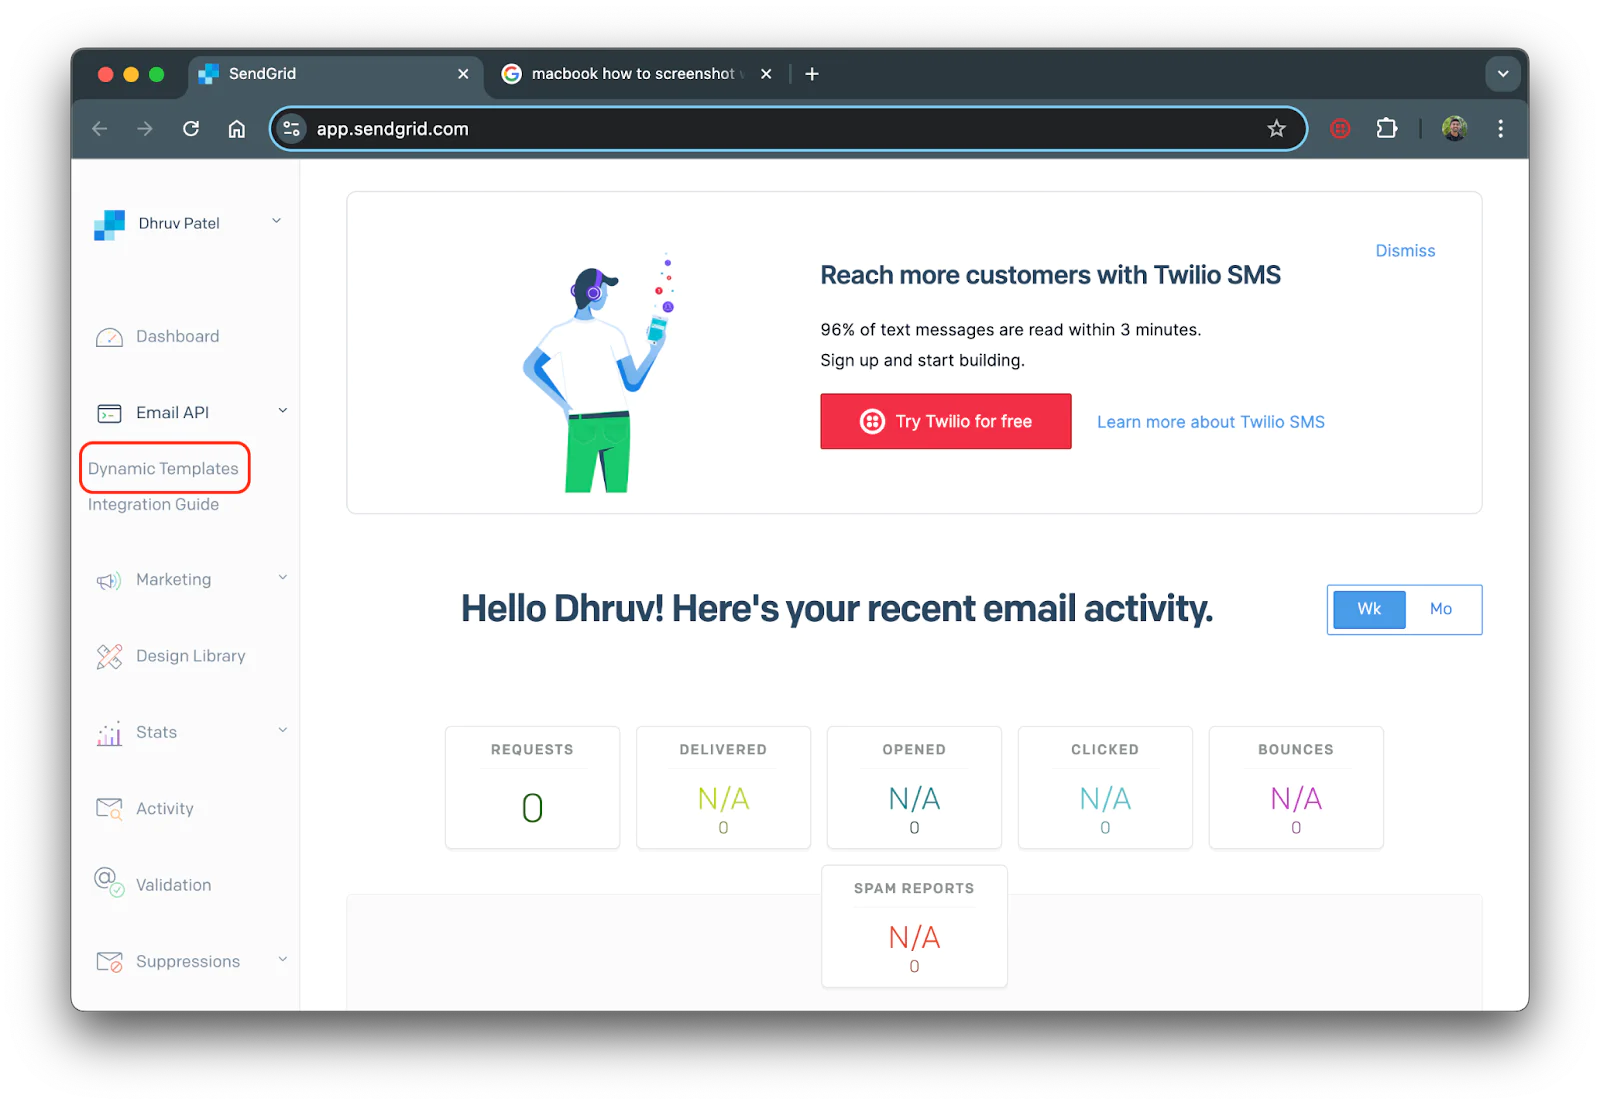
We’ll start off by creating a dynamic template. Log in to your SendGrid Dashboard and click Dynamic Templates under the Email API submenu on the left sidebar.
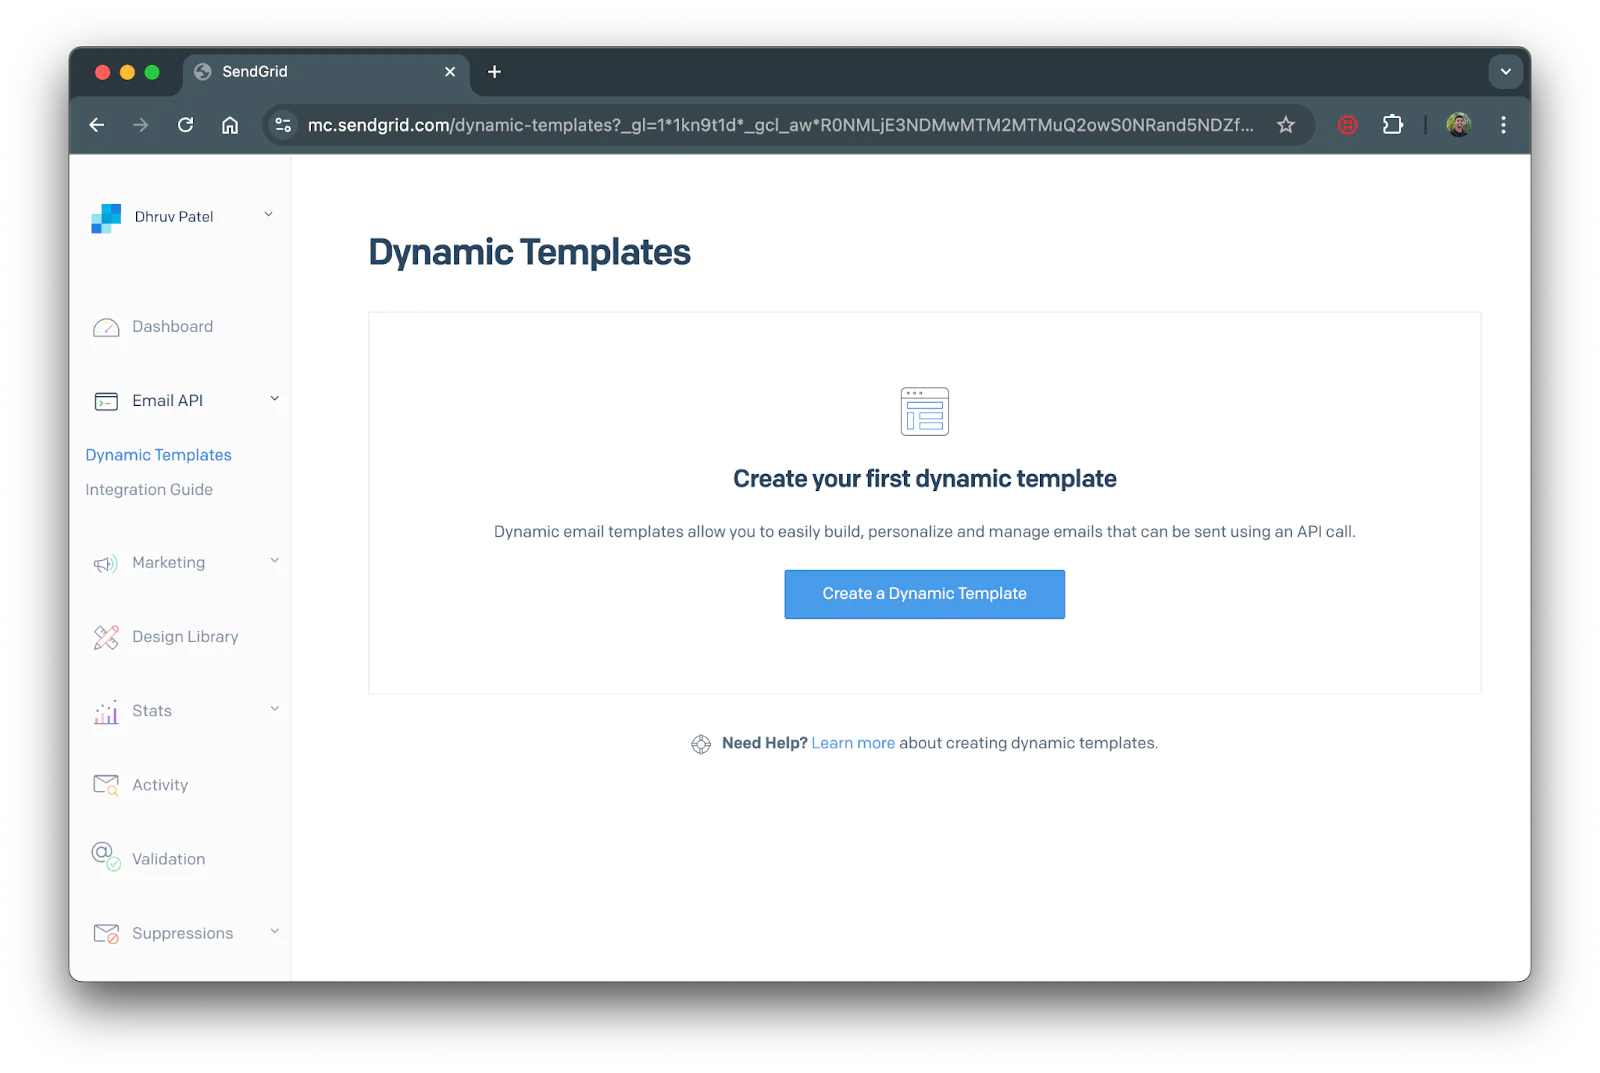
Once you’ve reached the Dynamic Templates menu, click on Create a Dynamic Template shown below.
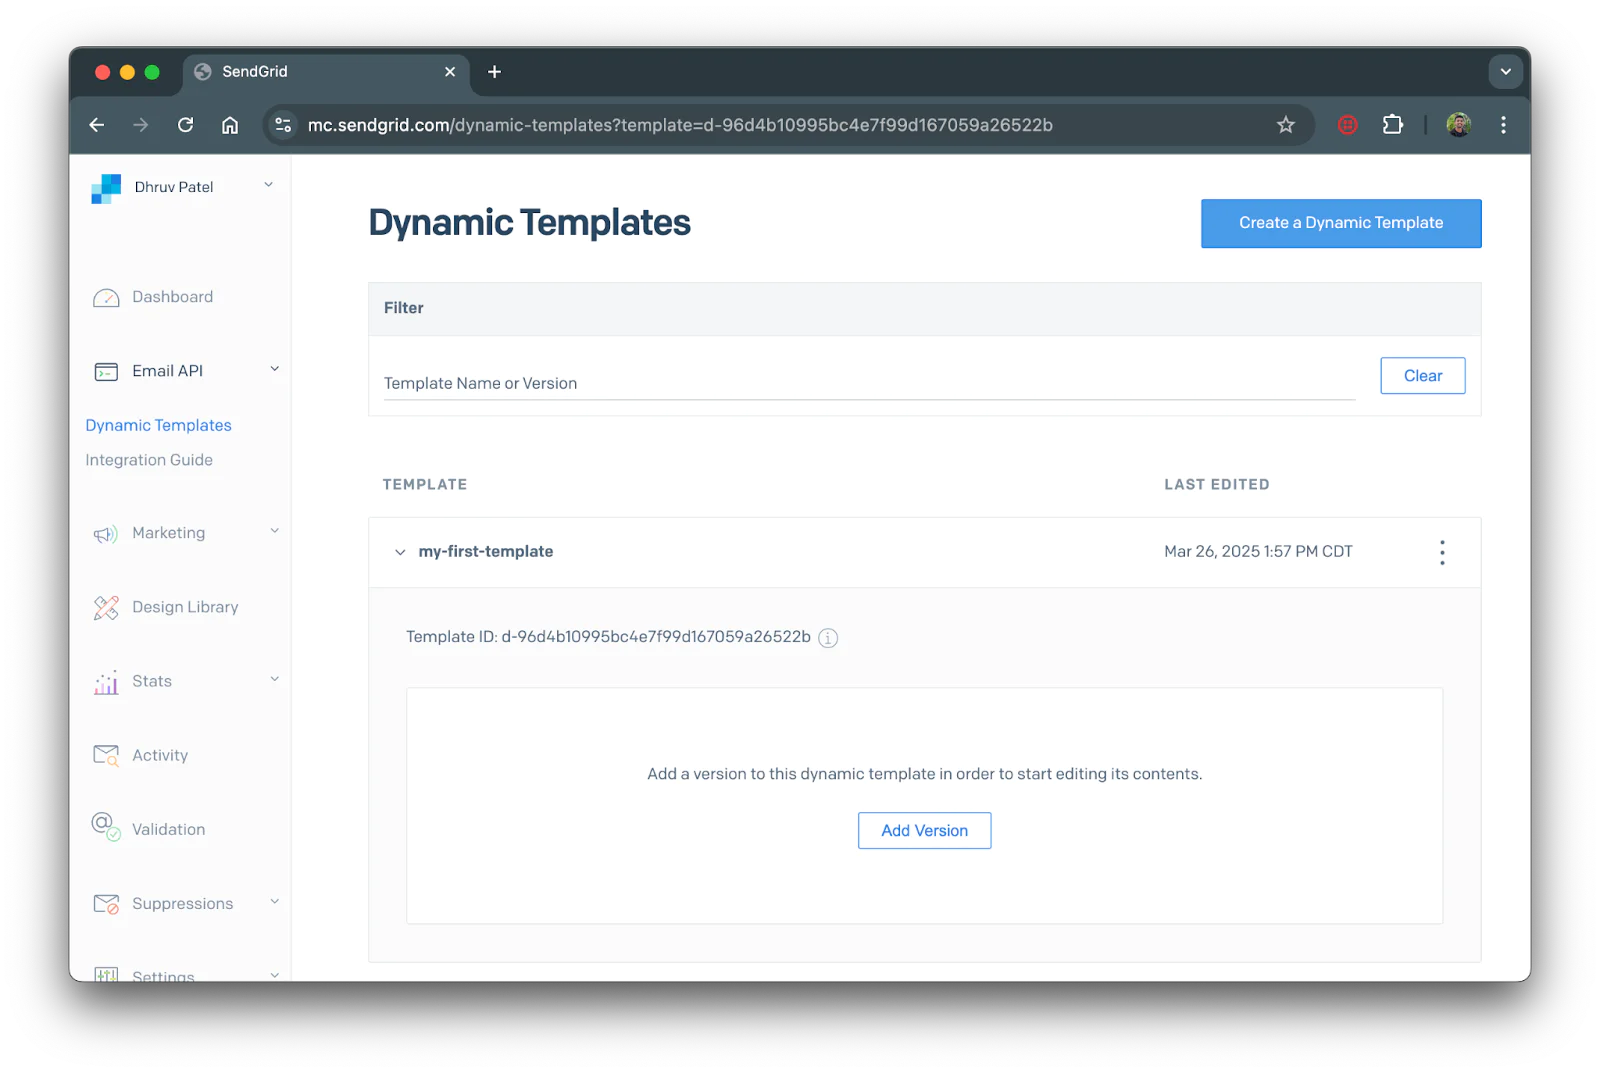
You’ll then be asked to create a name for your new Dynamic Template. Enter “ my-first-template” (or whatever name you want) and click Create.To start editing your new template, you’ll need to add a version to it. You can update and iterate your template by creating new versions in the future, so you can tweak it for different campaigns.
Click on your new template name and it will open a dropdown. While you're here, take note of your Template ID which will be used to select the template in your Node.js code.Within the dropdown, click on the blue button that says Add Version.
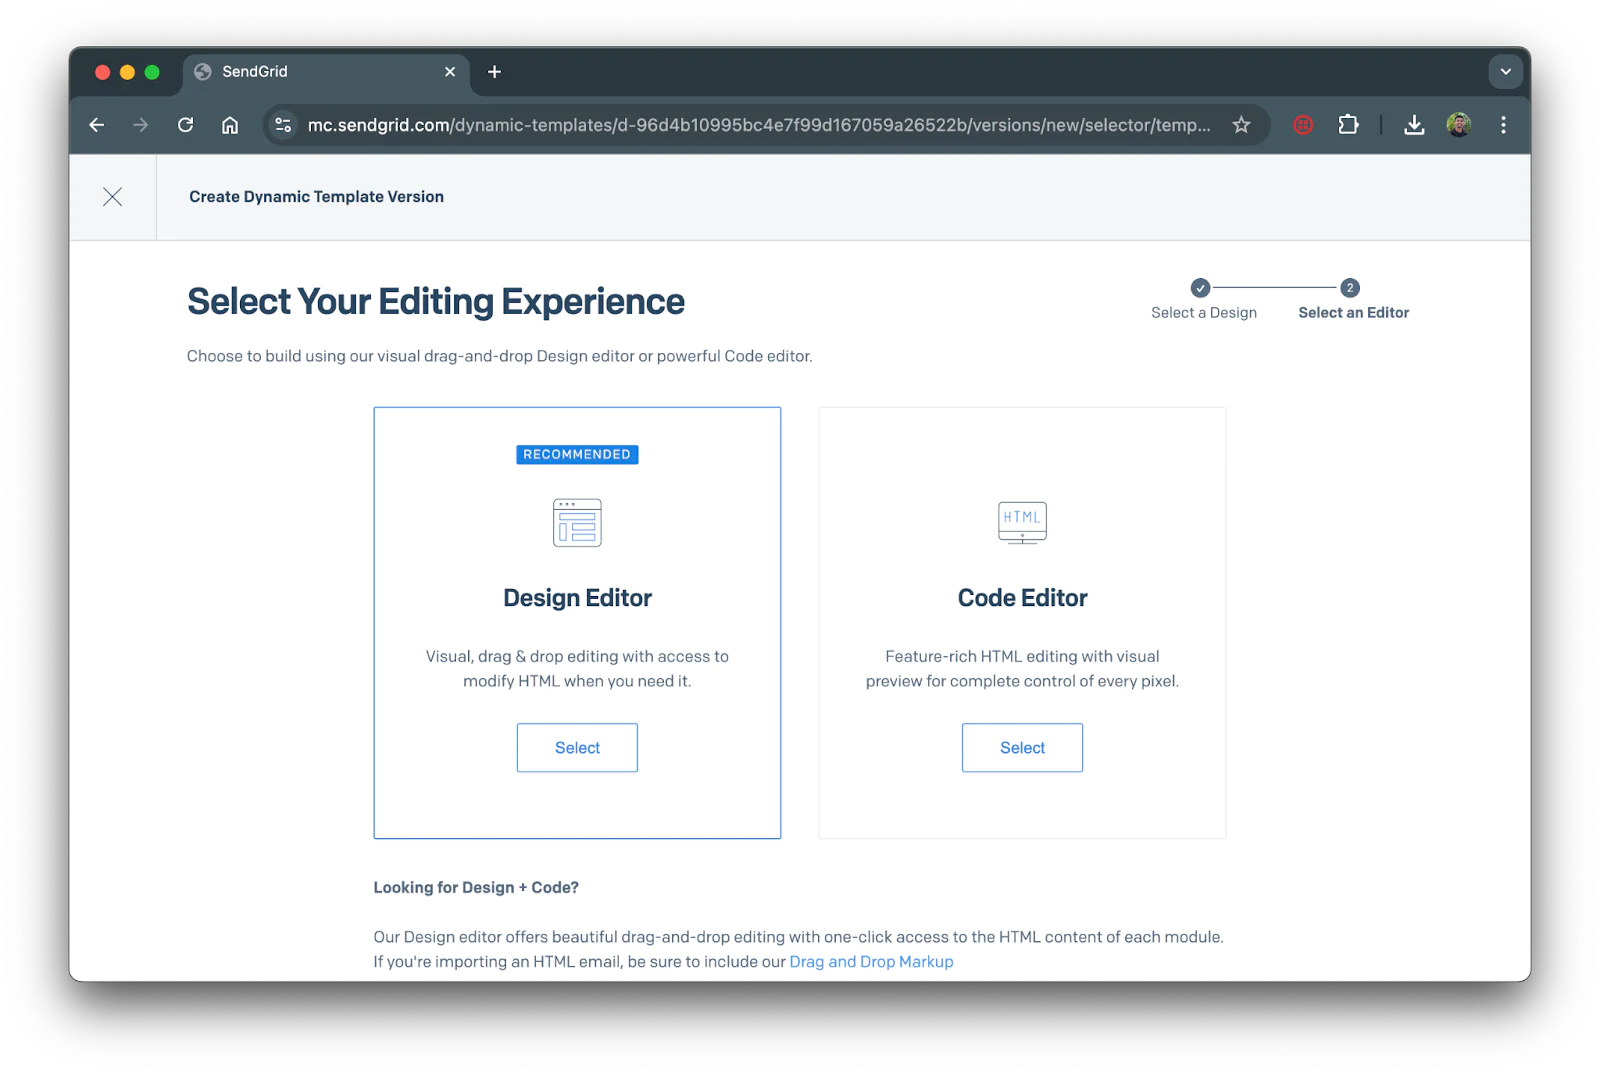
Once you’ve added a version the design modal will show and ask whether you’d like to choose a blank template or one of SendGrids Email Design templates. For this tutorial, we’ll choose one of SendGrids pre-made templates. However, if you’d like to create one from scratch, you can do so by selecting the blank template.
Design a Dynamic Template using the Design Editor
The Design Editor has various features that you can use via a drag-and-drop interface, for example, inserting images and text, buttons, code blocks, unsubscribe preferences, and so on. The GIF below demonstrates these features in action:
Select SendGrid Email Templates from the top. Then, scroll down and select the Free Trial Promo template.
You can edit this new template with the Design Editor or with the Code Editor. For this tutorial, you’ll use the Design Editor, but you can get more detailed by tweaking the HTML if needed.Select the Design Editor option and you'll be directed to the Design Editor.
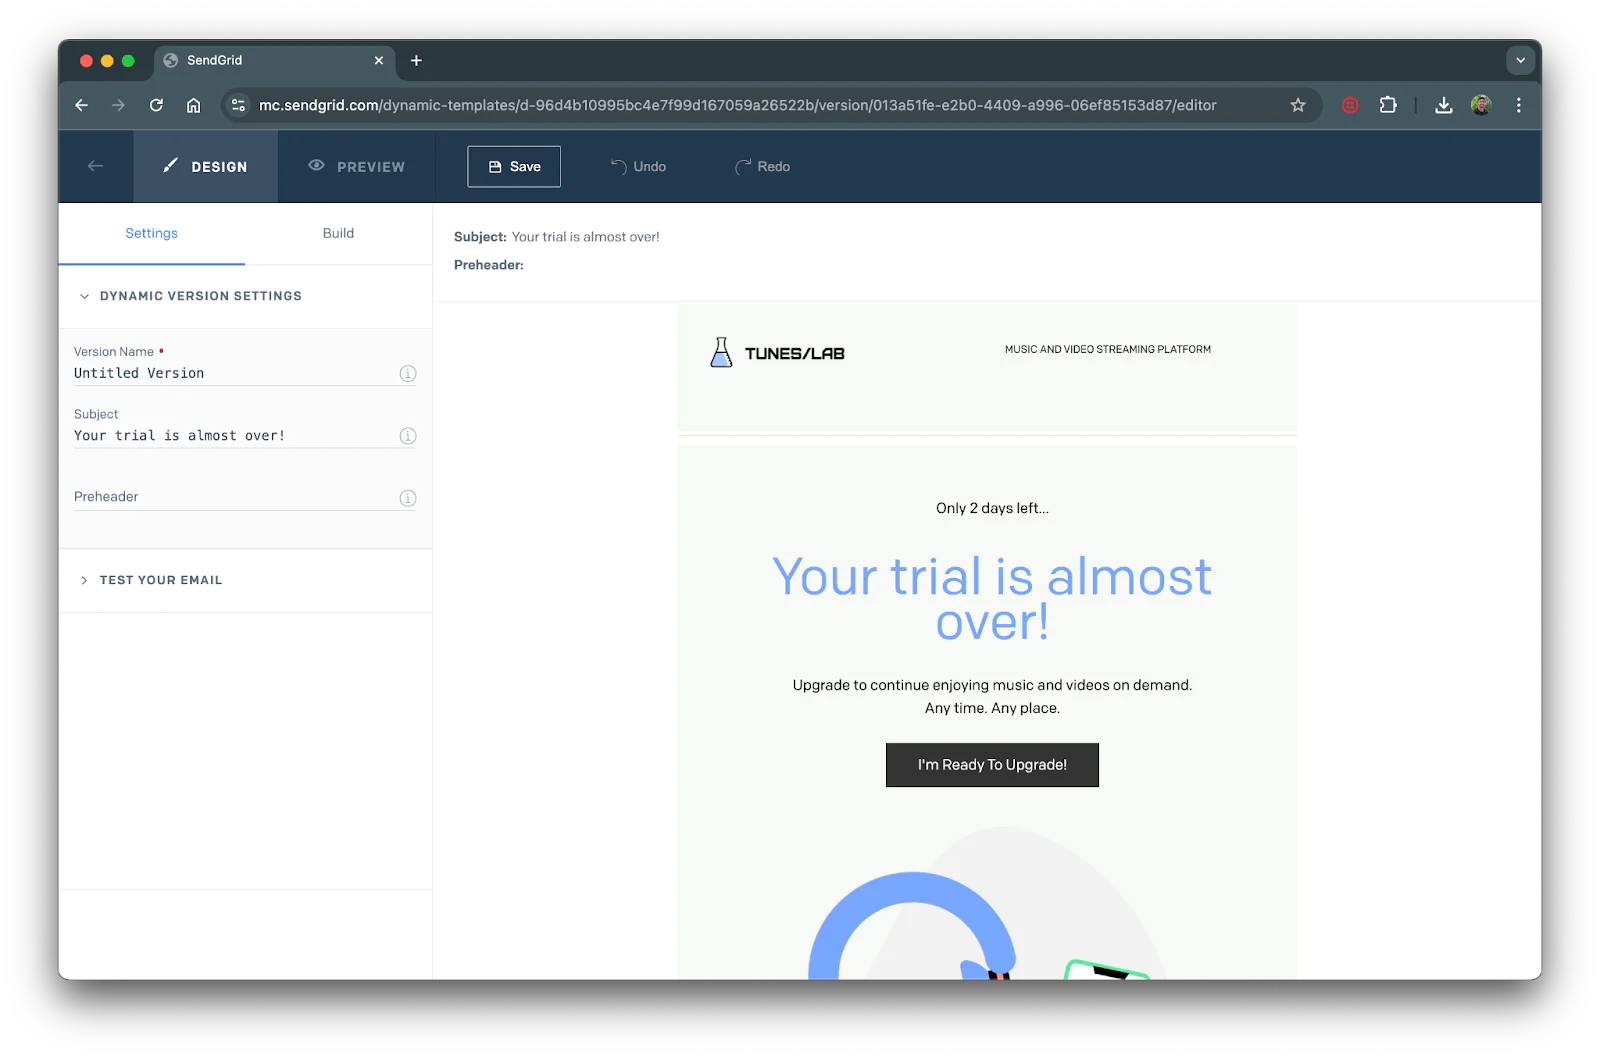
On the left sidebar, you’ll see your template settings. Rename the Version Name to “ Trial End” (or to whatever you’d like). Feel free to edit the Subject of the template as well; this will be shown on the subject line of the email when sent.
Customizing the template
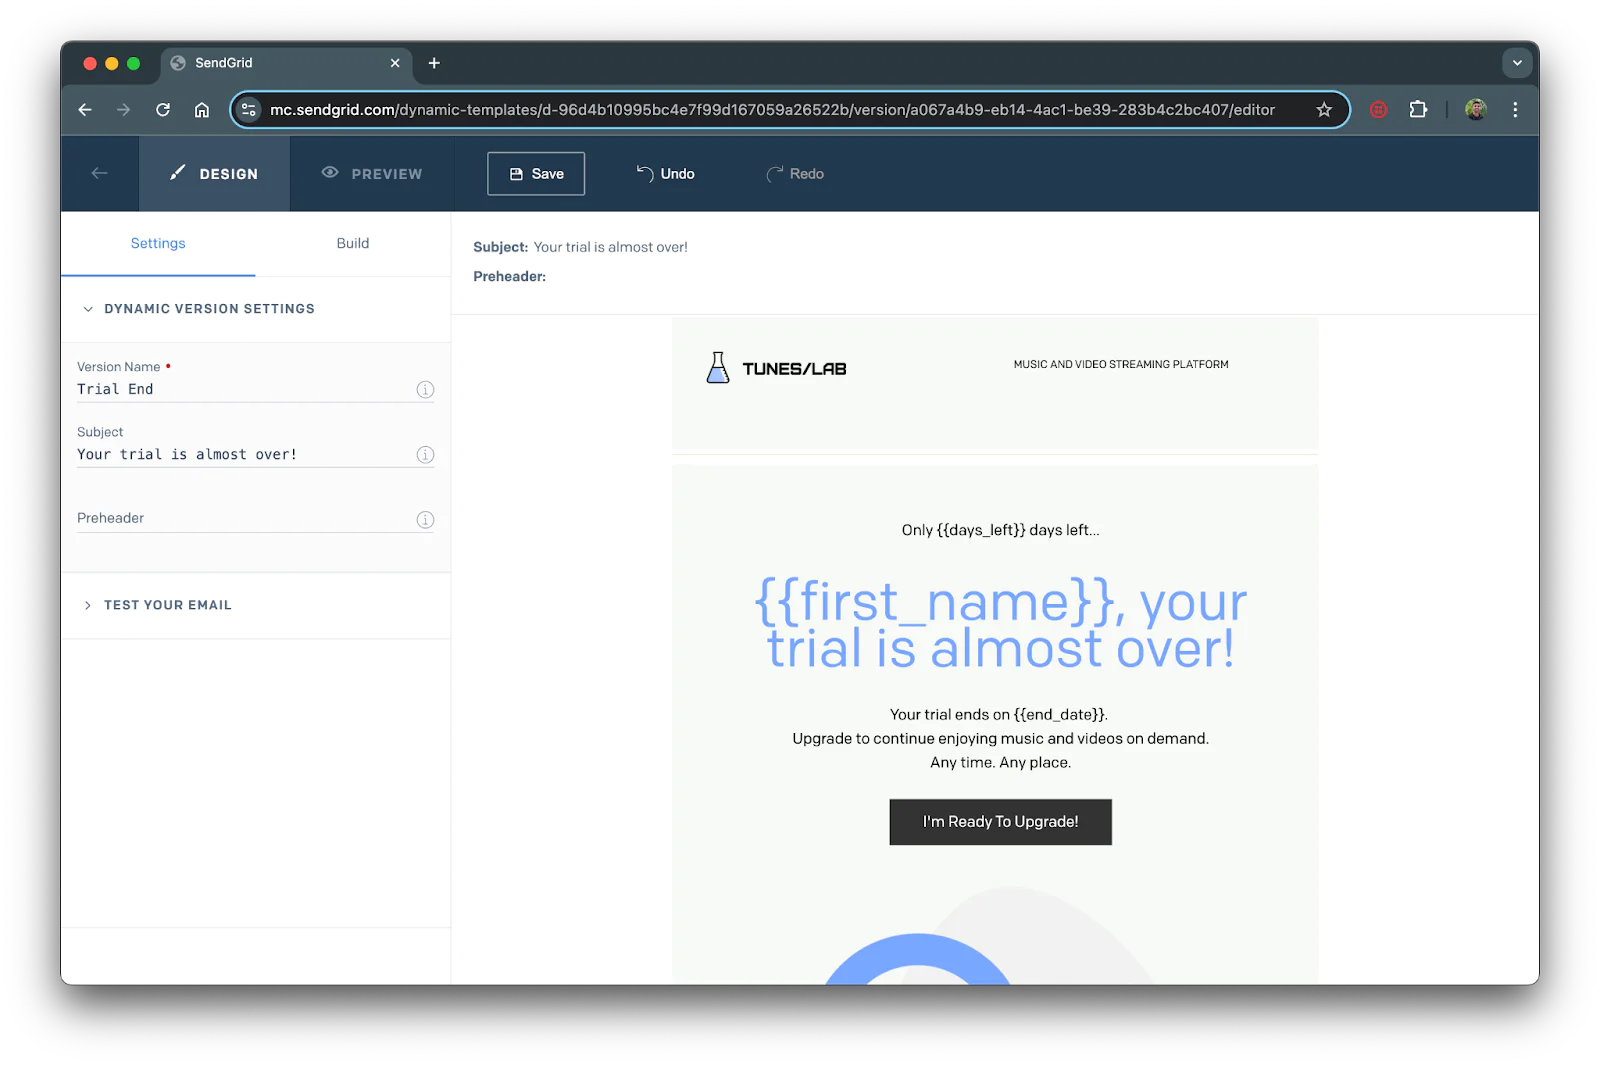
SendGrid supports Handlesbars templating language to make the content dynamic in your templates. This will enable you to make each email personalized for individual recipients making it much more relevant. You can pass dynamic template data, like the recipient's name, through the SendGrid API as a key value pair and it will show up throughout the email template wherever you want the customer's name to appear.
The template we chose currently does not have any dynamic template data so lets decide how we can add personalized data to our trial ended email.With free trials, the end date is all dependent on when the recipient signed up for the free trial. To make this email even more personalized, let's add the end date for the recipient. Copy and paste the following text to before where it says, “ Upgrade to continue enjoying music and videos on demand.”:
The first text of the body says “ Only 2 days left…” which should by dynamic according to the end date so replace it with the following:
Let’s also add the user's name to the heading of the email. Replace “ Your trial is almost over!” with the following text:
Your template should look like the following after the changes.
Click the Save button at the top of the Design Editor.
Sending a Dynamic Templated Email in Node.js
Now that we’re done personalizing the template, let's put it to use.
Before you can write code for emails using the Twilio SendGrid API, you'll need to create an API key if you don't already have one.
Initialize Node.js project
Open your terminal, navigate to your preferred directory and enter the following commands to create your node project:
Install Dependencies
Next, you’ll need to install the following node modules: SendGrid and dotenv. The SendGrid Node helper library will be used to send out your email. dotenv will be used to store environment variables.
Enter the following in your terminal to install these dependencies:
Import Environment Variables
For the environment variables, create a file named .env in the dynamic-template directory. Open the file in your preferred text editor for code and place the following lines in it while replacing the SENDGRID_API_KEY with your API key and SENDGRID_VERIFIED_SENDER with a sender email verified with your SendGrid account:
Build the app
Now create a file called index.js in the same directory and add the following code to it:
Lines 1-3 will set up the SendGrid library with your API key which is stored in the .env file.
In a production environment, you’ll typically fetch customer data including their email addresses from a database. However, for this example, you’ll create a customer object and hardcode the values in to keep things simple for this tutorial. This customer object is on lines 6-10. You can modify the values but ensure to update the email property with your email to view the final output of the email.
Lines 12-21 will build out the email object which will be sent to SendGrid. Be sure to change the templateId property with your template ID you received from the first section of the tutorial. The dynamic_template_data property will store all the dynamic data that will be passed into the template. The key values in the dynamic_template_data object should correspond to values used in the dynamic template.
The last code chunk will send the dynamic templated email using the data from the email object.
Save the file and you’re code will be ready to run.
Run the Code
Navigate back to your terminal and run the following command to send the dynamic templated email:
The terminal will output the status of the API response. Now, navigate to the email inbox of where your the email was sent and it should look like the following:
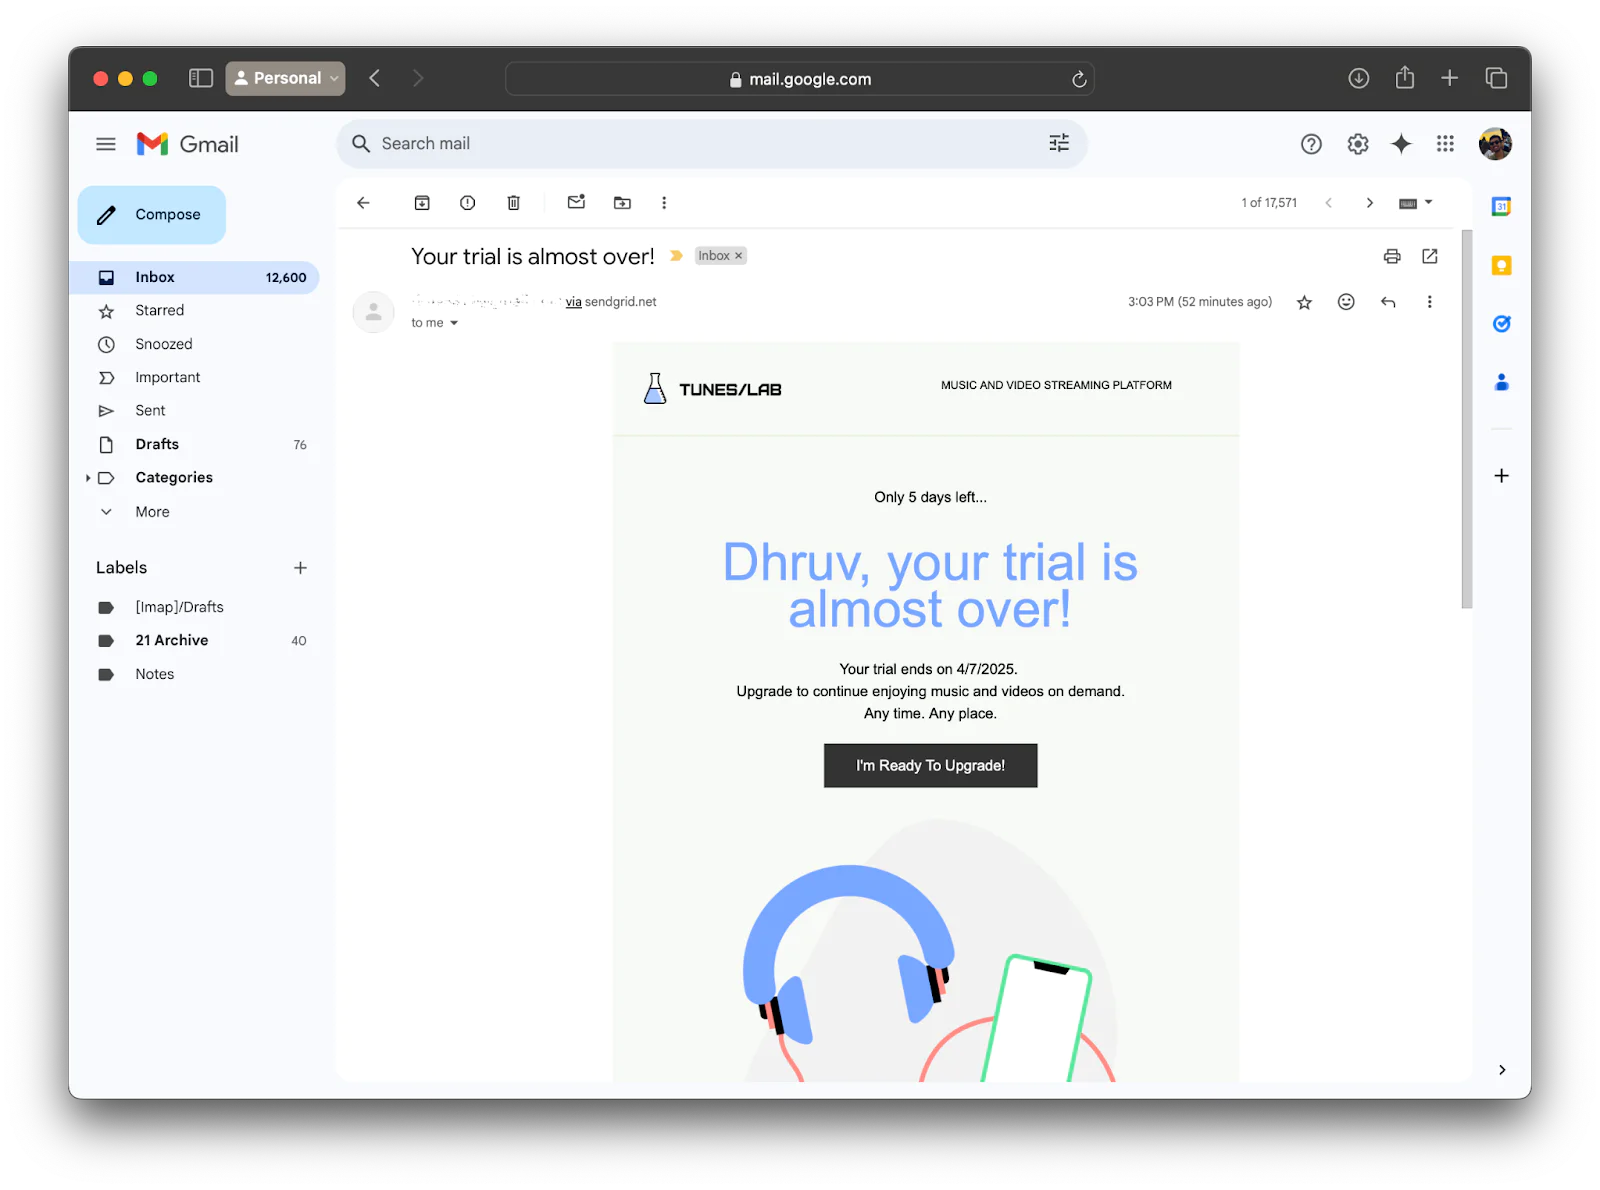
As you can see the Handlebars syntax {{variables}} have been replaced with the data we passed through the API.
Conclusion
By integrating Dynamic Templates with your emailing service, you’re able to personalize emails without extra hassle. Now that you’ve learned how to create, and send templated emails dynamically, you’re ready to upgrade your marketing campaigns with more efficiency and scalability. As for next steps, you can integrate your email service with SendGrids Contact lists or use Event Webhooks to monitor email metrics. If you’re looking to add email verification, you can also incorporate one-time passcodes using Twilio Verify! Happy building!
Dhruv Patel is a Developer on Twilio’s Developer Voices team. You can find Dhruv working in a coffee shop with a glass of cold brew or he can either be reached at dhrpatel [at] twilio.com.


Related Resources
Twilio Docs
From APIs to SDKs to sample apps
API reference documentation, SDKs, helper libraries, quickstarts, and tutorials for your language and platform.
Resource Center
The latest ebooks, industry reports, and webinars
Learn from customer engagement experts to improve your own communication.
Ahoy
Twilio's developer community hub
Best practices, code samples, and inspiration to build communications and digital engagement experiences.