How to Send Emails with Twilio SendGrid on EU Servers
Time to read:
July 15, 2025
Written by
Reviewed by
Sending Email in the European Union just became more straightforward and more compliant. If your business operates in Europe or serves customers who do, data residency is more than a checkbox – it's a commitment to handling personal data responsibly and in line with regional laws. With Data Residency for Email (EU), Twilio SendGrid enables you to keep all email event data such as opens, clicks, bounces, and unsubscribes within the EU, giving you control over where your customer data lives.
This matters because email event data includes recipient email addresses and engagement history data that’s often considered personally identifiable information under regulations like the GDPR. By keeping that data within EU borders, you’re not only meeting compliance standards, but also building trust with your users.
How does this differ from standard email sending?
Before, when you sent an email through Twilio SendGrid, it was handled by our global API. That meant your email and the data it generates is processed through our global infrastructure and stored in data centers around the world.
With Data Residency for Email (EU), the flow is different. Emails sent through the EU API are processed within the EU region, and recipient personal data and email event data is stored in EU-based systems. This gives businesses more control over where their data is stored and helps meet regional compliance standards without compromising performance or deliverability.
Why choose EU Data Residency?
Beyond enabling compliance, customers benefit from:
- Single account access: Easily manage both global and EU email sending from one account. EU regions are managed via subusers.
- Self-serve dedicated IPs: Customers can procure dedicated IP addresses on their own.
- Better IP reputation control: Your IPs aren’t shared, so you have complete control over your email deliverability and sender reputation.
- Cost-effective scalability: Data Residency Email (EU) is included with Pro and Premier packages. Additional EU-dedicated IPs can be purchased as you scale.
In this post, you'll learn how to configure your SendGrid setup to keep your data within the EU. This includes steps to create regional subusers, assign dedicated IPs, configure DNS records, and utilize the SendGrid API at the api.eu.sendgrid.com endpoint.
Let’s see how to set this up!
For this use case, you must create a parent account and then set up a subuser specifically for sending emails via the EU region. The parent account itself cannot send emails to the EU. This guide focuses on the process of creating and using an EU subuser for sending emails, with the key step being the procurement and assignment of EU IP addresses
Prerequisites
Before starting, you will need a Twilio SendGrid Pro or Premier Account. If you don’t yet have one, you can sign up for an account here.
Step-by-Step Instructions
Once you have the SendGrid account in place, you’re ready to set up a subuser to send from the EU! These next steps will walk through what you’ll need.
- A SendGrid API Key with Full Access permission on the Parent Account
- Procure EU IP Address for the EU Subuser
- A SendGrid subuser that will be bound to the EU region
- A SendGrid API Key with atleast mail-send permission on the Newly created Subuser Account
- Sender Authentication to verify that you own the email address or domain that you send emails from.
- Send an email via this newly created subuser.
Create an API Key for the parent account
Login to your parent account and create a your API key using the SendGrid app console

Click Create & View, and then save the value of the key somewhere safe – it is only shown once in your console.
Steps via the SendGrid Console
IP procurement and assignment
Add a regional IP and assign to parent account and subusers:
The next step is to add an IP address and assign it to the parent account and/or the newly created subuser.
You can purchase an additional dedicated IP Address from the IP Addresses Settings page or from your Plan & Billing Details page.
To add an additional dedicated IP Address:
- In the left navigation, select Settings and then click IP Addresses . Here you'll see a list of your current d IPs. Your IPs in warmup will have a 'warmup' label.
- Click Add an IP Address
Under "Additional Options" you will find the following options:
Check the Use automated IP warmup option This will allow SendGrid to gradually increase the amount of email sent over this IP. Note: It is best practice to warm an IP address over time before sending fully over that IP address. When using automated warmup, you must have at least one other warm IP that can handle the overflow traffic from the IP in warmup.
Check the Allow my account to send mail using this IP address
Make sure to set the IP Address Region as EU.
After purchasing your IP, we strongly encourage you to set up reverse DNS. For more information about setting up reverse DNS, see How to set up reverse DNS.

Create a regional Subuser
You can use the parent account or a subuser to assign to send emails in the EU region and assign the newly created IP address. In your console, go to settings -> Subuser Management -> Create New Subuser

Give a unique name, email and password to the user. Assign EU User region to this subuser as shown below.

Once EU User is selected then check the EU IP address created in the above step.

Click create subuser towards the end of the page.
Configure domain authentication for the Subuser
Once the new subuser is created. Next step is to authenticate your domain. From your parent account go to settings-> Sender Authentication -> Authenticate Your Domain. Make sure to assign this domain to a subuser and the “Make domain EU-pinned” option under Advanced Settings are checked while authenticating your email.

Continue with the steps and complete your domain authentication process.
With this you have created a subuser with EU domain authentication and an IP address.
Steps via the backend
IP procurement and assignment
Add a regional IP and assign to parent account and subusers:
The next step is to add a regional IP address and assign it to the parent account and/or the newly created subuser.
The cURL command below demonstrates how to add an EU-based IP address and assign it to both the subuser and the parent accounts. For the complete details on this endpoint, refer to the Add a Twilio SendGrid IP Address documentation.
cURL Example:
And the response should look something like this:
To obtain the correct subuser_id for the code above, you would first need to list all the subusers. You can do this by following the instructions provided in the Twilio SendGrid API documentation for listing all subusers. An example is below.
Here is an example response for the above command:
If you want to add an EU-based IP address to an existing subuser, here’s how you can do it:
And here is an example response:
Create a regional subuser
To create a subuser in the EU region, start by reviewing the SendGrid Subusers API documentation or by following the cURL example provided below. Be sure to specify the region as eu when configuring the subuser.
cURL Example:
And the response is below:
Complete Sender Authentication
Now that we have created a subuser and assigned it an EU IP address, the next step is to complete the domain authentication for this subuser.
You can complete domain authentication either via the SendGrid UI or through the API. Follow the steps below to complete domain authentication via the API. Each step includes links to the relevant documentation and an example cURL command.
Step 1: Authenticate your domain for the EU region
To authenticate your domain for the EU region, follow the instructions in the Authenticate a Domain documentation.
Run the initial command to authenticate your domain, which will give you the DNS records you need to add to your DNS host. This step also provides you with the domain_id.
And the response should be something like this:
Step 2: Retrieve the domain_id
Use the provided cURL command to list all authenticated domains and obtain the domain_id for your specific domain.
After running the cURL command to authenticate your domain, you'll need to add the DNS records provided by SendGrid to your DNS host.
Step 3: Validate the domain authentication
After setting up your DNS records, the next step is to validate your domain authentication. This ensures that your DNS records are correctly configured and your domain is ready for use.
Refer to the Validate Domain Authentication documentation for more details.
And the response should look something like this:
Step 4: Associate the authenticated domain with your EU-Based Subuser
After validating your domain, the next step is to associate the authenticated domain with your EU-based subuser. This ensures that the subuser can send emails using the authenticated domain.
Refer to the documentation on associating an authenticated domain with a subuser for detailed instructions.
Step 5: Create a branded link
To create a branded link, you can use the following cURL command. This branded link will be associated with the specified domain in the EU region.
Here’s the cURL command to create a branded link:
Step 6: Validate the branded link
After creating a branded link, the next step is to validate it to ensure it’s correctly set up. Use the following cURL command to validate your branded link:
Use the specific LINK_ID you received when you created the branded link.
Step 7: Associate the branded link with your Subuser
Once the branded link is validated, you can associate it with a specific subuser. This allows the subuser to send emails using the branded link.
Your domain has been successfully verified, and you’re now all set to use it for sending emails!
Create a SendGrid API Key to send emails for the Subuser
SendGrid offers three types of API keys: Full Access, Restricted Access, and Billing Access, each with specific permissions. The first key must be created via the Twilio SendGrid App. Subsequent keys can be managed using the API. More info can be found here.
Create an API Key in the Console
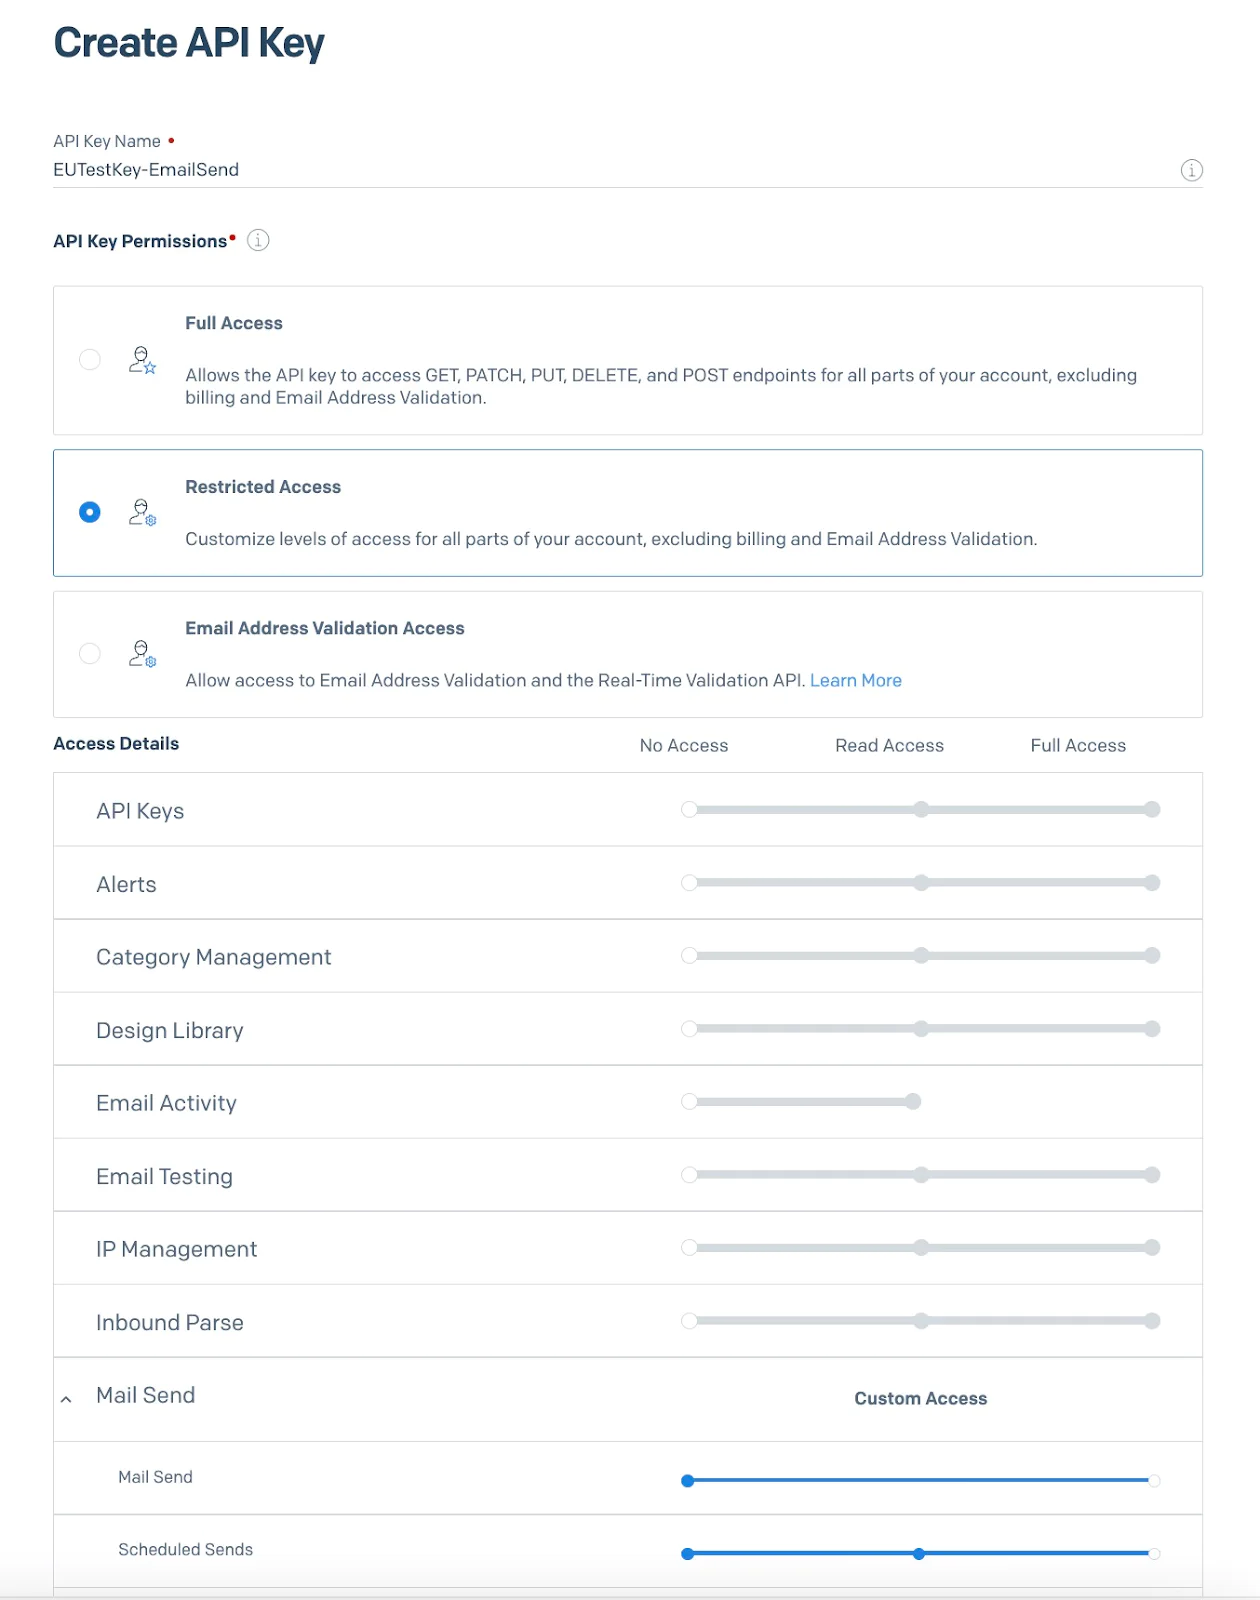
In the SendGrid Console, navigate to the API Keys section under Settings on the Console landing page. Click Create API Key in the top right corner to open a form on the right side. Name your API key and choose Restricted Access to set permissions.
For security, assign only the necessary permissions. In this tutorial, you'll only need the Mail Send permission. To enable it, scroll to the Mail Send section under Access Details and move the slider to the right.
Finally, click Create & View at the bottom of the form. The API key will be displayed on the screen. Since you won’t be able to retrieve it again after leaving this page, make sure to copy and store the secret securely
Send your email
With your API Key for the EU subuser ready, you can now send an email using the EU-specific base URL api.eu.sendgrid.com.
The cURL command below demonstrates how to send an email through SendGrid's EU region. Simply replace the placeholder email addresses with your authenticated sender email in the "from" field and your recipient's email in the "to" field. For additional details on sending emails programmatically, refer to the full Mail Send API documentation.

Conclusion
Twilio SendGrid enables you to manage email sending and receiving at scale.
In this guide, you learned how to send emails in the EU region using Twilio SendGrid's Email API. Here are the steps you performed:
- Created a subuser assigned to the EU region.
- Provisioned an IP address in the EU.
- Authenticated your domain for sending emails.
- Created a SendGrid API Key with email sending permissions.
- Send an email using the
api.eu.sendgrid.comendpoint.
Interested to know more about SendGrid? Check out our Data Residency documentation for more. We can’t wait to see what you build!
Yukti Ahuja is a Principal Solutions Engineer at Twilio. As an SE, she is a problem solver extraordinaire, blending technical expertise to bridge the gap between complex technology and practical solutions for customers.


Related Resources
Twilio Docs
From APIs to SDKs to sample apps
API reference documentation, SDKs, helper libraries, quickstarts, and tutorials for your language and platform.
Resource Center
The latest ebooks, industry reports, and webinars
Learn from customer engagement experts to improve your own communication.
Ahoy
Twilio's developer community hub
Best practices, code samples, and inspiration to build communications and digital engagement experiences.