Retweeting Twitter Mentions On Demand with Twilio Programmable SMS, ASP.NET Core 3.1, the Twitter API, and Azure
Time to read: 12 minutes

If you’re a developer, chances are you are on Twitter. It’s where all the cool developers like to tweet code snippets, ideas, and boasts about programming projects!
If you’re like me, you probably don’t like notifications on your phone.
I mean, text messages, sure, those are fine, but not notifications from apps.
Fortunately, there’s a way to get important Twitter notifications and respond to them without leaving the comfort of your texting environment. You can retweet mentions without having to install an app on your phone or open your phone’s browser.
This post demonstrates how to leverage Twilio Programmable SMS in conjunction with ASP.NET Core, the Twitter API, and Microsoft Azure to receive a text message when someone mentions you on Twitter. You’ll also be able to retweet the Twitter mention directly from your SMS client with a quick reply. There are four parts to the project:
- Setting up a Twitter application
- Setting up a Twilio phone number with Programmable SMS
- Building an ASP.NET Core Web Application
- Deploying the web application to Azure
Prerequisites
- GitHub account (if you want to fork the project source code, free)
- Microsoft account (free, required to create an Azure account)
- Azure account (trial account with 12 months of free services)
- Twilio account (Use this link to get a $10 credit on your free trial account.)
- Twitter Developer account (free)
- .NET Core 3.1 SDK (version 3.1.101+)
- Visual Studio 2019 (The Community Edition is free.)
- PowerShell 7 (or a comparable way of setting environment variables on your system)
To get the most out of this post you should have knowledge of:
- ASP.NET Core
- C# 8
A companion repository for this project is available on GitHub.
Setting up a Twitter application
You’ll need a Twitter Developer account to build the application presented in this post. Only the free Standard API level is required.
Note that there is an approval process for new Twitter Developer accounts. Approval usually takes less than an hour, but may take longer if there are questions about the information you submit. Be sure to answer the registration questions completely and be sure to watch your email inbox in case Twitter wants more information on your application. It’s a good idea to get this process started while you proceed with the rest of the process.
Once your Twitter Developer account has been approved you’ll need to create a Twitter application. Use the preceding link to go directly to the app creation page. You will be asked to provide a number of pieces of information to create the app:
App name: This is whatever name you want to give your Twitter app. Your app name will appear as the source of Tweets and in user-facing authorization screens.
Application description: This should contain a description of your app and what it does. Like the app name, it will be visible to users of your app.
Website URL: This should contain a URL that links to a website related to your Twitter app. For the purpose of the demo app, you can enter your company website, your personal web page, or another relevant website address.
Note: Do not use twilio.com for any of the URLs you provide.
Tell us how this app will be used: This should contain a detailed explanation of what you intend to do with your Twitter app. The information here helps Twitter employees understand how your app will be used.
The Enable Sign in with Twitter option is an optional one that should only be selected if the Twitter application will be used to sign in with Twitter. If it is selected, a “Callback URL” should be provided. For the purposes of this app, leave this option unchecked.
After entering the required details, click the Create button to create your Twitter app.
Once the app is created, click Details next to the app name in the Apps list. Select the Keys and Tokens tab.
Copy your API key and API secret key from the Consumer API keys section to a safe place.
Click the Generate button to generate an Access token and Access token secret. Copy them somewhere safe. Close the panel.
When you return to the Keys and Tokens tab you should see an Access token & access token secret section. The value for Access level should be “Read and write.”
Your work with the Twitter Developer Dashboard is complete.
Store your Twitter keys and tokens as environment variables. On Windows, use the following PowerShell instructions. Make sure to use double underscores (__) where shown.
To verify that these environment variables have been correctly created and assigned, execute the following PowerShell command:
Getting started with Twilio Programmable SMS
You’ll need a free Twilio trial account and a Twilio phone number with SMS capabilities to build this project with Twilio Programmable SMS. Getting set up will take just a few minutes.
Once you have a Twilio account and have registered a mobile device, go to the Twilio Console and perform the following steps:
On the Console Dashboard home, locate your Account SID and Auth Token and copy them to a safe place.
Select the Phone Numbers tab (#) and Click the + button to buy a number. (For new users the nominal fee is covered by the credit on your trial account, shown on the Dashboard.)
Select the appropriate value for Country and check the SMS box in the Capabilities list, then click Search. Select a number from the list and click Buy. Review the capabilities for the number and click Buy <phone number>.
You should see the information page for the phone number you’ve selected. Copy the values from the Phone Number and Phone Number SID to a safe place.
The credentials you just acquired are user secrets, so it’s a good idea not to store them in the project source code. One way to keep them safe and make them accessible in your project configuration is to store them as environment variables on your development machine.
ASP.NET Core can access environment variables and they can be used as properties of an IConfiguration object in the Startup class. You can also load configuration variables from the appsettings.development.json file.
If you have PowerShell installed on your Windows, macOS, Linux, or ARM system, execute the following commands in a PowerShell console window, substituting your credentials for the placeholders. For other operating system shells, use comparable commands to create the same environment variables. The environment variables will map to an instance of the IOptions<T>. More on that later.
To verify that these environment variables have been correctly created and assigned, execute the following PowerShell command:
If you prefer, or if your development environment requires it, you can place these values in the appsettings.development.json file as follows, but be careful not to expose this file in a source code repository or other easily accessible location.
Creating the ASP.NET Core Web Application
Create a new ASP.NET Core Web Application called TwilioHeartsTwitter with the Visual Studio 2019 user interface or with the .NET CLI. The following is the appropriate .NET CLI command-line instruction:
Add the required NuGet packages
The ASP.NET Core Web Application will use the Twilio, Twilio.AspNet.Core, and TweetinviAPI packages. Install them with the NuGet Package Manager, Package Manager Console, or the following .NET CLI command-line instructions:
The TwilioHeartsTwitter.csproj file should include the package references in an <ItemGroup> node, as shown below, if the command completed successfully. The version numbers in your project may be higher; just be certain that they are equal to or greater than the versions shown.
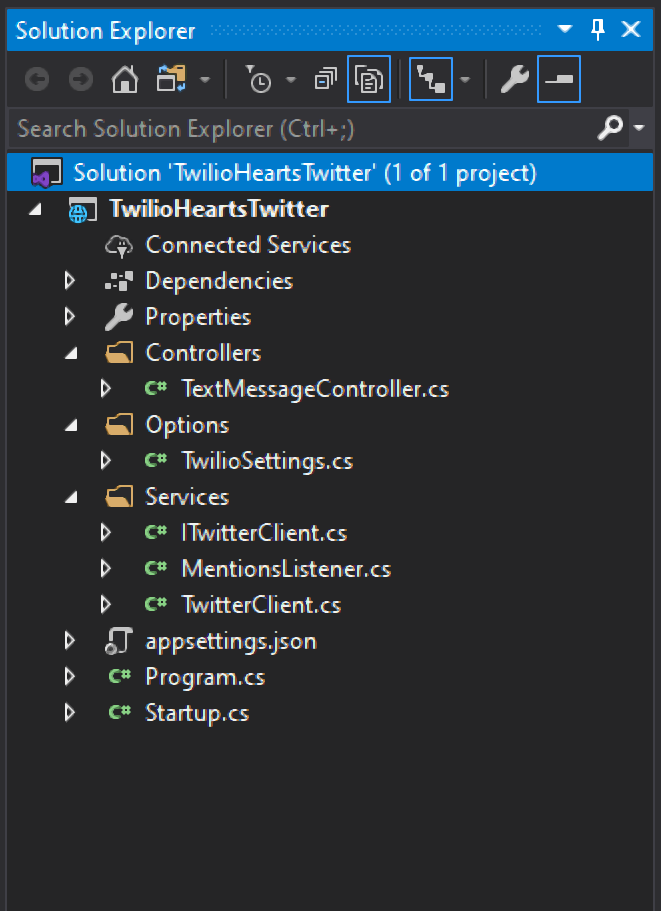
Create the web app project folder and file structure
Create the following folders and files under the TwilioHeartsTwitter project/folder:
TwilioHeartsTwitter
├── Controllers
│ └── TextMessageController.cs
├── Options
│ └── Settings.cs
└── Services
├── ITwitterClient.cs
├── MentionsListener.cs
└── TwitterClient.cs
If you’re using Visual Studio 2019 your Solution Explorer folder and file structure should look like the following when you’re finished:

Create the application startup and configuration
The following steps will take you through the process of coding the TwilioHeartsTwitter web application. As you assemble the code, pay attention to the packages included through the using declarations and the places where the user secrets are loaded from environment variables (or the appsettings.Development.json file) through the Configuration Manager.
As you assemble the code you’ll probably note that various class and assembly names will lint. Don’t worry about reference errors until you’re finished; you’re assembling the application in a different order than you might build it on your own to make it easier to follow the program execution.
Replace the existing contents of the Program.cs file in the project root folder with the following C# code:
The Program class is the main entry point into the executable. It creates a host and configures the host startup using the Startup class.
Replace the contents of the Startup.cs file in the root project folder with the following C# code:
The Startup class is instantiated with an instance of the IConfiguration class, which is stored in a class-scoped variable. By convention, there are two common methods in a startup class:
|
Method |
Description |
|
|
Adds services to a service collection for the purpose of dependency injection |
|
|
Configures services for use |
The ConfigureServices method maps Settings to the _configuration instance. Using the _configuration object, several values for Twitter authentication are assigned to the static properties of Tweetinvi.Auth.
Next, a singleton instance of the ITwitterClient interface is registered in the services collection using the corresponding implementation in TwitterClient. This will ensure that the application only ever has one single instance of the implementation available through Dependency Injection. The MentionsListener class is registered as a hosted service and the standard AddControllers function is used to ensure all the Web API controller services are available.
The Configure method body is where services are configured. If the environment is "Development", the developer exception page is added and this is standard procedure. Next, HTTPs redirection, routing, and authorization are all added as well. Finally, the endpoints are configured by mapping to the application’s controllers.
Define the Settings class
In the code you just created, the Settings class is mapped to the configuration. This is a simple property bag with a few things of interest: These properties map from either the JSON configuration in the appsettings.json file, or environment variables. With these mappings, they’re available as part of dependency injection when asking for an IOptions<Settings> instance. Each instance of the Settings class is provided by the framework middleware in fully-populated form through constructor injection.
Replace the contents of the Settings.cs file in the Options directory with the following C# code:
This is a POCO, a “plain ol’ class object,” so it doesn’t require a single using directive.
Create the Twitter client
The ITwitterClient interface represents the intentions this application will use from Twitter. Copy and paste the following C# code into the ITwitterClient.cs file:
This interface defines two methods. The GetMostRecentMentionedTweetAsync method returns a Task<IMention> and the RetweetMostRecentMentionAsync method returns a Task<ITweet>. While the contracts seem rather straightforward, the actual implementation is a bit more involved. Copy and paste the following C# code into the TwitterClient.cs` file:
The constructor takes an ILogger<TwitterClient> instance and assigns it to a class-scoped variable.
The implementation of the GetMostRecentMentionedTweetAsync function starts by declaring a mentions variable that is assigned to the invocation of a Task.Run lambda expression. Within the lambda expression several parameters are instantiated and the state of the _lastMentionId variable is evaluated. If it has a value, it is used as the SinceId for the parameter set.
The call to Timeline.GetMentionsTimeline from the TweetinviAPI library accepts the parameters and returns the last several mentions. The results are then ordered descending by their CreatedAt date, ensuring that the most recent mention is at the top. From the ordered mentions, a filter is applied capturing the first in the list or to the default, which would be null in this case. If the most recent mention is not null its Id is assigned to the _lastMentionId. Since this implementation was registered as a singleton, it is safe to maintain state in this manner without too much concern.
Next, the RetweetMostRecentMentionAsync function will try to retweet the _lastMentionId, if available, using the Tweet.PublishRetweet function. If it is not available, or there was an errant condition, the error is handled gracefully by logging the message. This is truly exceptional, and the call would have never been invoked in this order without first having a mention in the application state.
Create the Mentions Listener
The Twitter client capabilities enable a polling architecture, where mentions can occasionally be requested. Copy and paste the following code into the MentionsListener.cs file:
The first thing you’ll probably notice about this class is that it inherits the BackgroundService. This means it can override the ExecuteAsync function of a background service. The concept of a background service running within an ASP.NET Core Web Application has been around for a while now. Hosted services are rather powerful, as they provide a way to have an in-process means of communication between the request and response pipeline and a service that is always executing.
The communication channel makes it easier to share statefulness and communicate. The class declares three simple fields: a _logger instance, a _settings instance, and the implementation of the ITwitterClient. The constructor initializes these fields and then calls TwilioClient.Init using the Twilio Account SID and Auth Token required by the Twilio API.
The ExecuteAsync function takes a stoppingToken that is used to signal application termination. This is how the background service knows when to perform cleanup and stop executing, otherwise a continuous loop routine is executed. Before the while loop is initiated the lastId variable is assigned to 0, then while the token has not been signaled to stop execution begins. The subroutine is as follows:
1. Ask the _twitterClient for the most recent tweet that mentioned you
2. If there is a mention available and it’s Id is not the same as the lastId, check to verify that the full text does in fact contain your Twitter handle
3. Text to the configured phone number
(a) Share that someone mentioned you on Twitter
(b) Share the Tweet URL, either at the beginning or end of the text for it to render a preview on the device
(c) Ask for the recipient to reply with "Yes" to retweet the mention
4. Store the lastId
5. Wait for a configured amount of time
6. Continue with step 1 if the stoppingToken was not canceled
Create the text message controller
Now, you’re probably thinking: "Wait a second, how do I handle the SMS text message response?" Don’t worry, this is rather easy with the Twilio.AspNet.Core library. Copy and paste the following C# code into the TextMessageController.cs file:
This controller inherits the TwilioController, which exposes the base function called TwiML which accepts a MessageResponse instance. This controller uses the same instance of the ITwitterClient implementation registered as a singleton and it has one simple API endpoint, api/twitter/retweet. This endpoint is actually the Twilio webhook, which is configured in the Twilio Console for Programmable SMS. You won’t need to make any changes to your Twilio phone number for this to work properly.
When the configured phone number receives text messages the webhook is invoked. The request body contains the text message, and as you can see it's relatively easy; if the response is "yes", ask the _twitterClient to retweet the most recent mention and reply with "Done".
Deploying the completed application to Azure
The application compiles successfully and will run on your local machine. You may even get an SMS message if someone has mentioned you on Twitter recently. But for the complete process to function correctly the app will need to be deployed to an environment where the api/twitter endpoint defined in TextMessageController can be seen by the Twitter API.
An Azure App Service is a great place to do this, and you can publish the app directly from Visual Studio 2019. Follow these instructions to publish this application to Azure.
To complete the deployment you’ll need to set the environment variables in Azure. To do this, open the Azure portal and navigate to the App Services resource that you created during the publish process. Select the Configuration blade under the Settings node. Then click + New application setting to configure environment variables.
Enter name/value pairs for each of the environment variables you created on your local machine. Add each of the following names and their corresponding values:
- Authentication__Twitter__ConsumerKey
- Authentication__Twitter__ConsumerSecret
- Authentication__Twitter__AccessToken
- Authentication__Twitter__AccessTokenSecret
- TWILIO_ACCOUNT_SID
- TWILIO_AUTH_TOKEN
- TWILIO_SMS_PHONE_NUMBER
- TO_PHONE_NUMBER
- TWITTER_HANDLE
Once all of these name/value pairs have been assigned, click the Save button to restart your App Service instance.
Testing the completed application
After the app is published and configured it will execute automatically.
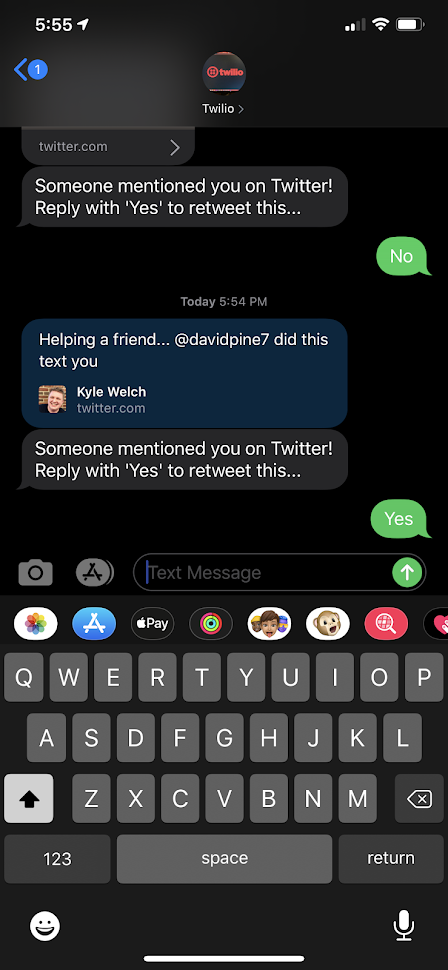
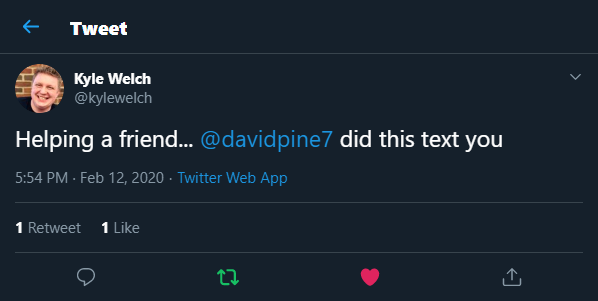
While executing, and if anyone mentions you on Twitter, expect some text messages from Twilio. Respond to them with "Yes" and those mentions will automatically be retweeted. Here is an example of this sequence in action:
Someone mentions you on Twitter.

You get a text message letting you know that someone mentioned you, and you can preview the Tweet on your device.

After you reply with "Yes", the Tweet will be retweeted on your behalf.

If this works using your phone and Twitter handle you’ve successfully built a new way to power-up your social media presence. Good job: fame awaits!
Summary
Now that you’ve finished building and deploying the project in this post you have covered a lot of ground. You’ve set up a Twitter application so you can access and manipulate tweets using the Twitter API. You have configured a Twilio phone number to send and receive SMS messages programmatically. You’ve built an ASP.NET Core Web Application that exposes a REST API, and you’ve deployed the app to an Azure App Service so it will always be available. Now you have a system that notifies you by text message when someone mentions you on Twitter so you can retweet with a quick text response.
You can see how this application could scale for someone who is managing a company or institutional Twitter account. By responsively retweeting the right mentions the account manager can work on the go when it might not always be convenient to use mobile or desktop apps.
Additional resources
The companion repository on GitHub includes a branch with one possible approach to caching results and managing SMS status callbacks.
Asynchronous programming with async and await – an excellent introduction to asynchronous programming in the C# Programming Guide on docs.microsoft.com.
Dependency injection in ASP.NET Core – docs.microsoft.com information about the dependence injection middleware used in this application.
Tweetinvi – Learn more about this C# .NET library that wraps the Twitter REST API, and consider making a donation in support of this software provided under an MIT License.
Twilio Docs: Programmable SMS – Quickstarts for a number of languages, tutorials, and complete API reference documentation.
TwilioQuest – Do something to brag about on Twitter: play TQ3, discover your power to change the world with code, and help plant trees in Australia all at the same time.
David Pine is a 2x Microsoft MVP, Google Developer Expert, Twilio Champion, international speaker, and works in Developer Relations at Microsoft. You can follow him on Twitter at @davidpine7. Be sure to check out his blog at https://davidpine.net.
Related Posts
Related Resources
Twilio Docs
From APIs to SDKs to sample apps
API reference documentation, SDKs, helper libraries, quickstarts, and tutorials for your language and platform.
Resource Center
The latest ebooks, industry reports, and webinars
Learn from customer engagement experts to improve your own communication.
Ahoy
Twilio's developer community hub
Best practices, code samples, and inspiration to build communications and digital engagement experiences.

