Respond to Twilio Webhooks using Azure Functions
Time to read: 10 minutes

Azure Functions is built on the concept of Triggers and Bindings, and while there's a Twilio binding for sending SMS, there is no trigger for receiving messages or calls. However, Azure Functions does have an HTTP trigger which you can use to receive webhook requests from Twilio.
In this tutorial, you will learn how to respond to Twilio webhooks using Azure Functions. You will learn what webhooks are, how to set up an Azure Function, and then use your Azure Function app to respond to a Twilio SMS webhook.
Prerequisites
You will need the following things to follow along:
- A Twilio account. Sign up for a Twilio account here and get trial credit to spend on Twilio Products.
- An Azure account with an active subscription. If you do not have one, you can create an Azure account here for free.
- .NET 6.0 SDK or newer
- A code editor or IDE (Recommended: Visual Studio Code with the C# plugin and the Azure Function plugin, Visual Studio, or JetBrains Rider)
- Azure Function Core Tools version 4. x
- Azure CLI
- Ngrok CLI, to expose your local development environment over the internet
You can find the source code for this application on GitHub.
What is a Webhook
A webhook is an HTTP request that is triggered by an event from a source system to a destination system. You tell where the source system will send the HTTP request by providing it a URL.
A typical webhook scenario consists of:
- A destination system that wants to be notified of an event
- A source system that wants to notify a destination system of an event - this system accepts the webhook URL and makes an HTTP request to that URL when an event happens.
- The details of an event (the message)
An example of a webhook use case is in the payment system for recurring billings. Say a user of your application is unable to use some services on your application because they have not renewed their payment. This same user then makes the payment using your payment system. In this scenario, you will want to be notified by the payment system when a payment has been successful so that you can unblock the services for this user. This is where the webhook comes to play. You provide the webhook URL to the payment system so that when a payment is made, this URL is triggered and a message containing the information about the payment is sent to your application. This message can then be used to unblock the user from the previous services they were unable to use before.
Thus, the source system defines the events which can be triggered and the destination system receives the messages at the configured webhook URLs.
There are several webhooks for various Twilio products, but in this article, you will focus on responding to webhooks triggered by incoming SMS.
For Twilio SMS, two types of webhooks can be triggered:
- Incoming Message: This webhook is triggered when your Twilio Phone Number receives a message. Twilio will send the details of this message to the webhook URL that you specify.
- Status Callback: This webhook is triggered when the status changes of a message sent via Twilio. This webhook sends a message with the status of the message along with other details about the message.
In the next section, you will start building the Azure Function project which will respond to the SMS webhook.
Create an Azure Function locally
Azure Functions is a serverless event-driven service by Azure that enables you to run lightweight code called functions which can be invoked through triggers like HTTP, Timer, queues, etc.
Azure Functions is built on the concept of Triggers and Bindings, and while there's a Twilio binding for sending SMS, there is no trigger for receiving messages or calls. However, as you learned earlier, Twilio uses webhooks, and you can handle the webhook HTTP requests using Azure Functions with the HTTP trigger.
To begin, create a new folder and initialize an Azure Function project locally with the following commands:
The func init --dotnet command creates the Azure Function project using .NET as its runtime and C# as the programming language.
Run the following command to create the function that will be triggered by the Incoming Message webhook:
- The
--nameparameter accepts a unique name for the function that will be part of the URL path. - The
--templateparameter accepts the name of the template you want to use. You can list the templates usingfunc templates list, and specifically list C# templates usingfunc templates list --language C#. As the name suggests, theHTTP triggertemplate uses the HTTP trigger and HTTP bindings to receive an HTTP request and send back an HTTP response. This is what you want for this tutorial to handle the webhook HTTP requests. You can check out other types of triggers and bindings in Microsoft Docs. - The
--authlevelspecifies the level of authorization to invoke the function. You can use other Authorization levels, butanonymouswill work fine.
The func new command generated a function that responds with a default message when the URL is requested.
To start the function locally, run:
This command builds the .NET project and runs the application in the local Azure Functions host. Once it is started, it will print out the list of functions in the project, including URLs for HTTP trigger-based functions.
Copy the URL that is printed for the IncomingMessage function which looks like http://localhost:<port>/api/IncomingMessage, then navigate to the URL in your web browser to trigger the function. The browser will show a message like the one below:
Stop the Function app by pressing CTRL + C.
Next, let's update the function C# code to respond to incoming messages.
Respond to incoming SMS with Azure Functions
When your Twilio Phone Number receives a message, Twilio will send an HTTP request with the message details to your webhook URL. In addition to receiving the request, Twilio also expects you to respond with instructions for Twilio to execute. You write these instructions using the Twilio Markup Language (TwiML). For example, the following TwiML will respond to the sender with "Ahoy!":
You can generate these TwiML instructions using C# strings or even the XML .NET APIs, but the Twilio SDK for .NET has dedicated APIs to generate TwiML. Add the Twilio NuGet package using the .NET CLI:
Twilio Labs maintains another library, the Twilio helper library for ASP.NET, which has the TwiMLResult class which will write the TwiML to the HTTP response body. Add the Twilio.AspNet.Core NuGet package:
Now, update the IncomingMessage class with the following code:
Using the HttpTrigger attribute, the function is configured to be triggered by HTTP requests and the request will be bound to the HttpRequest req parameter.
In Twilio, you can configure the SMS webhook HTTP request to be sent using the GET or POST method. In this tutorial, you'll use the POST method which means that the message details will be serialized as a form in the body of the HTTP requests. The function deserializes the message details from the form body using the ReadFormAsync method. Then the "Body" form parameter is retrieved for later use.
Next, the function constructs a MessagingResponse object which is one of the classes to construct TwiML provided by the Twilio SDK. To send a message back to the sender, you can use the Message method; in this case, the message responds with what the sender sent to your Twilio Phone Number. Whenever the status of the message changes, Twilio will send a webhook HTTP request to the URI you pass to the action parameter. This action parameter is also referred to as the Status Callback webhook. The method tells Twilio to send the status updates using the HTTP POST method.
Lastly, the function returns a TwiMLResult which takes care of serializing the objects to TwiML and writing it to the HTTP response.
Test your Azure Function webhook locally
To test this webhook, you have to expose your local URL over the internet as your localhost is inaccessible to Twilio. To achieve this, you can use ngrok. ngrok is a free tool that exposes local ports to the internet through secure tunnels.
To begin, start your function app using the func start command.
Then in another terminal, run the following command to start ngrok.
Replace <PORT> with the port on which your Azure Function is running locally.
The ngrok command will print a Forwarding URL that looks like https://d152-41-184-42-209.eu.ngrok.io.
Now that you have a public URL, let's configure the webhook URL in Twilio.
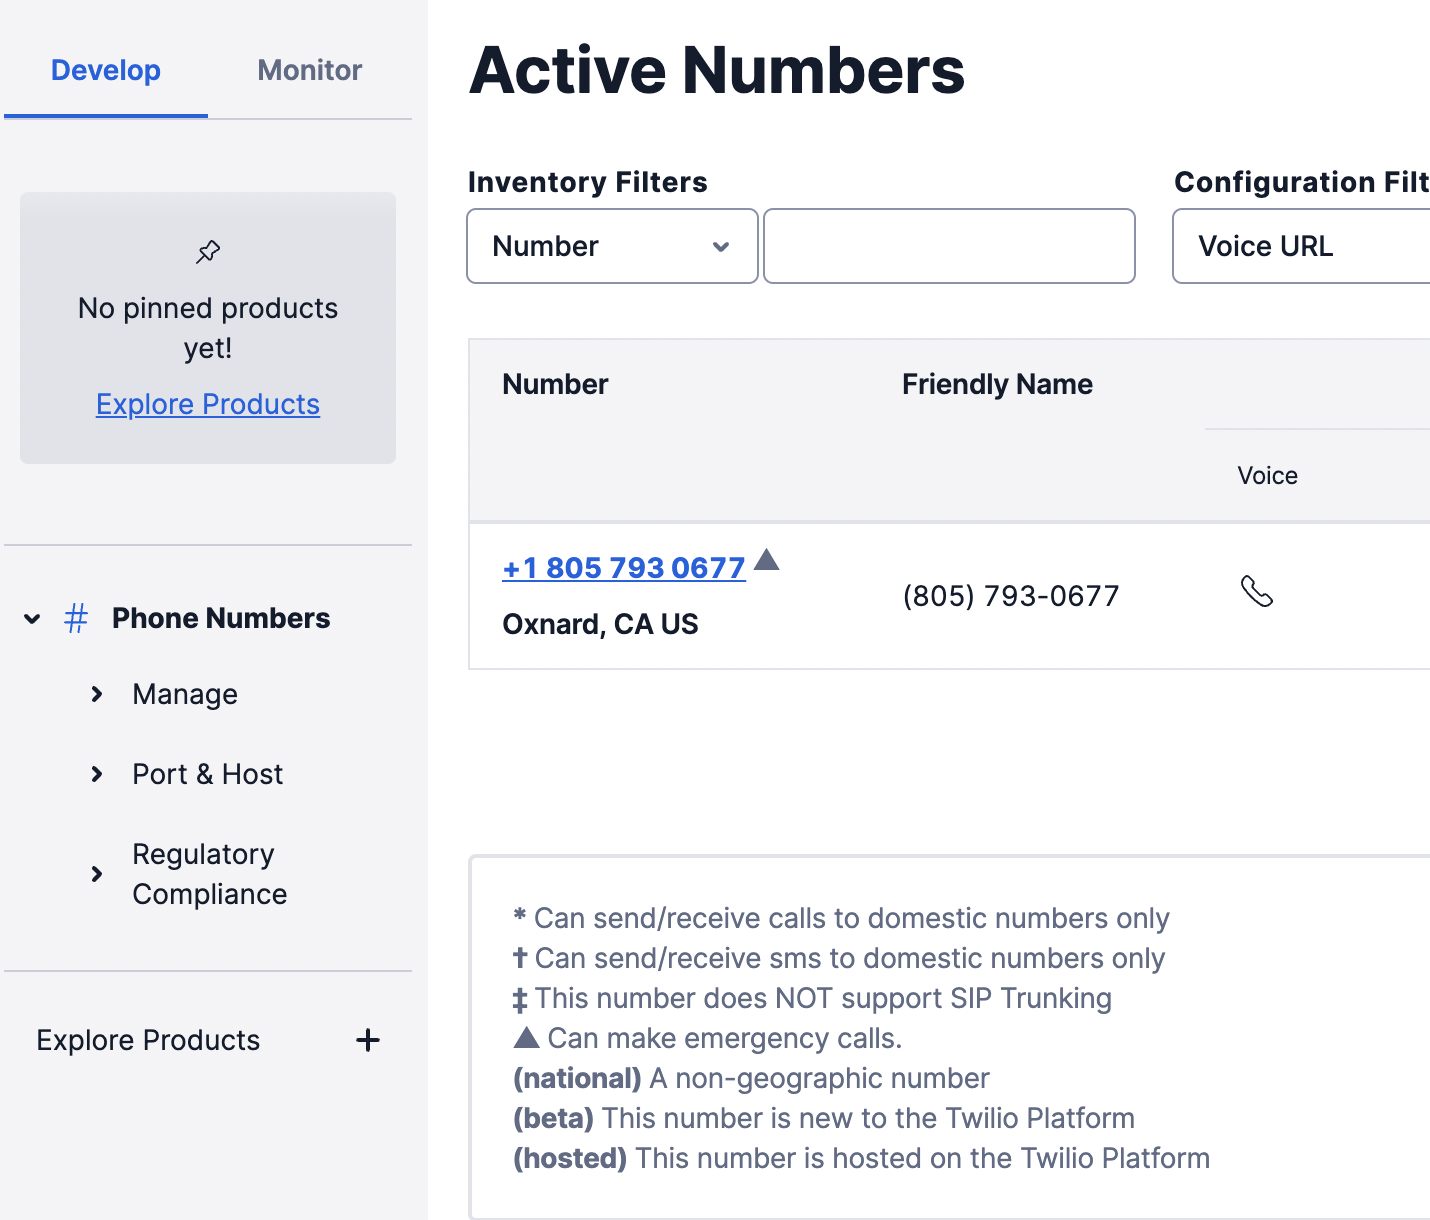
Log in to the Twilio console and select your Account. Click on the Explore Products and select Phone Numbers. Then in the left side navigation, click on Phone Numbers > Manage > Active Numbers.

Click the active number you'd like to use which will take you to the configuration page
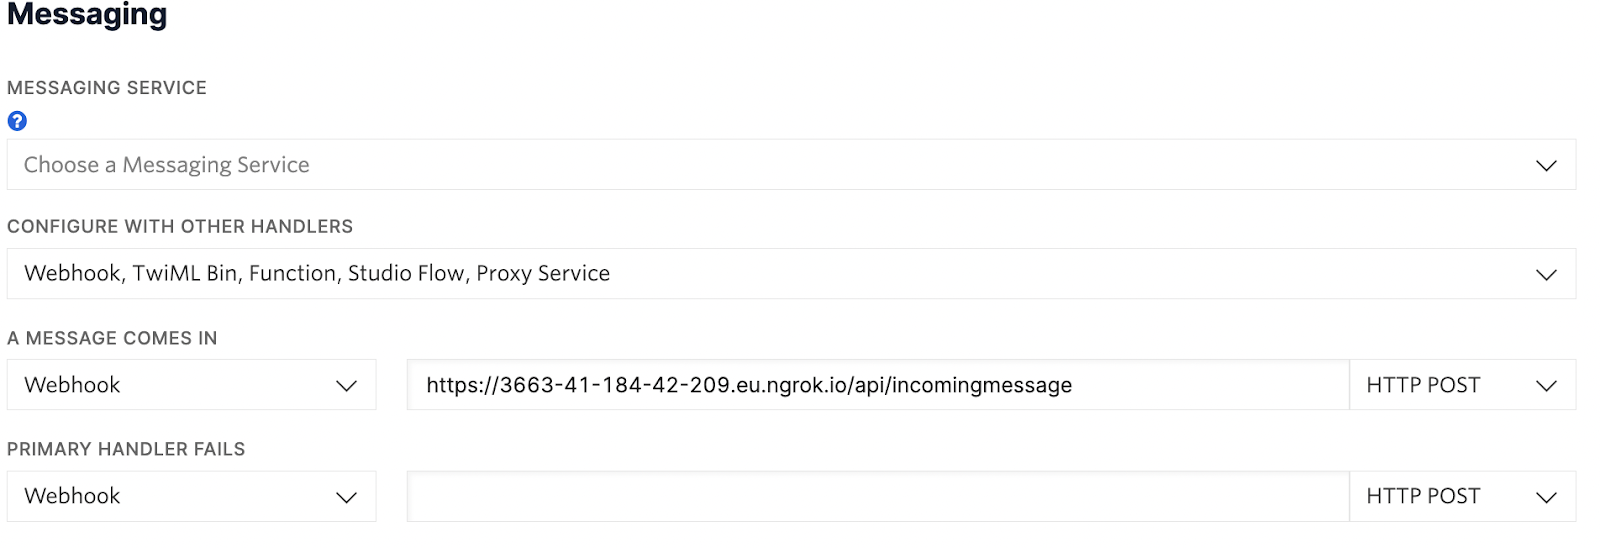
On the configuration page, scroll down to the Messaging Section. Under ‘A MESSAGE COMES IN’, set the first dropdown to Webhook, then into the text box, enter the ngrok Forwarding URL with /api/IncomingMessage as the path, and lastly, set the second dropdown to HTTP POST.

Click Save and then send an SMS to your Twilio Phone Number.
Here is an example of the SMS conversation:

Great job! You have successfully responded to an Incoming Message.
The ngrok command should show a successful 200 OK request for /api/IncomingMessage, but also a 404 Not Found request for /api/MessageStatus. Twilio is sending an HTTP request for the status callback, but you have not implemented that yet.
Leave the ngrok command running, but stop the Function app using CTRL + C. Now, let's implement that Status Callback webhook.
Implement the Status Callback Webhook
The Status Callback webhook will notify you when the status changes of an outgoing message.
Unlike the Incoming Message webhook, the Status Callback webhook URL is configured on the outgoing message instead of on the phone number.
If you configured the Status Callback webhook to be sent using the HTTP POST method, the data will be form encoded and look something like this:
To implement the Status Callback, create a new HTTP function using this command:
Recall that the action parameter aka the Status Callback URL is configured with path /api/MessageStatus in the IncomingMessage function? That URL points to this new MessageStatus function.
Update the MessageStatus.cs file to look like the code below,
The MessageStatus function will be triggered by an HTTP request which is bound to the HttpRequest req parameter. The implementation of the function is similar to the IncomingMessage function.
The request body is read using req.ReadFormAsync(), and the MessageSid and MessageStatus properties are retrieved to log them.
Unlike the Incoming Message webhook, Twilio does not expect TwiML instructions or any instructions as a response to the Status Callback webhook. So this function will return an empty response with HTTP Status 200 OK by returning an OkResult.
To test the Status Callback webhook, start the Function app again, but this time with the --verbose argument so you can see the information being logged:
Then send a message to your Twilio Phone Number. In the ngrok terminal, you should now see a 200 OK for the Status Callback URL, and you should also see the MessageStatus and MessageSid logged to the func start command.
You have successfully implemented all the webhooks for the Twilio SMS product.
Next up, let's deploy the Azure Function app to Azure.
Deploy the Azure Function to Azure
To deploy to Azure, you have to create the necessary resources on Azure. You will be doing so using the Azure CLI.
Sign in to Azure using the az login command.
This opens a web browser where you log in to the Azure portal. A response showing details about the account should now be shown on the terminal.
Then create a resource group using the following command:
The <RESOURCE_GROUP_NAME> must be unique within your Azure account. The <REGION> is the region where the resource group will be located. Running the command az account list-locations -o table returns you an array of regions to select from. You should always choose a region closer to where your users are to reduce latency.
Azure Functions uses Azure Storage to persist data. Create a storage account in this resource group using the following command:
The <STORAGE_ACCOUNT_NAME> must be a globally unique name on Azure Storage and must contain only lower-case letters and numbers only. You can specify the same region as before. If the same region isn't supported, try the next nearest region.
Create a Function app on Azure in the resource group with the Storage account you created earlier, using the following command:
Replace the <RESOURCE_GROUP_NAME> and the <STORAGE_NAME> with the names you have chosen for the resource group and Azure Storage account earlier respectively. You can also specify the same region as you have specified while creating other resources if supported.
Replace <APP_NAME> with a globally unique name. The <APP_NAME> is used as part of the hostname for the Function app. This command also specifies the version of the Function app, in this case, version 4. You can find the same version number in the AzureFunctionsVersion property of your project file (.csproj).
Finally to deploy the app, run the following command:
After a few minutes, a couple of URLs are displayed on the console showing the different function URLs of the Azure Function app you created. For this tutorial, 2 URLs will be shown that look like: https://<APP_NAME>.azurewebsites.net/api/<FUNCTION_NAME>
Next, go back to the Twilio Console and update the Incoming Message webhook URL as you did before with the ngrok Forwarding URL. Instead of using the ngrok Forwarding URL, use the full URL to the IncomingMessage function printed by the previous command. Now your Function app is running in the cloud and you can test your app again by texting your Twilio Phone Number.
Conclusion
In this article, you learned how to respond to the Twilio Incoming Message webhook and Message Status Callback webhook using Azure Functions. You also learned how to use ngrok to test it locally and deploy it to Azure.
You can use this code to build great products for your company like a FAQ bot, or a scheduling system where your customers can send a message to schedule an appointment with you.
If you enjoyed reading this article, you can check out these other articles:
- How to send SMS with C# .NET and Azure Functions using the Twilio Output Binding
- How to Send Emails using C# .NET with Azure Functions and SendGrid Bindings
- Respond to Twilio Webhooks using AWS Lambda and .NET
You can check out the full source code on GitHub.
Similoluwa Adegoke is a software engineer and currently works in the banking industry. When Simi is not coding or writing about it, he is watching tv shows. Simi can be reached at adegokesimi[at]gmail.com
Related Posts
Related Resources
Twilio Docs
From APIs to SDKs to sample apps
API reference documentation, SDKs, helper libraries, quickstarts, and tutorials for your language and platform.
Resource Center
The latest ebooks, industry reports, and webinars
Learn from customer engagement experts to improve your own communication.
Ahoy
Twilio's developer community hub
Best practices, code samples, and inspiration to build communications and digital engagement experiences.

