A Rapid Introduction to Laravel Gates
Time to read:

Laravel provides a wide range of features that make web development faster and more efficient. And one of the essential features of web development is authorization. In this article, we'll talk about one of the key authorize features: Gates.
Prerequisites
To follow along with this tutorial, you must have:
- An existing Laravel project using Laravel UI that has at least one registered user
- A database supported by Laravel, for logging in users
- PHP 8
- A database tool such as PhpStorm's database tool window, MySQL's command-line client, or HeidiSQL
What is authorization?
Authorization is the process of determining whether a user has access to a specific resource or not. This resource could be anything, such as a web page, a file, or a database record. Authorization is a crucial aspect of web application security and ensures that users can only access the resources they are authorized to access.
Laravel Authorization
Laravel provides a powerful and flexible authorization system that allows developers to control access to resources based on various criteria. The Laravel authorization system is based on Gates and Policies. Our focus will be on Gates in this article.
What are Laravel Gates?
Laravel Gates are a way to manage authorization in Laravel. Gates are closures that decide whether or not a user is allowed to perform a given action and are typically defined in the app/providers/AuthServiceProvider class using the Gate facade, which provides methods for defining and checking Gates. For example, you could create a Gate that only allows users with administrative privileges to access certain pages or features of your application.
How to Define a Laravel Gate
To define a Gate in Laravel, we use the Gate::define() method. This method takes two arguments, the name of the gate, and a callback function that defines the Gate's logic. The callback function should return a boolean value indicating whether the user is authorized to access the resource.
For example, we can define a Gate that checks if the user is an administrator as follows:
In the code above, the admin Gate checks whether the user is an admin by calling the isAdmin() method on the user model. If the method returns true, the Gate allows access; otherwise, access is denied.
Checking a Gate
To check if a user is permitted or authorized to access a resource, we can use the Gate::allows() method. This method takes two arguments: the name of the Gate, and any additional parameters required by the Gate's callback function.
For example, to check the admin Gate:
In the code above, we check if the user is authorized to access the admin Gate. If the Gate allows access, we can perform any necessary actions. If access is denied, we can display an error message or redirect the user to a different page.
Using Additional Parameters
Gates can also accept additional parameters to provide more context for the authorization decision. In the following example, we can define a Gate that checks if a user is the owner of a particular resource:
Here, the update-post Gate checks if the user is the owner of the post by comparing the user's ID to the post's user_id attribute.
To check if the user is authorized to update a particular post, we can pass both the user and the post to the allows() method, as in the following example:
When to use Gates
Role-based access control: Laravel Gates can be used to restrict access to specific parts of a web application based on the user's role. For example, you may want to restrict access to certain administrative features to users with an "admin" role.
Resource ownership: Laravel Gates can be used to restrict access to resources based on ownership. For example, you may want to restrict access to a user's own profile page or restrict editing of a specific post to only the user who created it.
Custom business logic: Laravel Gates can be used to enforce custom business logic based on the specific needs of your web application. For example, you may want to restrict access to a specific feature based on whether a user has made a certain number of purchases or has a specific subscription level.
Now, let's step through an example.
Configure your database
The first thing we’ll do is configure our database for this example. To configure the database, simply locate a file called .env in our Laravel project. We’ll then connect our database by setting the following credentials.
Replace your_database_name with the actual name of your database and your_database_username with root.
If you’re just creating your database, run the database migrations, after following the steps above, by running the following command:
Define a Gate
Suppose you have a website and want to show content only subscribers can access. So how, then, will you restrict users and only grant access to subscribers only?
Let’s add another field in the users table called subs, short for "subscribers". It will be a boolean. The subs will be given a value of 0 for users who don’t subscribe and 1 for users who subscribe.
To do this, run the following Artisan command to generate a new migration file:
Next, open the newly created migration file located at database/migrations/<timestamp>_add_subs_to_users_table.php and modify the up() method like so:
Now, run the migration using the migrate Artisan command:
Doing this will add a new subs field to the users table as a boolean field with a default value of 0.
Lastly, we’ll update the default value of the subs field for a given user. To do that, open the database in your database tool of choice, in the users table, set the subs column to 1 for your desired user.
Now let’s proceed with our project.
What we want to achieve is that when a user is subscribed, an extra link will appear alongside the "home" link when the user clicks the "Laravel" link, after, after the user logs in. This link will be visible to the users who have subscribed to view the content.
So the first thing we’ll be adding is the link. To achieve this, navigate to resources/views/welcome.blade.php, and right below our homepage link, we’ll add this:
Let’s now create our subs route. Inside our route/web.php, include this right after our welcome routes:
The next thing to do is to create a view called subs.blade.php in resources/views.This will be content that we'll display to our subscribers. In the file, add the following:
Next, we need to restrict this page from being accessed by users who didn't subscribe. Now, this is where our Gate comes in. To do this, we’ll first define our Gate. Inside app/providers/AuthServiceProvider.php, uncomment use Illuminate\Support\Facades\Gate; or add it to the file if it is missing, then define the Gate by adding this inside the boot() method:
In the code above, the Gate::define() method takes two parameters: the name of the gate being defined, which is called subs-only and a closure that implements the gate's authorization logic.
The closure takes a single parameter, $user, which represents the user being checked for access. The closure checks if the user's subs property is equal to 1. If the user has a subscription, the function returns true, indicating that the user is authorized to access the resource or perform the action. Otherwise, it returns false, indicating that the user is not authorized.
For better understanding, the boot() method now looks like this:
Here, we named our Gate subs-only.It will get our user details.
The next thing is to restrict our users from having access to the content if they haven't subscribed. We need to authorize the actions and use the allow() method. To do this, let’s go back to routes/web.php and modify the code to match the following:
The code above checks if the authenticated user can access the "subs" page. If so, the "subs" view is displayed.
Lastly, we'll make the link to the content only visible to the subscribers as this will make it more efficient instead of showing us something like "you are not authorized to view this". Go back to resources/views/welcome.blade.php and wrap our link inside the @can directive, as in the following code.
In the code above, we check if the authenticated user has the "subs-only" permission using the @can directive. Our link will not be displayed if the authenticated user does not have the subs-only permission.
All done! Now here's a summary of everything we did and what we want to happen:
- We created content that we wanted to show to only our subscribed users.
- We used the
@can('subs-only', Auth::user())to check if the currently authenticated user has permission. - We created a link and made it only visible to the subscriber alone. This was possible by using gates which helped us restrict the content to only authorized users.
Test that the application works
Now, let’s run our code and see the changes working. First, start the application by running the command below.
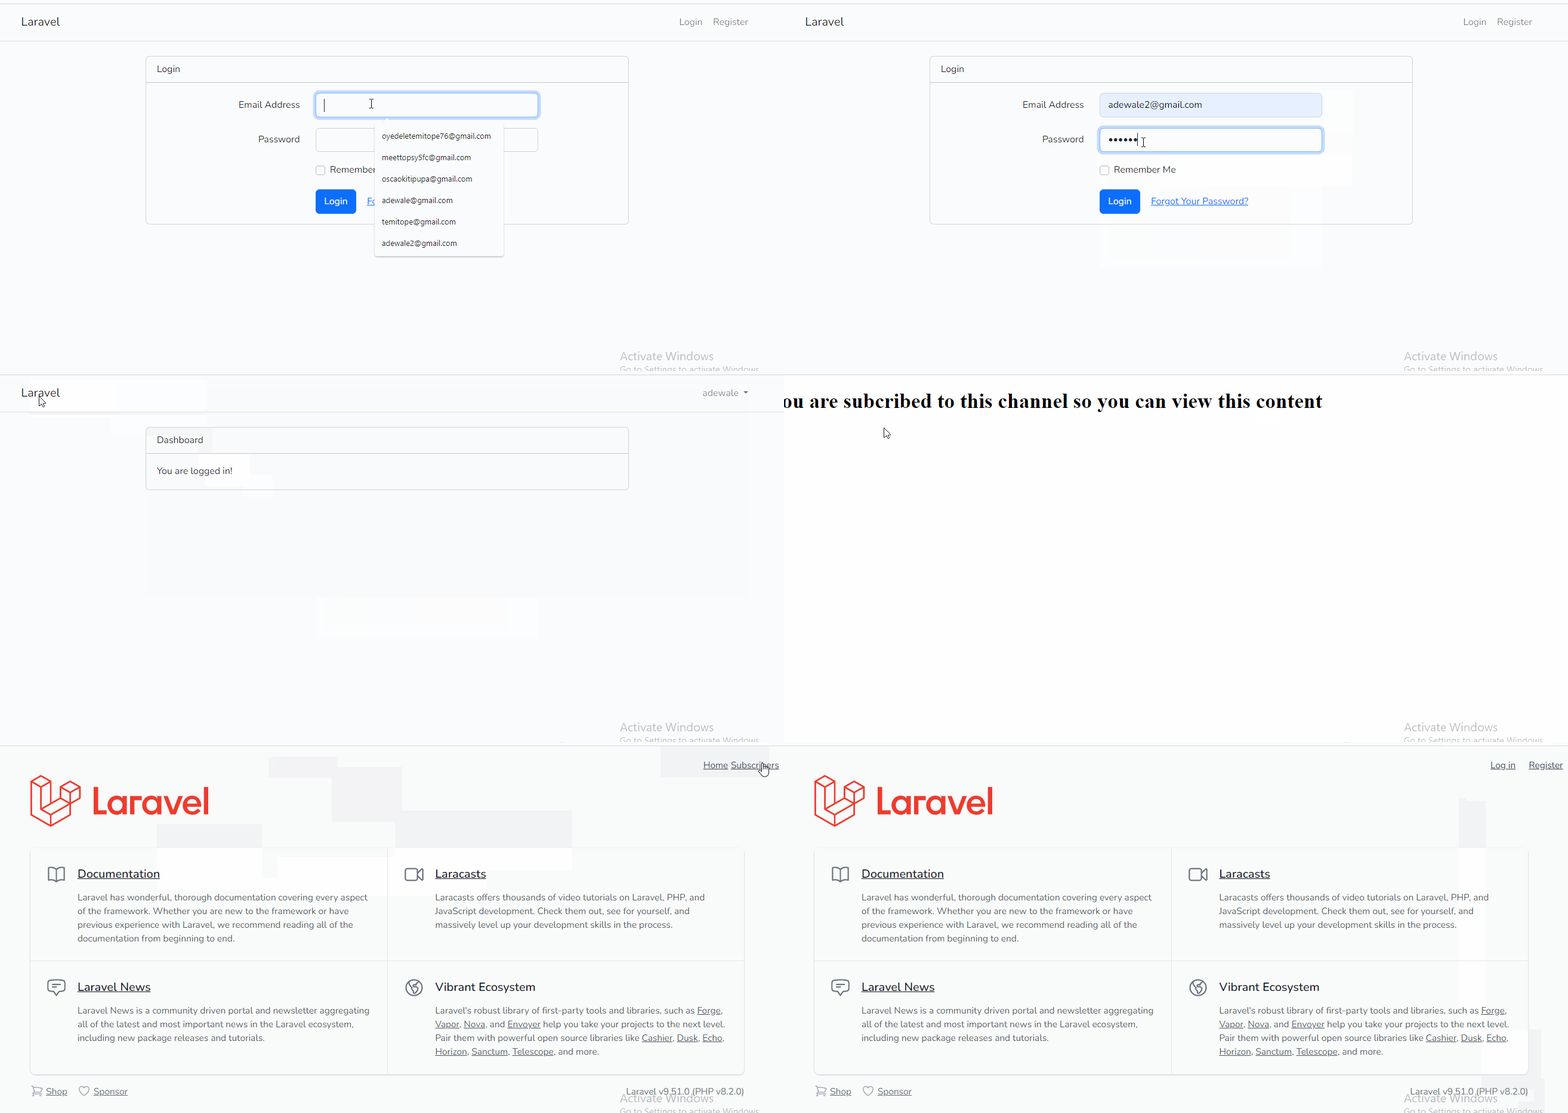
Then, open http://localhost:8000 in your browser of choice (change the port if it is bound to a different port) and click Login in the top right corner. After logging in, click the Laravel link. You'll now see the new Subscribers link appear next to the Home link, as in the animation below.

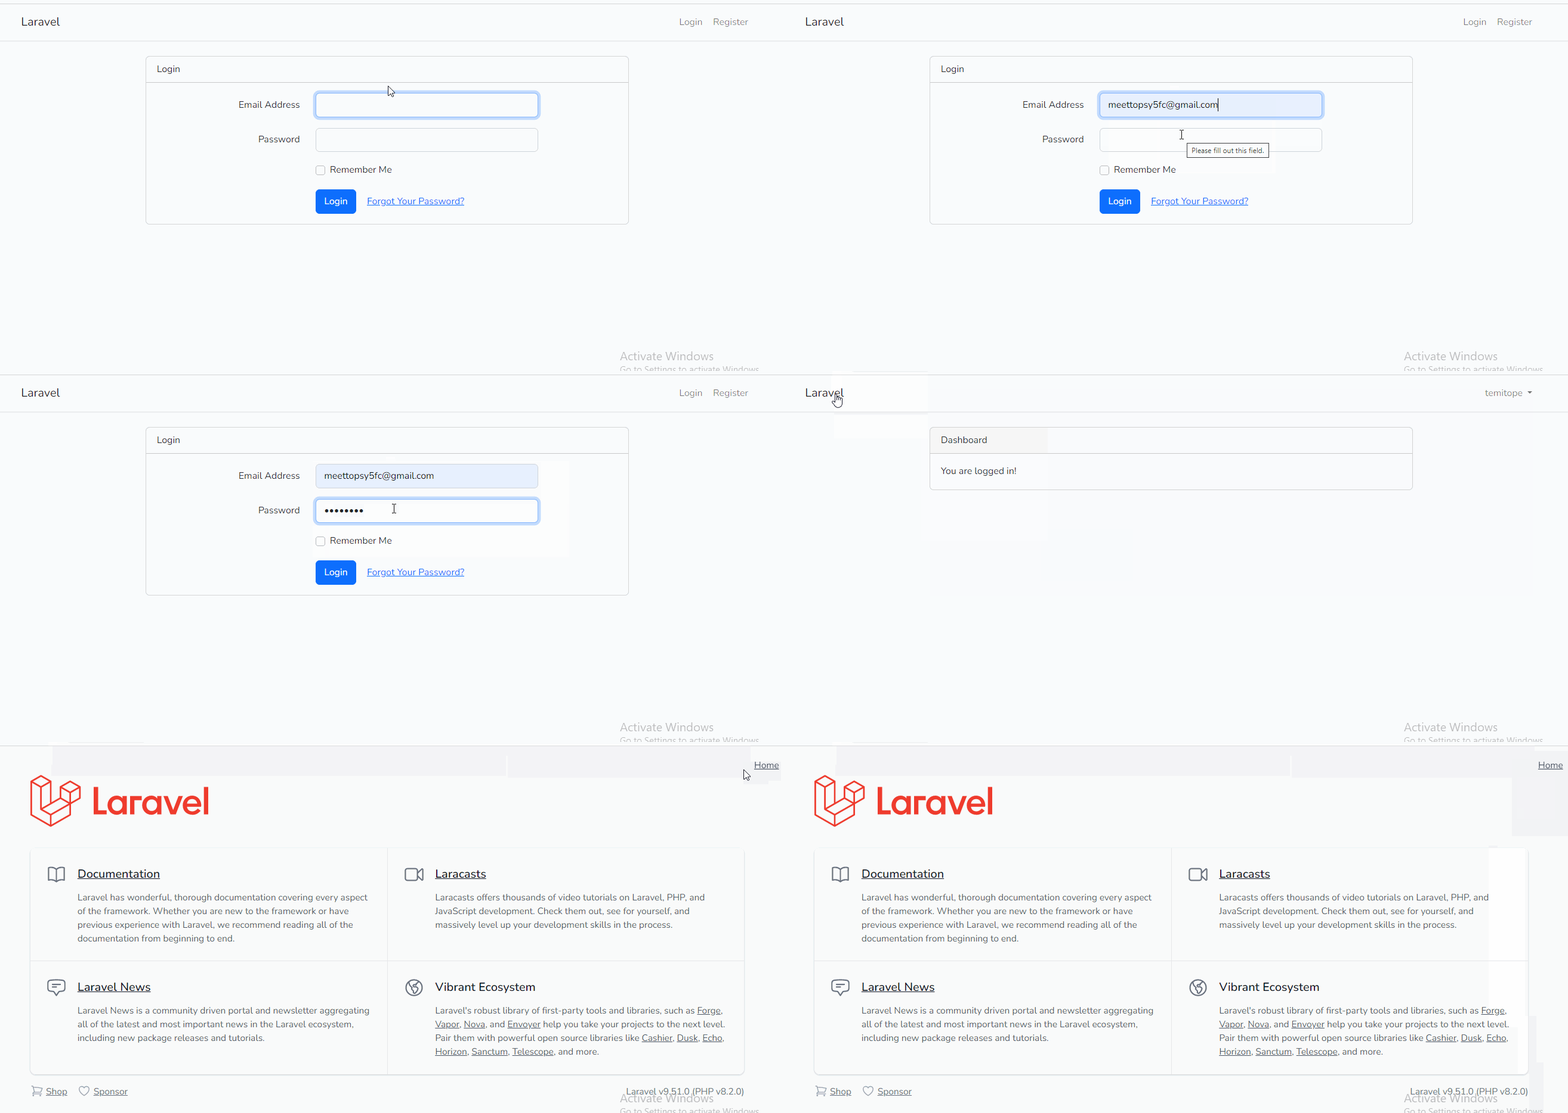
Here’s what happens when a user who is not subscribed logs in. You can see that the new link does not appear.

And that’s a wrap, everyone!
Conclusion
In this article, we talked about authorization and how it works. We also discussed Gates as a method of authorization, while also sighting an example of how to use it.
Laravel Gates are a powerful way to manage authorization in Laravel. By defining simple PHP functions that determine what actions a user can perform, you can easily control access to your application's resources and features. Whether you're building a simple website or a complex web application, Laravel Gates are a valuable tool to have in your toolkit.
In the next part, we'll take a look at policies. Please share if you found it helpful.
Temitope Taiwo Oyedele is a software developer and technical writer. He likes to write about things he’s learned and experienced.
Related Posts
Related Resources
Twilio Docs
From APIs to SDKs to sample apps
API reference documentation, SDKs, helper libraries, quickstarts, and tutorials for your language and platform.
Resource Center
The latest ebooks, industry reports, and webinars
Learn from customer engagement experts to improve your own communication.
Ahoy
Twilio's developer community hub
Best practices, code samples, and inspiration to build communications and digital engagement experiences.


