Personalized Customer Communications using Sentiment Analysis
Time to read: 6 minutes
Have you ever received a promotional text encouraging you to buy more products from a company after having issues with your order? As a customer, the tone mismatch can be off-putting, and as a company, it’s a missed opportunity to get feedback from your customer.
In this post, you will learn how to use IBM’s Sentiment API and Segment to personalize the message sent to a customer. First you will set up an IVR using a Twilio Studio Flow that will capture the user’s sentiment using IBM’s Sentiment API and send that sentiment to Segment as a Segment Event. If the user’s sentiment is negative, they will receive a text asking for feedback on how their experience can be improved. If the user’s sentiment is positive or neutral, they will receive an SMS with a coupon for the next purchase.
Prerequisites
To get started you will need:
- A Segment account – sign up for a trial here.
- An IBM account - sign up for a free developer account here.
- A Twilio account - sign up for a free developer account here.
This post uses material from the following blog posts:
- Analyze Texts using IBM Watson and Twilio Functions with Node.js
- Capturing Studio Flow Progress with Segment
For brevity, sections of the resources above will be referenced in the build section below.
Putting it together
Before you start building the solution, here's an overview of the importance of delivering the right message at the right time and a preview of what you're putting together:
This project will be in three sections: one for setting up IBM, one for setting up Segment, and one for setting up Twilio.
Setting up your IBM account
First we will set up a Watson Natural Language Service in your IBM account. Follow the instructions for the section Make a Watson Natural Language Service in this blog post. You can stop after you have set up your Watson Natural Language Service and have your Watson URL and API key. Save the API key and URL, we will use these when we set up our Twilio Functions later.
Setting up Segment
Navigate to your Segment dashboard and create a new Source Function by following Segment’s documentation here. Copy and paste the following code into your newly created Source Function code editor and name it “Twilio Sentiment Record”. Click “Save & Deploy” to save this Function.
Once this Function is deployed, copy the URL and save it. We will use this URL as a webhook in our Twilio Studio Flow later. When the Studio Flow posts to the webhook, Segment will track an event that records the user’s sentiment as positive, negative, or neutral.
Next, set up your Destination Function by following Segment’s documentation here. Then, copy and paste the following code below to the code editor in your newly created Destination Function and name it “Send Twilio SMS”.
Click “Save” to save this Function, we will deploy this later once we have all of our Twilio dependencies.
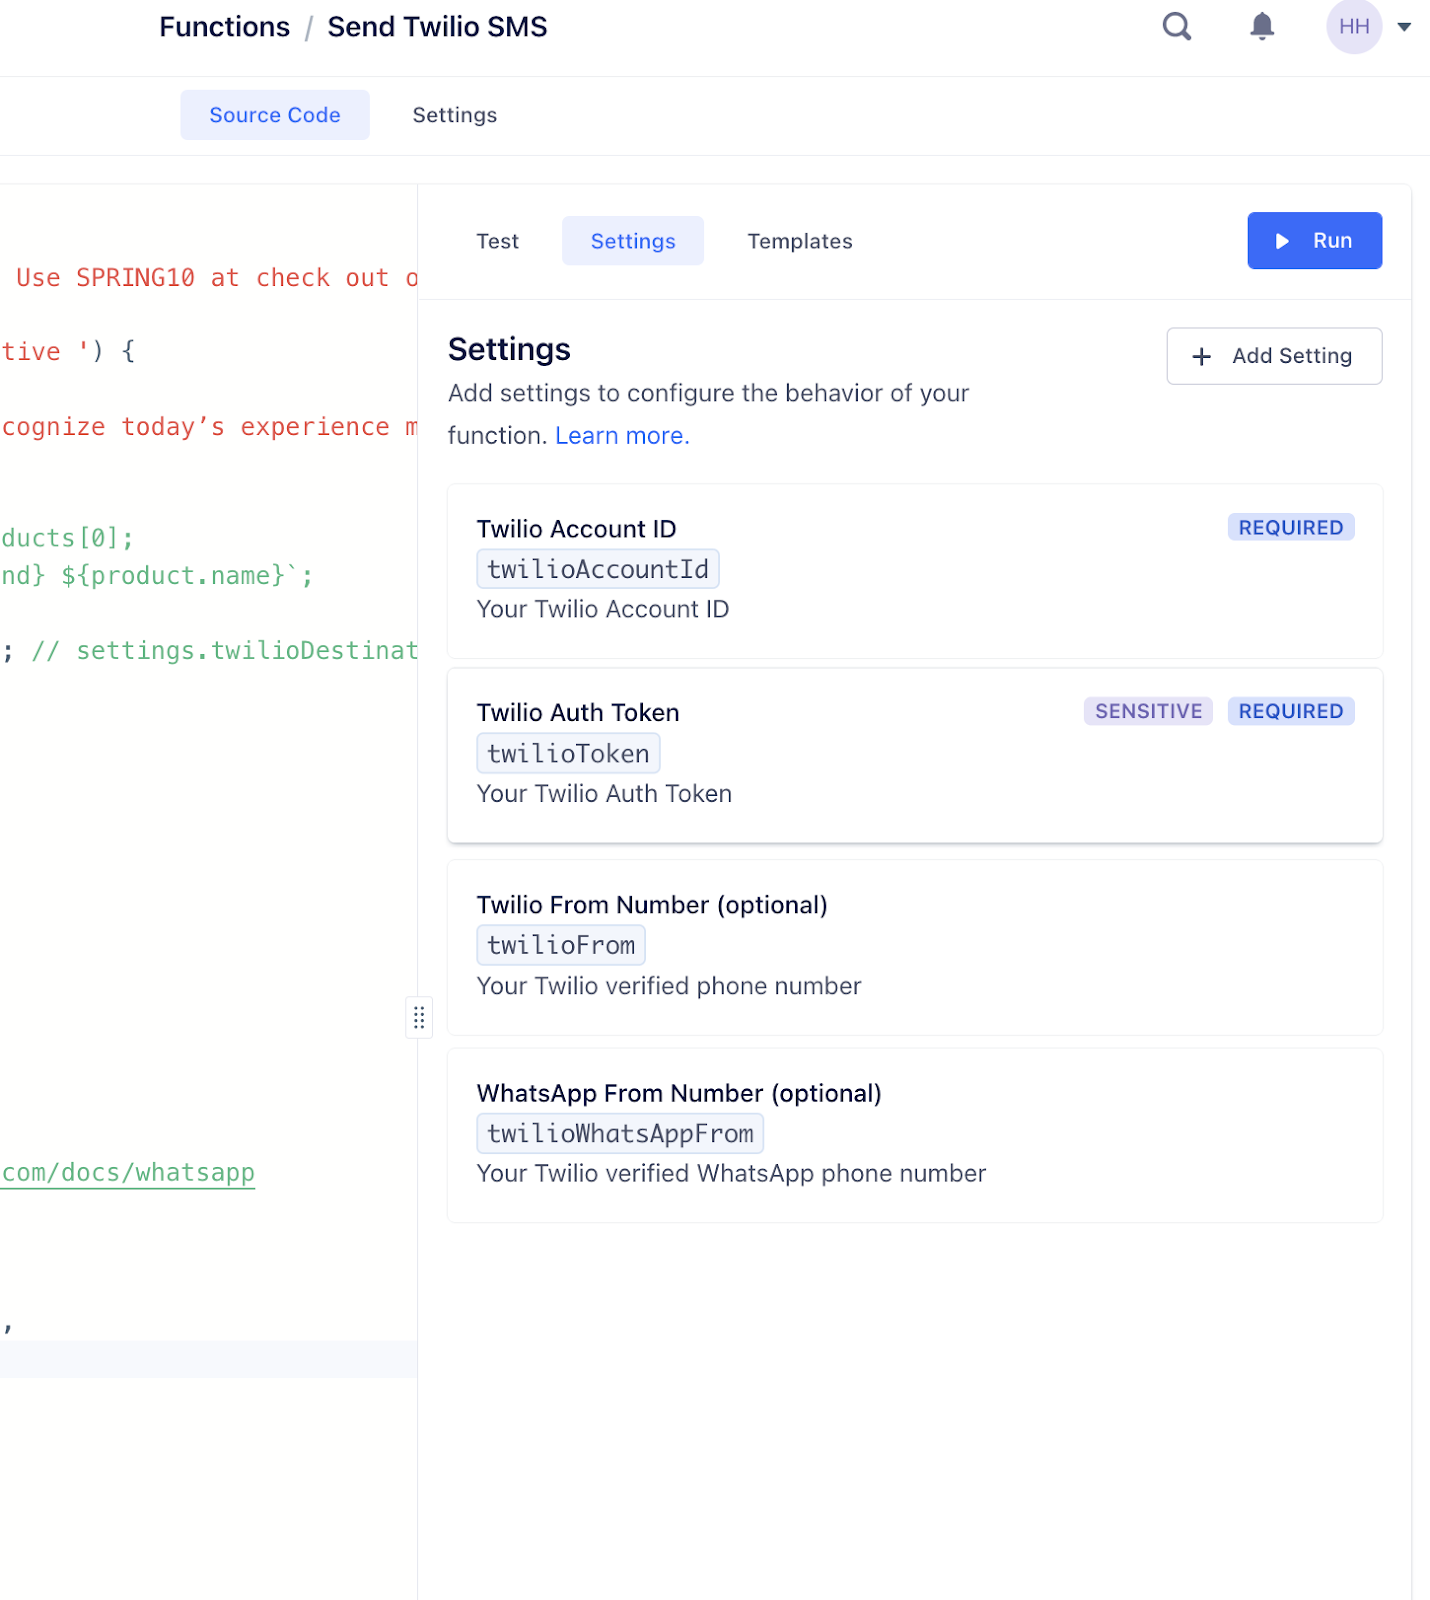
This code will send an SMS to the user once they have recorded a ‘Contacted Support’ event. The message body they receive depends on the event property ‘Sentiment’; if the value is negative then they will receive a request for feedback, otherwise they will receive a discount for their next purchase.
Next, we will sync our newly created Source Function to our Destination Function. Navigate to your Source Function by clicking into “Connections”, then “Sources”, and then your Source Function named “Twilio Sentiment Record”. Then, click “Add Destination” and select your Destination Function named “Send Twilio SMS” from the “Functions” tab.
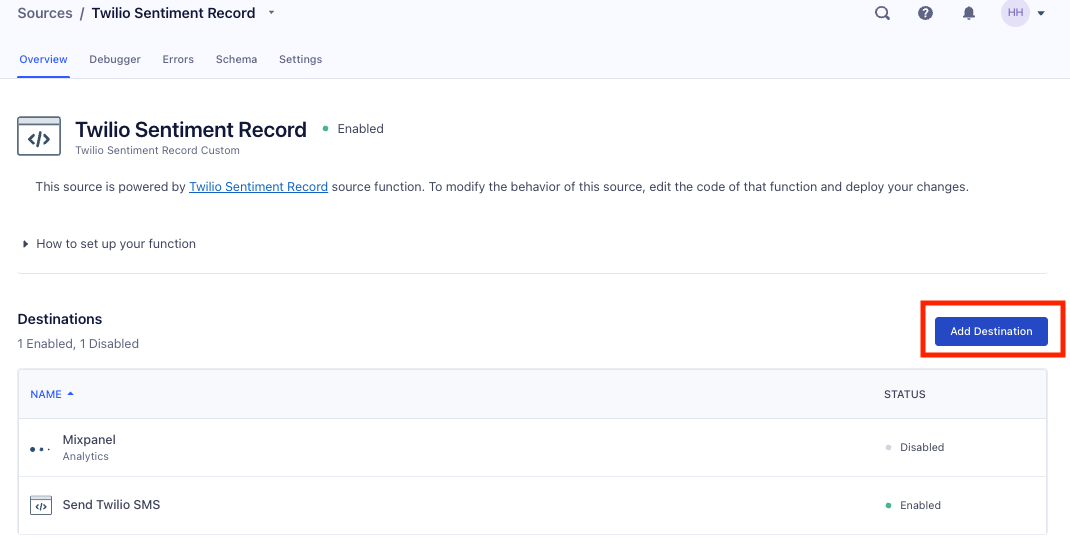
By linking this Source and Destination Function, every time a user records an event, an SMS will be sent out automatically. In a real world example we may want to delay this or set up an Audience in Segment to target when exactly those users should receive a text.
Setting up Twilio
Dependencies for Segment
Navigate to your Twilio console and copy your Account SID and Auth Token; we will use these in our Segment Destination Function. Next, purchase a phone number (or choose a phone number you already own) you would like to use for this project. This number will be used as the support line which users can call and text.
Once you have these three things, navigate back to your Segment Destination Function named “Send Twilio SMS”, click into “Settings, add your Account SID to the variable twilioAccountId. Continue to add your Auth Token to twilioToken and your phone number to twilioFrom. Save and deploy this Function.
Setting up the Twilio Function
Next, we will set up a Twilio Function to look up the sentiment of a user when they call into your IVR. Navigate back to your Twilio account and click into “Functions”, then “Services”, and “Create Service”. Name this Service “sentiment-analyzer”.
On the next screen, click “Add +” and select “Add a Function”. Then add the following code to the code editor:
Once that code is added, make sure to save your work.
Next we will add our IBM Watson dependencies to our Function. Click on “Environment Variables” and add the following:
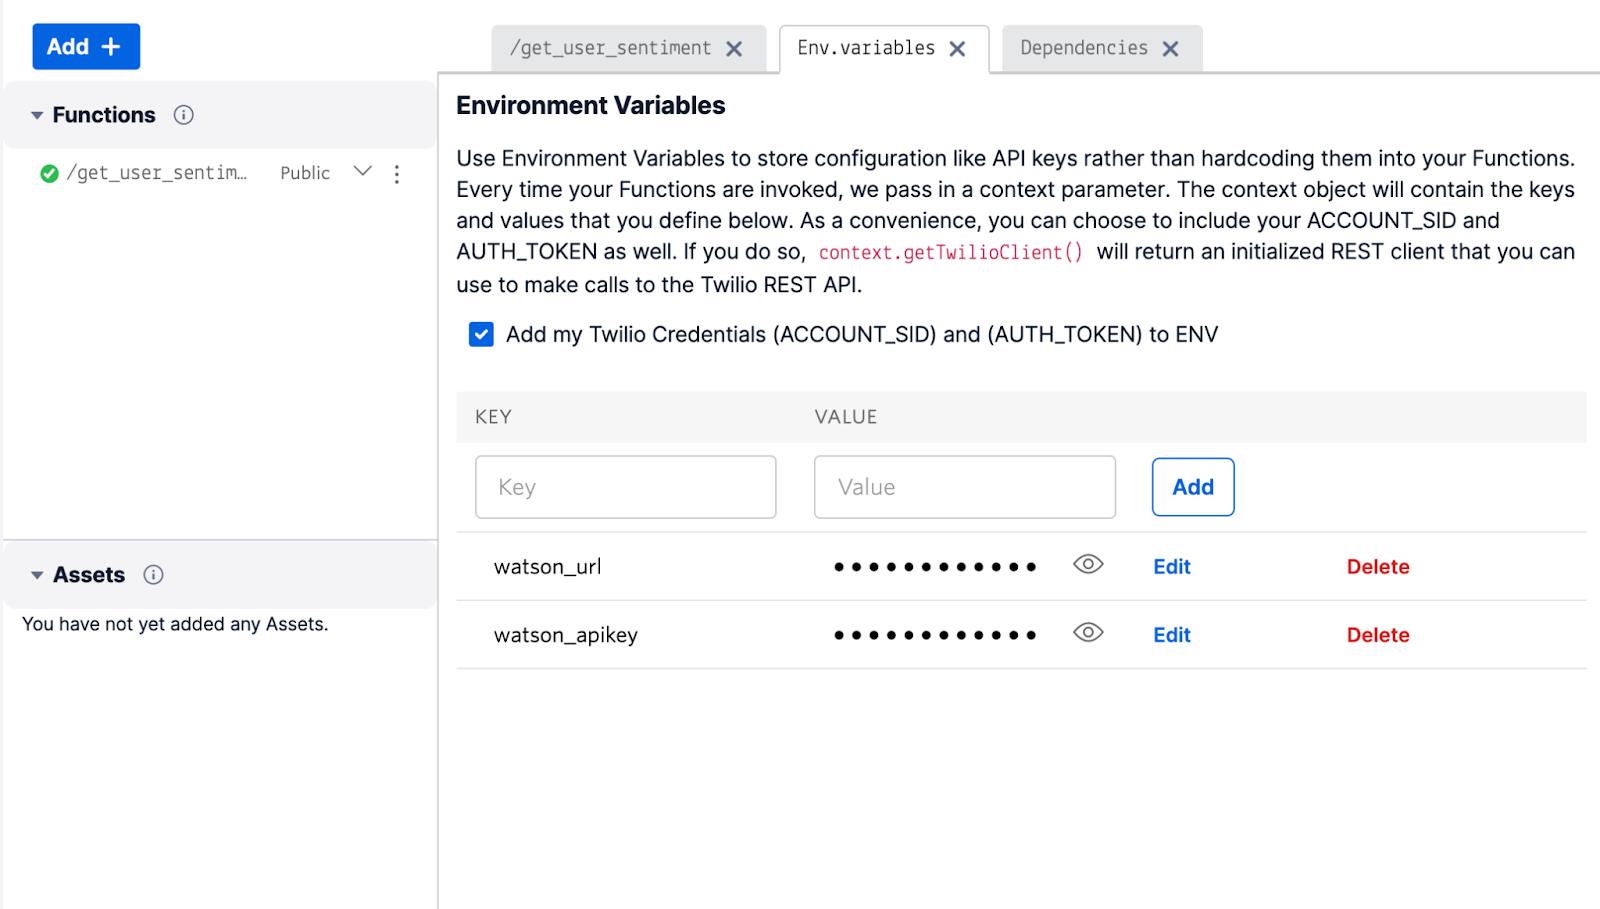
Next click on “Dependencies” and make sure that you have the following libraries installed:
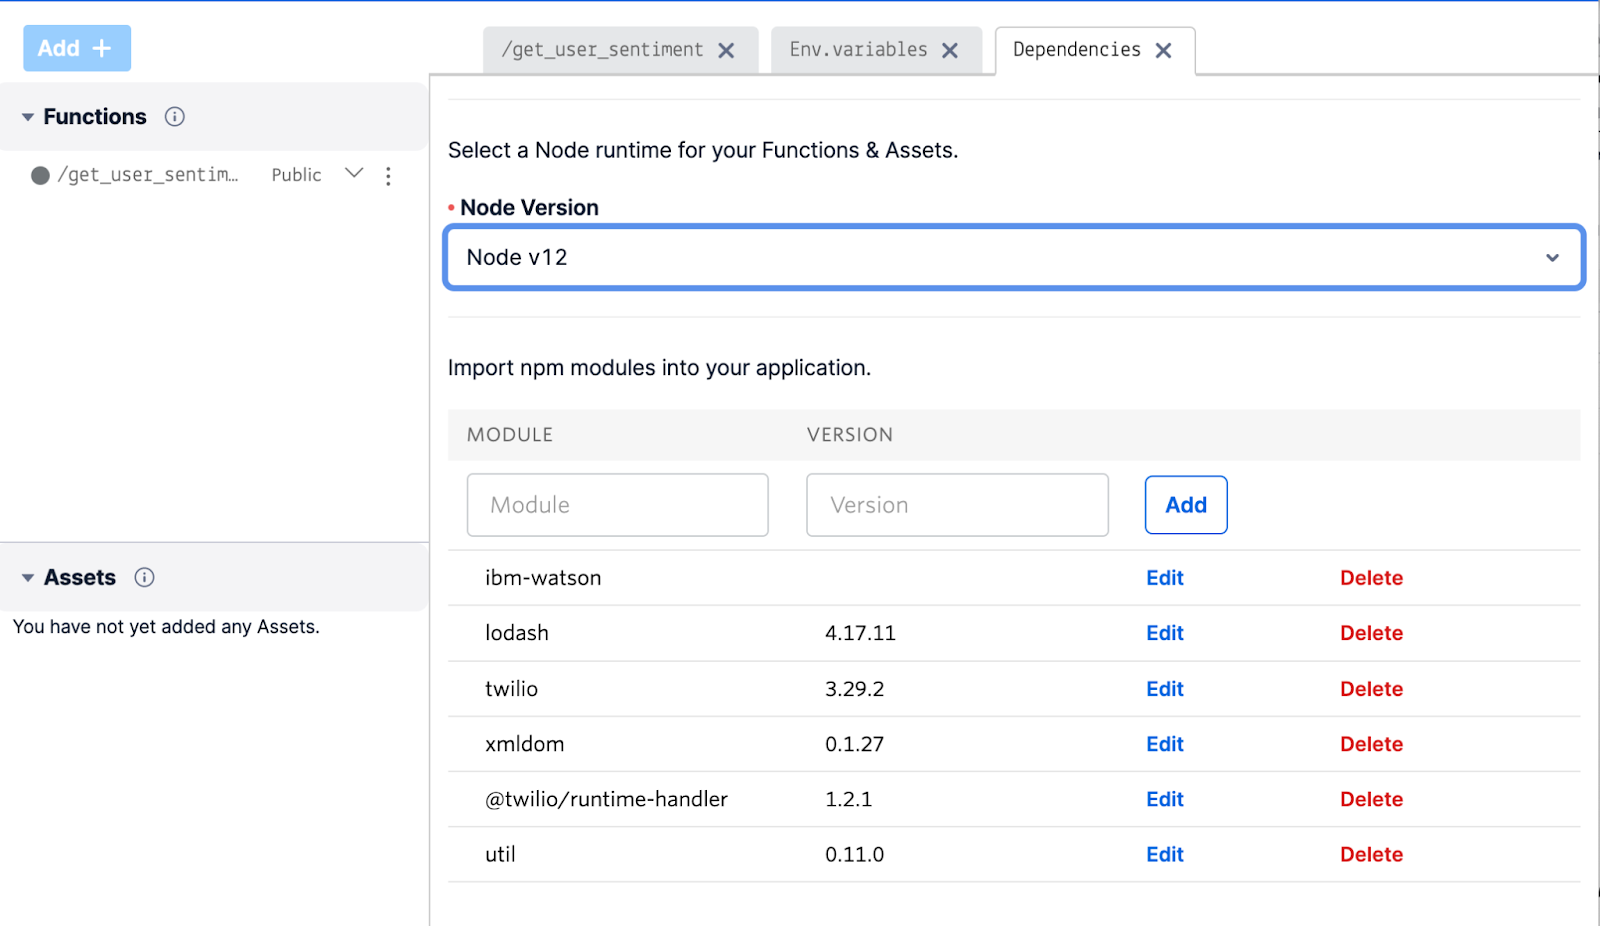
Finally, click “Deploy All” to make this Function live.
Setting up the Twilio Studio Flow
Lastly, we will set up our Studio Flow so your users have an IVR to call. Click on “Studio” on the left-hand menu, create a new Studio Flow, and name it “Support Line”. Select “Import from JSON” and paste the code from this Github gist into the code editor.
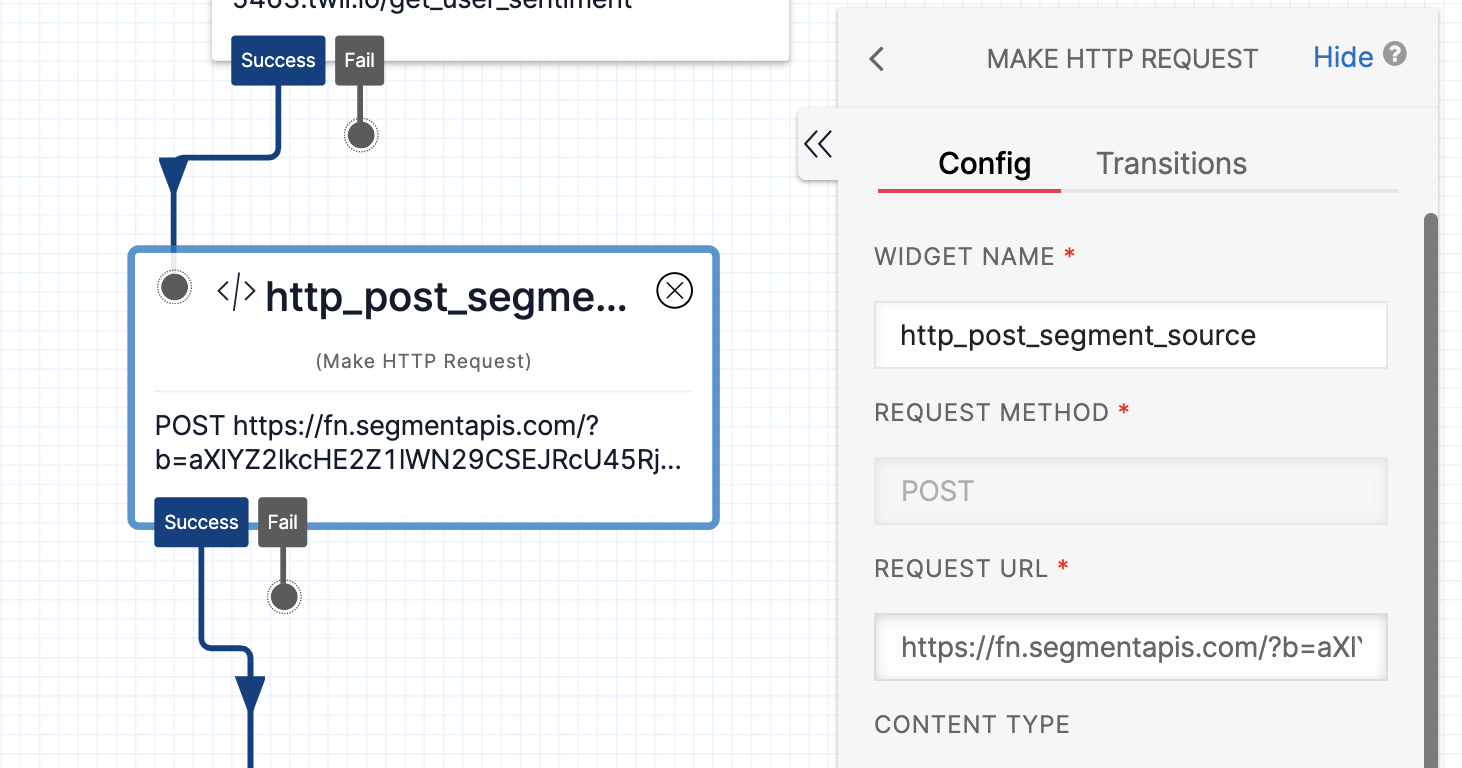
Next, we will update the webhook that the Studio Flow posts to the URL of your Segment Source Function. Click into the widget named “http_post_segment”. For the “Request URL”, paste your Segment Source Function URL. You can find this by navigating to Segment, clicking “Connections” > “Catalog” > “Functions” > “Twilio Sentiment Record”, and copying the webhook URL.
See the screenshot below to see where to find the Segment webhook URL:
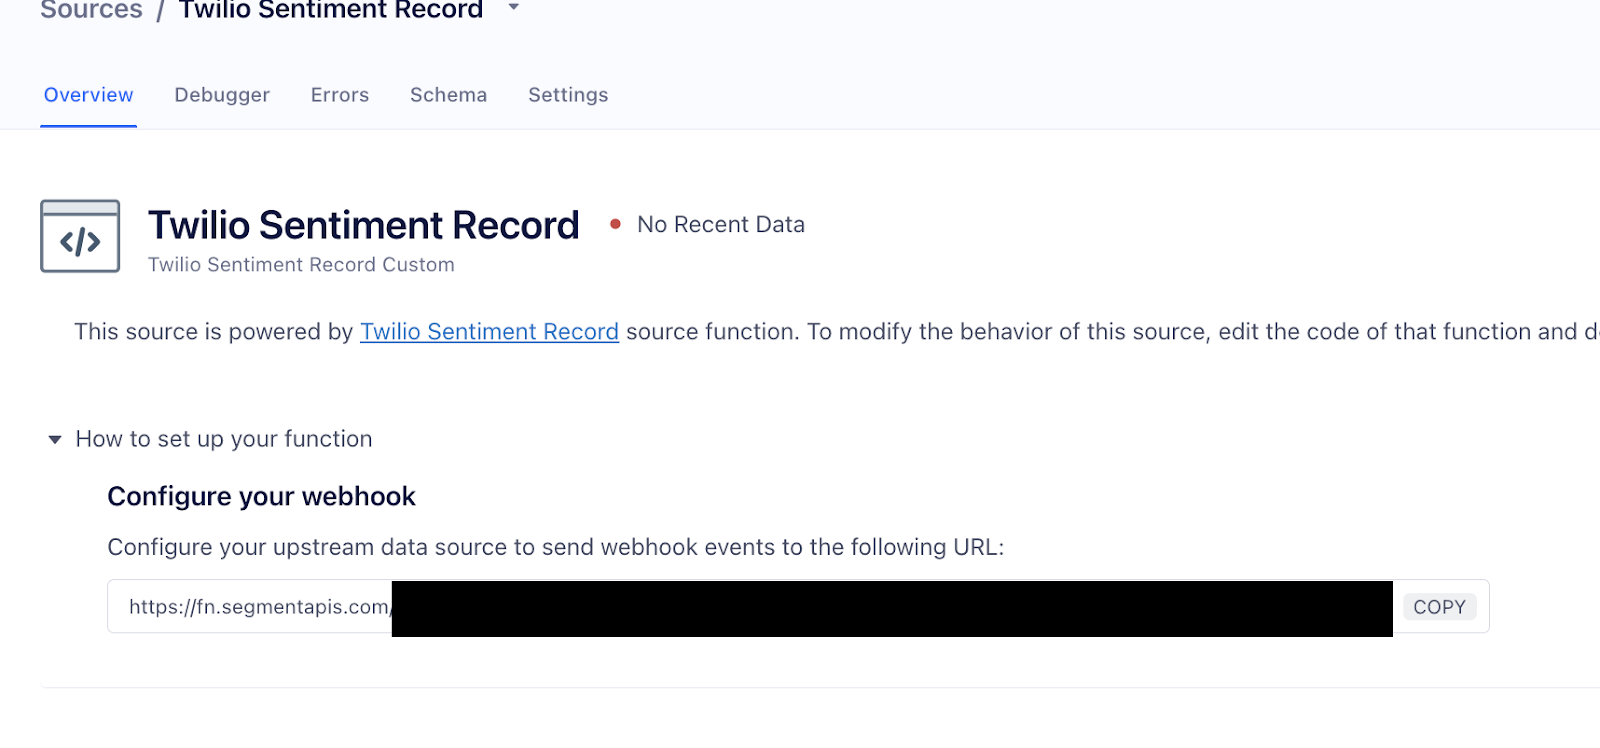
Here is where you will paste it into your Studio Flow.
Finally, click “Publish” to save these changes.
Once your Studio Flow is completed, navigate to your Phone Number and select your Studio Flow “Support Line” for when a call comes in. Click “Save” to save your changes.
Testing it out
Now that your IVR is set up, go ahead and call your number and say something. You can try saying “I’m having issues with the app” or “I had a frustrating experience I’d like to report”, and see what text message you get.
You can also check your Segment event debugger to see your events come in live and see the different sentiment recorded for different phrases.
Taking it to the next level
To recap, we built an IVR in Twilio that takes what a user says, analyzes the sentiment using IBM’s Watson API, and records the sentiment in Segment as an event. Segment then uses Twilio’s messaging API to send that user a personalized message based on their sentiment.
Matching the tone of your communications with what your customer is experiencing is a great way to foster trust with them, and using sentiment analysis is one of the many ways you can personalize your messages.
Here are some ways you can expand on this project:
- Send sentiment data to your marketing automation tool using Segment. When you send a campaign out through Marketo or Pardot you can use Segment data as audience data for your marketing campaigns.
- Use a different sentiment analysis tool, or instead of using natural language machine learning, flag certain phrases like “returns”, “delayed shipping”, or “order issues” to offer those audiences a form for feedback instead of a marketing message.
- Rather than creating a direct link from the Source and Destination functions which automatically sends a message when a “Contacted Support Line” event is tracked, create a Segment audience that checks to see if a user did the event “Contacted Support” and what the sentiment was. Audiences can be synced to a destination.
By now, we hope you’re ready to personalize your customer communications. Sign up for your Twilio Account and Segment account today, and check out the video below to see a demo on what we built and background on why Segment is ideal for this solution.
Heather is a Principal Solutions Engineer at Twilio who loves helping people and product teams optimize what they are building through A/B testing and personalization. She can be reached at hhargreaves [at] twilio.com.
Related Posts
Related Resources
Twilio Docs
From APIs to SDKs to sample apps
API reference documentation, SDKs, helper libraries, quickstarts, and tutorials for your language and platform.
Resource Center
The latest ebooks, industry reports, and webinars
Learn from customer engagement experts to improve your own communication.
Ahoy
Twilio's developer community hub
Best practices, code samples, and inspiration to build communications and digital engagement experiences.

