How to Implement Drag and Drop Image With File Upload in Laravel and React
Time to read:
September 24, 2024
Written by
Reviewed by
How to Implement Drag and Drop Image With File Upload in Laravel and React
File and image uploads are essential functionality for many applications, ensuring a smooth and user-friendly experience. Whether you are creating a photo-sharing website, a document management system, or any other application that works with dynamically generated content, having an intuitive file upload mechanism is essential. By integrating drag-and-drop functionality, users can easily upload files by dragging them from their file explorer and dropping them onto a designated area.
In this tutorial, you'll learn how to implement drag-and-drop file upload functionality in Laravel with React.
Prerequisites
To follow through with this tutorial, ensure you have the following:
- Composer installed globally
- PHP 8.2 or higher
- Node.js installed
- Prior experience with PHP, Laravel, JavaScript, and React
Create a new Laravel project
To create a new Laravel project and change into the new project directory, run the following commands.
Then, start the development server by running the following command in your terminal:
To confirm that the Laravel application is running correctly, open http://127.0.0.1:8000 in your preferred browser. You should see a page that matches the screenshot below.
Set up the database
Why SQLite
The latest version of Laravel (version 11) uses SQLite as the default database. SQLite is a strong, high-performance, and user-friendly database solution, designed for applications that demand a small, fast, and self-contained database, one that does not require a separate server.
Its simplicity and adaptability make it a popular choice for mobile apps, desktop software, and embedded systems. SQLite's ease of use and efficient performance make it ideal for a wide range of use cases, from tiny projects to more complicated applications.
Create a database migration file
To create a new migration file in the database/migrations directory, run the following command in your terminal:
Next, navigate to database/migrations, open the file ending with _create_uploads_table.php, and update the up() function to match the following code:
This code defines the structure of the uploads table in the database.
Now, to create the uploads table in your database with the structure specified above, run the following command:
Congratulations! You have successfully created your database and the necessary structure for this project.
Create a database model
Now, let's provide a programmatic means of interacting with the table, and ensure that only specific fields can be mass-assigned. This is where the model comes in.
To create the model, run the following command:
Next, navigate to app/Models directory, open the Upload.php file, and update it with the following code:
Each instance of the Upload model corresponds to a record in the uploads table.
Create the upload controller
Next, you need to generate a controller to handle file uploads. To do that, run the command below:
Then, navigate to app/Http/Controllers and open the UploadController.php file. Replace the existing code with the following and save the changes:
The code above validates the incoming request, processes the file upload, saves the relevant data to the database, and returns a JSON response based on whether the upload was successful or not.
Run the command below to create an API route that will handle the file upload.
Next, Open the routes/api.php file and add the code below:
This route sets up a POST endpoint in your project that directs incoming requests to the /upload-endpoint URL path, invoking the store() method defined within the UploadController class.
Configure Laravel's file storage
Laravel uses the storage/app directory for file storage, by default. Run the following command to create a symbolic link from the storage/app/public directory to the public/storage directory. This makes the files accessible within the application.
Configure Cross-Origin Resource Sharing
Cross-Origin Resource Sharing (CORS) is a security feature implemented by web browsers to safeguard against web pages making requests to domains other than the one that served the original web page. In a nutshell, CORS is a security feature that prevents unauthorized access.
To publish the CORS configuration file run the following command:
Now, open the config/cors.php and update the configuration with the following code to customize your CORS settings:
The code above configures the following specific settings:
- paths: Specifies the paths (api/*, upload-endpoint, sanctum/csrf-cookie) that should be CORS-enabled. Requests made to these paths will be subject to CORS policies.
- allowed_origins: Specifies the origins/domains (http://localhost:5173) that are allowed ate a new React project
Now, let's shift our focus to the frontend. Start by creating a new React/Vite template running the command below:
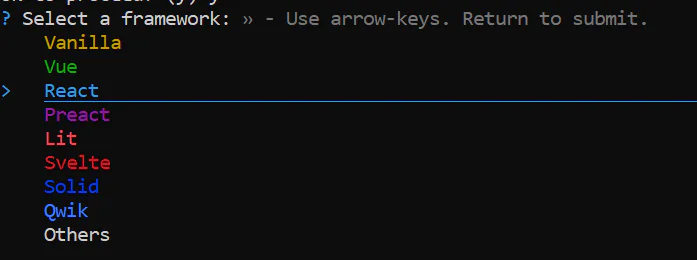
You’ll be presented with a list of frameworks. Use the arrow keys to navigate and select React.
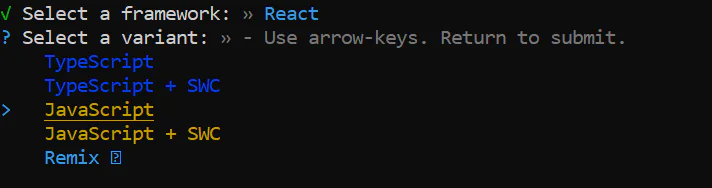
Lastly, you’ll be prompted to choose a variant for your application. For this tutorial select Javascript.
Now, navigate to the my-react-app directory by running the command below:
Next, run the following command to install the required packages.
- Axios is a popular JavaScript library used for making HTTP requests from the browser and Node.js. It is based on the promise API, making it easier to handle asynchronous operations.
- Dropzone is a JavaScript library that provides a user-friendly interface for handling file uploads with features like drag-and-drop functionality, image previews, and more.
Create the template
Now, navigate to the src directory inside your my-react-app directory. Create a new folder named components. Inside the components folder, create a new file called MediaLibraryAttachment.jsx and paste the following code into it:
The MediaLibraryAttachment component offers a drag-and-drop file upload interface, utilizing the react-dropzone library to manage file selection, validation, and user feedback.
Now, navigate back to the my-react-app/src directory and create a new file named MyForm.jsx. This file will house the main form component, which serves as the user interface for uploading files and additional information, such as the user's name and message. This component provides a streamlined user experience for submitting data to the Laravel backend for processing and storage.
Add the following code to the file to set up the form:
This code creates a form that allows users to upload a file along with their name and message. The form features a drag-and-drop interface for file uploads, utilizing the MediaLibraryAttachment component.
Next, open the my-react-app/src/main.jsx file to update the main entry point, updating the file to match the code below:
Now, ensure your application is well-structured and renders efficiently in your browser by updating my-react-app/src/index.css with the following code:
Test that the application works
With the application built, it's time to test it. So, if you stopped the Laravel application, restart it by running the following command in the project's top-level directory:
Next, in a new terminal session or tab, navigate to the my-react-app directory and start your React frontend application by running the following command:
Now, verify that the new functionality works correctly by opening http://localhost:5173 in your preferred web browser. Fill out the form, utilize the drag-and-drop feature to upload a file, and then submit the form as demonstrated in the short clip below.
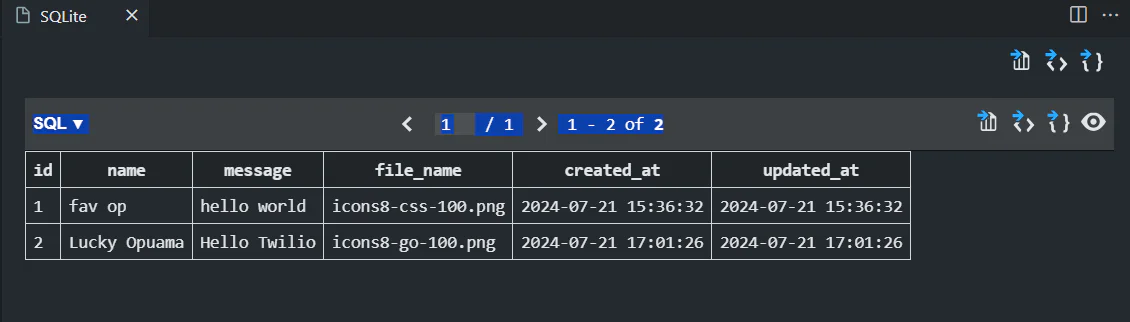
After uploading several images, the uploads table in your database should look like the screenshot below:
And, if you look in the storage/app/uploads directory, you'll find the images that you uploaded.
That's how to implement drag and drop image with file upload in Laravel with React
With this tutorial, you have built a single-page, full-stack application using React.js, with Vite.js on the frontend and Laravel on the backend, to implement a drag-and-drop file upload application.
You have learned how to:
- Set up the backend: You configured Laravel to handle file uploads, including setting up routes and controllers, and implementing validation rules.
- Design the frontend: You used React.js to create a seamless drag-and-drop interface, leveraging libraries like react-dropzone to handle file selection and upload.
- Integrate backend and frontend: You connected your React frontend to the Laravel backend using API requests to handle file uploads efficiently.
Now, you know how to manually integrate and manage React.js in your Laravel app, allowing you to develop modern and interactive web applications with ease. Happy coding!
Lucky Opuama is a software engineer and technical writer with a passion for exploring new tech stacks and writing about them. Connect with him on LinkedIn.
The upload icon in the post image was created by Ilham Fitrotul Hayat on Flaticon.


Related Resources
Twilio Docs
From APIs to SDKs to sample apps
API reference documentation, SDKs, helper libraries, quickstarts, and tutorials for your language and platform.
Resource Center
The latest ebooks, industry reports, and webinars
Learn from customer engagement experts to improve your own communication.
Ahoy
Twilio's developer community hub
Best practices, code samples, and inspiration to build communications and digital engagement experiences.