Enhancing WordPress Comments Using Twilio and WebServices

August 02, 2017
Written by
Michelle Randolph
Contributor
Opinions expressed by Twilio contributors are their own

DizcM7ghqinHOxe4GFNHKVImAD_Be_coHWGtvygHzLs5vO6_ywZ58bYnX9RSD7Jx2Hu2Cgcsk8LzbW21QNTWh1-7_wN-rBmdiU5MHx5myMYXjHoKqu8z6Cwoef4jxno3VZYLTI9V

Getting users to interact with your blog is essential. It’s also easy using Twilio. In this post you will learn how to write a WordPress plugin that will send your users a text message when someone replies to their comment. If you want to take it a step further you can enable the user to comment on the post via a text message by building a Java REST webservice.

Plugin Setup

You are going to need a self-hosted WordPress site so you can create and install a plugin. You will also need to download the Twilio SDK and set up a Twilio number.

Plugin Development

We are going to create a plugin in its entirety outside of WordPress and then install and activate it. First, create a directory in your development file system called sms-twilio-comment-notifier and in that directory create sms-twilio-comment-notifier.php. This is your main plugin file. You need to add metadata to define this class as your plugin file and the code will come after that.

<?php

/*
Plugin Name: SMS Twilio Comment Notifier
Plugin URI: http://www.coderanchers.com
Description: Example of using Twilio to send SMS Notifications of replies to a user's comments
Version: 1.0
Author: CodeRanchers, LLC
Author URI: http://www.coderanchers.com
*/


?>

Next, tell the plugin where to find the Twilio SDK you downloaded earlier. Unzip the SDK into the folder and add the following to sms-twilio-comment-notifier.php:

//download the latest twilio libraries and place them in the plugin root.
require __DIR__.'/twilio-php-master/Twilio/autoload.php';

use Twilio\Rest\Client;

Now we can access the Twilio API. In order to authenticate to Twilio, we need to know a few key elements. We will store them in a custom database table. When we activate the plugin it will check to see if the table is there, and if not, it will create it. The following code will be run when the plugin is activated to create a table that will store the Account SID, Auth Token, and Twilio number you set up earlier, again in sms-twilio-comment-notifier.php:

// Create the table used to store the Twilio credentials
register_activation_hook(__FILE__, 'sms_twilio_comment_notifier_create_db');

function sms_twilio_comment_notifier_create_db() {
   global $wpdb;
   global $sms_twilio_db_version;

   $table_name = $wpdb->prefix . 'sms_twilio_credentials';

   $charset_collate = $wpdb->get_charset_collate();

   $sql = "CREATE TABLE ".$table_name." (
     id mediumint(9) NOT NULL AUTO_INCREMENT,
     sid varchar(100) NOT NULL,
     token varchar(100) NOT NULL,
     twilio_number varchar(25) NOT NULL,
     UNIQUE KEY id (id)
  )" .$charset_collate.";";

   require_once( ABSPATH . 'wp-admin/includes/upgrade.php' );
   dbDelta( $sql );

   $row_count = $wpdb->get_var("select count(*) from $table_name");
   if($row_count == 0) {
       $wpdb->insert($table_name, array('sid' => 'sid', 'token' => 'token', 'twilio_number' => 'twilio number'));
   }

   add_option( 'sms_twilio_db_version', $sms_twilio_db_version );
}

We are going to need a way to clean up the table if it is deleted, so let’s take care of that now.

Create a file called uninstall.php and add the following:

<?php

if (!defined('WP_UNINSTALL_PLUGIN')) {
   exit();
}

global $wpdb;

$table_name = $wpdb->prefix.'sms_twilio_credentials';

// drop the table from the database.
$wpdb->query("DROP TABLE IF EXISTS $table_name");

delete_option('sms_twilio_db_version');

?>

This class will get called when the plugin is uninstalled and will drop the table from the database and delete the database version option from WordPress.

How does data get into our new table? We need to create an admin page for that. Add the following to sms-twilio-comment-notifier.php:

// Create the settings page where the admin can set the Twilio Credentials.
// This is going to take in one Twilio number for now; you can easily expand to add multiple.

add_action('admin_menu', 'sms_twilio_comment_notifier_add_admin_page');

function sms_twilio_comment_notifier_add_admin_page() {

   add_menu_page('SMS Twilio Comment Notifier', 'SMS Twilio Comment Notifier', 'edit_pages', 'sms_twilio_comment_notifier_options', 'sms_twilio_comment_notifier_admin_page');

}

We are adding a menu page where only users with the edit_pages role can see the page. Now let’s put something on the page. Keep it simple and only allow one row of the table so we have a very basic form to collect our three pieces of data. Register an action to capture the form submission and grab the contents from the table so we can prepopulate the fields with the current values from the table. Set a nonce field to verify the form submission. Add the following to sms-twilio-comment-notifier.php:

add_action('admin_post_sms_twilio_comment_notifier_submit', 'process_sms_twilio_comment_notifier_submit');

function sms_twilio_comment_notifier_admin_page() {

   global $wpdb;
   $table_name = $wpdb->prefix . 'sms_twilio_credentials';
   $twilio_creds = $wpdb->get_results("select * from $table_name where `id` = '1'");

   ?>
   <div>
       <h2>Twilio Settings</h2>

       <form name="sms_twilio_comment_notifier_admin" action="admin-post.php" method="post">
           <input type="hidden" name="action" value="sms_twilio_comment_notifier_submit"
           <?php wp_nonce_field('sms_twilio_comment_notifier_verify'); ?>
           <table>
               <tr>
                   <td>SID:</td>
                   <td><input type="text" name="sms_twilio_comment_notifier_sid_value" value="<?php echo($twilio_creds[0]->sid) ?>" size="50"/></td>
               </tr>
               <tr>
                   <td>Token:</td>
                   <td><input type="text" name="sms_twilio_comment_notifier_token_value" value="<?php echo($twilio_creds[0]->token) ?>" size="50"/></td>
               </tr>
               <tr>
                   <td>Twilio Number:</td>
                   <td><input type="text" name="sms_twilio_comment_notifier_twilio_number_value" value="<?php echo($twilio_creds[0]->twilio_number) ?>" size="50"/></td>
               </tr>
               <tr>
                   <td></td>
                   <td><input name="sms_twilio_comment_notifier_submit" type="submit" value="<?php esc_attr_e('Save Changes'); ?>" /></td>
               </tr>
           </table>
       </form></div>

   <?php
}

Here is the completed page:

Screen Shot 2017-07-14 at 2.37.21 PM.png

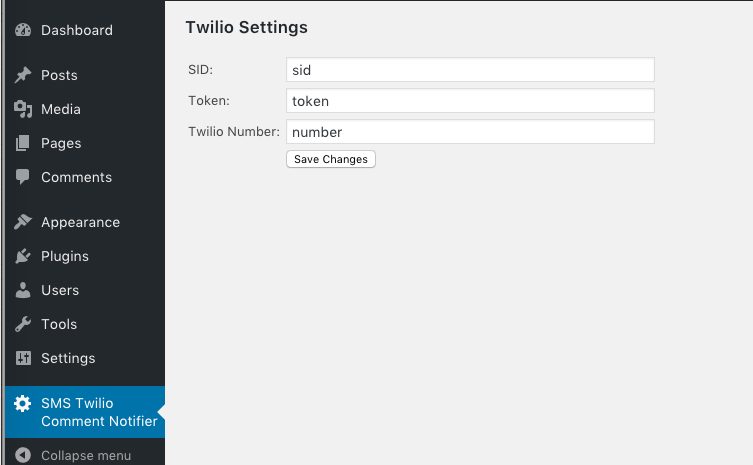
Once the user saves their Twilio account values, persist them to the table. First we’ll verify the nonce to make sure the request has not been spoofed. We need to sanitize the inputs for security, then we can store them in our table and refresh the page. Add the form below to sms-twilio-comment-notifier.php:

//process the admin form
function process_sms_twilio_comment_notifier_submit() {

   global $wpdb;
   //verify the nonce
   wp_verify_nonce('sms_twilio_comment_notifier_verify');

   if(isset($_POST['sms_twilio_comment_notifier_submit'])){

       $sidInput = sanitize_text_field($_POST['sms_twilio_comment_notifier_sid_value']);
       $tokenInput = sanitize_text_field($_POST['sms_twilio_comment_notifier_token_value']);
       $twilioNumberInput = sanitize_text_field($_POST['sms_twilio_comment_notifier_twilio_number_value']);

       $table_name = $wpdb->prefix . 'sms_twilio_credentials';

       $wpdb->update($table_name, array('sid' => $sidInput, 'token' => $tokenInput, 'twilio_number' => $twilioNumberInput), array('id' => '1'));

       wp_redirect(admin_url('/admin.php?page=sms_twilio_comment_notifier_options'));
   }
}

Now that we have that setup done so we can talk to Twilio, we need to be able to store the user’s mobile number. Add a field to the User Profile page so the user can enter their number and save the fields to the user metadata. Still in  sms-twilio-comment-notifier.php, add:

// add the user's mobile number to their profile screen.

add_action('show_user_profile', 'sms_twilio_user_comment_notifier_profile_fields');
add_action('edit_user_profile', 'sms_twilio_user_comment_notifier_profile_fields');

function sms_twilio_user_comment_notifier_profile_fields( $user ) { ?>
   <h3><?php _e("SMS Twilio profile information", "blank"); ?></h3>

   <table class="form-table">
       <tr>
           <th><label for="mobile"><?php _e("Mobile"); ?></label></th>
           <td>
               <input type="text" name="mobile" id="mobile" value="<?php echo esc_attr( get_the_author_meta( 'sms_twilio_mobile', $user->ID ) ); ?>" class="regular-text" /><br />
               <span class="description"><?php _e("Please enter your mobile number, including the country code, for SMS notifications. By entering your mobile number you are consenting to be notified by SMS of notifications and standard messaging rates apply."); ?></span>
           </td>
       </tr>
   </table>
<?php }

add_action( 'personal_options_update', 'save_sms_twilio_user_profile_fields' );
add_action( 'edit_user_profile_update', 'save_sms_twilio_user_profile_fields' );

function save_sms_twilio_user_profile_fields( $user_id ) {

   if ( !current_user_can( 'edit_user', $user_id ) ) { return false; }

   update_user_meta( $user_id, 'sms_twilio_mobile', $_POST['mobile'] );
}

This is what your profile page will have now:

Screen Shot 2017-07-28 at 5.00.26 PM.png

We are almost there! We can authenticate to Twilio and we have a number we can send a message to. We need to add some hooks into the comment functions. When a comment is published or updated, first check to see if this comment is a reply to another comment. If it is, make sure the user is not replying to themselves. If they’re replying to someone else, send the user of that parent comment a notification. Add the following to  sms-twilio-comment-notifier.php:

// add action to capture comment status changes including publication

add_action('wp_insert_comment', 'sms_twilio_comment_notification', 99, 2);
add_action('wp_set_comment_status', 'sms_twilio_comment_status_changed', 99, 2);

function sms_twilio_comment_notification($comment_id, $comment_object) {

   // Check to see if the comment is approved or if it's not a child comment, since
   // we only notify of comment replies at this point
   if ($comment_object->comment_approved != 1 || $comment_object->comment_parent < 1) {
       return;
   }
   $comment_parent = get_comment($comment_object->comment_parent);

   // Don't notify the user if they reply to their own comment
   if ($comment_parent->user_id == $comment_object->user_id) {
       return;
   }

   // Send the SMS notification
   send_SMS($comment_object, $comment_id, $comment_parent);
}

function sms_twilio_comment_status_changed($comment_id, $comment_status) {
   $comment_object = get_comment($comment_id);
   if ($comment_status == 'approve') {
       sms_twilio_comment_notification($comment_object->comment_ID, $comment_object);
   }
}

Time for the fun part – using Twilio to send the message. First, get the Twilio authentication fields from the table we created, then get the mobile number from the parent comment to send that user the message. We’ll send a message including the link to the comment to make it a useful message. You could stop here and have yourself a nifty little notification plugin.

Comment Notifications via SMS

If you want to take it the extra mile, we’re going to let the user reply to that text message and post the comment to the blog on behalf of that user. In sms-twilio-comment-notifier.php add:

function send_SMS($comment_object, $comment_id, $comment_parent){

   //You could hard code this, but I prefer to keep it in a database table.

   global $wpdb;
   $table_name = $wpdb->prefix.'sms_twilio_credentials';
   $credential_sql = "select * from $table_name";

   $sid;
   $token;
   $twilio_number;

  $creds = $wpdb->get_results($credential_sql);
       $sid= $creds[0]->sid;
       $token = $creds[0]->token;
       $twilio_number = $creds[0]->twilio_number;

   $client = new Client($sid, $token);

   $mobile = get_the_author_meta('sms_twilio_mobile', $comment_parent->user_id);

   if($mobile){

       $client->messages->create(
           get_the_author_meta('sms_twilio_mobile', $comment_parent->user_id),
           array(
               'from' => $twilio_number,
               'body' => "A new post was published at ".get_bloginfo('name').". See it here: ".get_comment_link($comment_object)." To reply, type ".$comment_object->comment_post_ID.":: followed by your comment."
           )
       );
   }
}

If you don’t want to let your user reply to the text in order to post a comment, just change the body message.

If you do want to let the user text a comment to the post, it gets a little tricky. WordPress finally has a REST API where you can interact using REST web services, including making posts or comments. However, in order to post a comment as a user you have to authenticate as that user. In order to do that, you would need to have OAuth or something similar set up to allow the user to use a token to authenticate to WordPress. Complicating matters, WordPress does not have out of the box support for OAuth. There are plugins to help but the whole point of replying via a text message is to get in and get out without having to jump through too many hoops. Otherwise, you could just use the WordPress app or log in to a browser. To offer a fast way to comment on a blog post, we are going to set up a “tweener” service that will post anonymously to WordPress on behalf of your user. Since the user isn’t logging in and posting the comment themselves, we will append the user’s display name to the end of the comment so it is clear who wrote the comment.

To do this, enable anonymous commenting. Add this filter to sms-twilio-comment-notifier.php:

add_filter( 'rest_allow_anonymous_comments', '__return_true' );

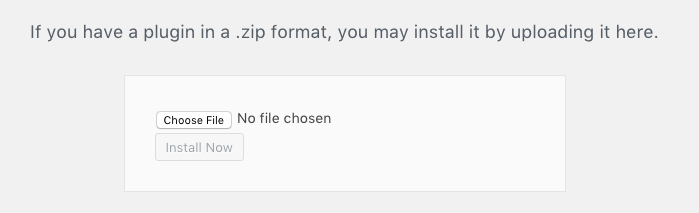
Now your plugin is complete. Zip up your plugin. You can download the example on GitHub sans the Twilio SDK. Go to the plugins screen in your WordPress admin panel, and click Add New.

Screen Shot 2017-07-14 at 2.36.28 PM.png

Click Upload Plugin.

Screen Shot 2017-07-14 at 2.36.38 PM.png

Upload your zipped up plugin file and Activate it.

Screen Shot 2017-07-14 at 2.36.45 PM.png

All done!

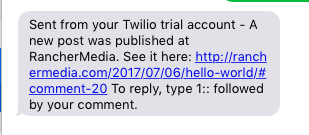
This is what your text might look like, if someone replies to your comment:

Screen Shot 2017-07-14 at 2.38.16 PM.png

Now, how about that reply feature?

Enter Java

For the next piece you are going to need to be able to install a Java webservice on an application server. You can install one locally and use ngrok to test until you are ready to publish it to the world.

If you don’t already have a Java development environment set up, download Eclipse and Tomcat and unzip them.

Create a new Dynamic Web Project in Eclipse, and name it SMSNotify. Create a package structure – I use com.company.sms.notify and your SMSNotify.java class in the package. To speed things up, create a dao subpackage and an SMSNotifyDAO.java class in that package. We’ll get to them in a bit.

We are going to use RESTEasy to expose our REST web services, but you could use your favorite framework instead.

What we need is a webhook in Twilio that will call your webservice any time a message is sent to your Twilio number. The webservice will try to parse out the post id to reply to, make a call to the WordPress database to grab the user meta data, and then submit a POST to the WordPress REST API to actually post the comment.

In your web.xml you will need to set up RESTEasy by adding the following right before your closing tag.

<listener>
<listener-class>org.jboss.resteasy.plugins.server.servlet.ResteasyBootstrap</listener-class>
     </listener>
     <security-constraint>
         <web-resource-collection>
             <web-resource-name>All Access</web-resource-name>
             <url-pattern>/Resteasy</url-pattern>
             <http-method>POST</http-method>
         </web-resource-collection>
         <auth-constraint/>
     </security-constraint>
     <context-param>
         <param-name>resteasy.scan</param-name>
         <param-value>true</param-value>
     </context-param>

    <servlet>
         <servlet-name>resteasy-servlet</servlet-name>
         <servlet-class>org.jboss.resteasy.plugins.server.servlet.HttpServletDispatcher</servlet-class>
     </servlet>

    <servlet-mapping>
         <servlet-name>resteasy-servlet</servlet-name>
         <url-pattern>/*</url-pattern>
     </servlet-mapping>

    <context-param>
         <param-name>resteasy.servlet.mapping.prefix</param-name>
         <param-value>/</param-value>
     </context-param>

This will let any class be scanned by RESTEasy to be used to surface a REST endpoint which only accepts a POST call.

First we will set up the web service the Twilio webhook is going to POST to.

Set up your @Path at the top of your SMSNotify.java class, and annotate a function to receive the POST.

@Path("sms")
public class SMSNotify {

   @POST
   public Response receiveMessage(String sms) {

       return Response.ok().build();

   }
}

This just replies with a 200 OK message.

Install your webservice on tomcat, and use ngrok to surface your local environment publicly.

Set up your webhook in Twilio:

Screen Shot 2017-07-14 at 2.49.48 PM.png

Now whenever someone texts your Twilio number, it will send the message to that web service.

Twilio sends messages in a specific format so we need to parse out the information sent in order to understand the message. We’ll set some constants that we can use to parse the String. We want to verify the incoming message so we’ll need to grab our Twilio credentials from our WordPress table as well. Prepare for that by creating constants for those calls:

private static final String FROM = "From=";
private static final String ACCOUNT_SID = "AccountSid=";
private static final String BODY = "Body=";
private static final String TO = "To=";
private SMSNotifyDAO dao = new SMSNotifyDAO();
        
public static final String TWILIO_ACCOUNT_SID_KEY = "sid";
public static final String TWILIO_NUMBER_KEY = "twilioNumber";

This is the format of the message we get from Twilio:

ToCountry=US&ToState=MD&SmsMessageSid=SMba3bbbff5eb4d0974df218c7d714cb52&NumMedia=0&ToCity=CLINTON&FromZip=22211&SmsSid=SMba3bbbff5eb4d0974df218c7d714cb52&FromState=VA&SmsStatus=received&FromCity=ARLINGTON&Body=1:::REPLY&FromCountry=US&To=+12403033453&ToZip=20623&NumSegments=1&MessageSid=SMba3bbbff5eb4d0974df218c7d714cb52&AccountSid=xxxxxxxx&From=+17039999999&ApiVersion=2010-04-01

The keys that we need are the AccountSid, Body, To, and From. We are going to make sure the AccountSid and To match our Twilio SID and Twilio Number stored in WordPress earlier. So, we need a DAO class to grab them.

In your DAO class, create final Strings to contain your SQL statements. We are using prepared statements and immutable Strings to prevent SQL injection attacks.

Notice we are calling the same table our plugin created earlier and retrieving the values from there. We also connect to the users and usermeta tables in WordPress to match up the mobile number the Twilio webhook is sending us to the user name who texted it. When we post the message we can append the user name so the post is not truly anonymous.

Depending on your webhost you might need to add the IP address of your Tomcat server to allow an outside server to connect to the hosted MySQL server.

public class SMSNotifyDAO {
        private static final String GET_CREDS = "select sid, twilio_number from wp_sms_twilio_credentials";
        private static final String GET_USER = "select user_nicename, ID, user_id from wp_usermeta, wp_users where meta_key = 'sms_twilio_mobile' and meta_value = ? and user_id = ID";
}

We’ll need to set up a connection to the database. You can set up a datasource in Tomcat, but since this is just sample code, connect manually and don’t worry about connection pooling, which you would want to do in a production environment.

private Connection getConnection() {
   Connection conn = null;
   Properties connectionProps = new Properties();
   connectionProps.put("user", "wordpress_user");
   connectionProps.put("password", "wordpress_password");
 
   try {
   Class.forName("com.mysql.jdbc.Driver");
   conn = DriverManager.getConnection("jdbc:mysql://wordpress_host:3306/", connectionProps);
   }catch (SQLException | ClassNotFoundException e) {
   System.out.println("Exception getting WordPress connection");
   }
   return conn;
}

Now that we have a connection to the database, we can call to get our credentials.

public Map<String, String> getCredentials() {
           Connection conn = null;
           PreparedStatement ps = null;
           ResultSet rs = null;
           Map<String, String> creds = new HashMap<String, String>();
                
           try {
                   conn = getConnection();
                   ps = conn.prepareStatement(GET_CREDS);
                   rs = ps.executeQuery();
                        
                   while(rs.next()) {
                         creds.put(SMSNotify.TWILIO_ACCOUNT_SID_KEY, rs.getString("sid"));
                         creds.put(SMSNotify.TWILIO_NUMBER_KEY, rs.getString("twilio_number"));
                                  }
                } catch(Exception e) {
                        System.out.println("Exception getting twilio credentials "   e);
                } finally {
                          close(rs, conn, ps);
                }
                
                return creds;
}

Notice the close call in the finally method. We need to make sure we close all of our connections.

private void close(ResultSet rs, Connection conn, PreparedStatement ps) {
            if(rs != null) {
                     try { rs.close(); } catch (Exception e) {}
            }
            if(ps != null) {
                     try { ps.close(); } catch (Exception e) {}
            }
            if(conn != null) {
                     try { conn.close(); } catch (Exception e) {}
            }
        }

While we’re here, we can code our method to get the user’s name from their mobile number.

public String getUserFromMobile(String mobile) {
                 Connection conn = null;
                 PreparedStatement ps = null;
                 ResultSet rs = null;
                 String user = "";

                try {
                         conn = getConnection();
                         ps = conn.prepareStatement(GET_USER);
                         ps.setString(1, mobile);
                         rs = ps.executeQuery();

                        while(rs.next()) {
                                 user = rs.getString("user_nicename");
                         }
                 } catch(Exception e) {
                         System.out.println("Exception getting mobile number for user: " e);
                 } finally {
                         close(rs, conn, ps);
                 }

                return user;

        }
 }

Let’s recap. We have a web service endpoint and a DAO class that can read all the data we need in the webservice. Time to dive in and finish out the web service.

We already created the constants needed for our parsing so we can fill out the method.

Get your credentials from the DAO method we just made. If we can’t find them, we need to error out since we won’t be able to validate the incoming message.

Map<String, String> twilioCredentials = dao.getCredentials();
                if(twilioCredentials.isEmpty()) {
                        return Response.status(Status.INTERNAL_SERVER_ERROR).build();
                }

If we made it this far, the credentials were found. Make sure the Account SID posted to the web service matches your Twilio Account SID. We will parse the String sent to the webservice and find the first time we see AccountSid=. Grab everything between that location in the String and the first time after that we see the &. If it doesn’t match our Account SID, bail out with an Unauthorized message.

final String myTwilioAccountSID = twilioCredentials.get(TWILIO_ACCOUNT_SID_KEY);
 
String accountString = sms.substring(sms.indexOf(ACCOUNT_SID));
String accountSid = accountString.substring(0, accountString.indexOf("&"));
String smsAccountSid = accountSid.substring(ACCOUNT_SID.length());
 
if(!myTwilioAccountSID.equalsIgnoreCase(smsAccountSid)) {
 return Response.status(Status.UNAUTHORIZED).build();
}

Do basically the same thing with the Twilio number. When the message is sent to us, the text is html encoded. We could use some third party utils to unencode the message but it’s just as easy to replace the text as we do here, changing the %2B to +.

final String myTwilioNumber = twilioCredentials.get(TWILIO_NUMBER_KEY);
String toString = sms.substring(sms.indexOf(TO));
 String to = toString.substring(0, toString.indexOf("&"));
 String smsNumber = to.substring(TO.length());
 
 if(!myTwilioNumber.equalsIgnoreCase(smsNumber.replaceAll("%2B", "+"))) {
 return Response.status(Status.UNAUTHORIZED).build();
 }

Now that the message is validated, we need to grab the mobile number of the user who sent it. Again we are going to replace the encoded %2B with a +.

String fromNumberString = sms.substring(sms.indexOf(FROM));
                String fromNumber = fromNumberString.substring(0, fromNumberString.indexOf("&"));
                String from = fromNumber.substring(FROM.length()).replaceAll("+", " ");

Hang on to this and we’ll get back to it in a minute.

Get the text message the user sent and parse out the post id from it. We told the user to type <postId>::. The :: were encoded when they were sent to us so we have to stick the colons back in order to parse our message:

String commentString = sms.substring(sms.indexOf(BODY));
String commentText = commentString.substring(0, commentString.indexOf("&"));
String comment = commentText.substring(BODY.length()).replaceAll(":", ":");

We have just about everything we need to post the comment so add this at the end of your class:

boolean success = postComment(from, comment);

Now let’s build that method so the call will work. Take the mobile number and call the method in our DAO that returns the user’s name and build up our new message. In our plugin we told the user to reply with <postId>::. If they did that, we can get the post id from the message. We parse out the number and trim the string so the <postId>:: doesn’t actually appear in the comment.

The message comes to us with plus signs as spaces so quick replace all to change them to spaces so they don’t show up in WordPress looking like This+is+my+reply. Now, this isn’t a bullet proof approach since some users might actually put a plus sign in their text but it will work for now.

private boolean postComment(String from, String comment) {

                String postId = "";
                String trimmedComment = "";
                String userName = dao.getUserFromMobile(from);
                
                try {
                        
                    postId = comment.substring(0, comment.indexOf("::"));
                    trimmedComment = comment.substring(comment.indexOf("::") 2);
                    trimmedComment  = "-Posted By "   userName;
                    
                }catch (Exception ex) {
                        System.out.println("Couldn't get post from comment - aborting");
                        return false;
                }

The last step is to call the WordPress REST API to post the message. We need the URL to send it to. You can store this in a local table somewhere, but to speed things up a bit I’m hard coding it in the DAO since it won’t likely change any time soon:

public String getWordPressURL() {
       return "http://wordpress-host-name.com/wp-json/wp/v2/comments";
        }

Let’s make the call to the API. We have the post id and the comment text, which we append as query parameters to our WordPress URL. Use RESTEasy to send the message. If there’s an error, we will return false so our webservice knows to return an error to the user, otherwise we will return a success.

                try {
                        
                        String wordpressURL = dao.getWordPressURL();
                        String queryParams = "post=" postId "&content=" cleanUp(trimmedComment);
                        wordpressURL  = "?" queryParams;

                        ClientRequest request = new ClientRequest(wordpressURL);
                        ClientResponse<String> response = request.post(String.class);
                        System.out.println(response.getStatus());
                        
                  } catch (Exception e) {
                        System.out.println("Exception posting comment to WordPress "   e.getMessage());
return false;

                  }
return true;
        }

        private static String cleanUp(String trimmedComment) {
                String cleanedComment = trimmedComment.replaceAll("\ ", " ");
                return cleanedComment;
        }

Finally, return a response based on whether the postComment worked or not:

if(success) {
                return Response.ok().build();
                }
                else return Response.status(Status.INTERNAL_SERVER_ERROR).build();

Deploy your completed webservice to Tomcat (see the full example on GitHub) and test it out!

You have now enabled two way communication between your WordPress site and your end users. A user can enter a mobile number on their profile which will allow them to receive a text message when someone replies to their comment. If they want to comment on the post again right away, they can text a reply. Your webservice will receive this text and make a comment on the same post and note that it was sent by a specific user name.

Use this as a starting point to expand your user interaction with your WordPress site!