How to Build an IVR with Django and Programmable Voice
Time to read:
June 07, 2024
Written by
Reviewed by
In this guide, you will use the Twilio Programmable Voice API to build an interactive voice response (IVR) for an imaginary pizza shop. This automated telephony system will use touch-tone keypad selections to guide users through pizza menu options. The menu options and responses will have been stored in an SQL database and managed by Django through its ORM .
By the end of this article, you will learn how to integrate Twilio Programmable Voice with your Django application.
Pre-requisites
- Twilio account. If you don't have a Twilio account, you can create one here .
- Twilio number. Follow the prompts when signing up, and you'll be redirected to a page where you can get a phone number.
- Python3. If you do not have it installed, you can install it here .
- ngrok. This tool enables your locally running web applications to be accessible online. Install it here .
- HTTP/API client of choice. You can install Postman here or Insomnia here . This article uses Insomnia.
You can find the complete Django project code in this GitHub repository.
After completing the project in this article, you should expect an experience similar to the one illustrated in this video .
Set up the Django app and database
Create a new directory where the project will live. Type the following commands in your terminal:
To isolate your project dependencies, you'll start by creating a virtual environment. Use the following command:
This will allow your project to be set up with specific dependencies without affecting the system-wide Python environment or other virtual environments.
Activate your virtual environment using the following command:
When the environment is active, you should see its name in brackets in the prompt.
You can type deactivate in the terminal to deactivate the virtual environment, but keep it active for now.
With your environment all set up, install the first dependency, which is, you guessed it, Django.
Start a new Django project with the following command:
To ensure everything works well, change into the project directory and run the Django development server:
Copy the URL in the output and paste it into your web browser to see the following page:

Congratulations. You have successfully created and run a Django project.
Close the server by typing CTR+C in the terminal.
Create an app inside of the pizzaproject directory.
Let's check on the structure of the pizza app you just created. Inside the pizza directory, type tree onto the terminal line.
This will show you the structure of the project.
Django creates these files by default, where:
- models.py file contains the necessary fields and behaviors of the data you're storing.
- admin.py file is Django's command-line utility that performs administration tasks.
- views.py file contains Python functions that take HTTP requests and return HTTP responses, like HTML documents.
Understanding these files will make it easier for you to start and manage your Django project.
Next, you will install the other necessary apps, Django Rest Framework and Twilio Python SDK.
Integrate the Django Rest Framework in to your application
Django REST framework is a powerful and flexible toolkit for building Web APIs.
Install DRF in the command line using pip as follows:
Install the Twilio Python SDK
The Twilio Python SDK, for this case, will be used to create the TwiML.
Install it as follows:
Open the project using your favorite text editor or IDE . Navigate to your project's settings.py file and add pizza and rest_framework to the INSTALLED_APPS list to integrate them into your project as seen below:
Create Django models to represent your data
Let's discuss the logic for the database. Customers will pick the size of the crust, and then the topping they desire, and that will be all for the order. So, all you need to store is the crust sizes and the toppings, both with their respective prices.
Navigate to the pizza app directory, where models.py is. Add the following to the models.py file:
The Crust model manages crust sizes and their corresponding prices, enforcing unique size and price combinations. The sizes have been hard-coded into the system and can be accessed as choices in the Crust model. The Topping model will store the various pizza toppings with individual names and their prices.
You will also need a way to track your orders. The Order model stores customer orders, including phone numbers, chosen crust and toppings, and a draft flag to determine whether the order is complete.
The OrderMessageConfig model stores configuration data for order-related messages; the welcome_message will be what the customer first hears when they call the Twilio number.
These models are the core building blocks for creating your application.
Register the models in the admin panel
The admin.py file inside your app folder is where you register your models to make them accessible and manageable through the Django admin interface. Registering models allows administrators to interact with and manage the data stored in those models through a user-friendly web interface.
Add the following code to the admin.py file:
The admin.site.register() function associates each model with the admin panel. After registration, you can perform various administrative tasks, such as adding, editing, and viewing data related to these models.
Migrate the models in Django to apply the changes to your database
It is essential to migrate the models before you can start using the admin panel to manage them.
Migrations in Django serve as the mechanism for applying model changes to your database. After you run the migrations, your database will know the changes you made in the models.py file.
Change the directory to the root of your project where manage.py is located. Write these commands in the terminal:
The command makemigrationscreates migration files that will then be used by the migrate command to create the schema defined in the database.
Create a superuser for your SQL database
Before you can access the admin panel, you will need to create a super user. A super user has complete control over the administrative aspects of a database.
Execute the following command in the terminal:
Follow the prompts to input the username and password.
After successfully creating your user, run python manage.py runserver again to restart your server.
Open your web browser and navigate to http://127.0.0.1:8000/admin . Notice the /admin in the URL; this is the route to your admin panel. Enter the username and password you created in the previous step. You should now have access to your admin panel.

Add data through the Django admin panel. It is a convenient way to populate your application with initial test data.
Assign a price to each crust size, from small to extra large. Add the types of toppings available for pizza, for example, pepperoni and mushrooms, each with pricing. Finally, add a welcome message that one would hear when they call.
Understand the architecture of your app
So far, so good. With the test data, you can start creating the API that will interface with Twilio Programmable Voice to give you the IVR.
Take a moment to understand the overall architecture of the app.

Twilio will communicate with your application via HTTP REST APIs . You could use Django itself to create a REST API, but that would be cumbersome and involve much re-inventing of the wheel. Instead, you will use a third-party Django package called Django Rest Framework (DRF). It is a powerful, robust, and battle-tested package that will make your API creation much easier, providing serialization, authentication, and other valuable features.
DRF will be the link between Twilio Programmable Voice and your Pizza app. When a customer initiates a call to the registered phone number, Twilio sends an HTTP request to your app using the endpoints you will expose through DRF. Your app subsequently processes this request, using Twilio's Python SDK to generate TwiML (XML that Twilio Programmable Voice understands). Finally, your app sends this XML data back to Twilio. Twilio will then use the data to generate the corresponding voice commands for your caller.
Integrate the app with Twilio
This section will take you through the process of integrating your application with Twilio.
Create the REST API
Using your IDE or text editor, navigate to your pizza app directory, and create a new folder called api.
You will start by setting up an entry point to the app. Whenever a customer calls your number, Twilio will automatically access this code through a webhook .
Create two new files inside the folder named views.py and urls.py.
Open views.py and add the following code:
The above code first imports the necessary modules and packages. It includes:
reversefrom Django's URLs module for dynamic URL generation.VoiceResponseclass from the Twilio Python SDK allows for the creation of TwiML responses.
When a call is received, this view constructs a welcome message by fetching data from the OrderMessageConfig model. It then dynamically adds the available pizza crust sizes retrieved from the Crust model to the message.
Each crust size is associated with a digit, which users press/tap on their phone keypad. This is where Twilio's VoiceResponse comes into play. The view uses it to create an XML response with a gather element, instructing Twilio to listen for user input.
Upon receiving a digit from the caller, it instructs Twilio to navigate to the topping URL, passing along the selected digit for further processing.
Next is the Topping view. Whatever digit was chosen in the previous interaction will be passed here as Digits in the POST data of the request, and this information will be used to determine the selected crust size. Create the view in views.py with the following code:
The Toppings view builds upon the user's input from the Welcome view and manages the selection of pizza toppings. The view creates a new order entry in the Order model, associating it with the chosen crust size and the caller's phone number for contact purposes.
The view then constructs a message listing all available toppings by iterating through the Topping model, giving each topping a corresponding digit for user selection. Like the Welcome view, it utilizes Twilio's VoiceResponse to create an XML response with a gather element. This element instructs Twilio to listen for further user input. Once a digit is received, the instruction redirects to the finalize URL, passing on the selected digit and the order's ID for subsequent processing.
Finally, create the FinalizeOrder view in views.py using the following code:
The FinalizeOrder view completes the pizza order process. It takes the user's final input, representing a topping choice, and fetches the corresponding topping from the Topping model. It identifies the order to update based on the provided order ID and associates it with the selected topping. The topping is the last step to ensure the order is confirmed.
Additionally, it calculates the total order price based on the selected crust and topping prices. It then constructs a confirmation message, which includes details such as the crust size, topping name, order ID, and the total cost. The view utilizes Twilio's VoiceResponse to create an XML response to deliver this message to the caller. The message is spoken to the caller, providing confirmation and gratitude for choosing the pizza service.
You will need to create URLS corresponding to the views you just created. These are the endpoints that can be accessed via http.
Open the urls.py file in the api folder and add the following:
The code above defines the URL routing configuration for the app's api views.
- The /welcome/ URL pattern is associated with the Welcome view, handles incoming calls, and presents users with pizza crust options.
- The /topping/ pattern corresponds to the Toppings view, managing topping selections.
- The /finalize-order/int:order_id/ URL pattern maps to the FinalizeOrder view, which is responsible for processing and confirming pizza orders. It expects an
order_idparameter, allowing the view to identify and handle specific orders.
Add the app's URLs to the project's URL. Navigate to the urls.py in the project folder and add the following code:
Test the REST API endpoints
You will test the endpoints to check that they return the expected XMLs.
First, include 127.0.0.1 in the ALLOWED_HOSTS setting in settings.py. This tells Django to trust requests coming in using that hostname.
Make sure you are in the project directory where the manage.pyfile located is to run the server:
You will test your endpoints inside your preferred API client. I used Insomnia for this tutorial.
Use the POST method for all your HTTP requests because Twilio Programmable Voice will, by default, send POST requests to your endpoints.
First, enter the URL for the Welcome view.
Click on your API client's Send or Execute button. Your response should look similar to the one shown below:

Next, check the "Toppings" and create a new HTTP request in your client.
Ensure that you set each request method to POST. Set the URL field of your request to the following URL:
For this test scenario, it's essential to include Multipart/form-data content type with two key-value pairs, as this is the content type Twilio will use when you go live:
- Digits: The digit corresponding to the crust size the user selects during the Welcome view interaction.
- Caller: The caller's phone number, ensuring that the Toppings view associates the order with the caller.
Click the Send or Execute button.
The response should look something similar to this:

Take the same steps when testing finalize_toppings. Set the URL field of your request to the following URL:
This URL points to the FinalizeToppings view and includes an order_id parameter, identifying the specific order. Include multipart/form-data content type with a single key-value pair:
- Digits: The digit corresponding to the topping choice you want to simulate.
Click the Send or Execute button.
Your response should look something similar to this:

Expose your local server to the internet
Your endpoints are now generating the TwiML as expected, but all that is running on your local machine. How do you get Twilio to communicate with your app?
You must expose your local development server to the internet, allowing Twilio to communicate with your Django application. This is wherengrok comes in. ngrok is a tool that creates a secure tunnel from the public internet to your local machine.
Open a new terminal window so that you don't interfere with where your server is running.
Run ngrok as follows:
This will create a public URL that, when accessed, ngrok will forward the requests to your local server.
Look for the "Forwarding" section in the ngrok interface. The URL is usually in the format http://random.ngrok-free.app. Copy the URL.

Paste the ngrok URL to the ALLOWED_HOSTS list in your Django project's settings. This will tell Django to trust requests originating from the ngrok URL.
When you visit that URL in your browser, You should see the same interface you see with 127.0.0.1:8000.
Now that your app can be accessed via the public internet, it is time to tell Twilio where to find it.
Log in to your Twilio account and navigate to the Active Numbers tab. This is where you manage your Twilio phone numbers.

Select the phone number you want to use for testing. You'll find a section in the phone number settings where you can configure webhook URLs for various events, including incoming voice calls.
In the webhook settings for incoming voice calls, paste the ngrok URL you copied earlier. Include the specific path for the orders app by appending /orders/welcome/. This is where Twilio will point whenever a phone call is made to your number.

Click the Save button to save and apply your changes.
Call the number given to you by Twilio. You should hear the messages you generated in the XML and input the digits as requested.
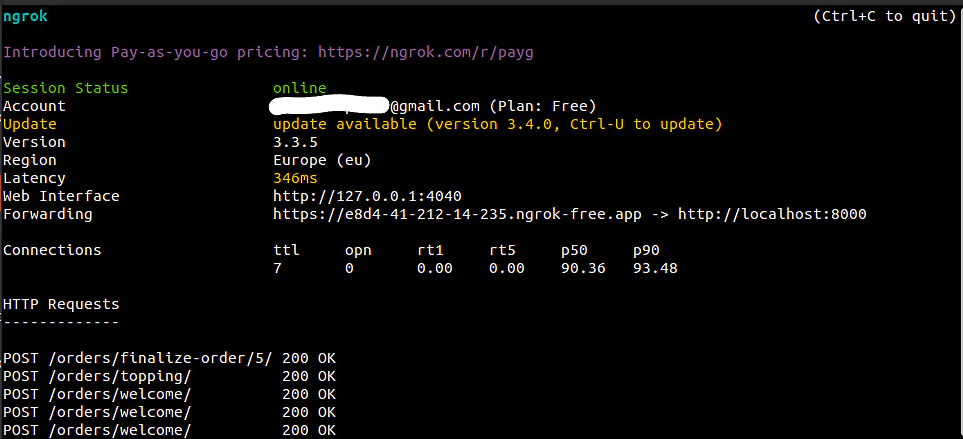
The ngrok setup forwards Twilio's incoming POST requests to the pizza app, which processes the data related to incoming calls at the specified endpoint. The POST 200 OK response confirms the successful communication between Twilio, ngrok, and the app while handling incoming voice calls.
And that is it; you have a working Pizza Order-By-Phonecall app.
What's next for Django apps and Programmable Voice?
Congratulations on integrating Twilio Programmable Voice with your Django application.You can build your skills further by exploring these resources:
Happy coding!
Chepkirui is a Technical Writer and Back-end Developer. She enjoys learning new technologies and writing articles about them.When not coding, she is into photography. Connect with her on LinkedIn and GitHub .


Related Resources
Twilio Docs
From APIs to SDKs to sample apps
API reference documentation, SDKs, helper libraries, quickstarts, and tutorials for your language and platform.
Resource Center
The latest ebooks, industry reports, and webinars
Learn from customer engagement experts to improve your own communication.
Ahoy
Twilio's developer community hub
Best practices, code samples, and inspiration to build communications and digital engagement experiences.