Deploy a Flask App on AWS EC2 Instance - No Stress Involved!
Time to read: 8 minutes
So you created your first Twilio app and it became a hit, great! That’s no surprise with the magic of Twilio. But wait, since Twilio is so popular, why not deploy the app to a live site so that it can live on without you having to constantly run the app on your local computer?
Follow this tutorial to learn how to quickly deploy your functional Flask application to Amazon Web Services (AWS). Get ready to impress people with a live Twilio and Flask application on the web for free!
Tutorial Requirements
- A GitHub repository with files for your working Flask application. Make sure that the application that you want to deploy into AWS has secured required environment variables and is ready to deploy. You can refer to the Flask Application Tutorial if you need assistance starting a basic Flask app.
- Create a free account or sign in to your AWS console
- A credit card for AWS to have on file in case you surpass the Free Tier eligibility options. It is worth noting that you should take extra precautions if you are deploying an app onto AWS. Make sure you stay within the Free Tier limits to avoid surplus charges at the end of the month. Refer to the EC2 pricing guide and proper docs to prevent future charges.
- Tmux to run the application in a terminal session
Create a User Account
In order to deploy fast and easily, create an AWS account. Upon logging back into your account, you have the option to login as a Root user or an IAM user.
I would recommend logging in as a Root user account to perform tasks requiring unrestricted access or creating an IAM user account that holds all of the permissions that a Root user would have. IAM users have the ability to work on the AWS dashboard with secure control access that can be modified.
For the purpose of this article, I am logging in as a Root user to accomplish the necessary tasks.
Navigate the EC2 Dashboard
Click on the Services tab at the top of the webpage. Click on “EC2” under the Compute tab or type the name into the search bar to access the EC2 dashboard.
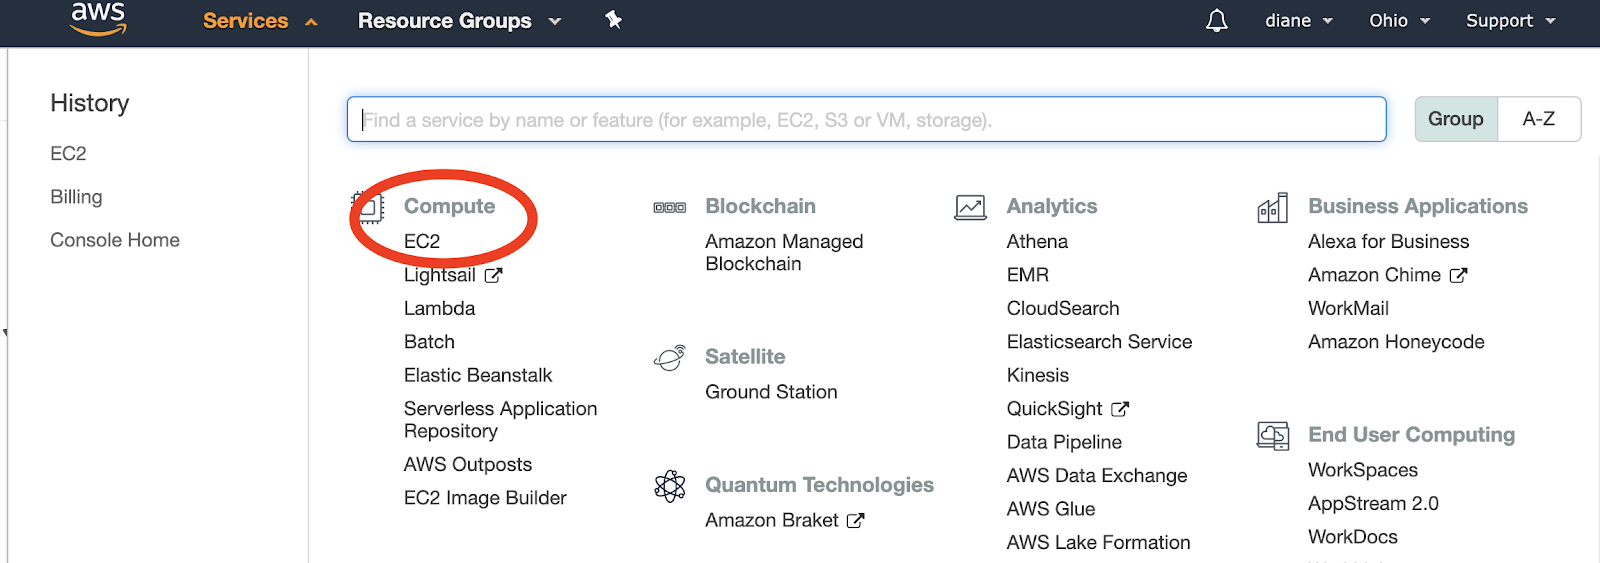
EC2 is a virtual server in the cloud where the Twilio web app will live.
Launch an Amazon EC2 instance
Look for the Launch Instance section of the web page. It should be an orange button labeled Launch Instance as shown below. You can see that the section says “Note: Your instances will launch in the US East (Ohio) Region”. This may vary for your EC2 dashboard, as you want to make sure that your instances are within the US states if you are a developer in the US.
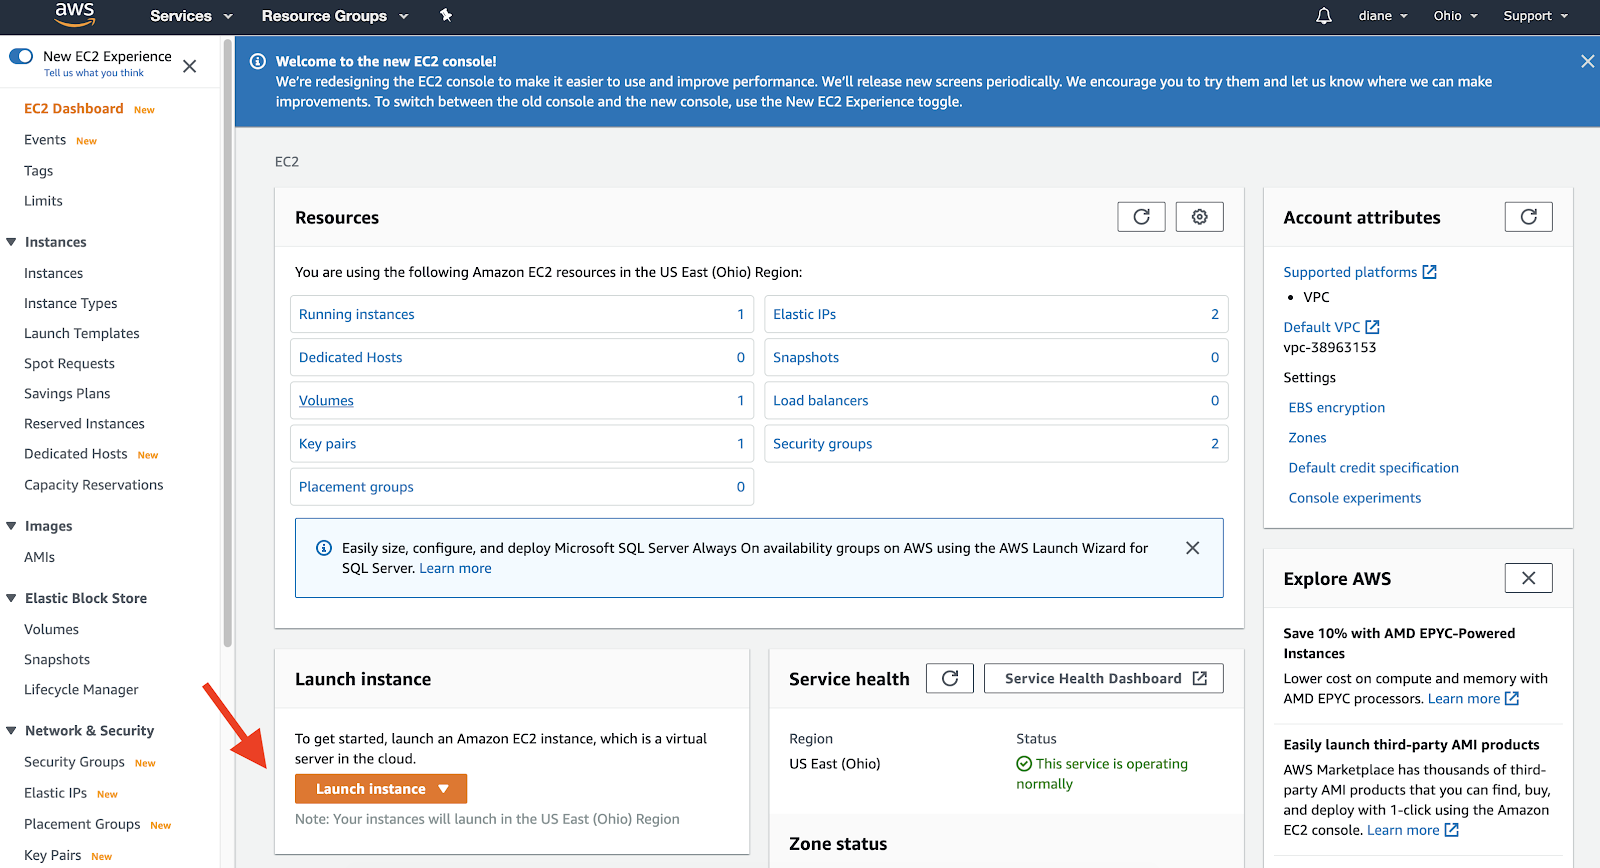
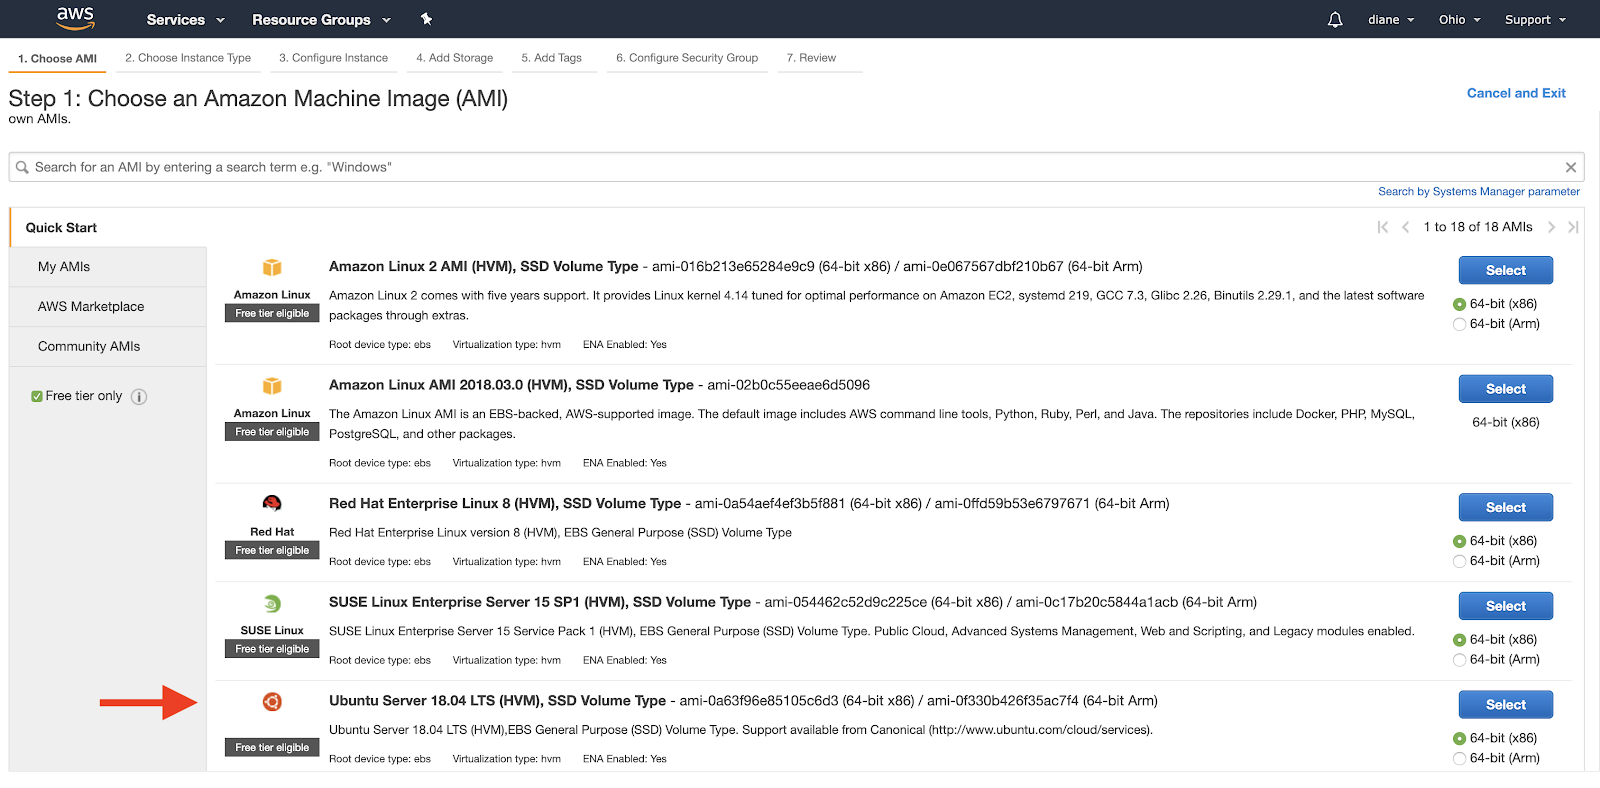
Select Free Tier Instances for the Machine Image
Select the Free Tier Only option on the left hand side under Quick Start. There is a list of Amazon Machine Images (AMI) that you can choose from, but we will select the Ubuntu Server with the Free tier eligible option.
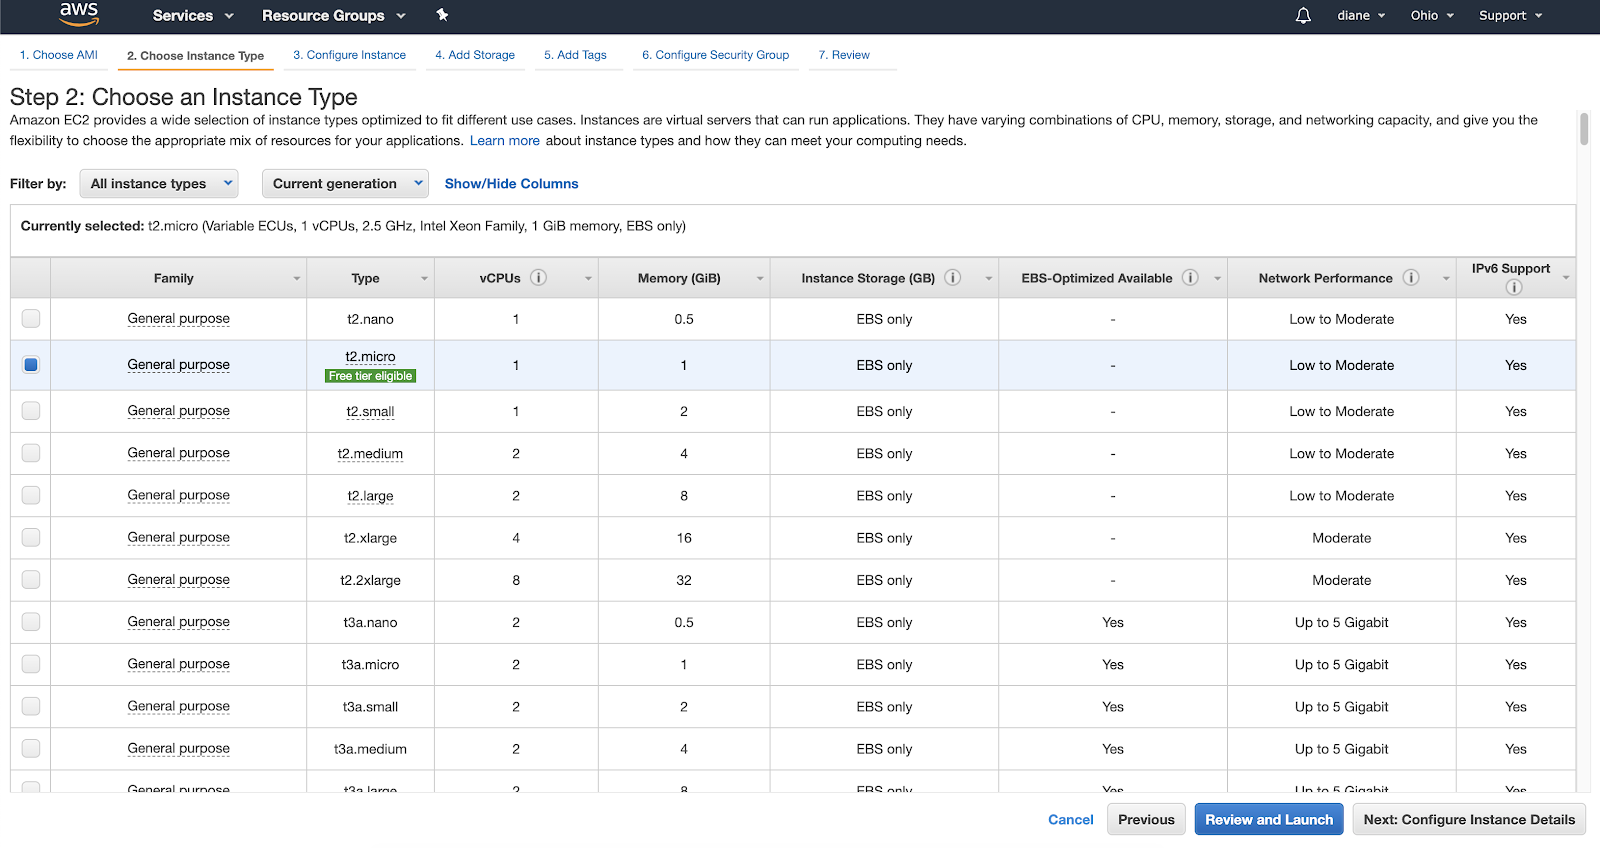
Choose the Instance Type
Select the Instance with the Free tier eligible option. After checking the instance you want to use, click on Next: Configure Instance Details.
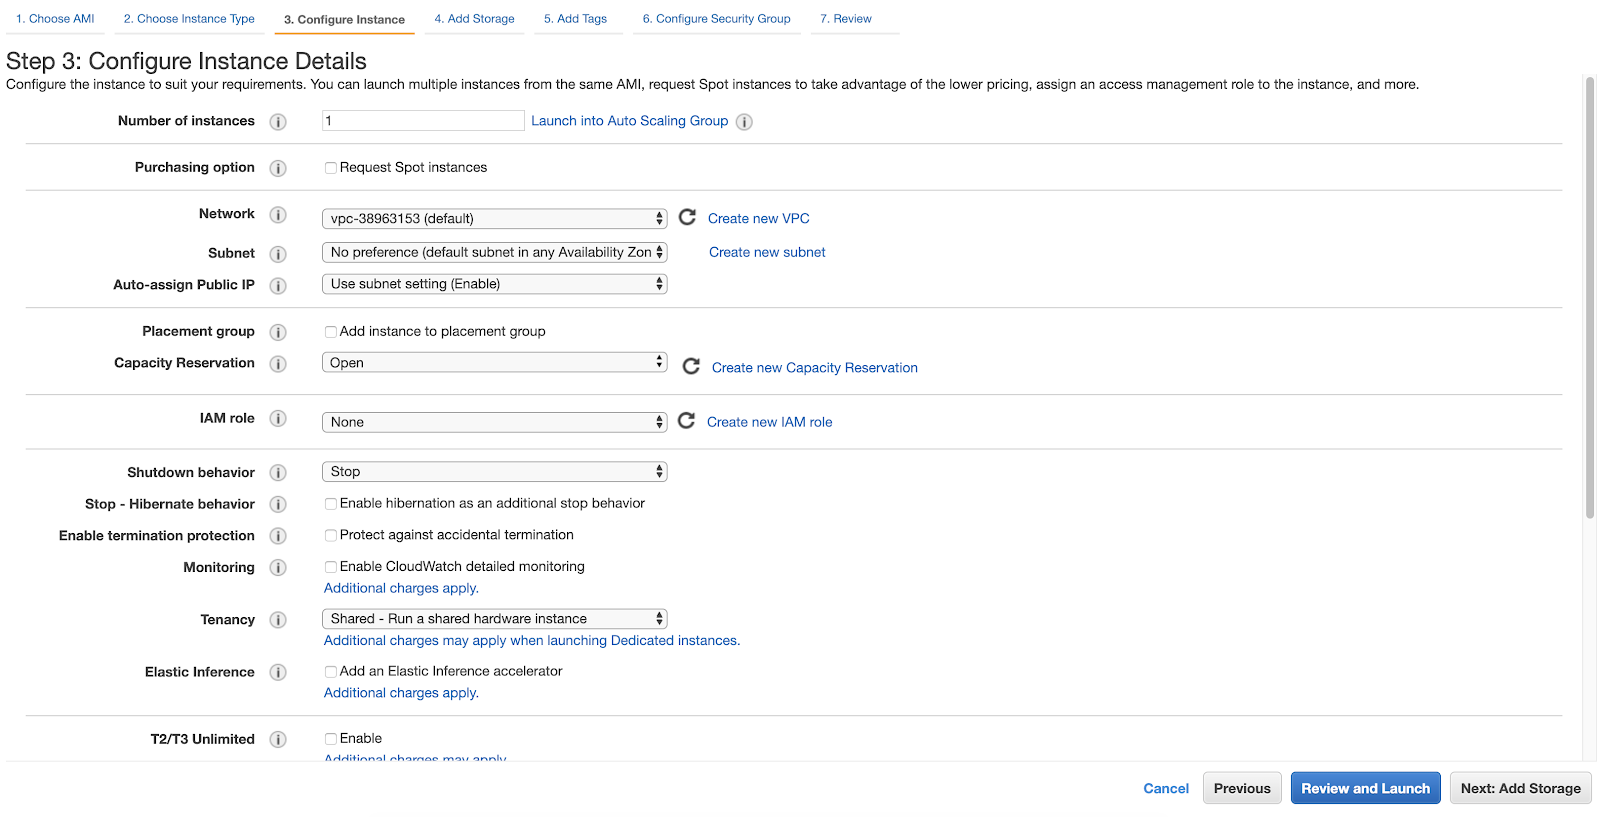
Configure Instance Details
View the default settings and move on to Next: Add Storage.
Add storage
Select the amount of storage necessary to run your application. Free tier eligible customers can get up to 30 GB. The storage used will depend on your application. For example, if your application requires image file storage, heavy graphic rendering, or storing user data it will use more storage. In this case, you will have to be careful and make sure your app does not go over the free GB allocation. If you go over your limit for the month, you will be charged.
After you select the size you want, click Next: Add Tags.

Add Tags
Tags are used to categorize your AWS resources for different use cases to easily keep track of your resources. This would apply if you are working on large scale projects and need to organize the AWS billing costs in a preferred structure. Thus, it might not be necessary to add tags to your machine especially if you only plan on using AWS one time for this specific application. Go ahead and click Next: Configure Security Group.

Security Group
Configuring the security is the last step before launching the AWS EC2 instance. If this is your first time creating a security group, select SSH in the dropdown under Type. Everything else in this section should be set to default to TCP at Port 22.
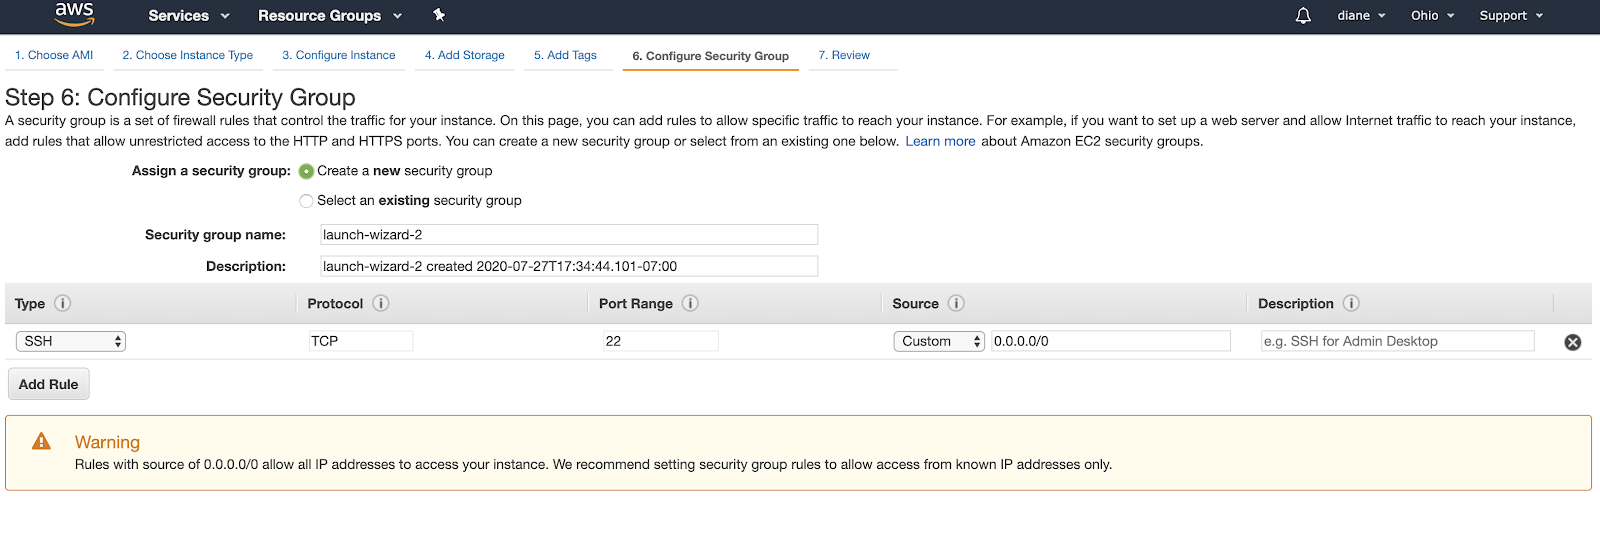
Here’s an example of the security types and ports you can use in your web application. Since we want people around the world to access the site, set the Source to these protocols to “0.0.0.0/0”.
Here’s the list of security types and protocols you should use. You can add additional rules to the following list as well:
Set Type HTTP, Protocol TCP, Port range 80, and Source to “0.0.0.0/0”.
Set Type HTTP, Protocol TCP, Port range 80, and Source to “::/0”.
Set Type Custom TCP, Protocol TCP, Port range 8080, and Source to “0.0.0.0/0”.
Set Type SSH, Protocol TCP, Port range 22, and Source to “0.0.0.0/0”.
Set Type HTTPS, Protocol TCP, Port range 443, and Source to “0.0.0.0/0”.
Launch and create a key pair
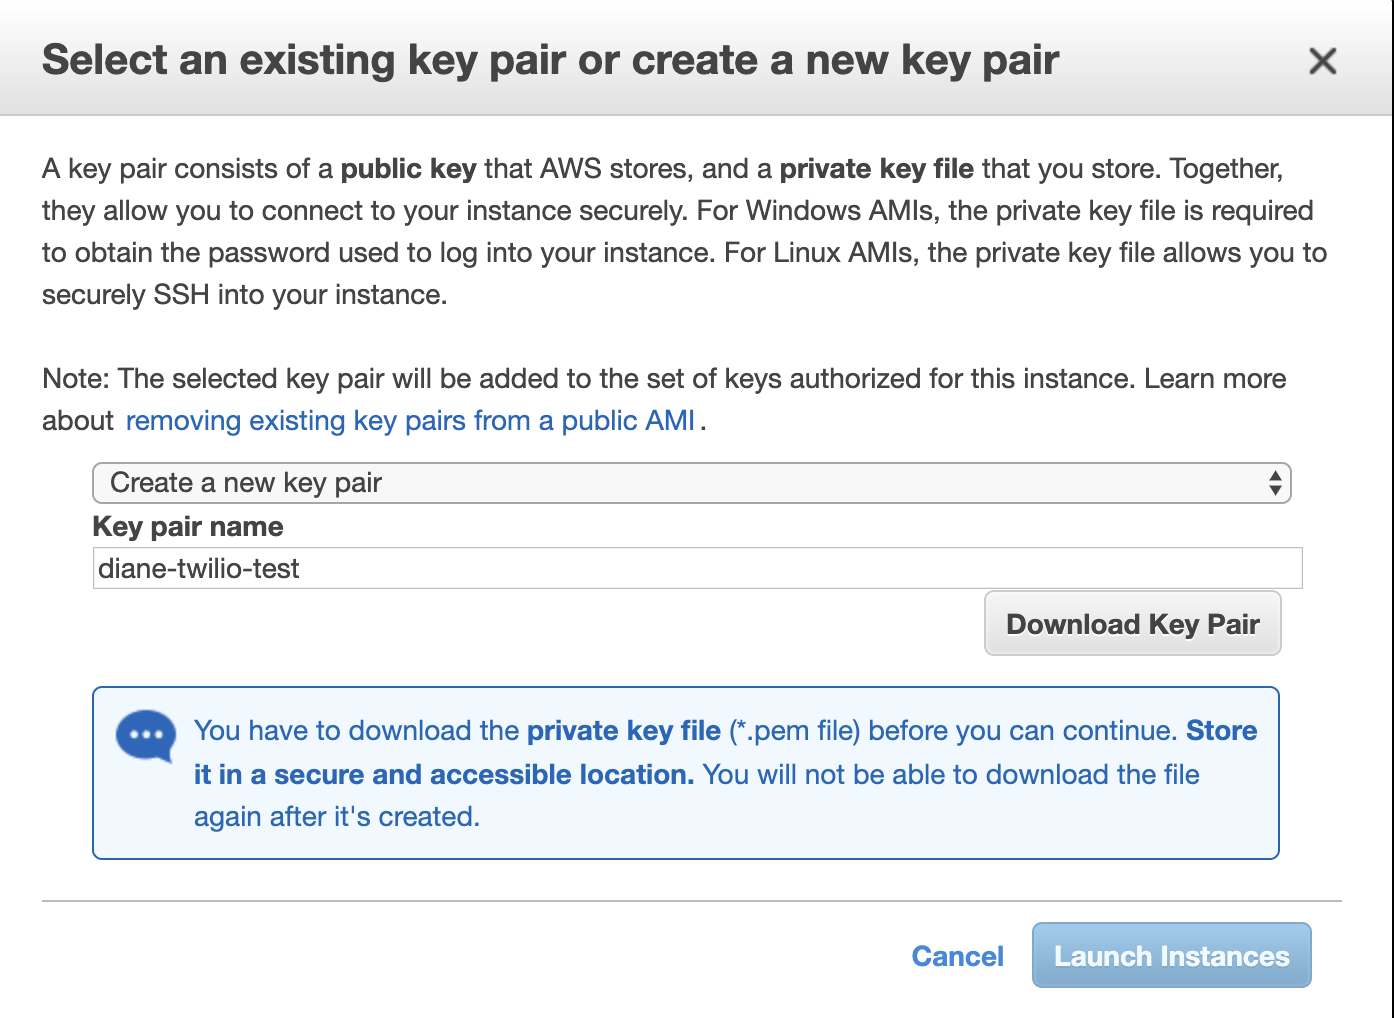
Click "Review and Launch" to confirm your security group for your project. After you review your settings and click "Launch" you will be prompted to select an existing key pair or create a new key pair.
Click on the drop down menu and select Create a new key pair. This is essential to access your AWS instance securely through your machine. Give your key pair a memorable name. For the purposes of this article, the key pair name is “diane-twilio-test”.
Click on Download Key Pair after creating your key pair. This will download the private key file (learn more about .pem files or about public key cryptography). Drag the .pem file to a secure location. It is absolutely crucial that you keep this .pem file safely, as this is the ONLY way to access your web application.
Here is a screenshot of the private key file also known as the .pem file on a macOS machine:

Review and launch the instance
Give your AWS dashboard some time to launch the instance. Your IPv4 Public IP is the address you need to access your web application. In this article, the public IP address for the instance is “52.15.127.3”.
The instance has been launched once the Instance State tab says running along with a green circle.

SSH into the virtual machine
It’s time to access the virtual machine created through AWS. Open your terminal and locate the directory with the .pem file.
Type chmod 600 ./<YOUR_PEM_NAME>.pem on the command line in your project directory to restrict read and write permissions to the private key file.
Next, set up the ssh environment by typing ssh-add ./<YOUR_PEM_NAME>.pem. This command adds SSH private keys into the SSH authentication agent in order to have single sign-on options.
You will see the following text in your terminal:
Take the IPv4 Public IP address from the EC2 instances dashboard and type the command ssh ubuntu@<YOUR_IP_ADDRESS> in order to SSH into your virtual machine.
Once you respond with “yes”, you will notice that your terminal shell is now your Ubuntu shell. Your root line might say something like “ubuntu@ip-172-31-31-102:~$”. All the commands that you type here are executed in the virtual ubuntu shell.
Inside the ubuntu shell
Install tmux in order to open and use multiple windows within a session. This helps you run the app in the background instead of the forefront, even when you disconnect from the ubuntu shell. The session exists so that you can go back and make changes to the deployed code whenever you want.
In other words, the app is reattached to a different terminal in order to be deployed on AWS which will be covered later. Run the following command to install tmux in addition to Python3 and other specified requirements on the Ubuntu shell.
Transfer your project files to remote host
Inside of the Ubuntu shell that you SSH’d into, create a directory for the application that you want to deploy.
Create a new tab or window on your terminal so that you have one tab using the Ubuntu shell, while the other tab is using your machine’s zsh or bash.
Locate the directory where your application lives. If your app directly does not already have a requirements.txt file, create one by entering pip freeze > requirements.txt into the terminal.
Copy the full path of that directory into the command at the end of this subsection to transfer the folder from local to remote host.
The <FULL_PATH> of your application may look something like /Users/<YOUR_NAME>/Documents/<YOUR_APP_FOLDER>/.
The deployedapp at the end of the command refers to the folder that was created inside of the Ubuntu shell earlier.
This may take a few minutes depending on the size of the project.
Deploy the application on EC2 instance
Go back to the Ubuntu shell in the other tab or window. If you type the command cd deployedapp into the terminal and see the familiar project files inside the folder then you are on the right track so far.
Use the tmux commands to create a new session. This is where your application will run live. In the command below, I used “mytestapp” to name the tmux session, but you can name it however you would like.
After running this command, you will be redirected to the “mytestapp” tmux session. Now that you have your application on the EC2 server, install the requirements for your application.
If your Flask application is regularly run inside a virtual environment, start up the virtual environment with the command source venv/bin/activate. Otherwise, it’s time to run your app as you usually would inside your local machine.
Press Ctrl B and press D on your keyboard to leave the tmux session running in the background. You will see the following output in your terminal:
If you need to make changes to your application for some reason or stop the session, enter the command below to reattach to the “mytestapp” session.
Once again, when you are ready to leave the tmux session to do it’s work, press Ctrl B and press D on your keyboard. If for some reason, you want to kill the session, press Ctrl D while inside the tmux session instead.
You can check if the application is running in the tmux session. The output below will show if you did not kill the session earlier.
You can view your live application by appending 8080 to your public IPv4Public IP address. In the example of this article, the URL would be “http://52.15.127.3:8080/”.
You can now Ctrl C to logout of the virtual machine and share the newly deployed app with the URL link.
What’s next for deploying projects on AWS?
Congratulations on deploying your Flask application on AWS! Show off your live project by setting up a customized URL for your project - here’s a tutorial on how to change your URL name.
It’s definitely not easy navigating AWS so be sure to pat yourself on the back for completing this tutorial. If you’re looking for a new project to deploy into AWS, check out these ideas:
- Visualize image data and display live results using Google Maps API
- Build scalable interactive voice response with Twilio, AWS and Python
- Explore a Serverless Project with your own personal training exercise bot with Python, Zappa, AWS and Twilio SMS
Let me know about the cool app you deployed - I would love to hear more about it!
Diane Phan is a Developer Network Intern on the Developer Voices team. She loves to help programmers tackle difficult challenges that might prevent them from bringing their projects to life. She can be reached at dphan [at] twilio.com or LinkedIn.
Special thanks to her friends outside of work for teaching her about AWS EC2 instances.
Related Posts
Related Resources
Twilio Docs
From APIs to SDKs to sample apps
API reference documentation, SDKs, helper libraries, quickstarts, and tutorials for your language and platform.
Resource Center
The latest ebooks, industry reports, and webinars
Learn from customer engagement experts to improve your own communication.
Ahoy
Twilio's developer community hub
Best practices, code samples, and inspiration to build communications and digital engagement experiences.

