Choose Your Own Adventure Presentations: Wizard Mode Part 3 of 3 with Flask, Reveal.js and WebSockets
Time to read: 8 minutes
You’ve coded your way through the original Choose Your Own Adventure Presentations story, the Wizards Only gatekeeper and the Web Forms trials blog posts. Now it’s time to pull out our magical wands for one more trick and complete our application-building quest.
Voting with a wand (or smartphone)
In this final tutorial we’ll wrap up our Flask application with a new ability that will allow the audience to vote with a web browser on their wand…or smartphone. We will write code to keep track of audience votes from web browsers using websocket connections. The new browser-based voting can augment our existing SMS-based voting for presentations when cell signals aren’t working well.
Roll up the sleeves on your cloak and get ready to write a bit more Python code as we finish out our Choose Your Own Adventure Presentations application.
What We’ll Need
If you followed along with part 1 and part 2 of this series then you’ve already set up all of the dependencies and the database connections we’ll need for this part of the tutorial.
If you haven’t read parts 1 or 2 yet, that’s okay. Here’s a quick recap of the tools and libraries we used to build the application so far.
- PostgreSQL for persistent storage. PostgreSQL drives the Wizards Only mode by keeping track of our authentication and presentation data.
- Redis and redis-py for ephemeral storage. Redis keeps the vote counts so make sure redis-server process is running the background while developing the application.
- The psycopg2 Python driver to connect to PostgreSQL. Psycopg2 will continue to drive the connect between our web application and the database.
- Flask-SocketIO for creating and working with websockets in our Flask application.
- Flask-Login for authentication. In part 1 we set up Flask-Login to protect the Wizards Only pages.
- Flask-WTF for web form handling. We’re creating a bunch of new pages in this post so we’ll use Flask-WTF extensively in the following sections.
You can get caught up with us by working through the code in parts 1 and 2 or just clone the CYOA Presentations repository tutorial-step-5 tag stage. Here are the commands to execute if you’re going to clone the repository to get up to speed:
If you need a walkthrough to create a virtualenv, re-install the dependencies in requirements.txt, export the environment variables for the project and sync the database tables, there are detailed explanations for each of those steps in part 1 of this tutorial. Note that if you make a typo somewhere along the way in this post, you can compare your version with the tutorial-step-6 tag.
Manage Decisions View
We need to create new Wizards Only screens to set up the web browser voting when we want to enable it for presentations. Note that we don’t have to enable voting via a web browser, we can continue to just use SMS for votes. However, these new screens simply give us an option to replace or augment SMS voting which is great if the cell phone service does not work well in a venue. After we write the code in this section and fire up our development server, our new admin screens should look like these screenshots below.

When we create a presentation there will be an option to manage web browser-based voting as shown above. The Manage choices link takes the wizard user to a new screen where decisions that have been created can be edited, deleted or created.
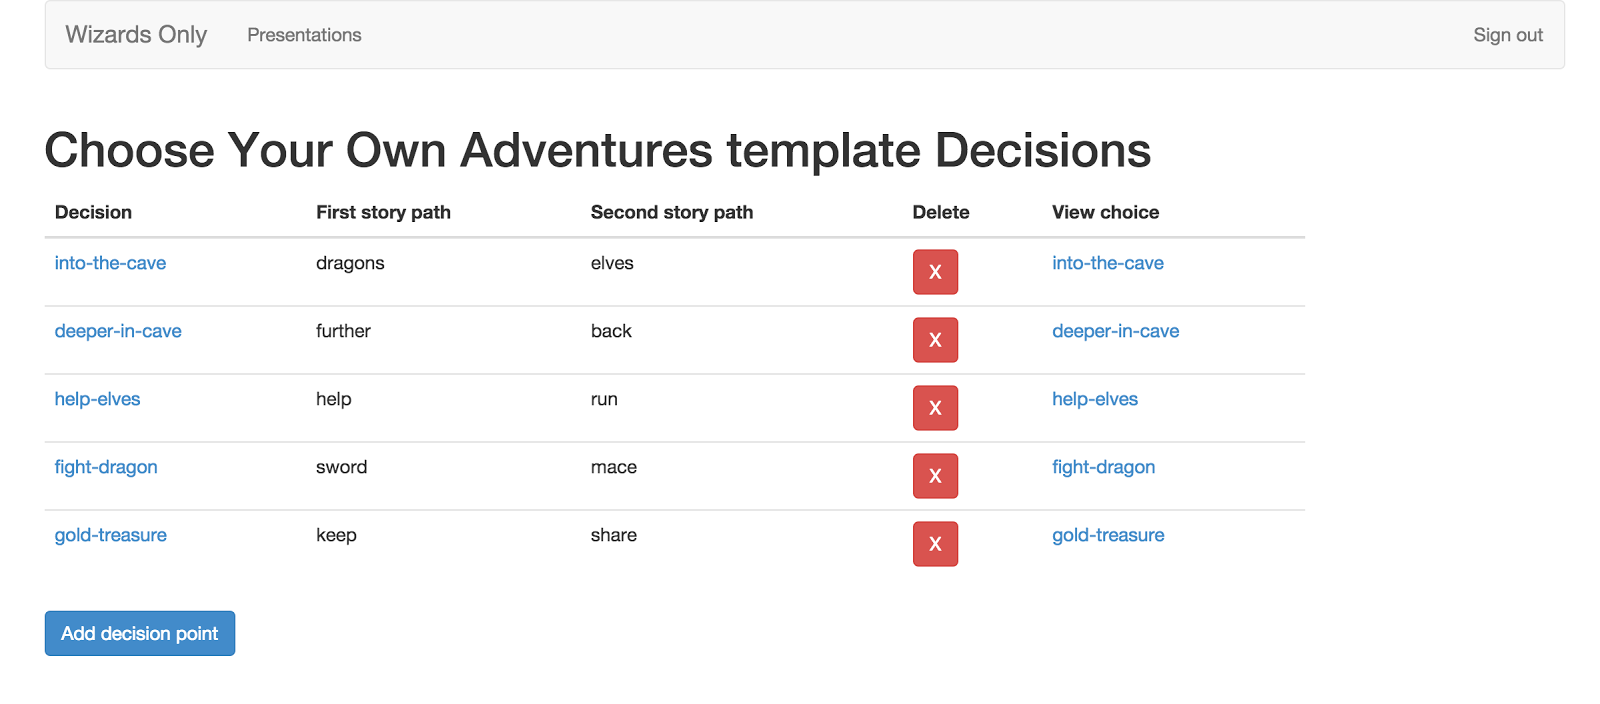
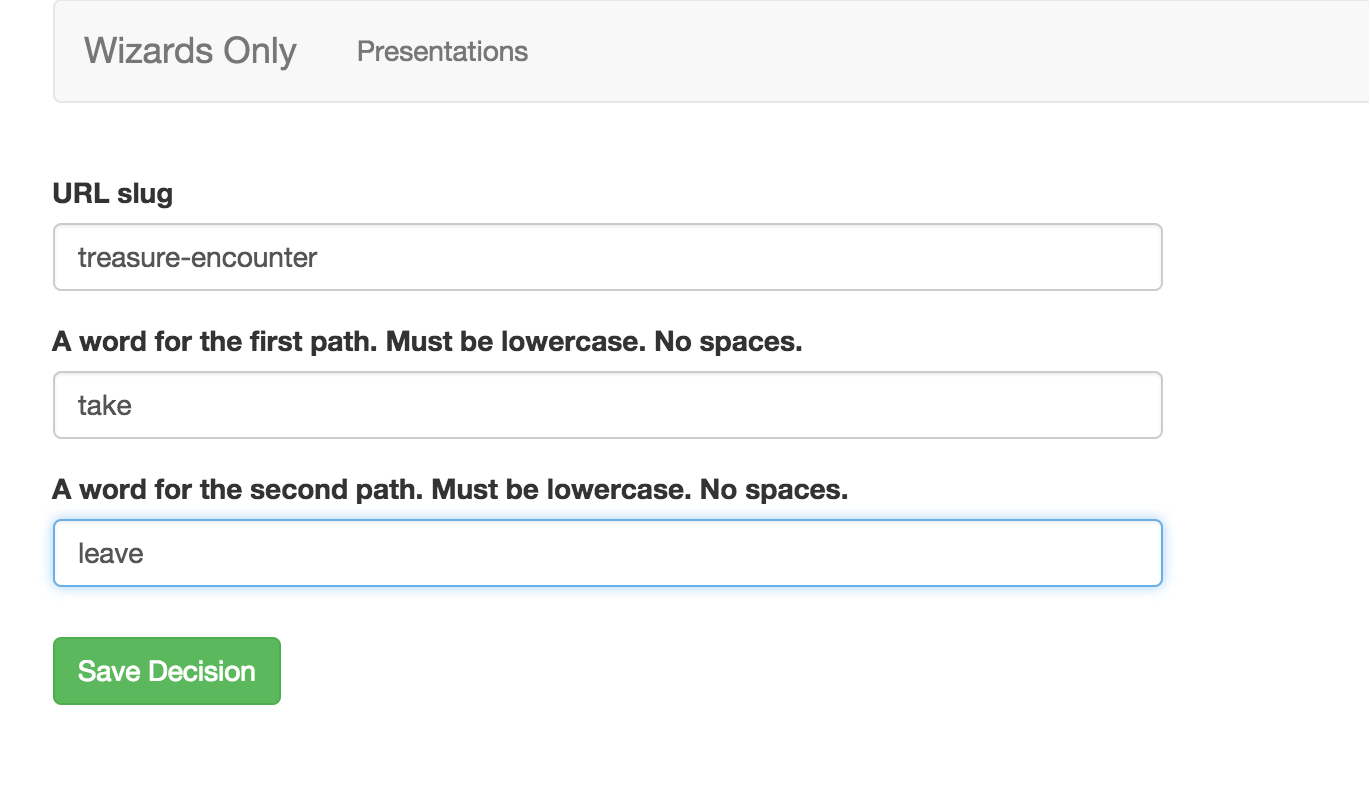
Decisions can be created and saved via the simple form as seen below.

Let’s get into the new code we need to write to transform the above screenshots from images into a part of our working application. Crank open the existing cyoa/models.py file in your favorite editor. We’re going to add the first highlighted line to the Presentation model that represents a foreign key to the new Decision model. The Decision model will hold the slugs to the webpages that will allow someone in the audience to vote on a decision. Add the new line to Presentation and create the new Decision model as shown below.
The new models code above allows us to save and manipulate web browser-based decisions that can be associated with specific presentations.
Next we need to update the cyoa/forms.py file with a new DecisionForm class. Within cyoa/forms.py append the following new form class as highlighted below.
The DecisionForm is used to create and edit decisions through the user interface. We’ve included some basic validation to ensure proper URL slugs are input by the user.
The next file that’s critical for getting our web browser-based voting up and running is cyoa/wizard_views.py. The changes we’re going to make in this file will allow us to modify the decisions found in presentations so users can only vote in the web browser on choices we’ve created for them. In part two of our tutorial, we included stub functions in this wizard_views.py file knowing that we’d flesh them out in this post. Make sure to remove the pass keyword from the body of those functions and insert the highlighted code shown below.
We added code to list, create, edit and delete decisions in the system. These are standard operations for an administrative interface that any self-respecting wizard would expect.
Alright, that’s all the Python code we need at the moment for the new Wizards Only screens. Now we need to create some new templates to generate the HTML for our decision screens. Create a new file named cyoa/templates/wizard/decisions.html with the following markup.
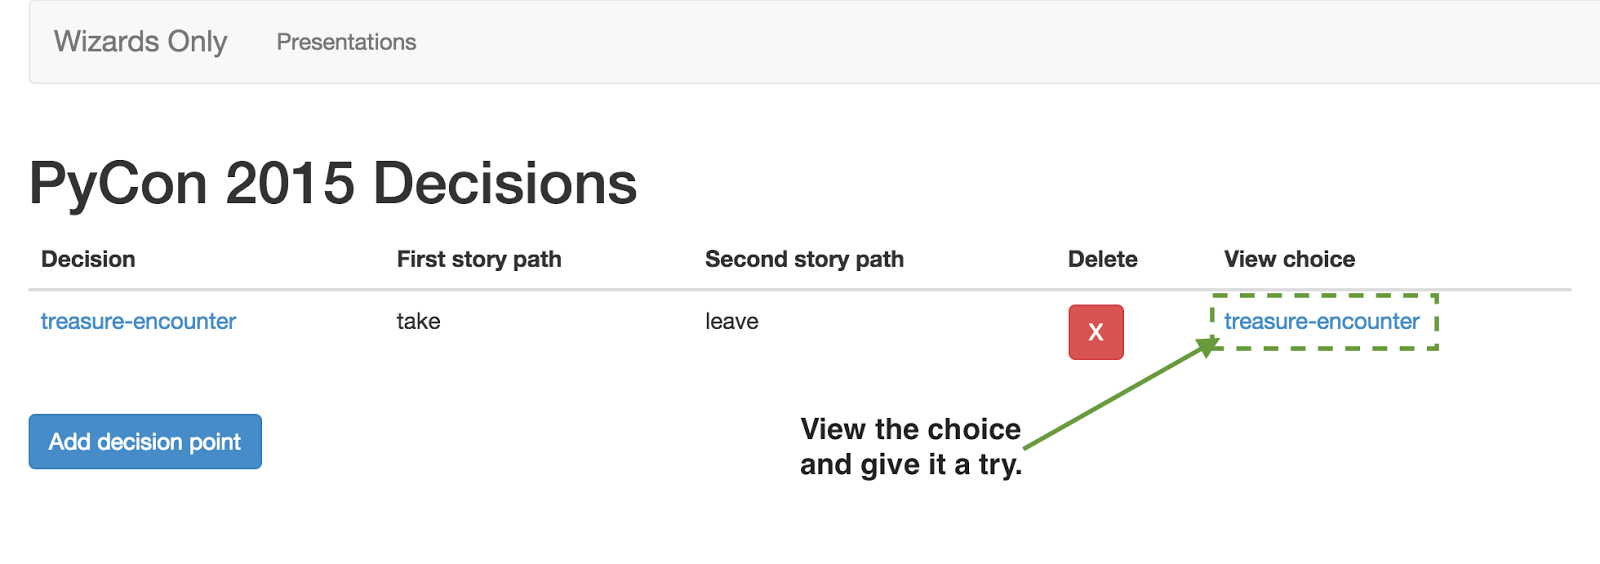
The above template markup loops through existing decisions and displays each one’s name and first and second story paths along with options to delete or view the decision’s webpage. If no decisions are returned from the database for the selected presentation, then a simple explanation will show “No web browser voting enabled for [presentation name].” There must be decision points created in the user interface for the browser-based voting to work.
There also needs to be a template file for creating new decisions and editing existing ones. Create the file cyoa/templates/wizard/decision.html and insert the following markup. Make sure you’ve named this file without an ‘s’ at the end of “decision” so it doesn’t overwrite the previous template we just created.
With the above template we have a way to create and edit decisions. The template is generated with a form submit to either create a new decision if the “New Decision” button was clicked or edit the existing decision when modifying an existing decision.
Finally, it’s time to test out our new code! Create the new Decision database table by running the following command at the base directory of our project.
Now run the development server with the following command as we’ve performed in previous blog posts.
Head to http://localhost:5001/wizard to check out the current version of our application.
So far so good. Sign in using the defaults “gandalf” as a username and “thegrey” as the password that were created in part 1 of the tutorial.
If there are existing presentations in your application, click on the “Manage choices” link for one of the presentations, or create a new presentation then click the link. Unfortunately, upon clicking “Manage choices” we will suddenly get the following error page…
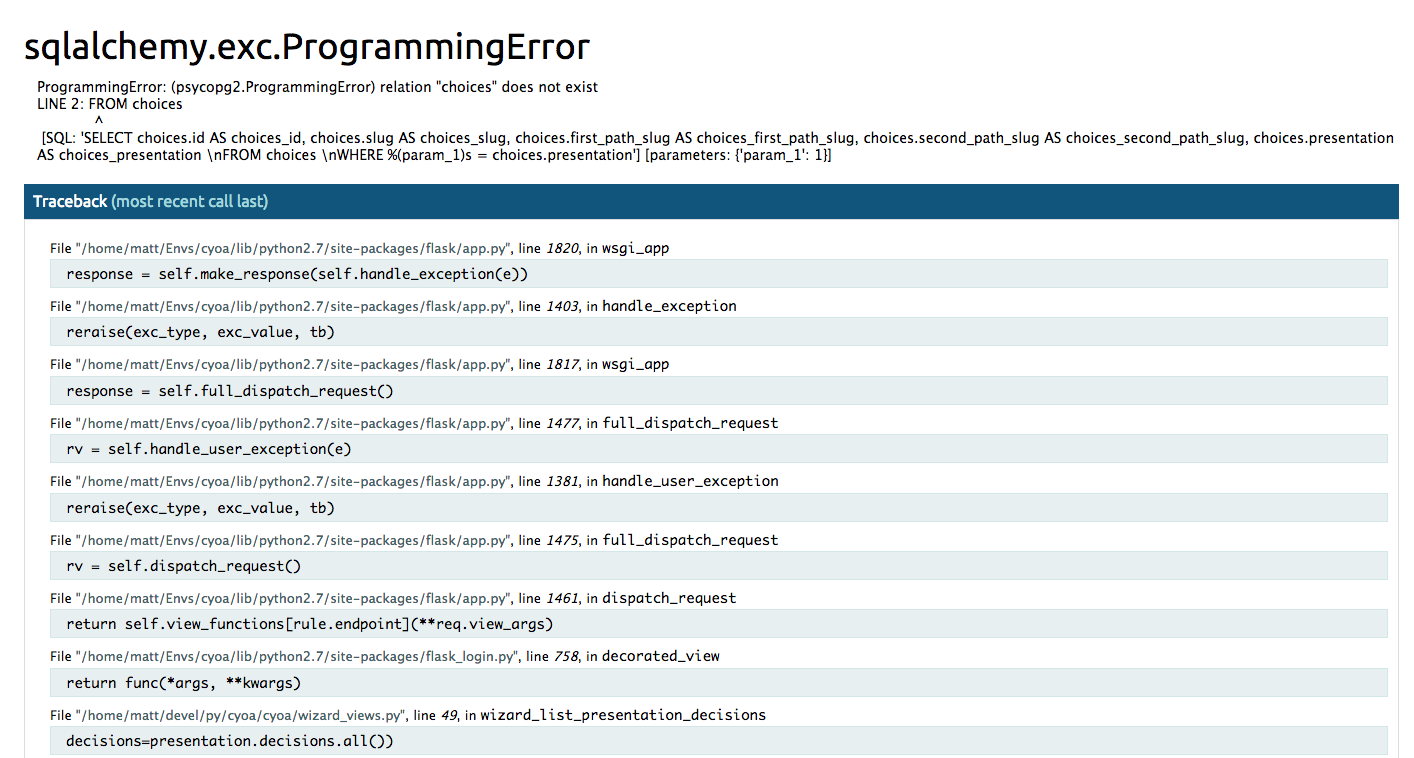
Uh oh. What’s happening here? It looks like the new foreign key relationship in the Presentation table is causing a database error. Although we created the new Decision table with the syncdb command, it did not create the foreign key relationship column in the Presentation table.
How do we fix this problem? We need to ensure the Presentation table has the appropriate column in the database. To accomplish that we have to
- Use a library to perform a schema migration based on our updated SQLAlchemy models
- Add the column manually to the database with an ALTER TABLE statement
- Drop and recreate the database and re-sync the database tables.
For simplicity’s sake, in this post we’ll use the third method of dropping and recreating the database. Note that unfortunately the existing wizards and presentations in the database will be deleted when we blow away the database so we will also walk through recreating them.
Kill the development server process with Ctrl-C and execute the following commands to recreate the PostgreSQL database.
We also need to create a new Wizard user in the database since the previous one was deleted.
Finishing up browser voting
With our new Decision model in place, let’s finish out this tutorial by adding the browser-based voting functionality. Open up cyoa/views.py and update the following highlighted lines.
The above code creates two new routes for displaying voting choices and decisions built within the Wizard interface. These decision pages allow an audience member to vote by clicking one of two buttons on a page and staying on the voting page. Those votes are calculated just like SMS votes as long as the user stays on the page.
An active websocket connection increments the vote counter for that choice in Redis and when a user leaves the page the websocket connection is cleaned up and the Redis value for that choice is decremented. Note however one downside of the web browser-based voting is that the websocket connection may not be immediately recognized as closed. It can take a few seconds before the websocket is cleaned up and the vote counter decremented.
We have a couple more steps to wrap up the application’s browser-voting functionality. Modify the cyoa/websockets.py file by adding the highlighted code shown below.
The above code handles the websockets connections and determines the decision chosen by a user.
There’s one small change to the Wizard decisions page that’ll make our lives easier. We want to be able to immediately view a decision after it’s been created. To accomplish this task, edit the cyoa/templates/decisions.html file and update the following single highlighted line.
The above one line change in decisions.html allows a wizard to view the decision she’s created by opening a new browser window with the decision.
We’re almost there – just one more template file to build! Create one more new template named cyoa/templates/web_vote.html with the following contents.
Let’s give our application a final spin to see the web browser-based voting in action.
Run the development server with the following command as we’ve performed in previous blog posts.
Head to http://localhost:5001/wizard to log in with our wizard account. We’ll create a new presentation and add decisions to it through the new user interface to test it out.

Add a new presentation based with the following data or based on a presentation you’ve already built.
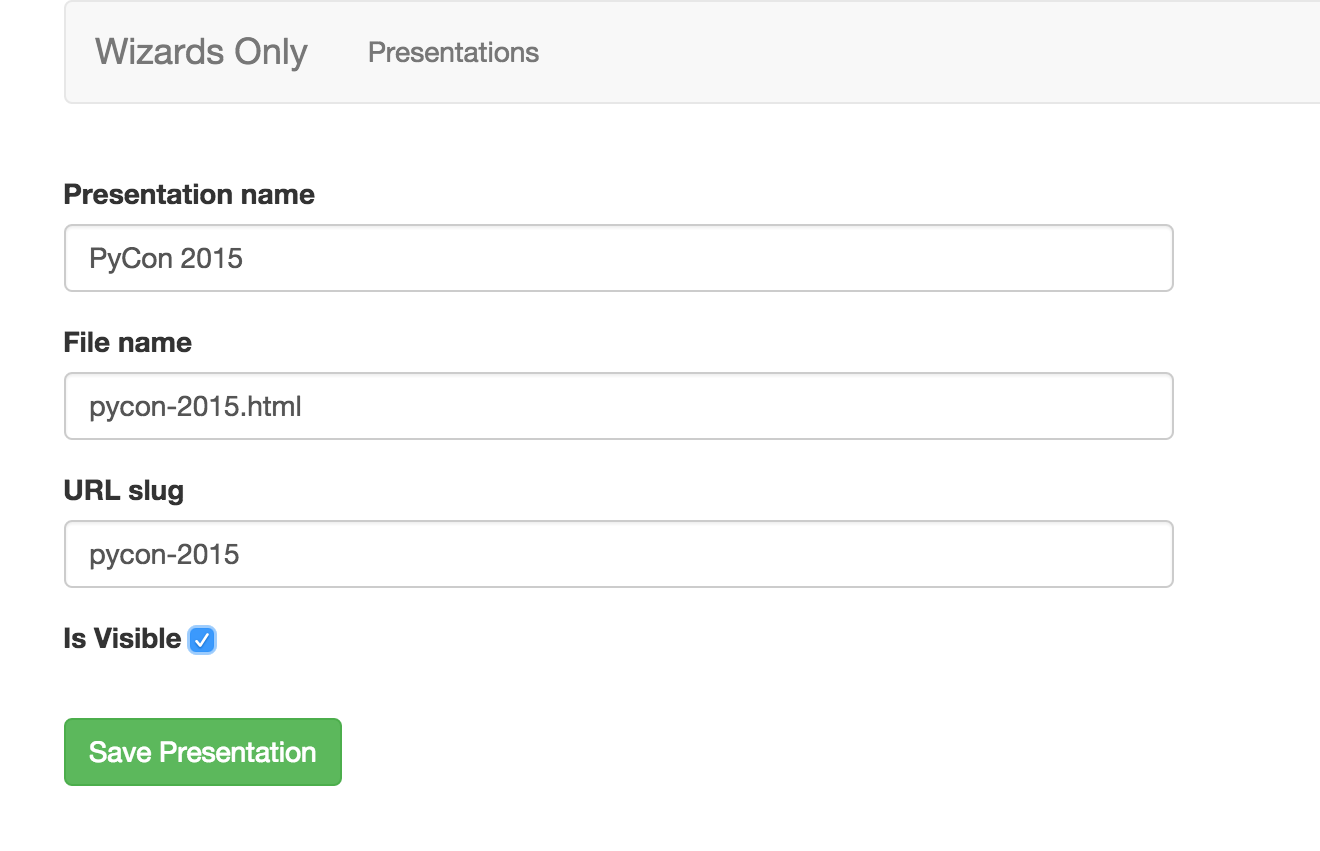
Next create a decision point using the new code we wrote in this tutorial. This decision will allow the audience to vote with their web browser. Create a decision like the following and save it.
Click the link in the rightmost column to view the new decision.
Select one of the two options on the screen and your vote will be tallied along with any other browser and SMS-based votes.

You’re voting for this choice via websocket just by staying on this page! This type of voting is a huge help for when cellular service doesn’t work in a room or you’re giving a presentation internationally where many folks don’t have an active cell phone plan, such as with PyCon 2015 in Canada.
Now we’ve got the ability to vote both with SMS and web browsing in our Choose Your Own Adventure presentations! If there was an issue you ran into along the way that you couldn’t figure out remember that there is a tutorial-step-6 tag that contains the finished code for this blog post.
Wizard Mode Engaged!
Our Wizard Mode is complete. We now have far more control over presentations and a new mechanism for audience voting via web browsers in addition to SMS. With our battle-ready upgrades, we’re set to use them in a live technical talk. In fact, this is the code that Kate Heddleston and I used for the talks Choose Your Own WSGI Deployment Adventure at PyCon 2015.
Let me know what new Choose Your Own Adventure presentation stories you come up with or open a pull request to improve the code base. Contact me via:
- Email: makai@twilio.com
- GitHub: Follow makaimc for repository updates
- Twitter: @mattmakai
Related Posts
Related Resources
Twilio Docs
From APIs to SDKs to sample apps
API reference documentation, SDKs, helper libraries, quickstarts, and tutorials for your language and platform.
Resource Center
The latest ebooks, industry reports, and webinars
Learn from customer engagement experts to improve your own communication.
Ahoy
Twilio's developer community hub
Best practices, code samples, and inspiration to build communications and digital engagement experiences.

