Faster Wrap-up Times in Twilio Flex using a GPT-3 Chat Summary Plugin

Time to read: 5 minutes
Agent effectiveness is a goal for any contact center. If agents provide support to customers faster, it not only makes your KPIs better, but it also creates a positive image of your brand in customers' eyes. Serving customers more quickly means agents can handle more chats in the same period, and customers don't have to stay in contact with support for a long time.
I'm sure it's happened to you – having to contact support multiple times with the same problem is not a good customer experience, and it's even worse when you need to give context of the problem to a new agent, repeatedly. And yes, agents do not always have the context of your previous support calls, nor do they know the topic of those interactions. Having that information would make the life of both the agent and the customer much easier: agents could serve customers much faster, and customers wouldn't need to repeat their issues. That seems like a win/win situation!
Storing an interaction summary sounds great... but who would write it? Maybe we can automate writing those summaries – and with the rise of AI, this task has become more straightforward than ever before. In this blog post, I will show you how you can quickly implement chat summary functionality in Twilio Flex powered by OpenAI's GPT-3 to generate a chat summary on demand.
Tutorial prerequisites
Before you can get started building, you need to make sure you have an account with Twilio. You can sign up here for free.
As soon as your Twilio account is created, you can proceed with creating a Twilio Flex Project. To create a Flex account, navigate in your Twilio Console to Flex, then Overview, then click the "Create My Flex Account" button.
Once you've got your Flex account, note the following details – you will need them later:
- Twilio Account SID: You can find your account SID and auth token in the admin console.
- Twilio Auth Token: You can find your account SID and auth token in the admin console.
To make the plugin work, you will also need an OpenAI API key. You can create one if you don't have here: https://beta.openai.com/account/api-keys
And with that, you're ready to start.
How the solution will work
You will be leveraging Twilio Functions and Twilio Sync, as well as OpenAI's API. Here is our high-level plan:
- Create a Flex Plugin that will:
- show a widget with a Text Area on task in Wrapping state.
- show a Customer Interactions Timeline on the right side of the screen.
- call functions to generate summary, update the task, and store and retrieve the Customer Interactions Timeline in a Sync Map.
- Create a Sync service and a Map object in it; the Map will be our Customer Interactions Timeline storage.
- Create a Function that will be called once the widget is shown. The function will be responsible for:
- getting the chat transcript
- replace any PII in the chat transcript (yes, you don't want to share any of that with OpenAI... and at least for this particular task, it is not necessary)
- call the OpenAI API and ask it to summarize the provided chat transcript
- Create another three Functions that will update task attributes, then write and retrieve the Customer Interactions Timeline
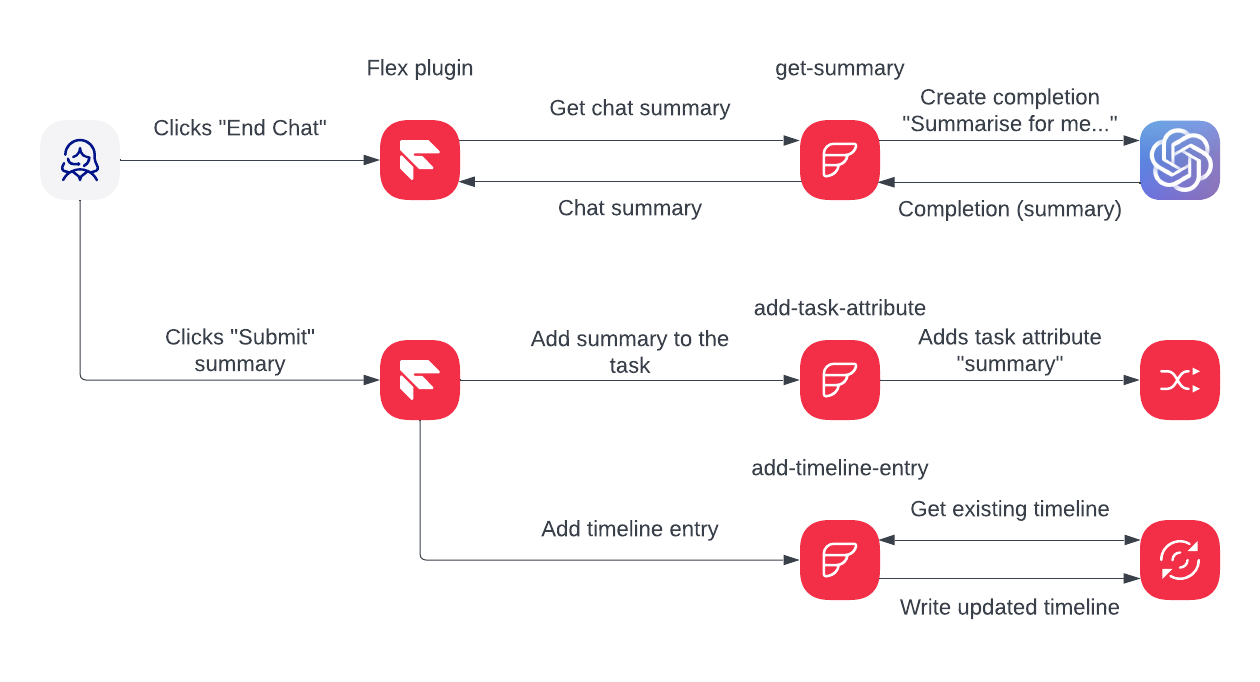
Here is a diagram of the solution you will be building:

Sync setup
As mentioned before, you will be storing the Customer Interactions Timeline data in a Sync Map.
First, you need a Sync Service and then a Map within the service. In your Twilio account, a Sync Service with the name `Default Service` should already exist – it is okay to use this service, and for this blog post, I will be using the default service. Alternatively, you can create a new one if you navigate to the Sync Services page in the Twilio Console.
For configuring your environment variables later, you will need a Sync Service SID. You can see the SIDs of all your services if you go to the Sync Services page in the Twilio Console (note the SID of the service you will be using).
Next, navigate to the chosen Sync Service, select Maps on the left, and create a new Sync Map. You will have to provide a name for your new Map – make sure to leave Time to Live blank. After the Map is created, take a note of its SID... you will need it later.
Once you have a Sync Service and Map, you are ready to move on.
Developer Environment Setup
Before you continue, let's make sure you have the software you need:
I will use Typescript for this tutorial, but it should work just as well with JavaScript.
Now you can start coding!
Clone the project
The code of the plugin is available on GitHub here: https://github.com/kuschanton/flex-plugin-chat-summary
Configure environment
In order to run the code, you'll need environment variables to be in place. Go to .env-example in the functions folder of the project, copy the file and rename it to .env , update the file according to the instructions in comments above each environment variable.
Deploy functions
The next step is to deploy our code to Twilio Functions. To do this, execute the following command in the root of your project:
Once deployment is complete, you will see the URL of your newly created functions. It will look like the following:
Copy the URL domain – you are ready to configure environment variables in the plugin itself. Go to .env-example in the root folder of the project, copy the file and rename it to .env , then update the file according to the instructions in comments above each environment variable.
Deploy plugin
The next step is to deploy the plugin to your Flex instance. To do this, execute the following command in the root of your project:
Once the command succeeds, it will show the next steps, you will have to run the command mentioned there (something like twilio flex:plugins:release ... etc etc)
Testing
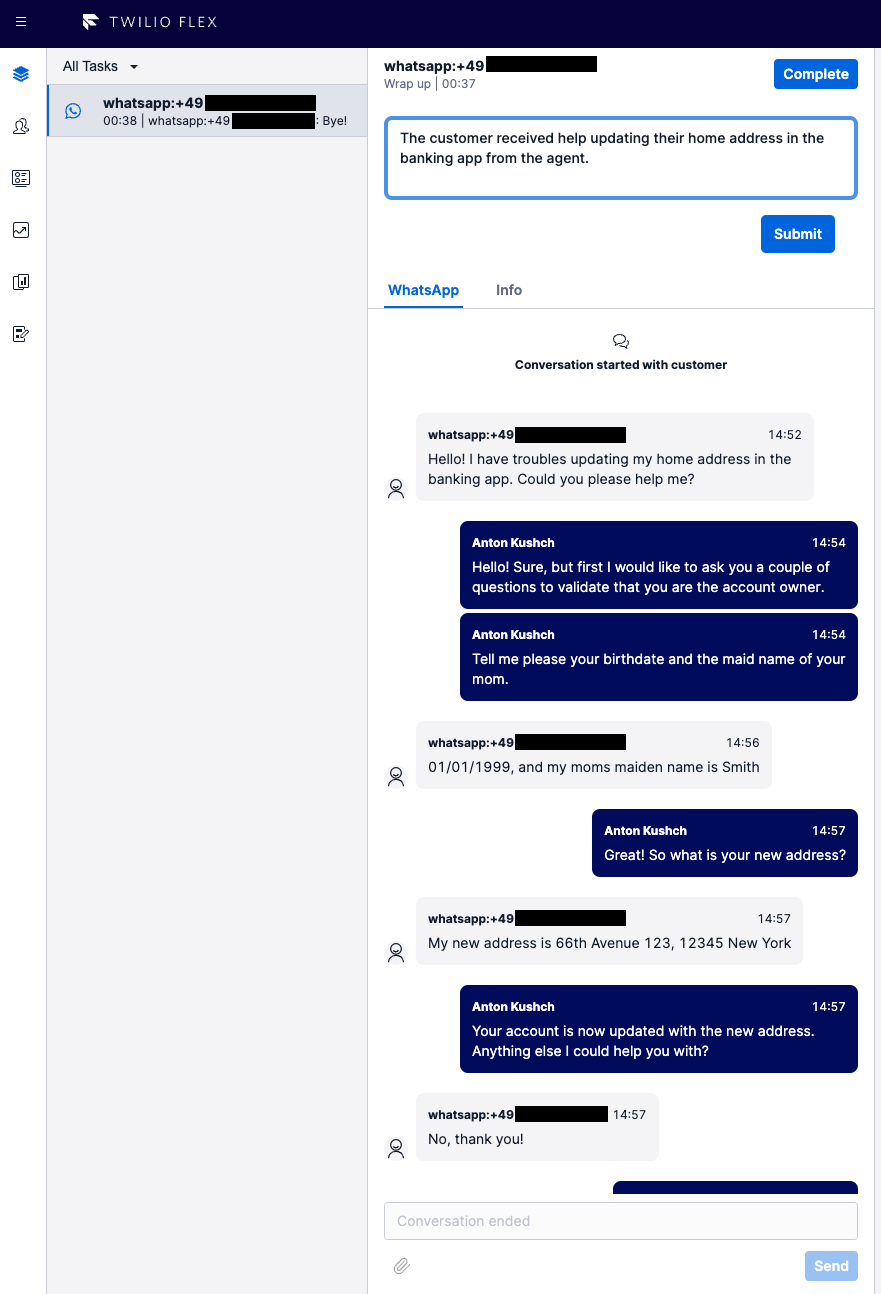
To test our solution, start a chat (it can be in SMS, WhatsApp, etc.) and write a couple of messages back and forth. Once you are done, click the End Chat button in Flex UI.
You should see a Summary Text Area above the chat. In a couple of seconds, as soon as the summary is generated, the text area will be populated with the response from GPT-3.
As an agent, you can edit the summary however you like or just submit it as it is.

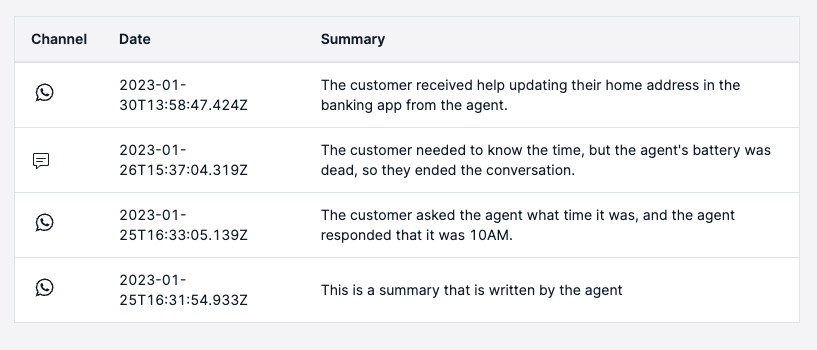
On the next conversation with the same customer (identified by phone number), you will see a timeline of the interactions with the customers and summary of each of them on the right side of the screen.

Conclusion
Using Twilio Functions, Sync, and OpenAI's GPT-3 API you built a plugin that saves a lot of time for your agents by writing chat summaries. When a customer calls back, it saves more time by providing a brief overview of the customer interactions to give agents the required context of what recent chats were about.
The plugin as it is now works only with text channels, but with a couple of tweaks it can be adapted to work with voice channels as well. This example is only one use case for GPT-3, but it shows how even the automation of simple tasks might bring a lot of value to your contact center. The potential of AI in the Contact Center seems limitless.
The full code for the project is available on GitHub at https://github.com/kuschanton/flex-plugin-chat-summary.
Like what you built? See some of our other Functions and serverless tutorials on the blog.
Anton Kushch is a Senior Solutions Engineer at Twilio. He is helping companies in Emerging Markets in EMEA build powerful customer engagement solutions powered by Twilio. He can be reached at akushch [at] twilio.com, or you can collaborate with him on GitHub at https://github.com/kuschanton.
Related Posts
Related Resources
Twilio Docs
From APIs to SDKs to sample apps
API reference documentation, SDKs, helper libraries, quickstarts, and tutorials for your language and platform.
Resource Center
The latest ebooks, industry reports, and webinars
Learn from customer engagement experts to improve your own communication.
Ahoy
Twilio's developer community hub
Best practices, code samples, and inspiration to build communications and digital engagement experiences.

