Building SMS Weather Forecasts With Stamplay, Twilio and NodeJS
Time to read:
March 07, 2016
Written by
This post is part of Twilio’s archive and may contain outdated information. We’re always building something new, so be sure to check out our latest posts for the most up-to-date insights.

Growing up, my dad regaled me with stories of cutting 1/4″ tape with a razorblade to patch audio snippets together. He didn’t have GarageBand, ProTools, or Abelton. The analog world can be more unforgiving than the digital world, and requires a tremendous amount of effort and precision.
In the software world, it’s easy to forget the days of analog, too. Instead of programming motherboards, we write a few lines of code. Now, with so many APIs and third party services, instead of writing code, we use a visual development environment and we’re a few clicks away from having a back-end up and running.
Stamplay respects the days of analog, but is firmly in the “few clicks away from a deploy” camp. They offer developers a dead-simple interface they can use to create and run workflows using APIs like Mailchimp, KeenIO, Firebase, Twilio and others. Think of IFFT or Zapier, but for APIs.
In the spirit of making things incredibly simple, Isaiah Grey of Stamplay built a simple demo showing how you can create an SMS weather alert service using Twilio and Node JS. Without further adieu, here’s Isaiah’s tutorial plus a video walkthrough.
Building A Weather Service, Powered By SMS with Twilio and Stamplay
Our service will work in the following steps :
- A user sends an SMS to a number provided by Twilio that will pass a city name into our Stamplay backend.
- A Stamplay Task will catch the SMS using the Twilio integration and pass it to a custom Code Block.
- Our custom Code Block will fetch weather data for a city, then assemble a response message from the data, and output the message.
- Another Stamplay Task will execute once the Code Block execution is complete, and using the output to respond to the intial SMS number with the weather data for that day.
Try it out by sending a text to +1 628 600 1473, with the name of a city (e.g. “New York”). You can also get a full week forecast by typing “forecast” after the name of the city (e.g. “New York forecast”).
What You’ll Need
- Twilio Account
- Stamplay Account
Get Started
After you have a Twilio account, navigate to your Account Settings to get your API credentials, your AccountSID and AuthToken. You can find them here.

In Stamplay, on the left hand side select Tasks then components. Choose the Twilio component within the list.
Next inside the Twilio component configuration, add the Twilio credentials to their corresponding fields. Now we are ready to start using Twilio within our Stamplay app.
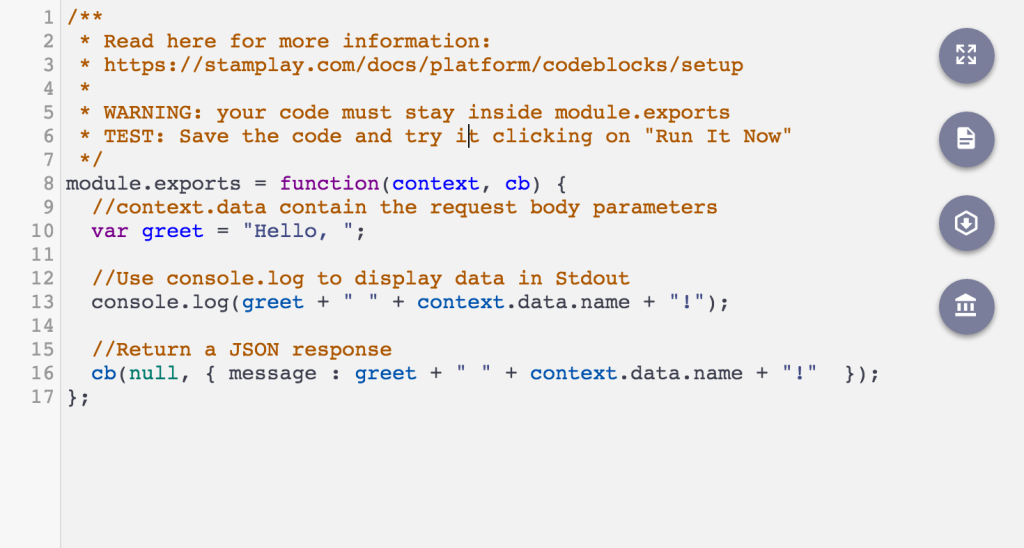
First we need to initialize a Code Block within Stamplay. Code Blocks are custom RESTful endpoints within our Stamplay application. Create a new one by selecting Code Blocks on the left hand side and entering a name for our Code Block. Let’s call it weather.
Our new Code Block should look like this.
Head over to the Stamplay Tasks section and create a new Task. Configure the new task to trigger to: when a new SMS from Twilio is received, run a code block.
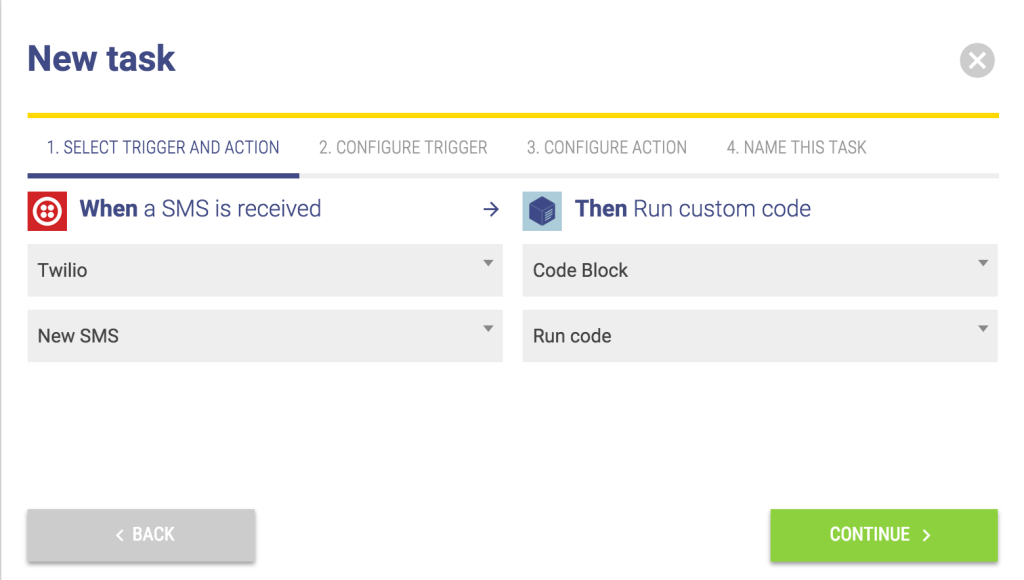
In Step 2, select a number from the dropdown you wish to trigger this Task when the number selected receives and SMS.
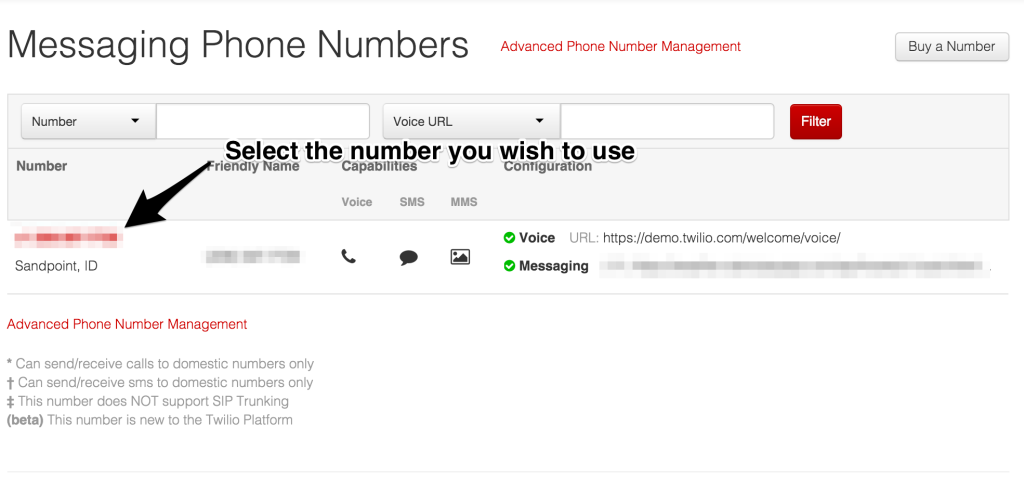
When you’ve created a Twilio account, a Twilio number will be automatically provisioned for you. You can see your numbers here. If you don’t have one, you can easily buy one.
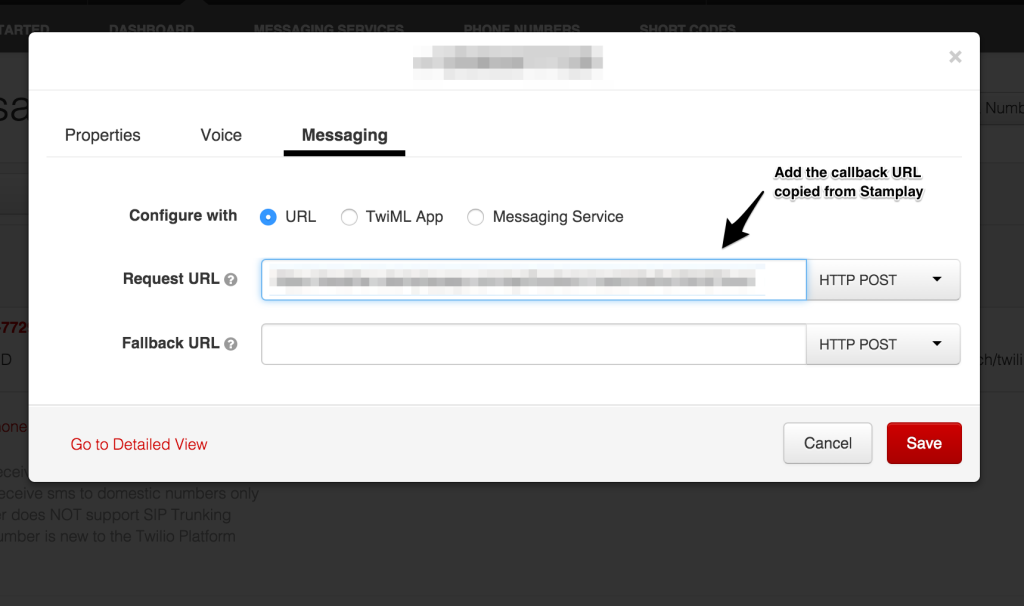
Below the dropdown where we selected the Twilio number, copy the input field containing the callback url, and head over to your Twilio phone numbers page.
Select the number you used to trigger the Task in Stamplay.
Then in the prompt add the callback url into the Request URL input:
Now back in Stamplay, we need to finish our Task setup.
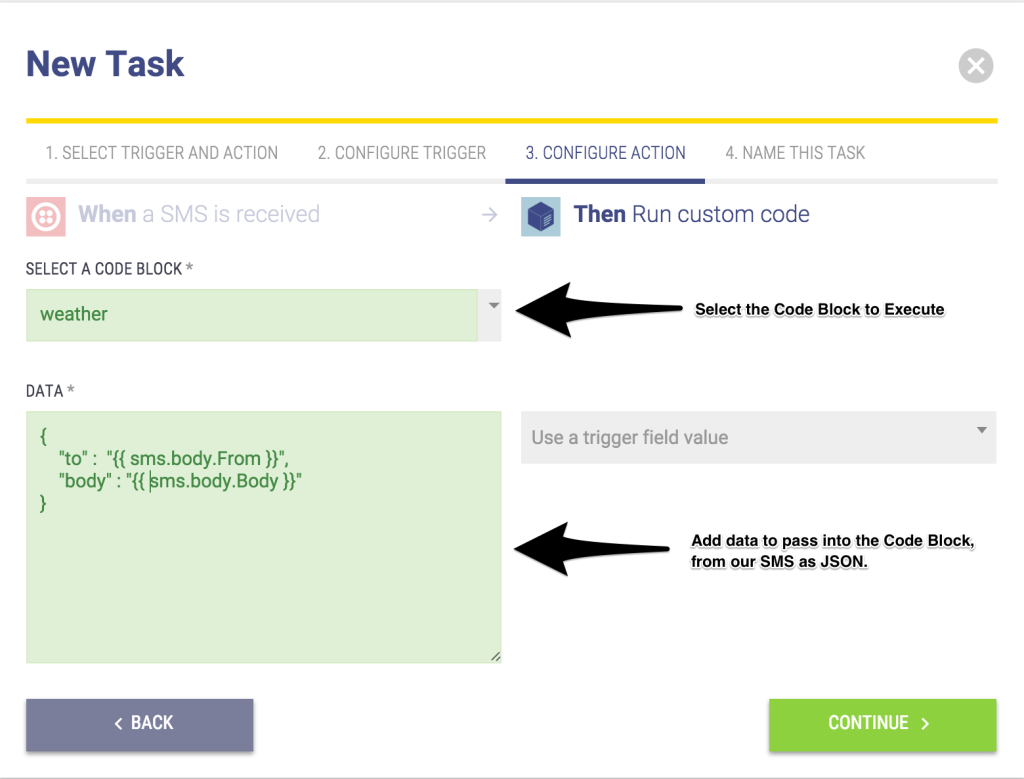
We will pass in the phone number that sent the original text as the to property on the JSON object as we will use this number after the Code Block executes to send a message back. The body property is the city name and if present the forecast option which we will explain later once we get to our Code Block.
After Step 3, name your Task and head over to the Code Block to start editing.
Inside our Code Block we first require any npm packages we are going to use.
Next we need to add our API key from Open Weather Map, where we will be pulling our data from.
The type variable inside our Code Block is used to check whether the forecast option has been passed in. What this means is that apart from a city name if our user passed in forecast at the end, we will send them a 5 day forecast instead of just the current weather for the city.
When we assemble our query string for our API request, we will pass in the city name as the q param, our API Key as the APPID parameter, and the unit type we want our information displayed; I have chosen imperial, but metric is available as well.
The if block determines which request to run. Inside the intial if, if the type equals weather we will fetch data for the current weather in a city.
To see all available data on the JSON response for our current weather data request, you can see all the options here.
Otherwise, if the type is forecast we run the else block. Our request retrieves a 5 day forecast which we will loop through and concatenate a readable message to send back to our user. You’ll notice we are iterating by 8. This is because within the forecast, they will return forecasts for every 3 hours of a day giving us 8 blocks in a day. To be concise, we’ve elected to only send the first 3 block of each day.
Once we’ve formulated our response, we output the weekly data as the body property, and to property.
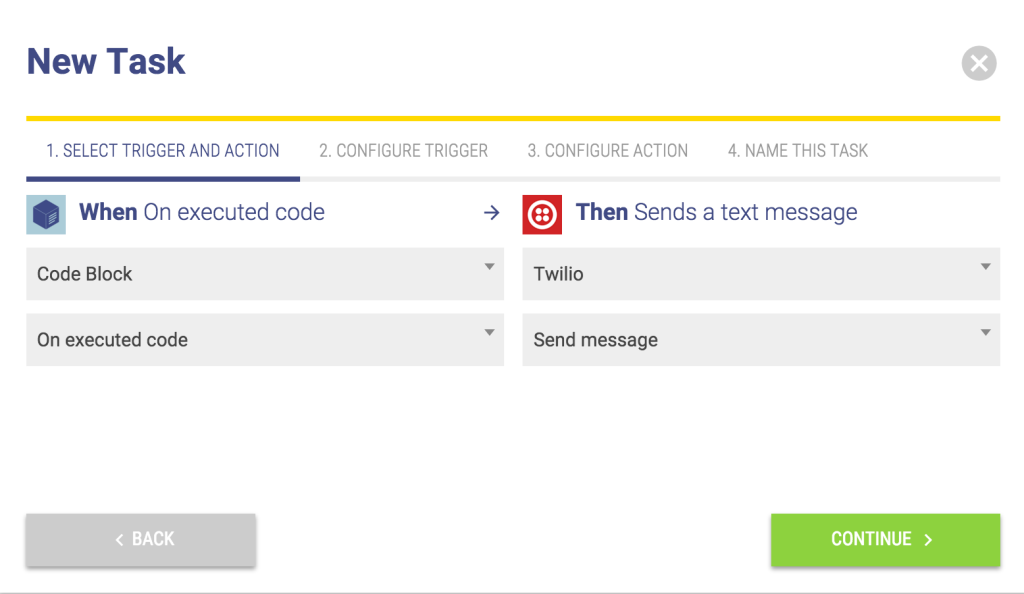
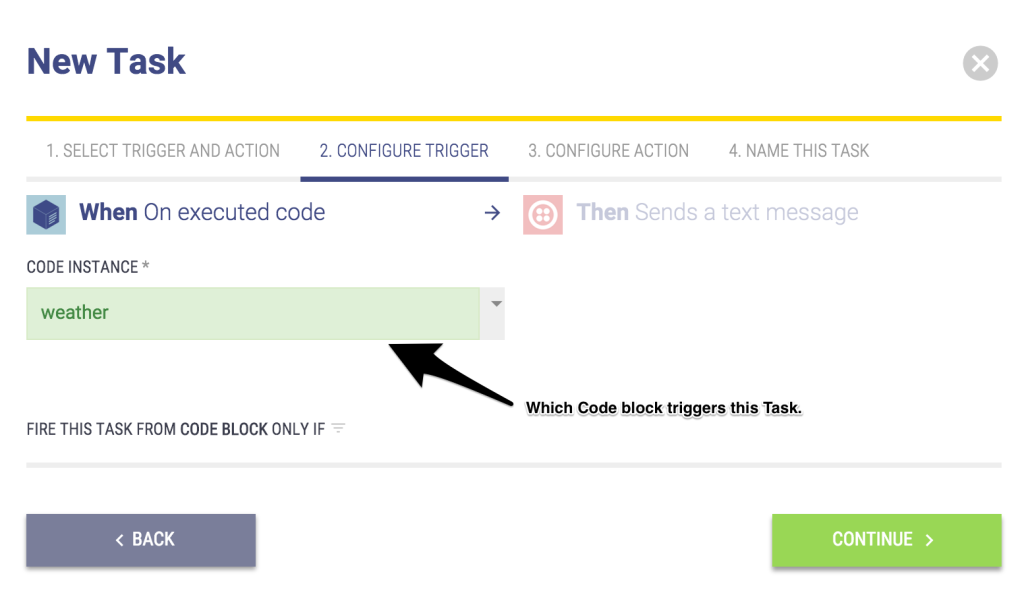
Next, trigger this Code Block when the weather Code Block executes.
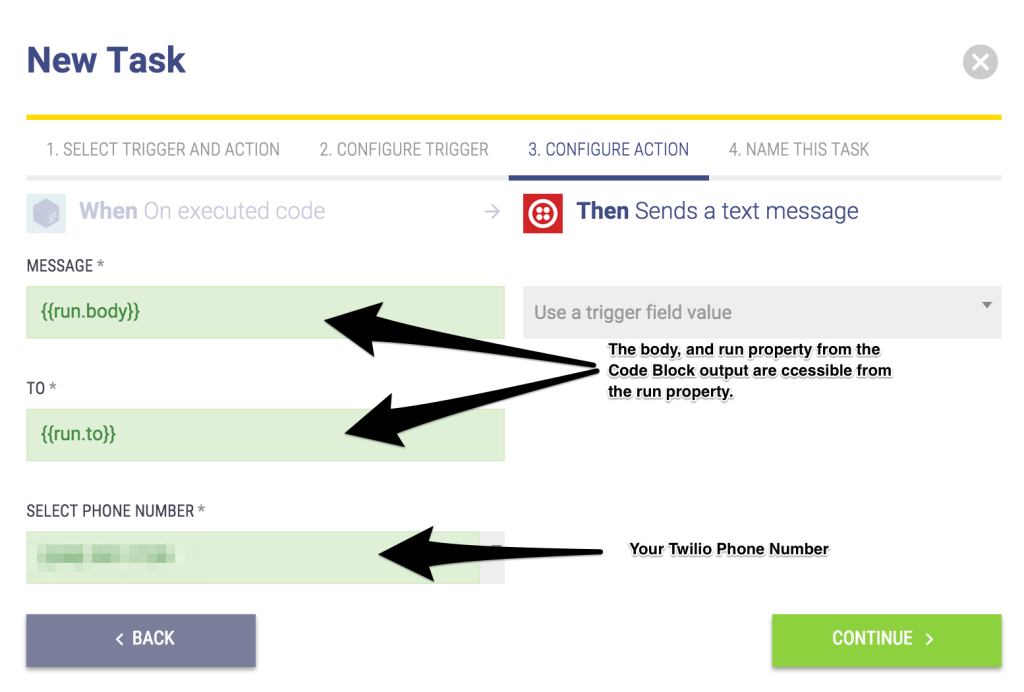
Set the Message to send as the body property from our Code Block output, and the To field as the to property from our Code Block output.
Select the Twilio number that you want to send the message with.
Name the Task and click save. Now we can test our service.
Testing Our Weather By Text Service
To test our service, we simply need to text our Twilio number from a verified number in Twilio.
To verify a number visit, https://www.twilio.com/user/account/phone-numbers/verified to add one. Once verified send a city name to your number and you should receive a response text within several seconds.
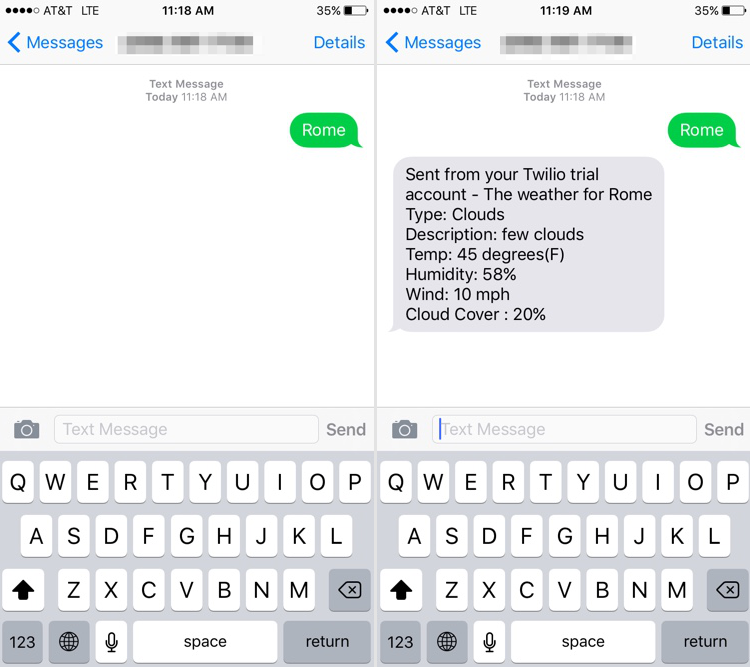
There we have it, we now can get the current weather, and forecast via text!
With Twilio we were able to very quickly, and easily integrate SMS capabilities and hook into our Stamplay Task system to provide value to our users.
Learn more about Stamplay and build new apps here


Related Resources
Twilio Docs
From APIs to SDKs to sample apps
API reference documentation, SDKs, helper libraries, quickstarts, and tutorials for your language and platform.
Resource Center
The latest ebooks, industry reports, and webinars
Learn from customer engagement experts to improve your own communication.
Ahoy
Twilio's developer community hub
Best practices, code samples, and inspiration to build communications and digital engagement experiences.