Build an SMS Reminder Service using Python and Twilio
Time to read:
There are different scenarios within your applications where you would like to send reminders. For example, maybe you would like to send appointment reminders to your users or happy birthday wishes, this tutorial can serve as a great starting point for that. In this tutorial, we’ll be looking at how we can build an SMS Reminder Service using Python and Twilio.
Technical Requirements
To follow along, you’ll need the following:
- A free Twilio account. If you use this link to register, you will receive $10 credit when you upgrade to a paid account.
- Python 3.6 or newer.
- A free PythonAnywhere account.
- A phone line that can receive SMS messages.
Creating a Python environment
Let’s create a directory where our project will reside. From the terminal, run the following command:
Next, cd into the project directory and run the following command to create a virtual environment.
To activate the virtual environment on a Linux or MacOS computer, run the following command:
If you are using a Windows computer, then the activation command is different:
Next, we’ll need to install all the dependencies our project will need:
- Flask: a Python web framework.
- Twilio: A Python helper library that makes it easy to interact with the Twilio API.
- python-dateutil: This library provides powerful extensions to the standard datetime module already provided by Python.
- python-dotenv: A library for importing environment variables from a
.envfile.
To install all the dependencies at once, run the following command:
Next run the following command:
This will generate a requirements.txt file for us which contains all our project’s dependencies along with their versions.
Creating A JSON Helper File
We won’t be making use of an actual database to store the reminders, instead we'll be making use of a JSON file. All reminders will be stored within a reminder.json file.
To get started, we’ll create a simple JSON helper module for handling reading and writing reminders to the reminder.json file. From the root of your project, create a reminder_json_helper.py file and add the following code to the file:
Here are some notes about this module:
- In the
reminder_json_exists()function, we use the Pythonosmodule to check whether thereminder.jsonfile exists. Theos.path.isfile()method is used to check whether a certain file exists. This method returnsTrueorFalseaccordingly. - The
read_reminder_json()function is used to fetch reminders from thereminder.jsonfile. Using thereminder_json_exists()function, we check to see if thereminder.jsonfile has already been created. If the file has already been created, theopen()function is used to read the file. The file is then parsed using thejson.load()method which gives us a dictionary nameddata. Thereminderskey is then returned from the dictionary. If the file does not exist, we return an empty dictionary. - Similarly, in the
create_reminder_json()function, thereminder_json_exists()is called once again. The function accepts a reminderdictionaryas an argument. If thereminder.jsonfile does not exist, an emptydictionaryis created, a reminders key with an emptylistis then assigned within the dictionary. The reminder that was passed in as an argument is then appended to the list and thewrite_reminder_json()function is called to write the file to disk. If the file already exists, theupdate_reminder_json()function is called instead. - The
update_reminder_json()accepts a reminder and appends it to the existing reminderlistwithin the json file. - The
write_reminder_json()is used to write the JSON representation of the reminders to thereminder.jsonfile. The function opens thereminder.jsonfile in writing mode using ‘w’. If the file doesn’t already exist, it’ll be created. Thenjson.dumps()transforms thedatadictionary into a JSON string which will be saved to the file.
Getting All Reminders
Now that we’re done with the helper file for reading and writing reminders to the JSON file, we can start implementing the API endpoints. Create a main.py file at the root of your project and add the following code to the top of the file:
Here we’ve imported the helper functions we defined earlier in the reminder_json_helper file along with Python’s uuid module.
Next, add the following function:
Here, we’ve defined a get_reminders() function which is associated with the /api/reminders endpoint and only supports the HTTP GET method. The function obtains all the available reminders using the read_reminder_json() helper function and then returns a JSON response using Flask’s jsonify function.
Creating A Reminder
Each reminder will consist of a message, phone number, due date and an interval. It’s important to note that the phone number must use the canonical E.164 format. The due date will be the date at which the reminders should be sent out. The interval is the frequency at which the reminder should be sent out and will default to monthly for this tutorial. Add the following functions to the main.py file:
The create_reminder() function is responsible for creating a new reminder and storing it. Within the function, a simple check is carried out to ensure the required fields are present in the request payload. We then create a new reminder dictionary, setting the interval field to monthly. The reminder is then passed as an argument to the create_reminder_json() helper function which is responsible for storing the reminder in the reminder.json file.
The bad_request() function is an error handler that will return a JSON response whenever our application is trying to handle a request with a HTTP status code of 400.
Deleting A Reminder
To delete a reminder, add the following functions to the main.py file:
In the delete_reminder() function, the id of the reminder is obtained from the URI, which is in turn translated by Flask into the reminder_id argument we receive in the function. Next, all available reminders are obtained using read_reminder_json(). A search is then carried out within the reminders array to find the reminder_id argument that was passed to the function. If the id cannot be found, a 404 response is returned. If the reminder is found, it is removed from the existing reminders array and the updated reminders array is written back to the JSON file using write_reminder_json()
Similar to the bad_request() error handler we defined earlier, not_found() is an error handler for returning a structured JSON response whenever our application is trying to handle a request with a HTTP status code of 404.
Starting the Web Server
To complete main.py we have to add the code that starts the Flask web server at the bottom:
Bringing it all together, the final main.py file looks like this:
Setting up Twilio
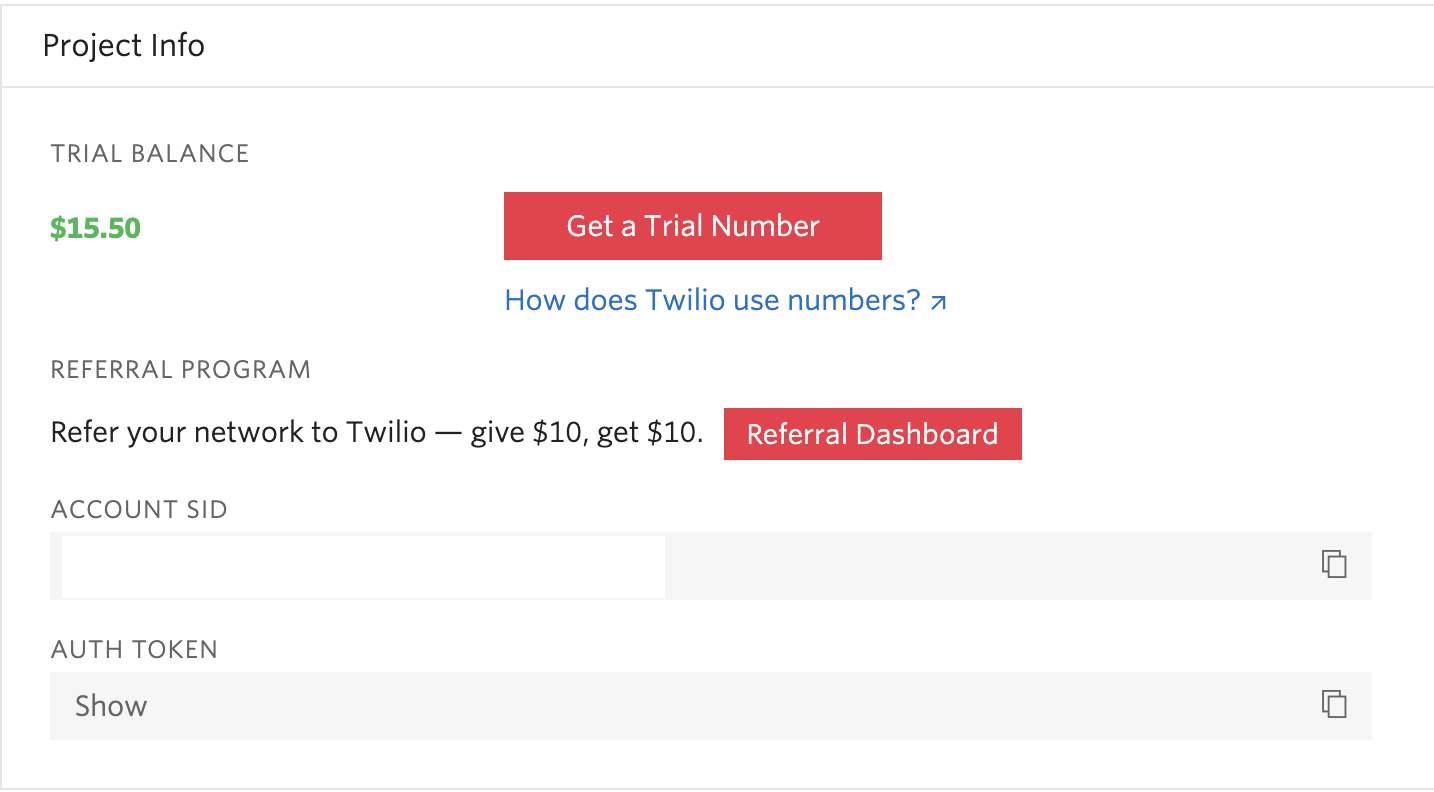
On your Twilio Console, copy your Account SID and Auth Token. We are going to need these values to authenticate with the Twilio service. You will also need to set up a Twilio phone number that can send SMS messages. You can add a phone number to your account in the Buy a Number page if you don’t already have one.
At the root of the project’s directory, create a .env file and add your Twilio credentials, along with your Twilio phone number associated with your account:
For the Twilio phone number use the canonical E.164 format.
Sending SMS Reminders
To get started with sending SMS Reminders, we first need to handle fetching all reminders that are due. Create a new send_reminders.py file and add the following imports at the top of the file:
Next, just below the imports, add the following code:
The load_dotenv() function loads our environment variables from the .env file.
Later we’ll be deploying our application to PythonAnywhere, and free accounts on this service use a proxy server to be able to access the Internet. This will in turn further affect how the Twilio Helper Library invokes the Twilio REST API. In order to avoid this pitfall after deploying, we can modify the default HttpClient that comes bundled with the Twilio Helper Library to make use of our Proxy server. The proxy_client object is simply a TwilioHttpClient class that accepts the credentials of our Proxy server.
Note that we haven’t defined values for the http_proxy and https_proxy attributes in our .env file. Those values aren’t needed at this stage and everything should still work smoothly.
The twilio_client object will be used for interacting with the Twilio API, while specifying the http_client to be the proxy_client object that was defined earlier. The TWILIO_ACCOUNT_SID and TWILIO_AUTH_TOKEN environment variables loaded by the load_dotenv() function will be automatically used to authenticate against the Twilio service.
Next, add the following functions to the send_reminders.py file:
The find_reminders_due() function returns all the reminders that have a due date equal to today’s date. If there are reminders due, the send_sms_reminder() function is subsequently called, passing in all the due reminders as an argument.
The send_sms_reminder() function loops through each of the available reminders and for each of them sends an SMS notification to the phone number tied to the reminder. The twilio_client.messages.create() invokes the Twilio API to send a notification. The body argument is the message attribute of the reminder. The from_ argument indicates the number of the sender, which is your Twilio phone number. The to argument is the phone number attached to the reminder. After the message has been sent, the update_due_date() function is called.
The update_due_date() function accepts a single reminder as an argument and updates the reminder’s due date by simply adding an extra month to it.
Here’s the final outlook for the send_reminders.py file:
Every time the send_reminders.py file is executed, the find_reminders_due() function will be called.
Testing
To get started, run the following command:
Next, I’ll be making use of Postman to test the API endpoints we’ve created. You can download it here if you don’t already have it installed. You’re also free to make use of any API client of your choice.
To create a reminder, head over to Postman. Make Sure Build is selected at the bottom right. Click the “+” button to open a new request tab and then paste in the URL http://localhost:5000/api/reminders in the URL field. Next, select the “Body” tab, which allows us to specify the data we need to send along with the request. Within the “Body” tab, select “raw” and then select “JSON” within the type drop-down list to indicate the format of our data.
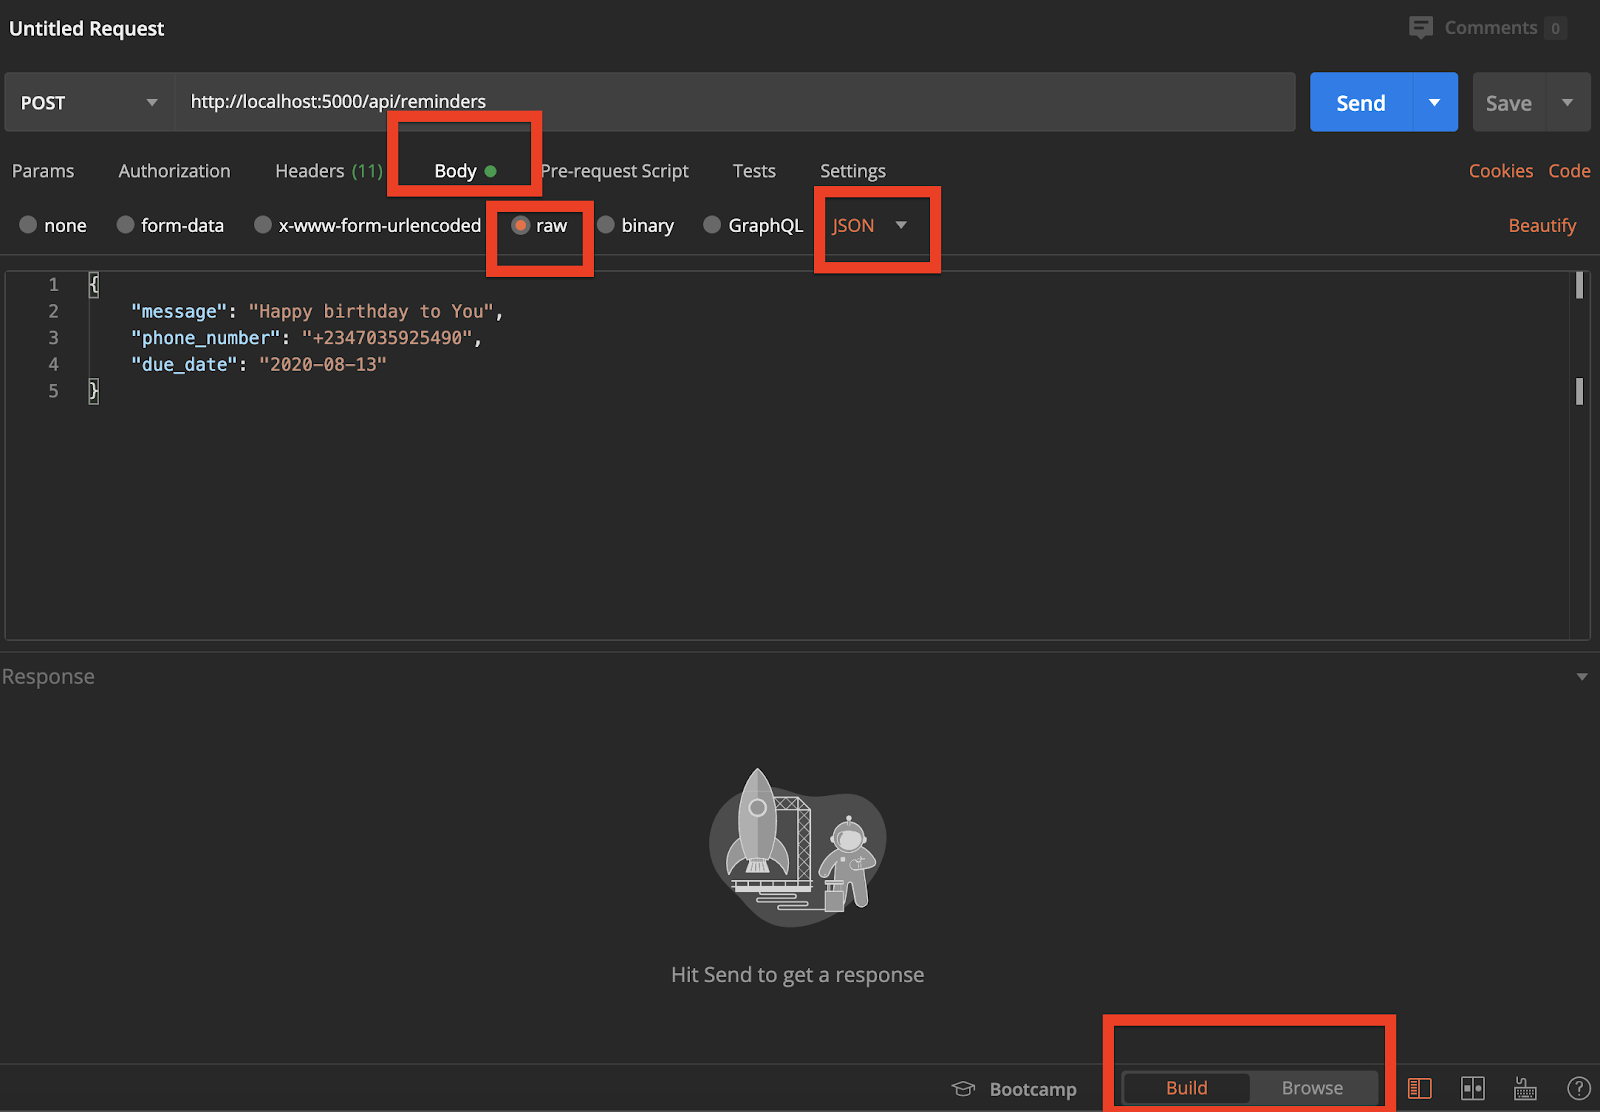
Now you can send a HTTP POST request to the http://localhost:5000/api/reminders endpoint passing in the message, phone number and due date as the JSON payload.
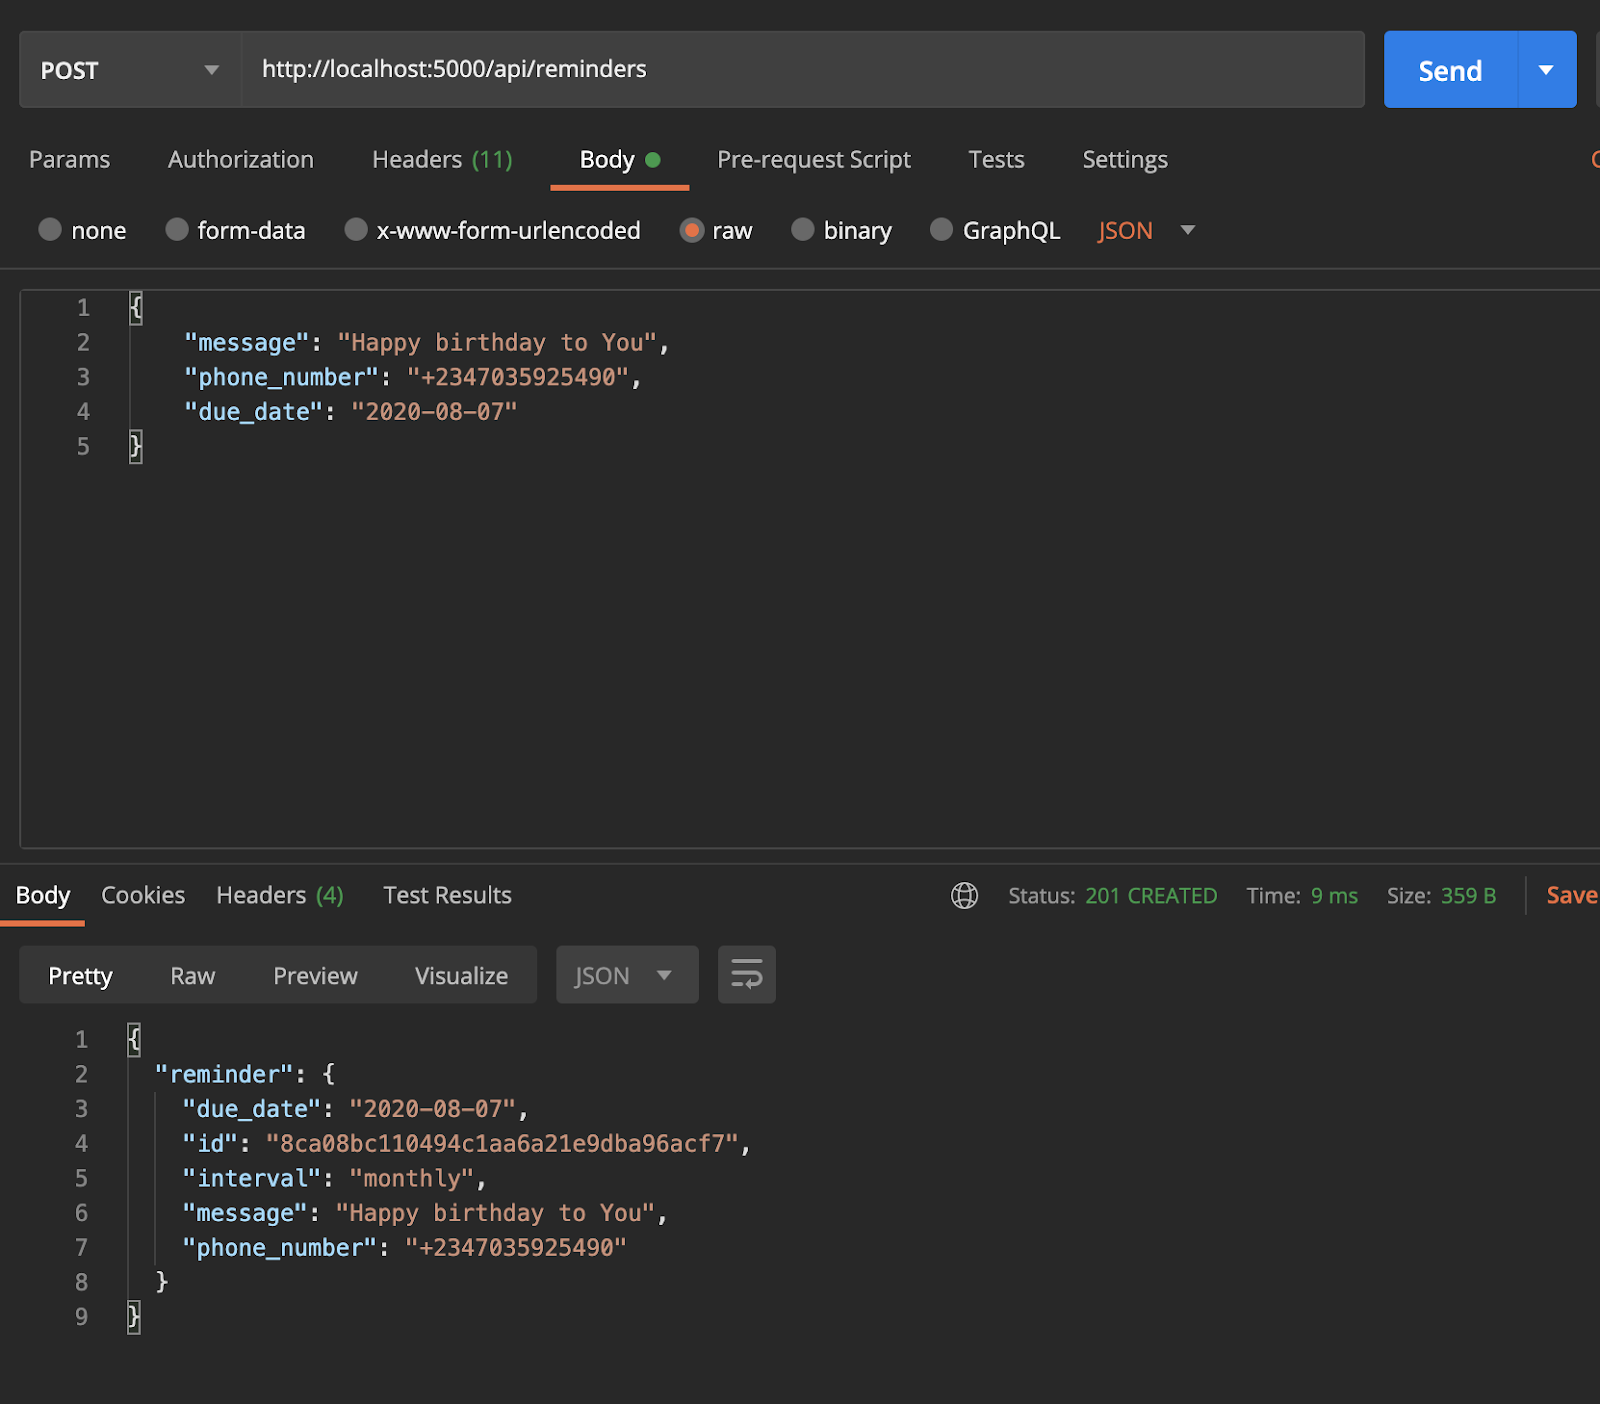
To Get all reminders, send a HTTP GET request to the http://localhost:5000/api/reminders endpoint.
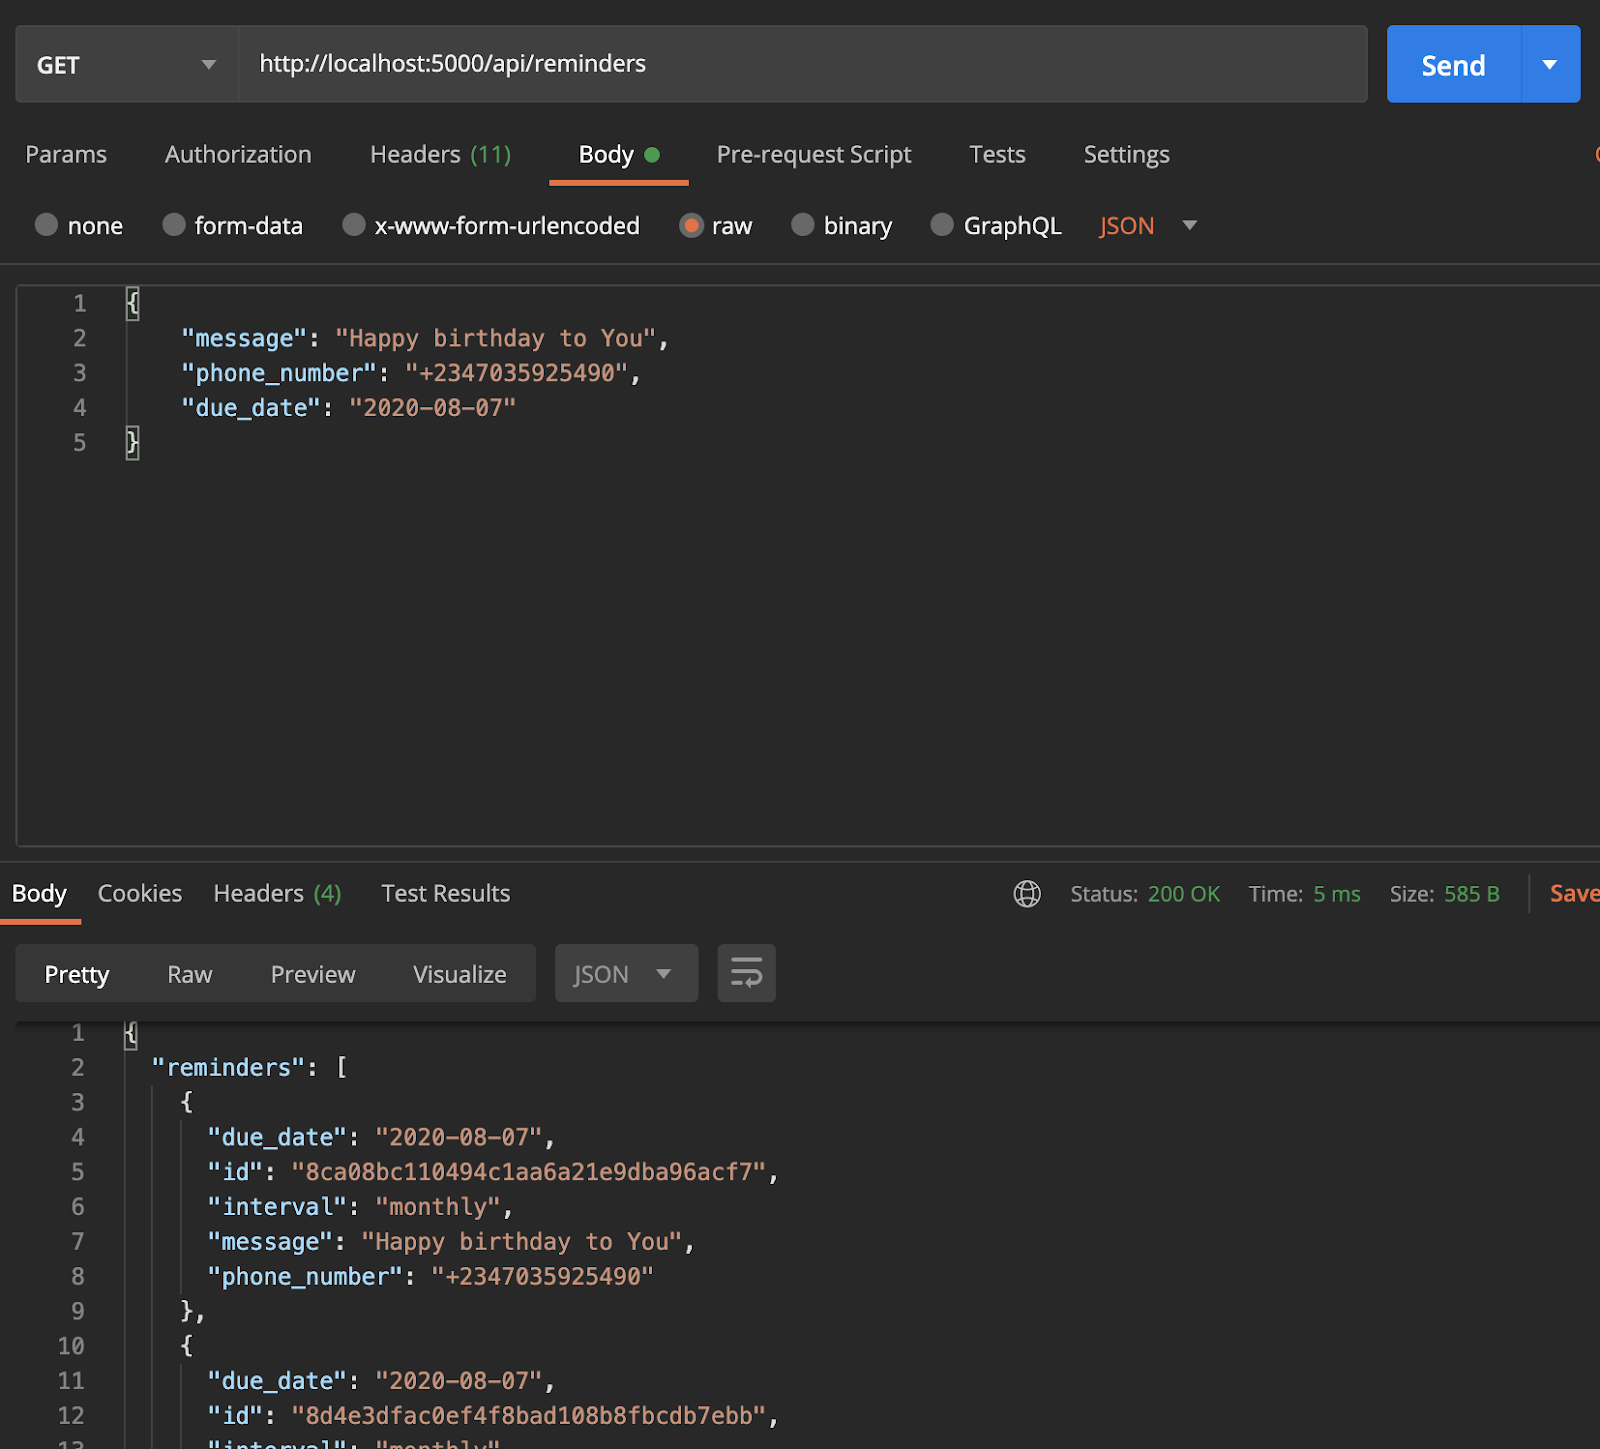
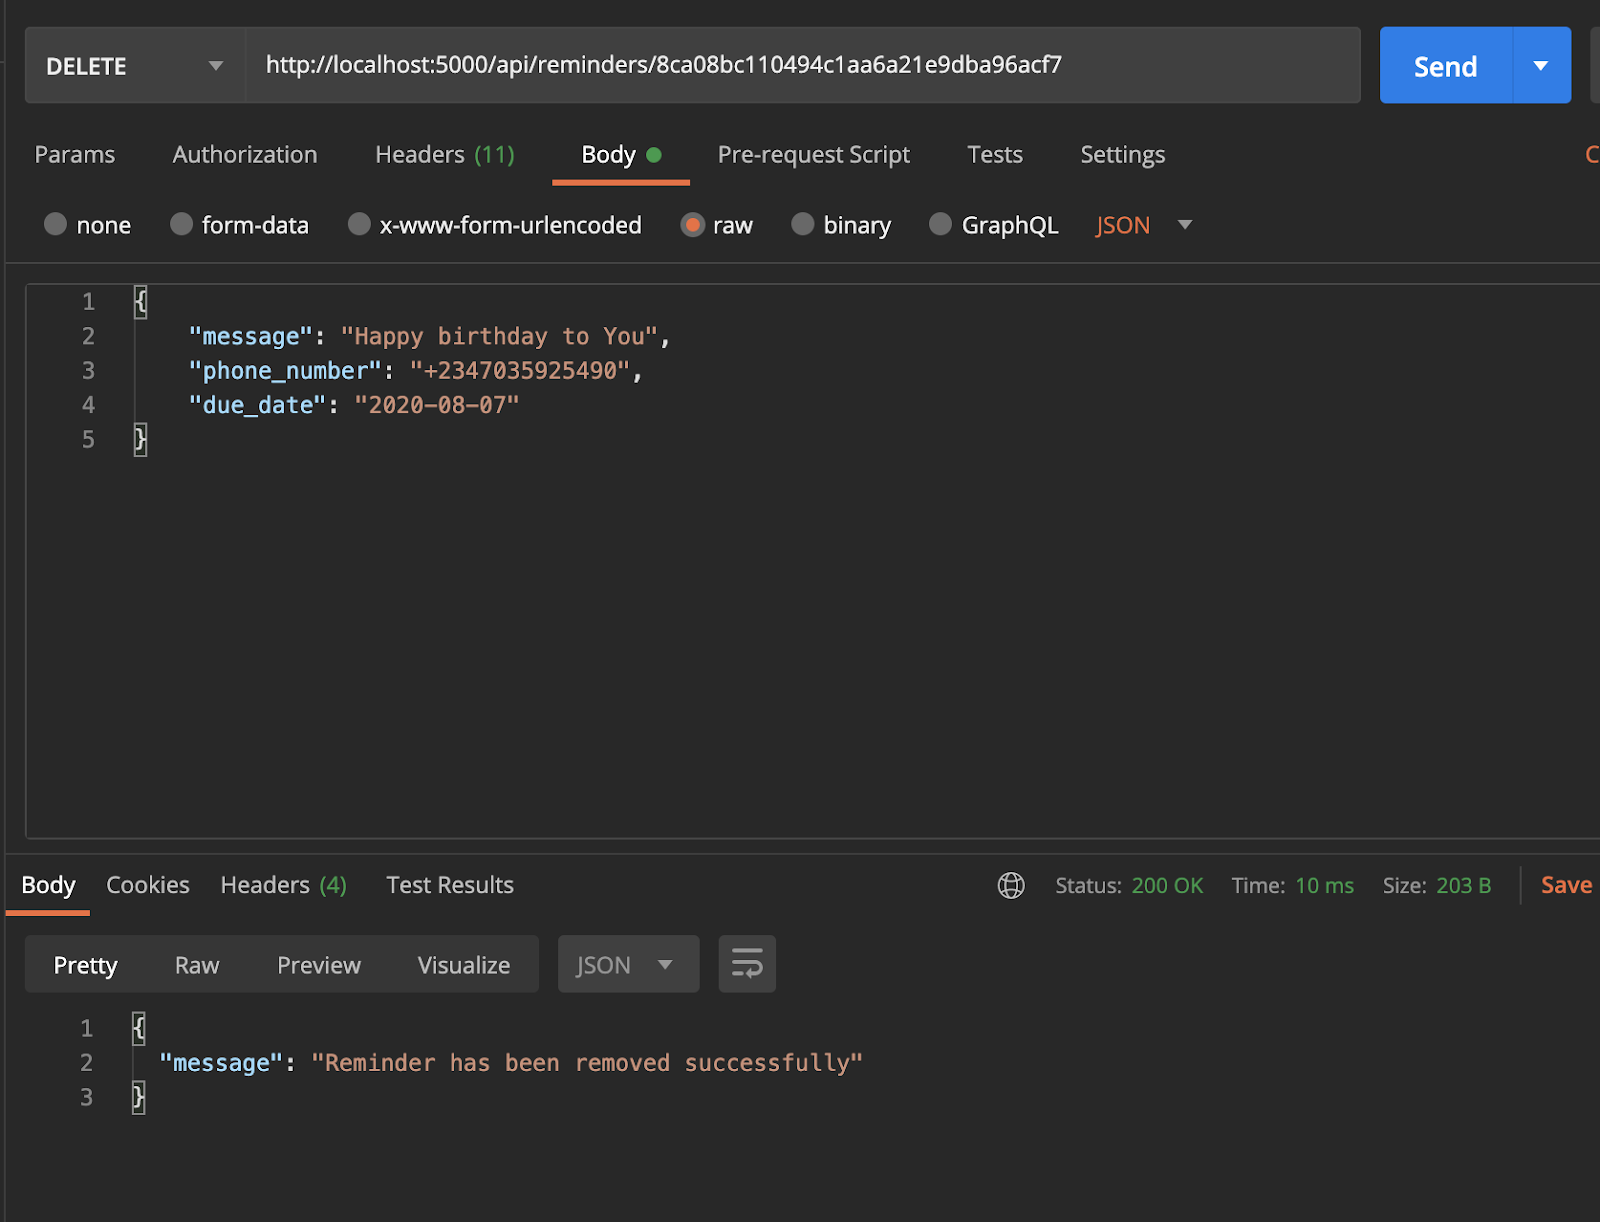
To delete a reminder, make a HTTP DELETE request to http://localhost:5000/api/reminders/reminder_id where reminder_id is the id of the reminder.
To send reminders that are due, the send_reminders.py file needs to be executed regularly. Open a second terminal window, activate the virtual environment and then from the root of your project’s directory, run the following command:
Here’s an example of the reminder received via SMS

Deploying to PythonAnywhere
In this section, we’ll be covering how we can deploy the service to PythonAnywhere. If you don’t have an account on PythonAnywhere, you can create one here.
To simplify the deployment to PythonAnywhere we are going to commit our project to a GitHub repository. Head over to Github and create a new repository called twilio-sms-reminders. Once you’re done with that, head back to the root of your project’s directory and create a .gitignore file. This will ensure that certain files we made use of during development won’t be committed to version control. Add the following files and folder to the .gitignore file:
Next, run the following commands to deploy the project to Github
Don’t forget to replace <my-github-repo-url> with the actual URL to your new GitHub repository, which should be https://github.com/github-username/twilio-sms-reminders.git where github-username is your GitHub username.
Head over to your PythonAnywhere dashboard, open up a Bash console and run the following commands:
Here, we’ve cloned our project, created a virtualenv and installed all the dependencies our project will be needing. Next, we’ll need to create a .env file and define all our environment variables. Pythonanywhere already provides the HTTP proxy address in the environment, so there’s no need for us to define it in the .env file.
Run the following commands to set your environment variables:
Don’t forget to replace xxxx with their actual values.
Now that we’re done doing all the initial setups, we can get started with creating a web app. Go to the Web Tab section and select “Add a new web app”. Choose “Manual Configuration”, and then select the Python version to be 3.7. This needs to be consistent with the same version as we used while setting up the virtualenv. Once that is done, head over to the “Virtualenv” section and enter the name to our virtualenv, which in this case is venv. After you hit enter, it’ll update to the full path to the virtualenv.

Finally, it’s time to edit the WSGI configuration file. Under the “Code” section, select the “WSGI configuration file”
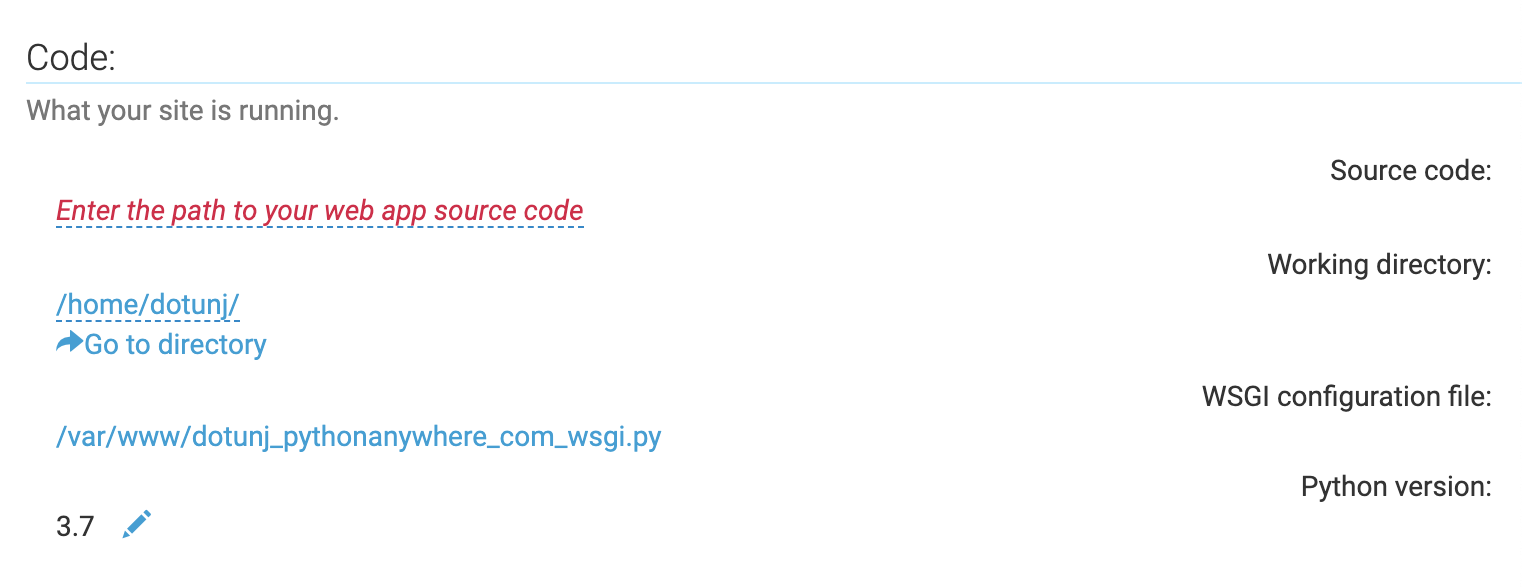
This will open up the WSGI file in a web editor. Replace the content of the file with the following code:
Here we've loaded the .env file we created earlier using load_dotenv. In the path variable, don’t forget to replace yourusername with your actual PythonAnywhere username. Once you’re done, click “Save” at the top of the editor.
Before we visit our web app, let’s reload it, so that all the configuration we’ve made so far can take effect. Under the “Web” section, select the web app you created, just under the “Reload” section, select “Reload yourusername.pythonanywhere.com”. You can now go ahead to test the API endpoints via Postman at yourusername.pythonanywhere.com.
We have just one more step left to complete this deployment. We need a way to schedule the send_reminders.py` file so that it can be executed on a daily basis. Luckily, PythonAnywhere makes that simple. Head over to the “Tasks” Tab on your Dashboard, and create a new scheduled task that runs every day at 12 midnight UTC time (or your preferred time). Add the following command to the “run” field:
Here we’ve specified the full path to the virtualenv python along with the full path to the send_reminders.py file. This scheduled task will be run within our virtualenv.
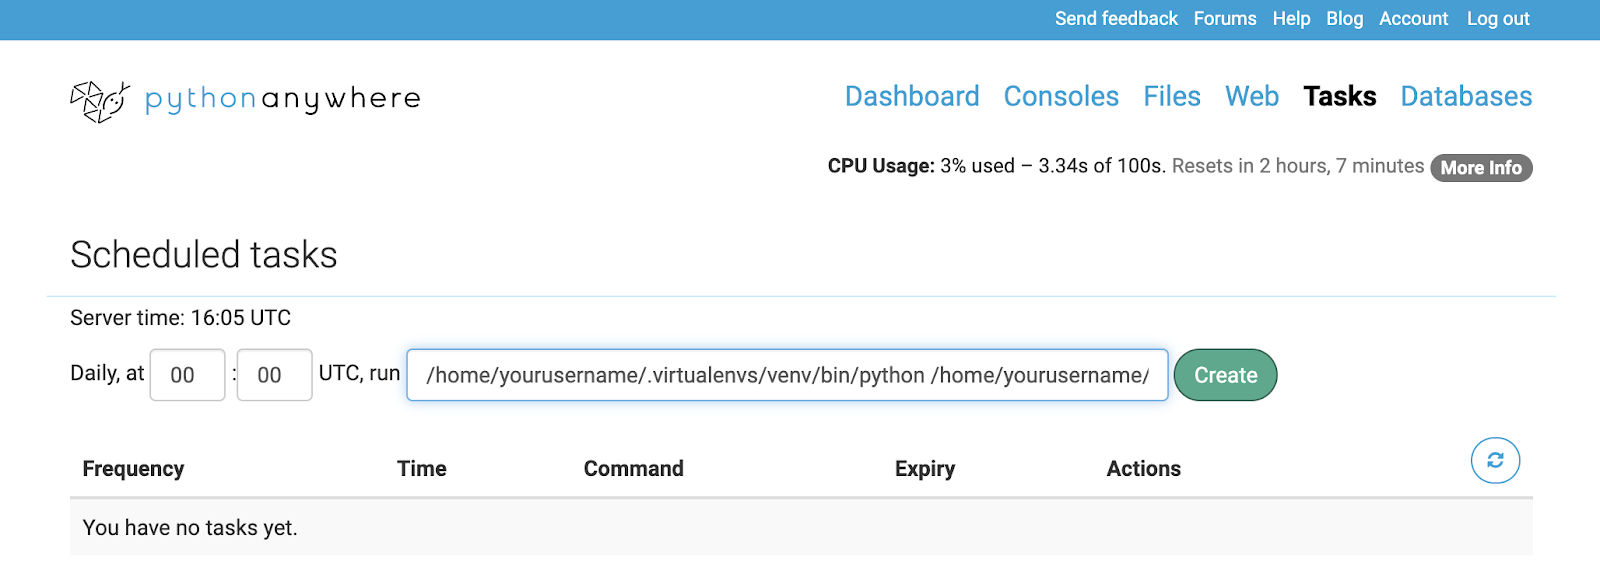
Select “Create”. Now, send_reminders.py script will be executed every day at the indicated time.
Conclusion
In this tutorial, we’ve seen how we can build a Simple SMS Reminder Service using Twilio and Flask. The source code for this tutorial can be found on Github.
Dotun Jolaoso
Website: https://dotunj.dev/
Github: https://github.com/Dotunj
Twitter: https://twitter.com/Dotunj_
Related Posts
Related Resources
Twilio Docs
From APIs to SDKs to sample apps
API reference documentation, SDKs, helper libraries, quickstarts, and tutorials for your language and platform.
Resource Center
The latest ebooks, industry reports, and webinars
Learn from customer engagement experts to improve your own communication.
Ahoy
Twilio's developer community hub
Best practices, code samples, and inspiration to build communications and digital engagement experiences.


