Build a Patient Reminder System with Laravel and Twilio

July 03, 2024
Written by
Lucky Opuama
Contributor
Opinions expressed by Twilio contributors are their own
Reviewed by

Build a Patient Reminder System with Laravel and Twilio

Failure to take drugs on time can lead to deterioration in patient health, higher hospitalization rates, and numerous other complications such as the treatment failing.

So, sending confirmation voice call messages to patients, which remind them to take their prescriptions, and explain how to do so to prevent drug abuse, can lead to better health results. This can also increase the likelihood that patients are going to stick to their prescribed treatment plans accurately.

This tutorial will teach you how to add patient reminder call functionality into a Laravel application, using Twilio Programmable Voice.

Prerequisites

Create a new Laravel project

Laravel is a sophisticated and attractive PHP web application framework that simplifies web application development with an MVC (Model-View-Controller) design.

To create a new Laravel project, run the command below:

composer create-project laravel/laravel patient_reminder

Next, change into the new project directory, and start your Laravel application by running the following commands:

cd patient_reminder
php artisan serve

Set up the database

With your new Laravel project setup, you can now use Laravel Sail to spin up the development environment including setting up a MYSQL database. To do this, run the following command in your terminal:

composer require laravel/sail --dev

Next, publish the Sail Docker configuration by running the command below:

php artisan sail:install

Running this command will prompt you to select which services you want to include in your Docker setup with: "Which services would you like to install?". Select the MYSQL service and continue. Depending on your internet connection speed, the remainder of the process may take a few minutes to complete, so please be patient.

Next, run this command to start your Laravel Sail configuration including all of its services:

./vendor/bin/sail up -d

Create the database migrations

Then, execute the following command in your terminal to generate a new migration file:

./vendor/bin/sail artisan make:migration create_patients_table

Once the migration file is created, navigate to the database/migrations directory and open the most recent migration file (ending with create_patiends_table.php). Inside the file, replace the existing code with the following and save the changes.

<?php

use Illuminate\Database\Migrations\Migration;
use Illuminate\Database\Schema\Blueprint;
use Illuminate\Support\Facades\Schema;

return new class extends Migration
{
    /**
     * Run the migrations.
     *
     * @return void
     */
    public function up()
    {
        Schema::create('patients', function (Blueprint $table) {
            $table->id();
            $table->string('name');
            $table->string('phone_number');
            $table->string('email');
            $table->string('gender');
            $table->string('drug_name');
            $table->string('dosage');
            $table->time('reminder_time');
            $table->timestamps();
        });
    }

    /**
     * Reverse the migrations.
     *
     * @return void
     */
    public function down()
    {
        Schema::dropIfExists('patients');
    }
};

The code above defines the table's columns such as the patient's name, phone number, and email address, as well as the drug dosage, name, and reminder time.

Now, apply the changes to your database schema by running the migration:

./vendor/bin/sail php artisan migrate

This command initiates the database migration process, ensuring that your database schema is synchronized with the most recent modifications defined in your application.

Generate the patient model

Generating the patient model is an important phase in managing database interaction. The patient model serves as an interface to the database's patients table, which the migration created, allowing you to organize and efficiently perform multiple tasks with that information.

To generate the patient model, run the command below:

./vendor/bin/sail artisan make:model Patient

Next, open app/Models/Patient.php and update the file to match the following code:

<?php

namespace App\Models;

use Illuminate\Database\Eloquent\Model;

class Patient extends Model
{
    protected $fillable = [
        'name', 
        'phone_number', 
        'email', 
        'gender', 
        'drug_name', 
        'dosage', 
        'reminder_time'
    ];
}

The code above provides a way to interact with the patients table in your database, and also allows you to run any query while ensuring that only the specified fields can be mass-assigned.

Install the Twilio PHP Helper Library

The Twilio PHP Helper Library acts as a bridge to Twilio's APIs, enabling you to integrate and utilize them in your PHP application.

Install the helper library by running the command below in your terminal:

./vendor/bin/sail composer require twilio/sdk

Retrieve your Twilio details

The next thing you need to do is to retrieve your Twilio access credentials (your Account SID and Auth Token) and your Twilio phone number. The credentials are necessary for authenticating the application's communication with Twilio's Programmable Voice API.

First, however, add the following environmental variables to the end of .env, so that you have a place to store the details.

TWILIO_SID=<your actual twilio sid>
TWILIO_TOKEN=<your actual twilio token>
TWILIO_PHONE_NUMBER=<your actual twilio phone_number>

Then, log in to your Twilio dashboard, where you'll find your Account SID and Auth Token in the Account Info section, as shown in the screenshot below.

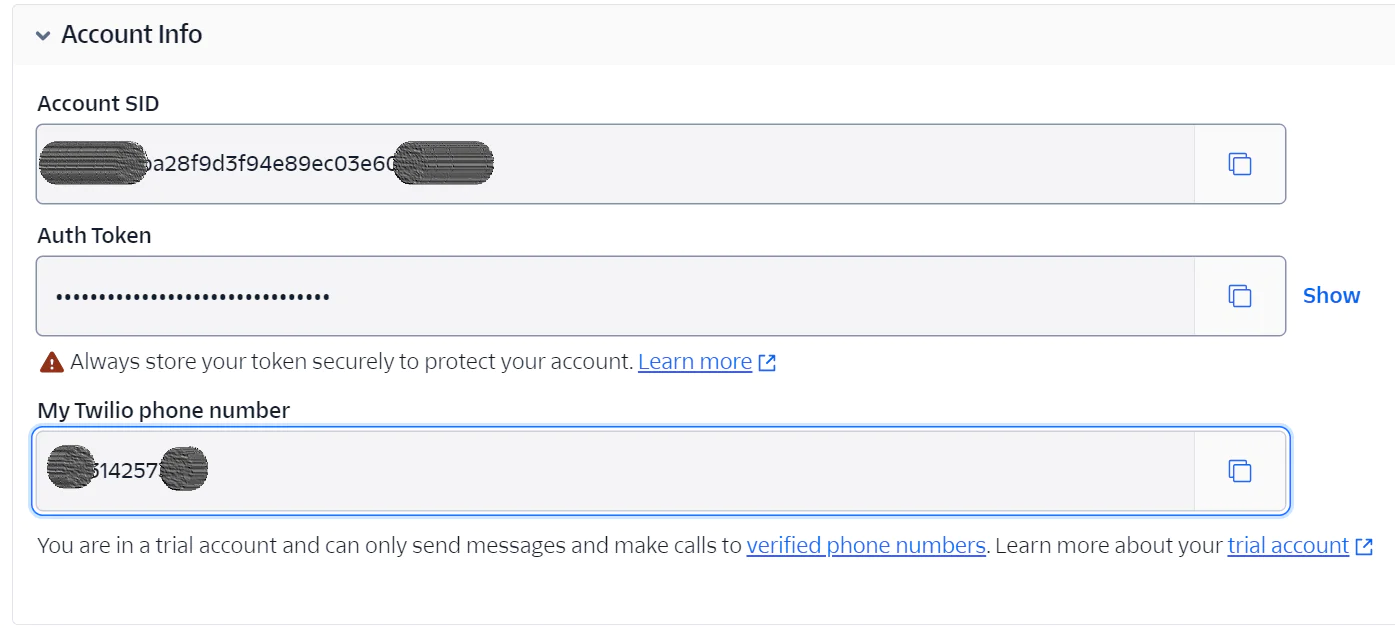
Finally, replace the three TWILIO_ placeholders in .env with the respective Twilio credentials that you just retrieved from the Twilio dashboard.

With that done, let's proceed to the next step of creating the controller. 

Create the patient reminder controller 

The patient reminder controller will handle the logic for interacting with Twilio's Programmable Voice API to send the patient reminders in your application. To create it, run the command below:

./vendor/bin/sail artisan make:controller PatientController

Next, open the new file (app/Http/Controllers/PatientController.php) and update it to match the following code:

<?php

namespace App\Http\Controllers;

use App\Models\Patient;
use Illuminate\Http\Request;
use Illuminate\Support\Facades\Validator;
use Twilio\Rest\Client;

class PatientController extends Controller
{
    public function addPatientForm()
    {
        return view('add-patient');
    }

    public function addPatient(Request $request)
    {
        $validator = Validator::make($request->all(), [
            'name' => 'required|string|max:255',
            'phone_number' => 'required|string|max:20',
            'email' => 'nullable|email|max:255',
            'gender' => 'required|in:Male,Female,Other',
            'drug_name' => 'required|string|max:255',
            'dosage' => 'required|string|max:255',
            'reminder_time' => 'required|date_format:H:i',
        ]);

        if ($validator->fails()) {
            return redirect()->back()->withErrors($validator)->withInput();
        }
        $patient = new Patient();
        $patient->name = $request->name;
        $patient->phone_number = $request->phone_number;
        $patient->email = $request->email;
        $patient->gender = $request->gender;
        $patient->drug_name = $request->drug_name;
        $patient->dosage = $request->dosage;
        $patient->reminder_time = $request->reminder_time;
        $patient->save();

        return redirect()->back()->with('success', 'Patient added successfully.');
    }

    public function sendMedicationReminders(Request $request)
    {
        $currentTime = now()->format('H:i') . ":00";
        $patients = Patient::whereRaw(
            "TIME_FORMAT(reminder_time, '%H:%i:%s') = ?",
            [$currentTime]
        )->get();
        foreach ($patients as $patient) {
            $this->placeCallReminder($patient);
        }
    }

    private function placeCallReminder($patient)
    {
        $twilioAccountSid = env('TWILIO_SID');
        $twilioAuthToken = env('TWILIO_TOKEN');
        $twilioPhoneNumber = env('TWILIO_PHONE_NUMBER');

        $client = new Client($twilioAccountSid, $twilioAuthToken);

        $message = "Hi $patient->name, this is a reminder to take your medication: $patient->drug_name. Dosage: $patient->dosage.";
  $client->calls->create(
            $patient->phone_number,
            $twilioPhoneNumber,
            ['twiml' => '<Response><Say>  ' . $message  . '.</Say></Response>']
        );
    }
}

The code defines four methods:

  • addPatientForm: This method displays the form for adding patient information.

  • addPatient: This method adds a new patient, checks the incoming request information provided with the form, ensures that all required fields are completed, and then redirects back to the form if the patient was successfully added.

  • sendMedicationReminders: This method is in charge of delivering medication reminders to patients and retrieving patients whose medication reminder time has either expired or is equal to the present time.

  • placeCallReminder: This method accepts your Twilio account credentials (Account SID and authentication token) along with your Twilio phone number, and sends a reminder call to the patient.

Create the required Blade template

Next, create a new file, add-patient.blade.php, in the resources/views directory and add the code below to the file:

<!DOCTYPE html>
<html lang="{{ str_replace('_', '-', app()->getLocale()) }}">
<head>
    <meta charset="utf-8">
    <meta name="viewport" content="width=device-width, initial-scale=1">
    <title>Laravel</title>
    <link href="https://fonts.bunny.net/css2?family=Nunito:wght@400;600;700&display=swap" rel="stylesheet">
    <style>
        html {
            line-height: 1.15;
            -webkit-text-size-adjust: 100%
        }
        body {
            background-color: #f0f2f5;
            font-family: "Poppins", sans-serif;
            margin: 0;
            padding: 0;
            box-sizing: border-box;
        }
        .main-con {
            display: flex;
            align-items: center;
            justify-content: center;
            flex-direction: column;
            margin-top: 5rem;

        }
        .right-con {
            margin-right: 40px;
            width: 100%;
        }
        .right-con input {
            width: 100%;
            padding: 8px;
            border-radius: 10px;
            margin-bottom: 22px;
            border: 1px solid #999;
            outline: none;
        }
        .right-con input::placeholder {
            font-size: 11px;
        }
        .right-con h1 {
            font-size: 33px;
            margin-top: -25px;
            color: #0079ff;
        }
        .small-div {
            display: flex;
            align-items: center;
            justify-content: space-between;
        }
        .small-div input {
            width: 90%;
        }
        label {
            display: flex;
            font-weight: 300;
            font-size: 15px;
        }
        .sign-btn button {
            width: 105%;
            background-color: #fff;
            color: #0079ff;
            border: 1px solid #0079ff;
            border-radius: 10px;
            font-size: 18px;
            padding: 3px 8px;
            margin-top: 20px;
            transition: 0.3s;
        }
        .sign-btn button:hover {
            background-color: #0079ff;
            color: #fff;
        }
    </style>
</head>
<body class="antialiased">
    <div class="main-con">
        <div class="login-con">
            <div class="right-con">
                <h1>Patient Reminder Form</h1>
                @if ($errors->any())
                <div style="color: red;">
                    <ul>
                        @foreach ($errors->all() as $error)
                        <li>{{ $error }}</li>
                        @endforeach
                    </ul>
                </div>
                @endif
                @if (session('success'))
                <div style="color: green;">
                    {{ session('success') }}
                </div>
                @endif
                <form action="/add-patient" method="post">
                    <!-- <form action="/send-medication-reminders" method="post"> -->
                    @csrf
                    <label>Full name</label>
                    <input type="text" placeholder="Enter full name" name="name" />

                    <div class="small-div">
                        <div class="phone">
                            <label>Phone_Number</label>
                            <input type="number" placeholder="Enter phone number" name="phone_number" />
                        </div>
                        <div class="address">
                            <label>Email</label>
                            <input type="email" placeholder="Enter email address" name="email" />
                        </div>
                    </div>
                    <div class="small-div">
                        <div class="gender">
                            <label>Gender</label>
                            <select id="gender" name="gender">
                                <option value="Male">Male</option>
                                <option value="Female">Female</option>
                                <option value="Other">Other</option>
                            </select>
                        </div>
                        <div class="Others">
                            <label for="appt">Medication Time:</label>
                            <input type="time" name="reminder_time" required />
                        </div>
                    </div>
                    <label>Drugs </label>
                    <input type="text" placeholder="Enter the Drugs" name="drug_name" />
                    <label>Drugs Description</label>
                    <input type="text" placeholder="Enter Drug Dosage" name="dosage" />
                    <div class="sign-btn">
                        <a href="google-page.html">
                            <input type="submit" value="Submit">
                    </div>
                </form>
            </div>
        </div>
        <!-- <a href="{{ route("send-medication-reminders") }}">Send Medication Reminders</a> -->
    </div>
</body>
</html>

The code above creates a patient registration page, capturing details such as the patient's name, email, gender, phone number, drug name, dosage, and reminder time.

Update the routing table

Now, create the route for this page by navigating to the routes/web.php and updating it to match the following code:

<?php
use Illuminate\Support\Facades\Route;
use App\Http\Controllers\PatientController;

Route::get('/', function () {
    return view('add-patient');
});
Route::get('/add-patient', [PatientController::class, 'addPatientForm']);
Route::post('/add-patient', [PatientController::class, 'addPatient']);
Route::get('/send-reminder', [PatientController::class, 'sendReminder']);
Route::get('/send-medication-reminders', [PatientController::class, 'sendMedicationReminders'])
    ->name('send-medication-reminders');

The code above defines the endpoints and the HTTP methods that are associated with various actions in your application; two for displaying the add patient form and processing it, and two for sending medication reminders to the patient.

Test the patient reminder application 

Next, run the command below to expose the application to the public internet over secure tunnels:

ngrok http  http://127.0.0.1:8000

You should see terminal output like the screenshot below:

Then, copy the Forwarding URL and paste it into your web browser's address bar. Once the page loads, you'll see a form displayed on your screen. Fill out the form with the required information, as shown in the image below, and submit it.

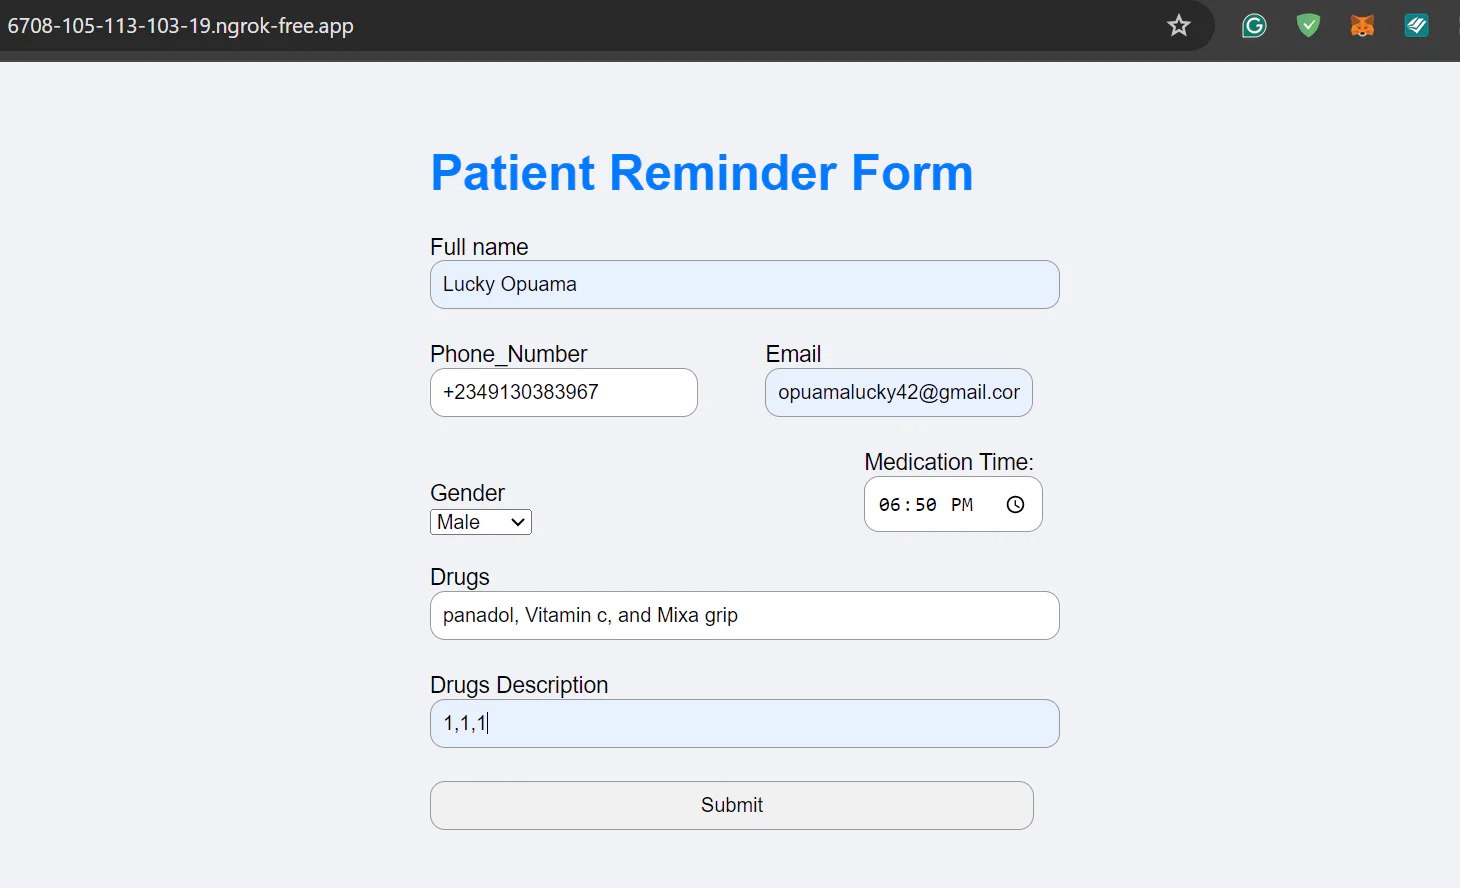
Congratulations! You've successfully added a new patient to your database.

Schedule medication reminders

To schedule medication reminders, follow these steps:

  1. Log in to your cron-job.org dashboard

  2. Click on CREATE CRONJOB to create a new cron job

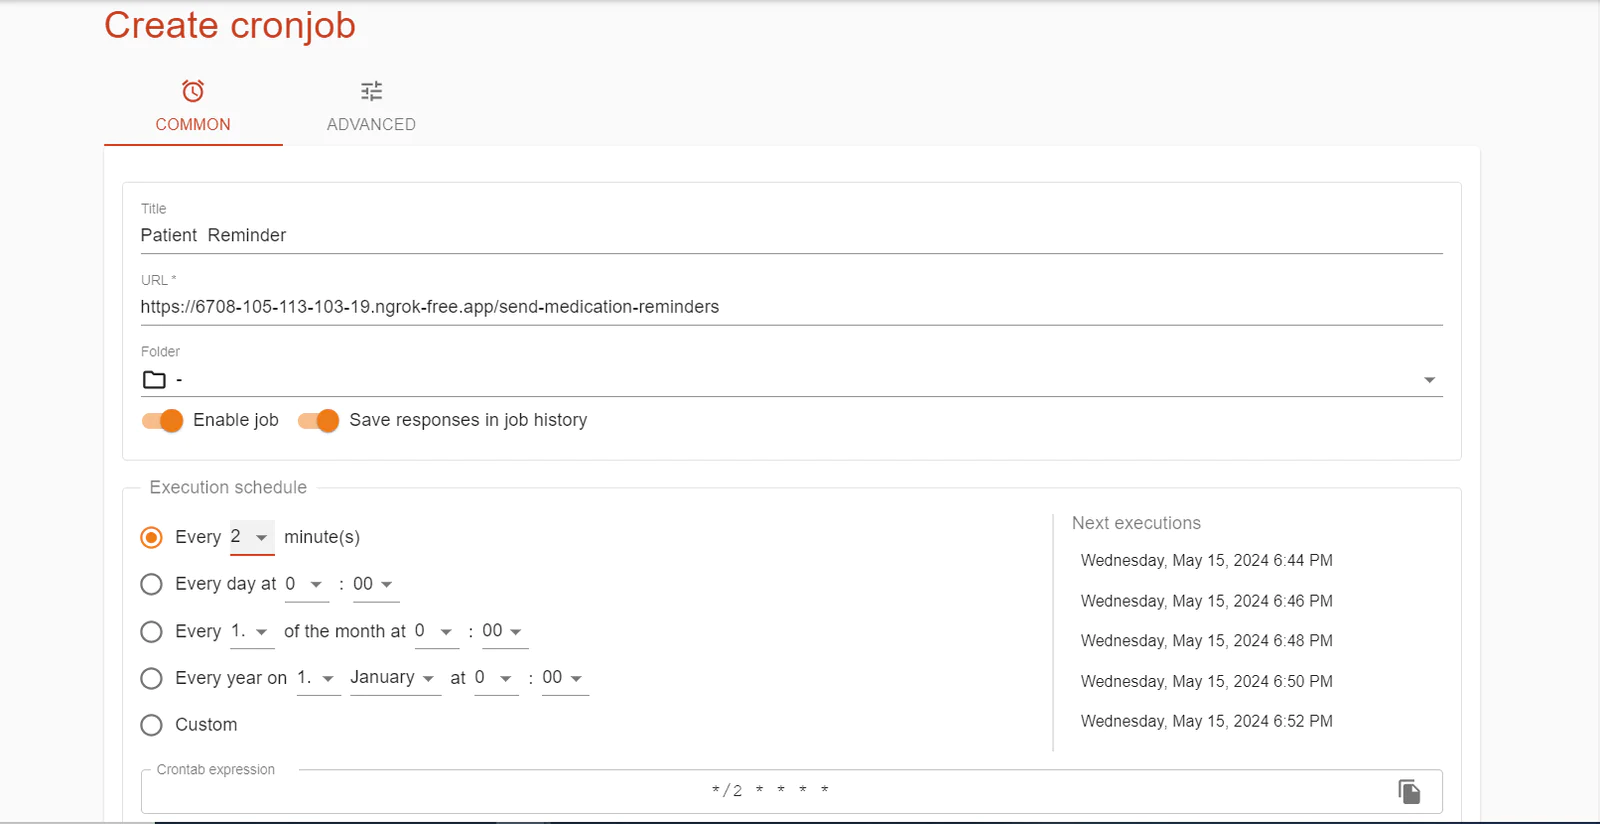
  3. Enter the details for the new cronjob, using the ngrok Forwarding URL plus /send-medication-reminders for the URL field, along with specifying the timing for the reminders, similar to the screenshot below.

  4. Click the CREATE button to finalize the setup

When the scheduled time stored in the database elapses, you will receive a call, as configured in your cron job, reminding you to take your medication. During the call, you will not only be reminded verbally, but you will also hear the names of the drugs and their dosages.

That's how to integrate patient reminder calls with Laravel, Cron Jobs, and Twilio

Patient reminder calls are an effective solution for healthcare applications that want to enhance drug adherence and patient outcomes. In this article, we integrated a patient reminder voice call system in Laravel using Twilio Programmable Voice and automated scheduling to trigger the calls at the relevant times. 

Lucky Opuama is a software engineer and technical writer with a passion for exploring new tech stacks and writing about them. You can find them on LinkedIn.

Patient icon in main image was created by RaftelDesign - Flaticon.