Build an Inactivity Timeout with Flex Conversations
Time to read:

As you may know, Twilio has released Flex Conversations. This is a big step in making orchestration more reliable and straightforward within the Flex ecosystem. In a blog post here, you can learn more about Flex Conversations's new perks. Introducing Flex Conversations also opens up possibilities for new cool features to be implemented, as the Conversations API provides a broad spectrum of tools for managing participants, addresses, and the conversation lifecycle.
One contact center feature that our customers often ask about is Inactivity Timeout. To keep your agents' productivity high, it's necessary to have an automated way to track abandoned tasks and clean them up. With the State Timers feature of the Conversations API along with Twilio Functions, it is possible now to implement an Inactivity Timeout in Flex. In this blog post, I will guide you through the configuration and code to achieve this.
Tutorial prerequisites
Before we can get started building, you need to make sure you have an account with Twilio. You can sign up here for free.
As soon as your Twilio account is created, you can proceed with creating a Twilio Flex Project.
To create a Flex account, navigate in your Twilio Console to Flex, then Overview, then click the "Create My Flex Account" button.
Once you've got your Flex account, note the following details – you will need them later:
- Twilio Account SID: You can find your account SID and auth token in the admin console.
- Twilio Auth Token: You can find your account SID and auth token in the admin console.
And with that, you're ready to start.
How the solution will work
We will be leveraging Twilio Functions and the Conversations API, namely for its State Timers. The goal here is to be able to configure a timeout – which resets every time there is a new message either from the customer or the agent – to complete a task in Flex in case no new messages are sent within a timeout period. Additionally, we would like to let the customer know that the conversation was timed out via sending a message.
Before we get to writing code, here is our high level plan:
Code
- We will write a function named
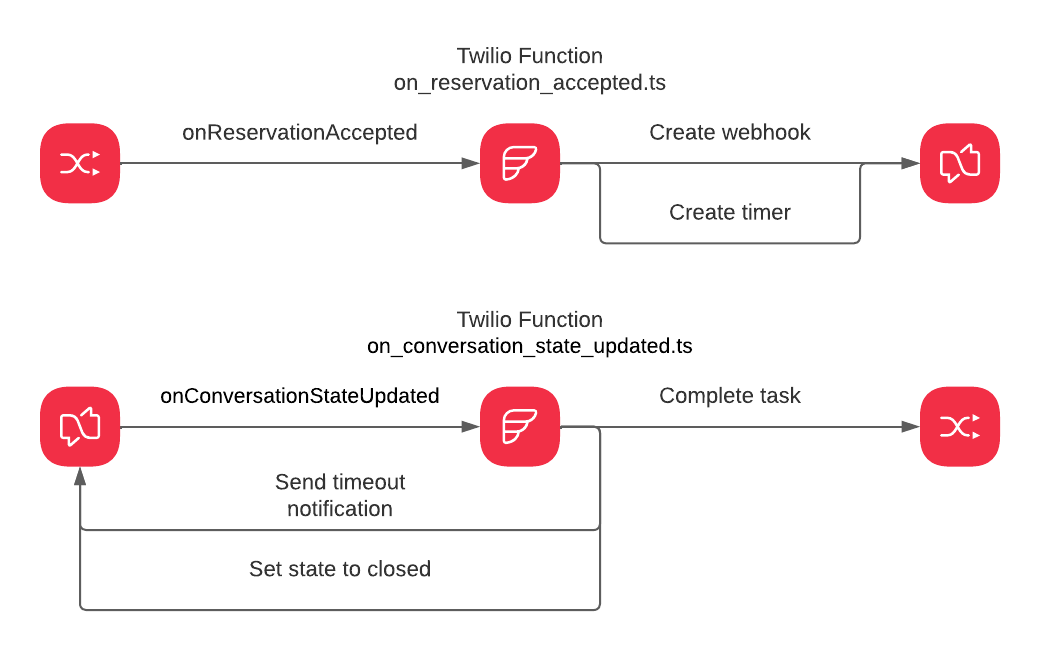
on_conversation_state_updated.ts. As the name suggests, this function will be invoked when the state of conversation changes via theonConversationStateUpdatedevent, which will serve as a trigger for cleaning up inactive tasks. The function will have the following responsibilities:- Set the task linked to conversation to
completedstate - Send a message to the customer that the session has timed out
- Set the conversation state to
closed(this is a necessary step in order to prepare a conversation to be reused for further communications)
- Set the task linked to conversation to
- We will write another function called
on_reservation_accepted.ts.This function will be invoked first at the moment when the task is accepted by an agent, thus the name is chosen to reflect the TaskRouter event that the function will be invoked on:onReservationAccepted. The function will have two responsibilities:- Create a webhook on the conversation linked to the task to be fired on an
onConversationStateUpdatedevent pointing to the URL of theon_conversation_state_updated.tsfunction. - Create an inactivity timer on the conversation linked to the task with the value defined in an environment variable.
- Create a webhook on the conversation linked to the task to be fired on an
Configuration
- We will configure TaskRouter Workspace to send a webhook to the URL of the
on_reservation_accepted.tsfunction on anonReservationAcceptedevent.
Here is a diagram of the solution we will be building:

Developer Environment Setup
Let's make sure you have the software you need:
I will use Typescript for this tutorial, but it should work just as well with JavaScript.
Now we can start coding!
Create project
We will start by creating a project using the Twilio Serverless Toolkit. For this run, issue the following command in your shell:
A couple of notes here:
- in the command, I used
flex-chat-inactivity-timeoutas my project name, feel free to use a different name - adding the
--typescriptparameter will create a project ready for Typescript. You can omit this parameter if you prefer JavaScript
With this step completed, you have a project that you can run in your local environment or deploy directly to Twilio Functions.
Configure your environment
In order to run the code, we'll need environment variables to be in place. Go to .env in the root folder of the project, and update the file to have the following keys and values. Make sure to replace my placeholders with the values you collected in previous steps.
The timeout in the configuration below corresponds to 1 minute, and is formatted according to the ISO 8601 duration standard.
You can find the TaskRouter Workspace SID in Twilio Console under TaskRouter in the Workspaces section. Look for a Workspace named "Flex Task Assignment".
Create functions
Now it is time to create the files you will be working inside. Navigate to src/functions, and create two files named on_reservation_accepted.protected.ts and on_conversation_state_updated.protected.ts.
Here is the complete code for the on_reservation_accepted.protected.ts function, augmented with comments explaining the code:
And here is the complete code for the on_conversation_state_updated.protected.ts function, augmented with comments explaining the code:
Deploy to Twilio Functions
The next step is to deploy our code to Twilio Functions. To do this, execute the following command in the root of your project:
Once deployment is complete, you will see the URLs of your newly created functions. It will look like the following:
Copy the URL of the on_reservation_accepted function – we are now ready to configure the TaskRouter Workspace.
Configuring TaskRouter Workspace
In your Twilio Console, navigate to TaskRouter then the Workspaces section, and then find a Workspace named "Flex Task Assignment". Open the workspace and go to Settings. On the settings page, find the "Event Callbacks" section and select the "SPECIFIC EVENTS" radio button. Make sure in the events list only the "Reservation Accepted" checkbox is selected.
Testing
To test our solution do the following:
- Login to Flex as an agent and make sure you are in
Availablestatus. - Send a SMS message to one of the numbers that you have configured in your Flex Project (to see configured phone numbers go to Twilio Console -> Flex -> Messaging and click the "Conversations Addresses" tab).
- Accept the incoming task in Flex and start chatting with the "customer".
- Wait for one minute and check that the task is automatically completed and your "customer" got a message saying that the session is timed out.
If you get all that: voilà! It's working! Now you're free to build it out for your own needs.
Conclusion
Using Twilio Functions and the Conversations API, we were able to build an automated way to handle inactive task cleanup to make sure we free up our agents for new customer chats.
The full code of the project is available on GitHub at https://github.com/kuschanton/flex-chat-inactivity-timeout.
Like what you built? See some of our other Functions and serverless tutorials on the blog.
Anton Kushch is a Senior Solutions Engineer at Twilio. He is helping companies in Emerging Markets in EMEA build powerful customer engagement solutions powered by Twilio. He can be reached at akushch [at] twilio.com, or you can collaborate with him on GitHub at https://github.com/kuschanton.
Related Posts
Related Resources
Twilio Docs
From APIs to SDKs to sample apps
API reference documentation, SDKs, helper libraries, quickstarts, and tutorials for your language and platform.
Resource Center
The latest ebooks, industry reports, and webinars
Learn from customer engagement experts to improve your own communication.
Ahoy
Twilio's developer community hub
Best practices, code samples, and inspiration to build communications and digital engagement experiences.


