Build Fast, Build Visually: Appery.io Shows You How To Send Twilio SMS From Your Mobile App
Time to read:
May 11, 2015
Written by
This post is part of Twilio’s archive and may contain outdated information. We’re always building something new, so be sure to check out our latest posts for the most up-to-date insights.

Appery.io lets you build powerful mobile apps in no time using intuitive visual tools. Using Twilio, you can easily integrate the Twilio API with Appery.io’s cloud-based rapid development environment with integrated back-end services and get sending SMS fast.
In this tutorial, Appery.io CTO Max Katz shows you how to build a mobile app from the ground up that uses the Twilio SMS API to send texts.
What you need to get started
Before you start, you’ll need Twilio and Appery.io accounts. Use the links below to register for free accounts.
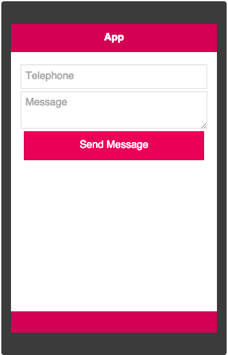
What we’re going to build
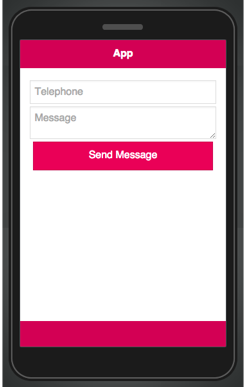
You are going to build a mobile web and hybrid mobile app that allows you to send SMS messages using the Twilio API. The app is going to have one page from which you can send the SMS message and will look like this:
Building the SMS app
Building an app in Appery.io is no different than using any other tool. You are going to create a new app, design the UI, connect to the Twilio API, test and then deploy the app.
Creating A New App
Let’s start by creating a new app.
- Once you are inside the platform, click the Create new app button. For app name, enter: SmsApp and click the Create button.
- From the Project view, click on Pages > startSreen. The device screen will open. The page should look like this:
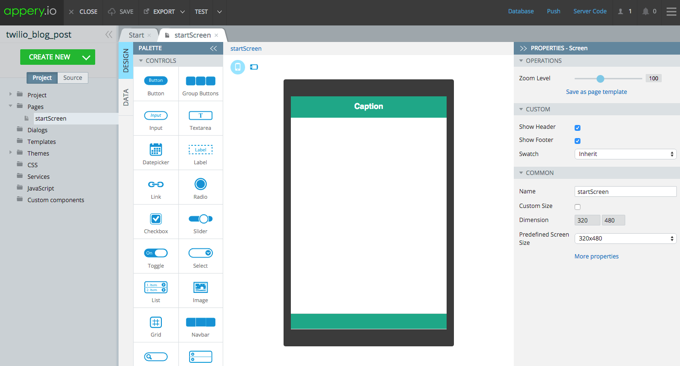
You just created a brand new mobile app. That was easy, right?
Next we are going to build the app UI.
Creating app UI
With Appery.io visual editor, building the app UI is fast as well.
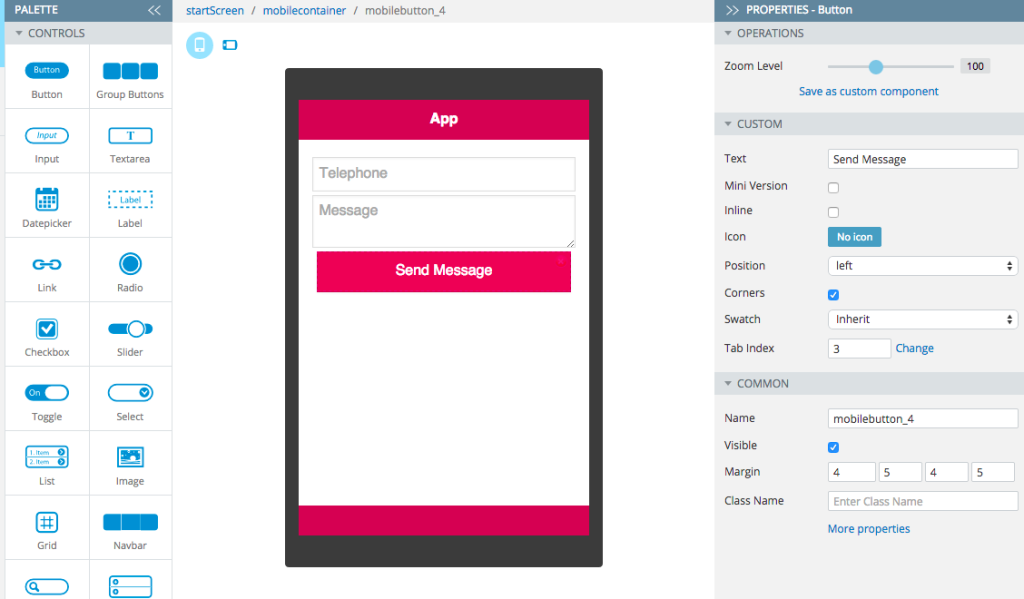
- Click the header, and in Properties view, change the Text property to: App
- From the Palette, drag and drop the Input component onto the device screen. This is where the user will enter the telephone number to which the the SMS message will be sent. Let’s make a few other updates to this field.
- In Properties view, delete the value in Text property and for Placeholder enter: Telephone.
- For Type, select tel value. When running the app on a mobile device, you will get a numeric keyboard for entering the telephone.
- Next add the Textarea component below the Text property. This input will be used to enter the actual message.
- Delete the value from Text property and instead set Placeholder to: Message.
- We need one more component, and that’s the Button. Drag and drop the Button component and position it below the Textarea.
- Change the Text property to Send Message. Your page should look like this:
That was fast, right? You are now ready to test the UI.
Testing the UI
Click the Test button in the toolbar to launch the app in the browser.
You can also quickly test the app on your device. Go back to the Test menu and click the down arrow to see the options. Check the Public option. You can scan the QR code shown in the Test window or the same QR code is available from the browser test page.
Adding new UI theme
The default (jQuery Mobile) theme has a number of swatches you can select. Simply select the page name in breadcrumbs and select a new Swatch property value.
It is also very easy to add a new theme to your app. Let’s add a theme that’s based on Google’s Material Design.
- From Create New select From plug-in.
- In Mobile category, check Material Design UI Theme.
- Click Import selected plug-ins.
- You are going to be prompted: “Would you like to set the plug-in page as the start page for the app?” Keep the default value of: keep current and click Apply settings
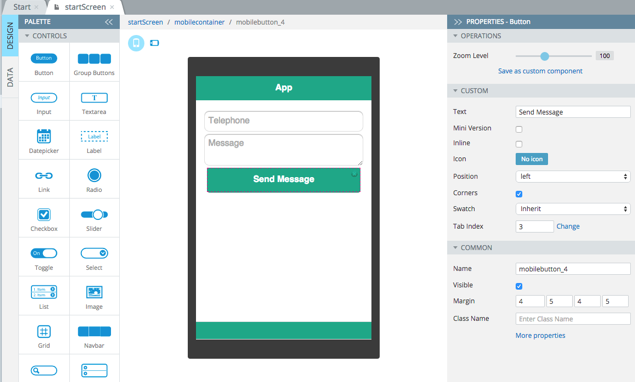
- Now that the Theme plug-in was added to the app, you need to set it as the active theme. Go to Open Project > App settings > General.
- For Theme, set material-design. You can also set a Swatch but you can also do this directly from the page. For example, setting the Swatch to A, your page should look like this:
You can also test the again in the browser to see the new theme.
Now that you have the app UI, the next step is to connect to the Twilio REST API.
Using REST APIs in Appery.io
Using any REST API service in Appery.io app involves the following general steps:
- Defining the REST API service
- Defining request parameters
- Defining response parameters
- Testing the service
- Adding the service to a page
- Binding the service to the page
Connecting to the Twilio Message API
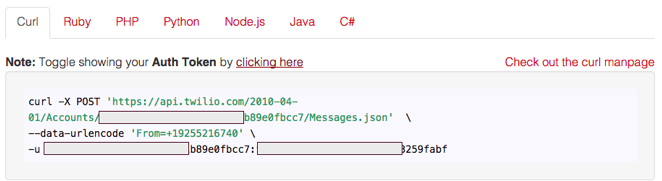
Let’s start connecting to Twilio. The information you will need for the service is available here: https://www.twilio.com/user/account/developer-tools/api-explorer/message-create. The curl command section looks like this:
- Select Create new > Service.
- For Name enter: SendSms.
- Keep the REST type and click Create Service. The service will be created and the service editor will open.
- For URL enter: https://api.twilio.com/2010-04-01/Accounts//Messages.json
- For Method select POST.
- For Request Content Type select x-www-form-urlencoded.
- You also need to create and use a proxy. Click New Channel and for name enter: TwilioProxy. Click Create to create the proxy.
- You also need to configure the proxy, go to https://appery.io/proxy/ and click open for the proxy that was just created.
- In the proxy settings, check Use old proxy implementation (slower). At a later step we will show you how to switch to using the new implementation.
- There is just one more thing you need to do and that’s add the AccountSid and access token to the URL.
- Looking at the curl command, copy the two numbers after -u option. You might need to click to show the Auth Token, see the note above.
- Go back to the Settings tab and copy the value right between https:// and api.twilio.com/ It should look like this: https://AccountSid:AuthToken@api.twilio.com/2010-04-01/Accounts/AC3526fbeedXXXXXX1ffe481b89e0fbcc7/Messages.json
- Then also add the sign @ between the AuthToken and api.twilio.com (as shown above)
- See a note on security at end of this section.
- Go back to the App Builder and open Request tab.
- Define the following three parameters:
- To
- From
- Body
- The From is your Twilio number. Go back to https://www.twilio.com/user/account/developer-tools/api-explorer/message-create and find your Twilio number in the curl command then set it as the default value.
You are ready to test the service
A quick note security: It’s not very secure to keep the AccountSid and AuthToken in the client and both values can be easily accessed. At a later step we will move them to the server so they are not available in the app (client). For now, this simplifies testing.
Testing the service and creating the response
With the URL and request parameters defined you can now test the service.
- Go to the Test tab.
- Enter a telephone number for the To value. If you have the Twilio trial plan you will only be able to send the message to your Twilio verified number.
- Enter any message in Body.
- The From value should already be set to your Twilio number.
- Click the Test button to test the service. You should see a response from Twilio in JSON format:
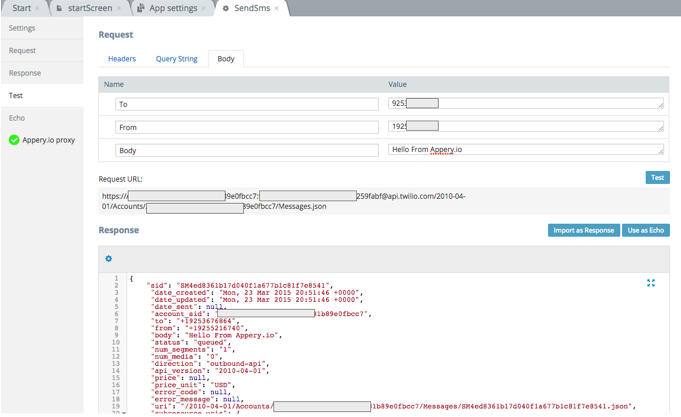
With the service tested, you can automatically create the service response from the JSON returned.
- Click Import as Response.
- Go to Response to see the response that was automatically generated.
We got a working service that talks to Twilio. Next we are going to add the service to the page.
Adding and binding the service to the page
- Open startScreen and click the Data tab (on the left side).
- For Add datasource, select Service > SendSms, click Add.
- Rename the instance name from restservice1 to send_sms:
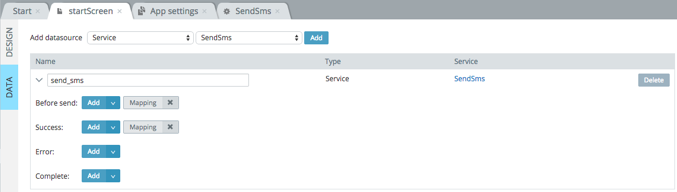
- Now you need to pass data from the page to the service. That’s done in Before send event (or input mapping). Click Mapping to open the mapping editor.
- Click Expand all on both sides. The left side is the page and the right side is the service.
- Using drag and drop create the following mappings:
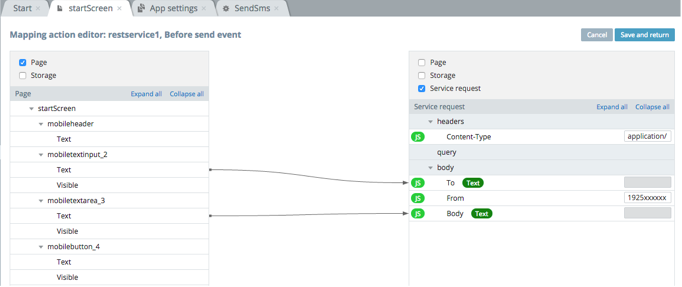
You are taking the telephone value and the message value and mapping them to the service. The From value is set to your Twilio number by default.
- Click Save and return to save the mapping.
The Twilio service returns a lot of data when the message is sent, but we don’t need it at this point so we are not going to map anything from the service back to the page. If you had to map something you would do it with a Success event.
- Switch back to the Design tab. The last step is to invoke the service.
- Select the button and click the Events tab.
- For Action, select Invoke service > send_sms and click Save.
You are done with the app. It’s time to test again.
Testing the Completed App
Click the Test button from the toolbar again to launch the app in the browser. Enter a telephone number (if you have the Twilio trial plan you should use the Twilio verified number), enter a message, and then click the send button.
Building a PhoneGap for iOS, Android or Windows Phone
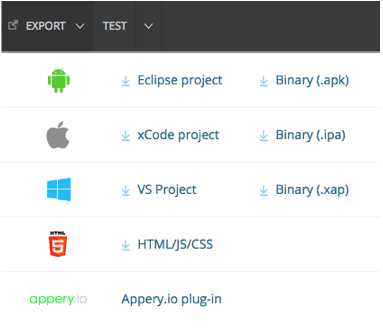
It is very simple to build and test the app in the browser. It is just as simple to package the app as PhoneGap which will allow you to publish the app to the app store and install it on the device.
To export the app, just click the Export option and select the platform:
Adding security to your app
One more thing you need to do is add an extra layer of security to the app. You want to hide the Twilio AccountSid and Auth Token values from the client. If these values are stored in the client, someone could gain access to them. You want to keep on the server.
An Appery.io app has the option to keep sensitive data in the database. Let’s see how to do that.
- From the App Builder click Database from the menu
- To create a new database click Create new database button. For name enter: TwilioDB and click Create. A new database will be created and opened
- Next you need to create a new collection. Click Create new collection. For collection name enter Secrets.
- Next you need to create two columns. To create a new column click +Col.
- Name the first column: key
- Name the second column: value
- Next you need to insert the AccountSid into the database. Click +Row. For key column enter: AccountSid_db and for value the actual AccountSid value.
- Same steps for inserting the Auth Token into the database. Click +Row. For key column enter: AuthToken_db and for value the actual AuthToken value. The database should look like this:
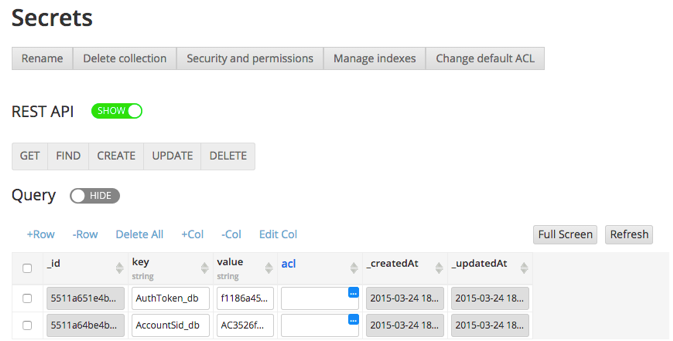
Now this sensitive data is stored in the database. Next you are going to delete the values from the app (client) and reference the values in the database (server).
Next you need to configure the secure proxy.
- Go to https://appery.io/proxy/. You should see the proxy you created earlier. Open the proxy.
- Select Use proxy + store sensitive (private) data in database.
- You will see drop downs that we need to point to the database you just created.
- For Database select TwilioDB
- For Collection select Secrets
- For Key column select key
- For Value column select value
You just configured this proxy to use this database.
The last thing is to update the actual app.
- In the App Builder, open Services > SendSms service
- Update the service URL to: https://{AccountSid}:{AuthToken}@api.twilio.com/2010-04-01/Accounts/{AccountSid}/Messages.json
- Open Request tab and then Query String tab
- Create two parameters and set their values:
- Name: AccountSid, Value: {AccountSid_db}
- Name: AuthToken, Value: {AuthToken_db}
As you set the proxy to be a secure proxy and linked to a database, the AccountSid and Auth Token values will now be kept on the server. When a call is made to Twilio API, the values will be substituted on the server
Summary
Creating mobile apps with Twilio and Appery.io is fast and simple. Twilio’s API can be quickly integrated, tested and secured when building a mobile app in Apppery.io. Appery.io visual tools allow building enterprise apps with messaging capabilites very fast.
In addition to this hands on tutorial, Apppery.io also provides an out-of-the-box plugin for Twilio Messaging API. To add a plugin to your app select Create new > From plug-in:

Once the plugin is imported you only need to set the AccountSid and AuthToken values. The plugin allows sending an SMS message, view a list of all messages and view details for each message.
Learn more about Appery.io here

Related Resources
Twilio Docs
From APIs to SDKs to sample apps
API reference documentation, SDKs, helper libraries, quickstarts, and tutorials for your language and platform.
Resource Center
The latest ebooks, industry reports, and webinars
Learn from customer engagement experts to improve your own communication.
Ahoy
Twilio's developer community hub
Best practices, code samples, and inspiration to build communications and digital engagement experiences.