Build A Message Queue For Email notifications Using .NET Azure Queue Trigger Function and Twilio SendGrid
Time to read:
July 24, 2024
Written by
Reviewed by
Build A Message Queue For Email notifications Using .NET Azure Queue Trigger Function and Twilio SendGrid
Introduction
Asynchronous processing is crucial in modern distributed systems, particularly for time-consuming tasks, communication, and reporting. Message queues enhance reliability, fault tolerance, and scalability in these processes. In this tutorial, you’ll learn how to create a message queue for sending email notifications using .NET, Azure Storage Queue, and Twilio SendGrid.
Prerequisites
In order to be successful in this tutorial, you will need the following:
Building the app
In order to get started, you need to create an Azure storage account. Create your account using the guidelines here while keeping the defaults selected.
You will use this storage account to create a storage queue where you will add the notifications that will then be processed and sent one by one.
Create a storage queue
Navigate to your storage account. Then, from the left sidebar, click Data Storage > Queues. Then select + Queue from the available tabs as shown below:

Add a name for the queue as shown below:

Create storage queue trigger function
Open Visual Studio. Click on Create a new project, then search for Azure Function. Click Azure Functions and click Next.

Name your project NotificationQueueTrigger and click Next. Then select the .NET runtime as .NET 8 and the function type as Queue trigger. Then add a custom connection string named QueueConnectionString, For the Queue name, use the name that you created in Azure storage: notifications. Then click Create.

Choose the dependency to use Azure Storage then click Next.

Visual Studio may ask you to sign in to use your Azure account. Sign in using your Azure portal credentials, then select the Azure storage account for the dependency setup. Click Next.
The Azure portal will now show you the connection string needed to connect to the storage account. Copy it and keep it safe. You will need it later when you add it to the local settings file. Keep the rest of the menu defaults, and click Finish. The setup may take a moment. When it is finished, click Close.

Setup SendGrid nuget package
In order to use SendGrid in the function, you need to install the SDK by clicking on top menu’s Tools > NuGet Package Manager > Manage NuGet Packages For Solution.

Before setting up the SendGrid package, make sure you have installed the Azure.Storage.Queues package, and that it is updated to the latest stable version. The installation flow in Visual Studio is shown below.

Then browse for SendGrid and install the official Twilio SendGrid package as shown:

SendGrid API key
Before you can start sending emails, there are a few more mandatory steps you’ll need to complete. These steps can take time depending on the domain registrar.
Once you’ve completed the above steps, you’ll need to create a new API Key. Keep this key somewhere safe as you will need it in the subsequent steps.
Go to the file local.settings.json and add the API key as shown below:

Add queue notification class
After the solution is loaded in Visual Studio, right click on the project name, then click Add > Class as shown below:

Add the name of the class as QueueNotification. This will be the object to parse the message from the message queue. Replace the content in the generated class with the following code:
Add EmailService class
In the same way that you added the Queue notification class, you need to add another class called EmailService. This class will handle the send email logic. Create the class as above, and replace the code for the class with the following code. Make sure you replace your verified email and name in the place of the placeholders your_sendgrid_email and your_sendgrid_name.
Implement notification function
Go back to the function1.cs file. Right click on it, and rename it to notification.cs. Click Yes to the pop-up that shows up to ask if you want to rename references as well. Replace the code in the file with the following code:
Test the queue trigger
You can now run the function in Visual Studio by clicking on the debug button as shown below:

You can use the debugging popup to check the log as the function runs.
The next step is to go back to the Azure portal and add a new message to the queue. Navigate to your Azure storage account, then, from the side bar, click on Data storage > Queues. Select the notifications queue as shown below:

Click on Add message to manually enter a notification message to test the trigger function.

Add the following code to the message text as shown below. Make sure you replace your_test_email with the email to receive the notification. Then click Ok.

You will then notice your local debugging log showing the invocations of sending the email and a success message as shown below:

Now check your email to make sure you received the notification.

Deploy your trigger function to Azure
The last step is to deploy your trigger function to Azure. For this, you need to log in to the Azure portal. Search for “function app” then click on Function App.

It will take you to the Azure Functions window. Click Create to create a new function app.

Choose the hosting plan as a Consumption plan. This allows you to pay only when the function executes. Azure gives you the first 1 million executions for free according to the guidelines mentioned here.

Then add the basic settings as shown below. For Function App name, you will need to choose a function app name that is unique:

The tabs at the top show other aspects of your function app, but you don't need to change any of the default values. Keep clicking Next until you reach the tab labeled Review + Create. Click Create.

It will take a few moments to create the resources for you. When it is done, Azure will notify you that the resource has been created successfully. Click on Go to resource on the notification popup.
In order to be able to publish your code, you need to go to Settings > Configuration in the left sidebar. Choose the General Settings tab. Look for SCM Basic Auth Publishing Credentials, and set this value to On. Click Save. Your app may need to restart to complete this process.

In the overview tab click on Get publish profile, and download the file. This is the file that you will attach to Visual Studio to be able to access the function app and publish your local job to Azure.

Go back to Visual Studio. Right click on the project name and click Publish.

Click on Import Profile and attach the publish profile that you downloaded from the Azure portal. Then click Finish.

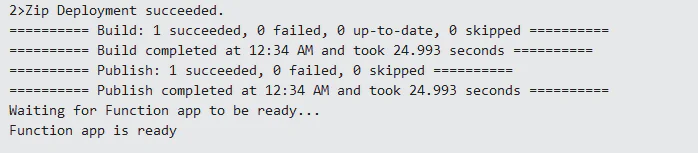
You can now click on Publish on the main publish window. It will show the following output when the publish is complete.
Add connection strings and API Key to Azure
Since the file local.settings.json is only for local settings, you need to also add the SendGrid’s API key to Azure.
You can do this by clicking on the function app. Then go to Settings > Environment variables and add the keys SENDGRID_API_KEY and QueueConnectionString with the same name and value as you configured in your local file. Click Apply to make sure you saved the changes.
Queue storage usage notes
You can use the Azure storage SDK to programmatically write messages to the queue to handle notifications in your large scale applications. For this, you will use the same instructions as discussed in this tutorial.
Security considerations
A better way to secure your API keys and database connection strings is through Azure Key Vault, instead of using environment variables directly. This will make this sensitive data more secure.
For additional security, use different API keys between testing and production environments.
What's next for Azure and SendGrid apps?
Now that you have completed this tutorial, you have acquired the skill sets to:
- set up and utilize Azure Storage Queues,
- use Twilio SendGrid APIs,
- manage large scale notifications.
You can find the source code of this tutorial on Github here.
Want to see other ways to make Azure and SendGrid work together? Try out this tutorial for building a daily sales report using Azure SQL and .NET Azure Functions.
Eman Hassan, a dedicated software engineer, prioritizes innovation, cutting-edge technologies, leadership, and mentorship. She finds joy in both learning and sharing expertise with the community. Explore more on her Medium profile: https://emhassan.medium.com.


Related Resources
Twilio Docs
From APIs to SDKs to sample apps
API reference documentation, SDKs, helper libraries, quickstarts, and tutorials for your language and platform.
Resource Center
The latest ebooks, industry reports, and webinars
Learn from customer engagement experts to improve your own communication.
Ahoy
Twilio's developer community hub
Best practices, code samples, and inspiration to build communications and digital engagement experiences.