How to Organize Animal Crossing Players using Twilio Programmable SMS
Time to read:
This post is part of Twilio’s archive and may contain outdated information. We’re always building something new, so be sure to check out our latest posts for the most up-to-date insights.
Socializing on Animal Crossing: New Horizons isn’t complete without visiting your friends’ islands and making plans to water each other’s flowers for the chance to show off rare and colorful hybrid flowers. The hard part is gathering a group of people who are able to water your garden.
Completing this tutorial will allow you to host a private party of your choice and be able to change your status throughout the day, everyday. Plus, you’ll realize just how easy it is to get started with coding!
In this post, I’ll show you how to develop a functional Python program to organize your friend groups using Twilio Programmable SMS and Flask.
Tutorial Requirements
In order to build this project, you will need to have the following items ready:
- Python 3.6 or newer. If your operating system does not provide a Python interpreter, you can go to python.org to download an installer.
- ngrok. We will use this handy utility to connect the development version of our Python application running on your system to a public URL that Twilio can connect to. This is necessary for the development version of the application because your computer is likely behind a router or firewall, so it isn’t directly reachable on the Internet. If you don’t have ngrok installed, you can download a copy for Windows, MacOS or Linux.
- A free or paid Twilio account. If you are new to Twilio get your free account now! (If you sign up through this link will give you $10 credit when you upgrade.)
- Two SMS enabled smartphones (perhaps your phone and a friend’s?)
- Nintendo Switch console and copy of Animal Crossing: New Horizons (I’m assuming you have this already, but just in case)
As we say in the game, if I can make this, anyone can!
Configuration
We’ll start off by creating a directory to store the files of our project. Inside your favorite terminal, enter:
Since we will be installing some Python packages for this specific project, we will need to create a virtual environment.
If you are using a Unix or MacOS system, open a terminal and enter the following commands:
If you are on a Windows machine, enter the following commands in a prompt window:
If you are curious to learn more about the packages, you can check them out here:
- The Flask framework, to create the web application that will receive message notifications from Twilio
- The python-dotenv package, to load the environment variables created
- The python-twilio package, to send messages through the Twilio service
Configure Twilio SMS
This is where we make sure you have a Twilio number activated. Log onto the Twilio Dashboard to view your Active Numbers. Click on the number you want to use to view the details. If you haven’t purchased a number yet, you can sign up through this link and receive $10 credit when you upgrade.
Receive and send messages with Twilio
The goal of our app is to allow as many of our friends to text your Twilio number and add themselves to the Gardener’s Directory. Your friends will have the ability to set their statuses by sending in a text message from their devices at any time while updating the directory for other users to see.
Receive messages
The Twilio API for Programmable SMS uses a webhook (web callback) to allow real-time data to be delivered to other applications. This is especially important since we want to constantly be able to view our friends’ statuses.
Here’s some code to help you write your first webhook handler. Add the following route and function to your python file, which can be called app.py:
We have a few things going on with the code above. The @app.route is a decorator from our Flask framework, which is used to get users like ourselves to start API projects quickly. This decorator will work with our webhook() function that will be included in a URL so that we can receive incoming messages from any user.
We also created a player variable which receives a value from Flask’s request.form function. When we look at the From, Flask is able to parse the phone number of the sender in the format of a E.164 phone number representation.
Creating the player variable is essential for our case because we will need to keep track of the users and numbers who are in the directory. You can play around and parse other variables in a text message, but for now, we’ll move on to the next part of our project.
Reply to a message
Next, we have to handle confirming with a player that we received their text message. The webhook allows us to issue a response to the player, the one who sent the message, by providing a TwiML payload in response to the webhook. TwiML is short for Twilio Markup Language, an XML-based syntax that the webhook can use to provide instructions to Twilio regarding how to handle the message.
The Twilio Helper Library for Python allows us to generate TwiML responses using classes and objects. For our project, we will utilize best programming practices by writing the definition for a respond() function so that we can call it throughout our project to generate a response that is sent back to the sender.
Add the new import line to the top of the app.py file and the new respond() function above or below the webhook.
Don’t forget to call the newly created function in the webhook, too. Here’s an example of what your starter code might look like:
If you are curious to see how TwiML looks, start a Python shell and enter the following code to generate an example response:

Set up a webhook with Twilio
Awesome job writing your first webhook!
However, in order to be a great developer, we must test it out and make sure it’s running properly by sending and receiving a few text messages.
Add a .flaskenv file (make sure you have the leading dot) to your project with the following lines:
These incredibly helpful lines will save you time when it comes to testing and debugging your project.
FLASK_APPtells the Flask framework where our application is locatedFLASK_ENVconfigures Flask to run in debug mode
These lines are convenient because the server will automatically reload when changes are made to the code, and you will not have to restart the server while you are adding more code to your application. That is: every time you save the source file, the server will reload and reflect the changes. Neat huh?
So, we’ll move forward by starting our Flask application with the following command:

The screenshot above displays what your console will look like after running the command flask run. The service is running privately on your computer’s port 5000 and will wait for incoming connections. You will also notice that debugging mode is active, and that my flask server restarted to reflect my changes.
While flask is running in one terminal window, open up a second tab or terminal window. Start ngrok with the following command:
Great, you have now enabled your flask service to be reachable to Twilio over the Internet!
Ngrok is a great tool because it allows you to create a temporary public domain that redirects HTTP requests to our local port 5000.
Note that if you are unable to install ngrok system-wide, try to locate the executable ngrok file in order to call it in your terminal using its full path.

Your ngrok terminal will now look like the picture above. As you can see, there are URLs in the “Forwarding” section. These are public URLs that ngrok uses to redirect requests into our flask server.
Copy the URL starting with https:// and return to the Twilio Console, where we will tell Twilio to send incoming message notifications with this URL.
In the Twilio Console, click on the (...) on the left sidebar to scroll down and find Phone Numbers. Click on the active phone number that you want to use for this project and scroll down to “Messaging”.
Paste the URL copied from the ngrok session into the “A MESSAGE COMES IN” field and append /webhook, since that is our endpoint. Here is my example for reference:
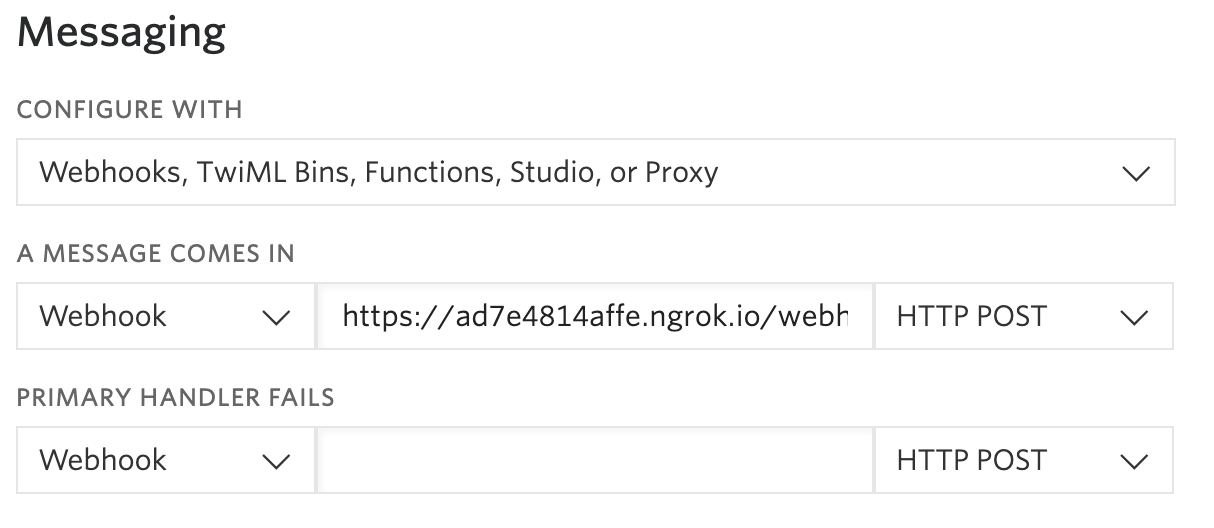
Before you click on the “Save” button, make sure that the request method is set to HTTP POST.
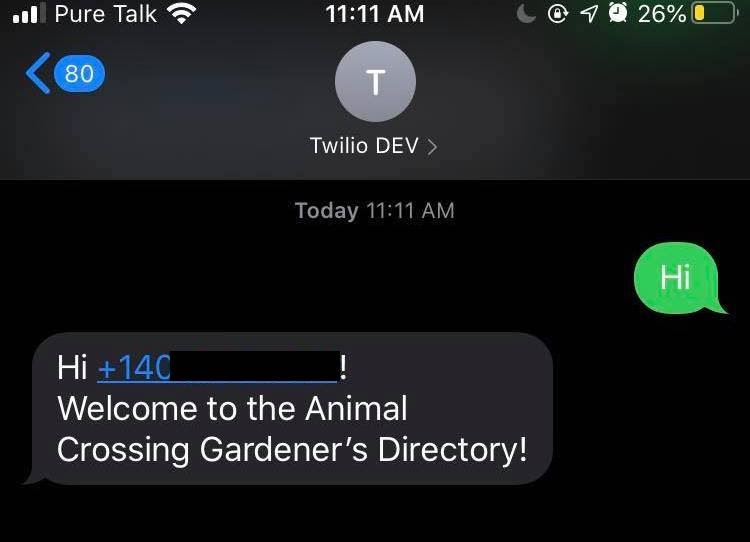
Time to test things out! Grab your SMS phone and send a text message to your active Twilio number.
Build your Animal Crossing group organizing app
Create the players dictionary
We’ve made it this far and we have seen how to receive messages from our Twilio number and respond to them. However, we need to spend time creating and personalizing our directory system.
Since we have to keep track of our players, represented as their phone number, as well as their statuses, a Python dictionary will get the work done for us.
Insert the following line on top of the definitions in app.py:
This data structure allows us to have one unique key, representing the player’s phone number. Each key will have it’s own status that can be updated throughout the 24 hour session. This dictionary will be recreated each day you and your friends use the program. It is also a returnable object that conveniently lists out all the keys (players) and their values (statuses).
Add yourself to the directory
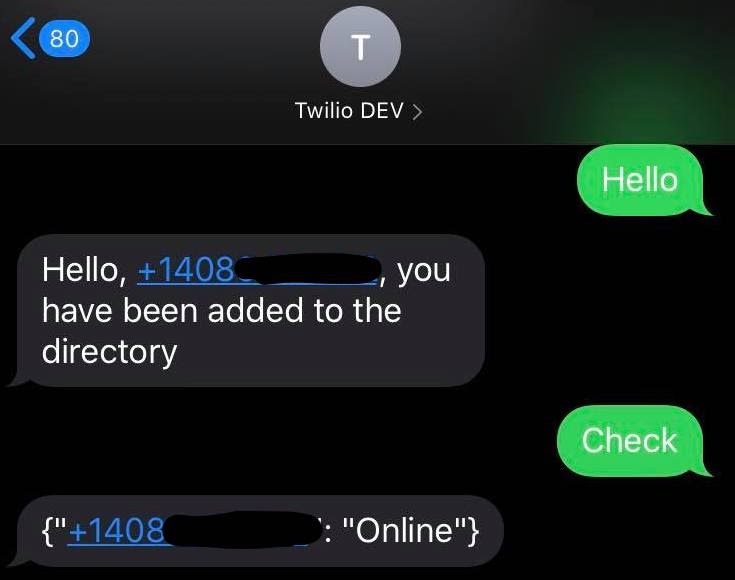
To add yourself to the directory, text your Twilio number with the message “hello”. The program first checks to see if you already registered yourself or not. If it’s a new day, then you will be added to the directory and reply with an appropriate message, otherwise, it will welcome you back.
Here’s the code that accomplishes that for you, along with the picture of what your texts should look like:
Set up and change the player status
As a developer, it is more efficient to create functions when you know you’ll use them in multiple places.
We can create a set_status function because it would be redundant to write the same lines of code multiple times, when you can simply call a function passing in a status line and player.
For my statuses, I decided to use 3 keywords:
wateringto indicate when I’m available to water plantstradeto indicate that I am willing to visit my friend’s island if they visit minedroughtto indicate when I’m in trouble and need someone to come over to water
Before I change my status, I need to check if I registered myself in the directory. This if statement does the job of checking if I exist first. If I’m in the directory, it can check my message to proceed and change my status.
Add these lines into your def webhook(). They could be added anywhere after you create the message variable. You could insert them underneath if message == ‘hello’ :
Repeat the process of writing if statements and defining key terms and statuses until you are satisfied with your system. Remember, feel free to change up the status codes and messages as you please.
Check a player’s status
Last but not least, you want to make sure you can view your status and see who else is online. In order to do so, you will have to make a request to your Twilio message and ask it to return the playersDictionary object that you created.
The nested if statement checks if the contents of the object exist before displaying it, otherwise, it will prompt you to invite some friends. I thought it be logical to put this at the top of all the if statements because it checks my existence of the dictionary data structure.
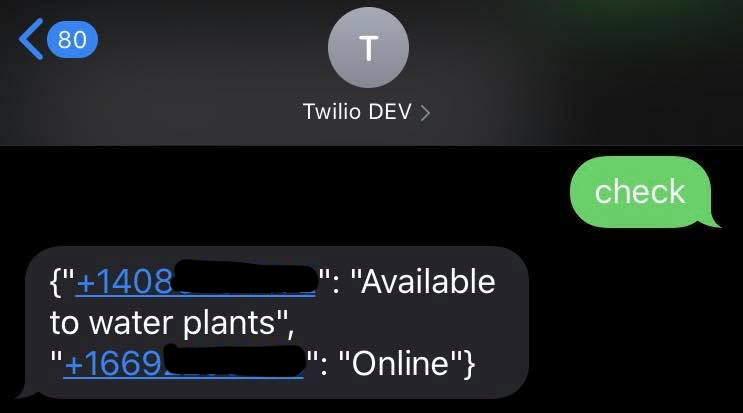
Here’s an example of when I asked my friend to text the number:
(Optional) Message restrictions
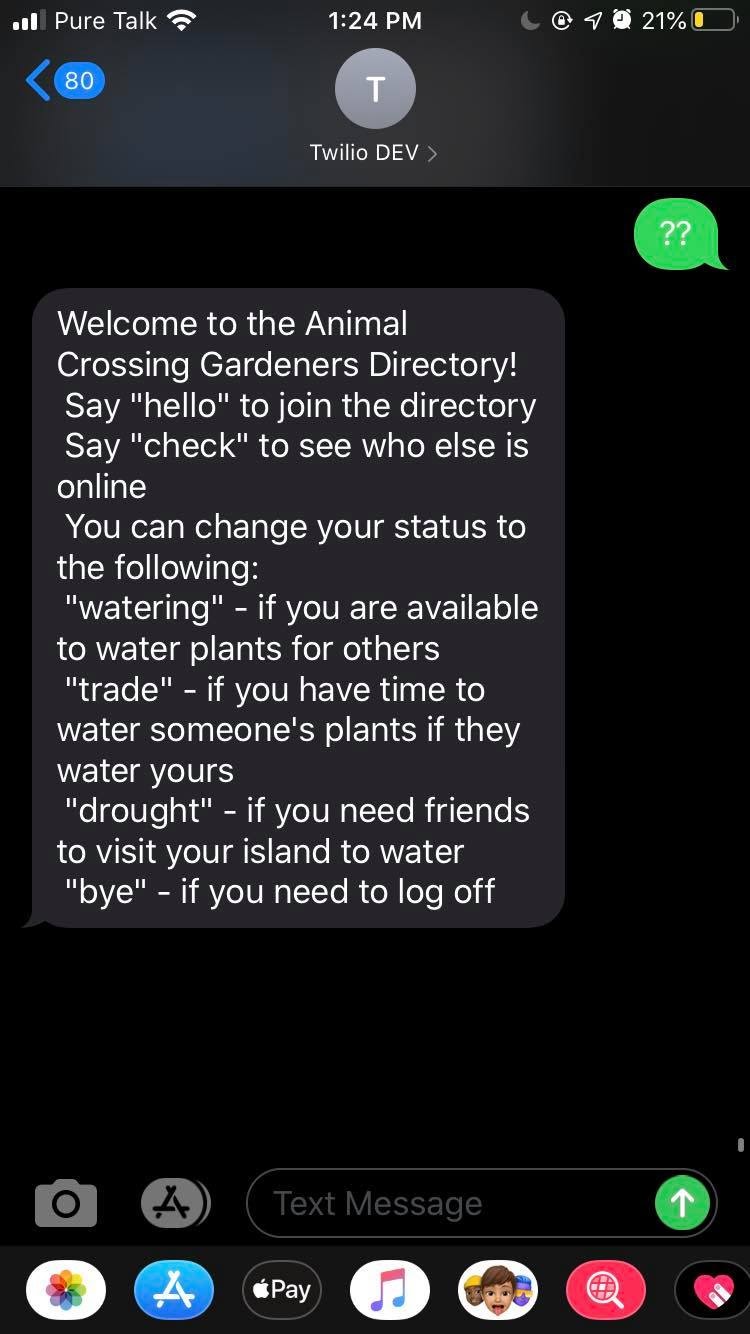
An optional addition to your code is to write up a scenario for when one of your friends accidentally types an incorrect message that doesn’t do anything. To lead them on the correct path, it might be helpful to create a help_text() function that returns some text explaining how to use the system.
You can see an example of what a help message looks like here:
Run the Animal Crossing team organizing Program
It’s time to wrap things up and make sure your program is working the way you want it to. If you want to view my code as an example, it’s on Github.
Make sure you have one tab running flask and one tab running ngrok. If you closed it for any reason, start it again now with the following commands in their respective tabs.
And in the second tab:
Furthermore, make sure that your SMS endpoint is configured with the forwarding URL reported by ngrok. Each time you restart ngrok, the URL changes, so you will have to replace the URL in your Twilio Active Phone Numbers console.
It’s time to form your gardening group and breed some beautiful flowers! Be sure to tell your friends your Twilio Number so that they can text in, register themselves in the database, and update their status!
Conclusion: Building an Animal Crossing Group Organizing app
You should be on the way to obtaining an impressive garden now, and perhaps a golden watering can from watering so many flowers. This simple SMS tutorial shows you how to create a database of friends and family members who can update their statuses simultaneously throughout the day with the help of Python and Flask.
Talk about a great way for friends to come together and bond during a time where we have to maintain a 6ft distance from one another!
What’s next for Animal Crossing projects?
Looking for ideas on how to expand? Try these:
- Build out a DoDo code directory for users in the
playerDictionary. If a player opens their gates, they should update their DoDo codes as well. - Match up
Onlineusers with others who need some help with their gardens. - Change this to your other favorite games or figure out how to apply this system to real-life chores!
Let me know if you take on the challenges or if you’re looking to build an Animal Crossing Party Line for more effective communication!
Diane Phan is a Developer Network Intern on the Developer Voices team. She loves to help beginner programmers get started on creative projects that involve fun pop culture references. She can be reached at dphan [at] twilio.com.
Related Posts
Related Resources
Twilio Docs
From APIs to SDKs to sample apps
API reference documentation, SDKs, helper libraries, quickstarts, and tutorials for your language and platform.
Resource Center
The latest ebooks, industry reports, and webinars
Learn from customer engagement experts to improve your own communication.
Ahoy
Twilio's developer community hub
Best practices, code samples, and inspiration to build communications and digital engagement experiences.


