AI-Based Sentiment Analysis Chatbot for WhatsApp and SMS with OpenAI, Twilio Studio and Twilio Functions
Time to read:
By now, you probably know that ChatGPT is a language model developed by OpenAI. It is part of the GPT (Generative Pre-trained Transformer) family, which means it uses deep learning techniques to generate human-like text based on the given input. As an AI language model, ChatGPT is designed to simulate conversations and respond to user prompts and questions. It has been trained on a large corpus of text data from the internet to acquire a broad range of knowledge on various topics. It has various applications, among them backing chatbots, virtual assistants, and interactive storytellers.
In this blog post, I will teach you how to get started on building an intelligent chatbot, capable of sentiment analysis, using OpenAI’s API, Twilio Functions and Twilio Studio. We will build with Twilio’s WhatsApp Programmable Messaging API as the text channel, but it works exactly the same if you want to use Twilio’s SMS Programmable Messaging API.
Prerequisites
Before you get started, you’ll need to set up a few things:
- A Twilio account - sign up for a free Twilio Account here
- A Twilio Phone Number (get a SMS capable number if you want to work with SMS) - learn how to buy a Twilio Phone Number here
- Optional (Only for WhatsApp): Sign up for a WhatsApp sender - learn how to sign up for a WhatsApp sender
- Optional: You can install Twilio’s Serverless Toolkit to create, test locally, debug and deploy your functions right from your code editor. (Not required for this tutorial.)
- An OpenAI Account - sign up for a free OpenAI Account here
Get the OpenAI API Key
After creating your OpenAI account, you'll need an API Key. If you don’t know how to get one, here is where you can create or find it. Save that API key for our next step to use the OpenAI client library in your Twilio Function.
Create a Twilio Function
First, we have to create a new Service under Functions and Assets in your Twilio Console. If you haven’t done it before, here is how to create a Service.
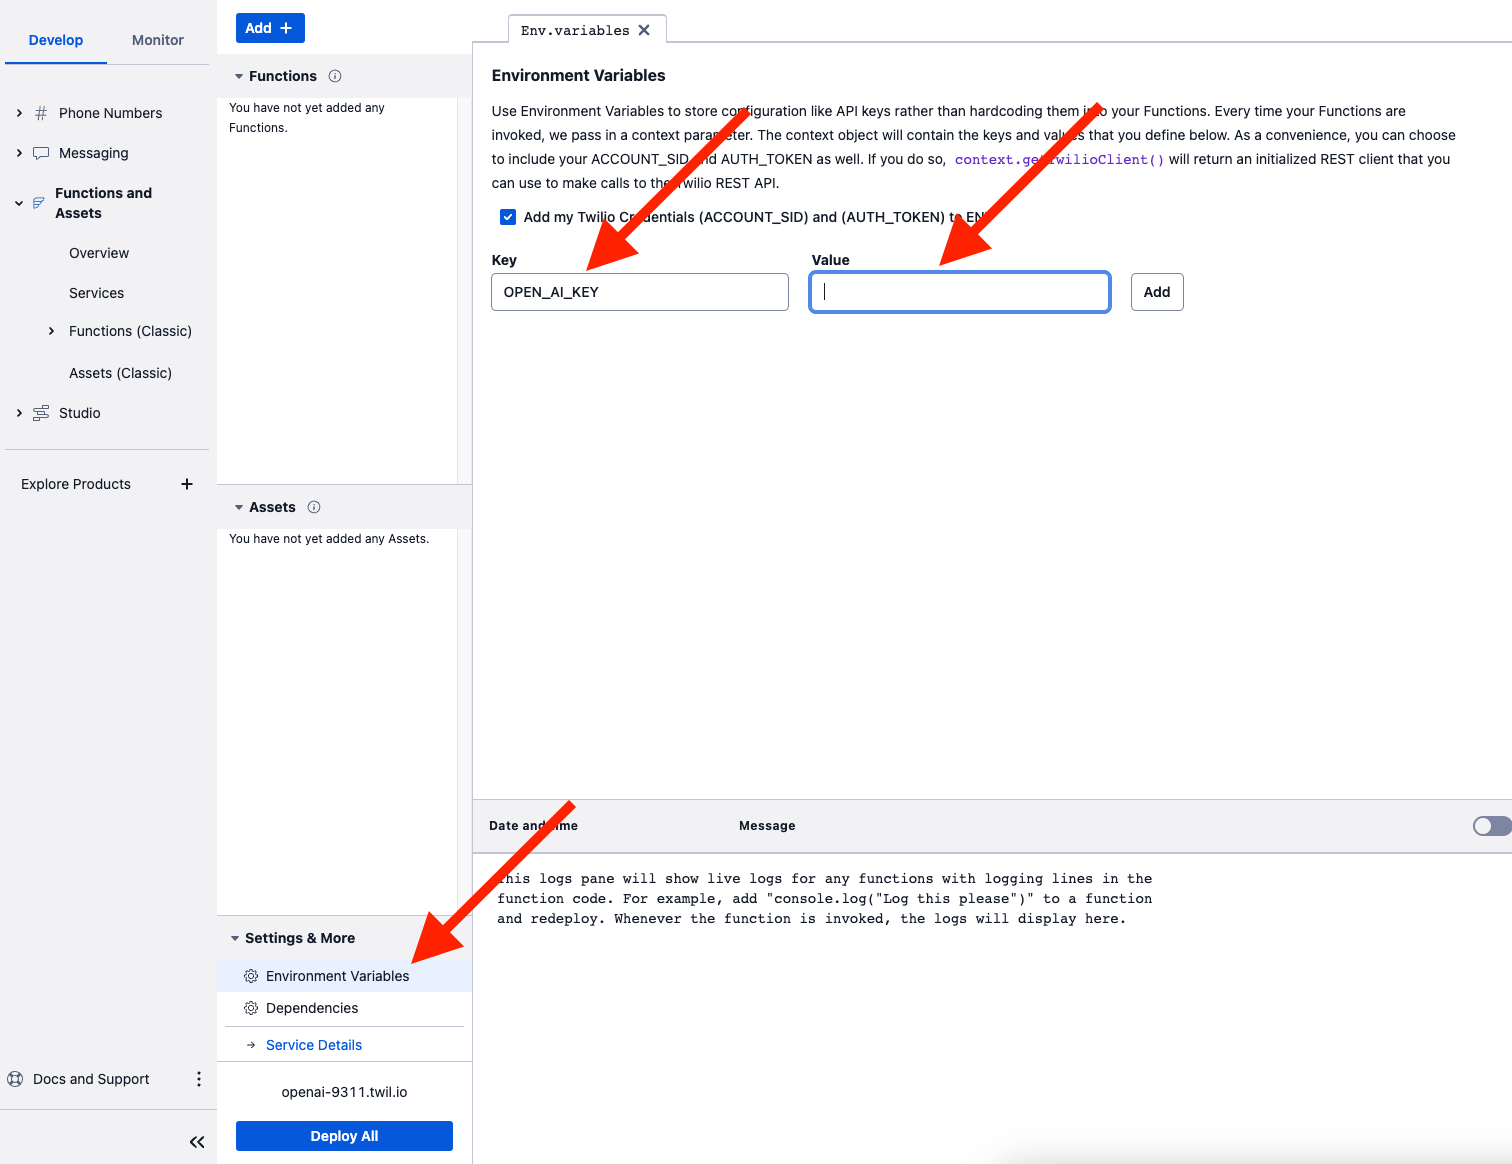
After that, inside your newly create Service, you can add your OpenAI API Key under Settings & More > Environment Variables:
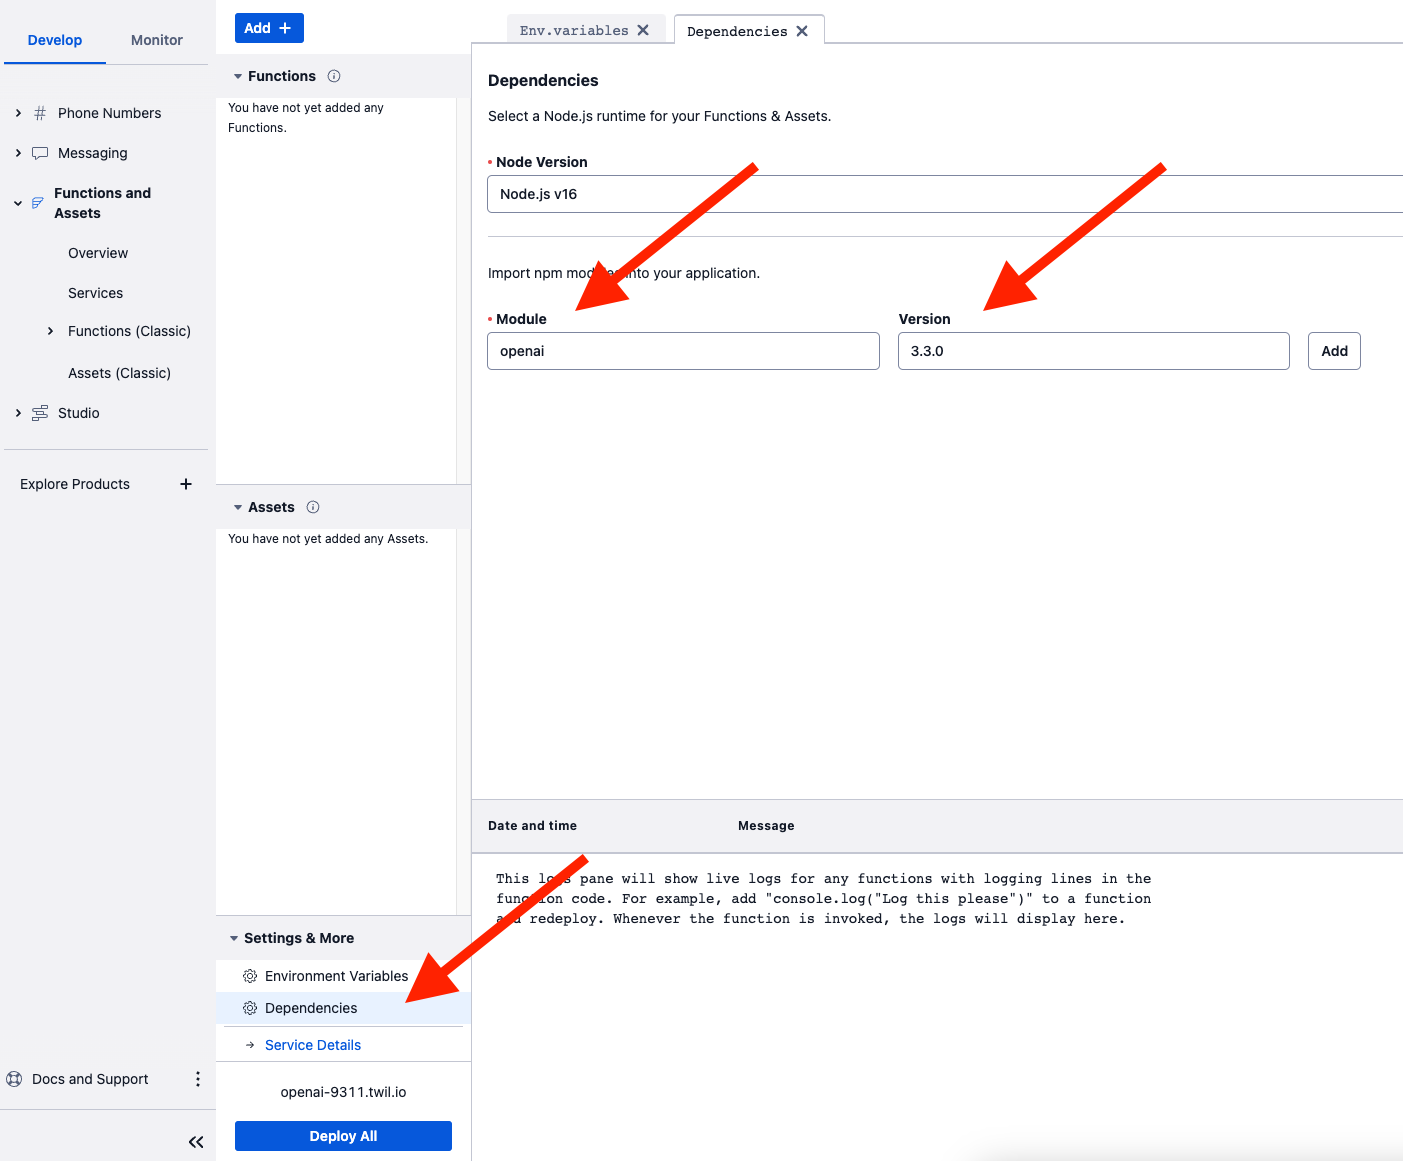
Now it’s time to add OpenAI’s npm module and its version under Settings & More > Dependencies. You can either type “latest” as the version, or choose the version you want here.
Ok, we’re ready to create our OpenAI function now. Click the Add + button to add a new function inside your Service and name whatever you like. Here we’ll name ours /openai.
Delete all the pre-generated code and paste the code below:
Click Save and next click in the Deploy All button to deploy your function.
In this tutorial, I am using the gpt-3.5-turbo-16k model. If you are not familiar with GPT models, please read more about them here. By the time you read this, there is probably a newer, faster, and more efficient model, so feel free to change it accordingly.
Optional properties max_tokens and temperature specify the maximum completion length and control randomness. You can learn more about optional properties for completion in OpenAI's documentation.
Create a Twilio Studio Flow
We will now create our chatbot using Twilio Studio. Studio is Twilio’s no code platform that enables the building of Twilio applications. If you are not familiar with it, here’s a great way to get you started.
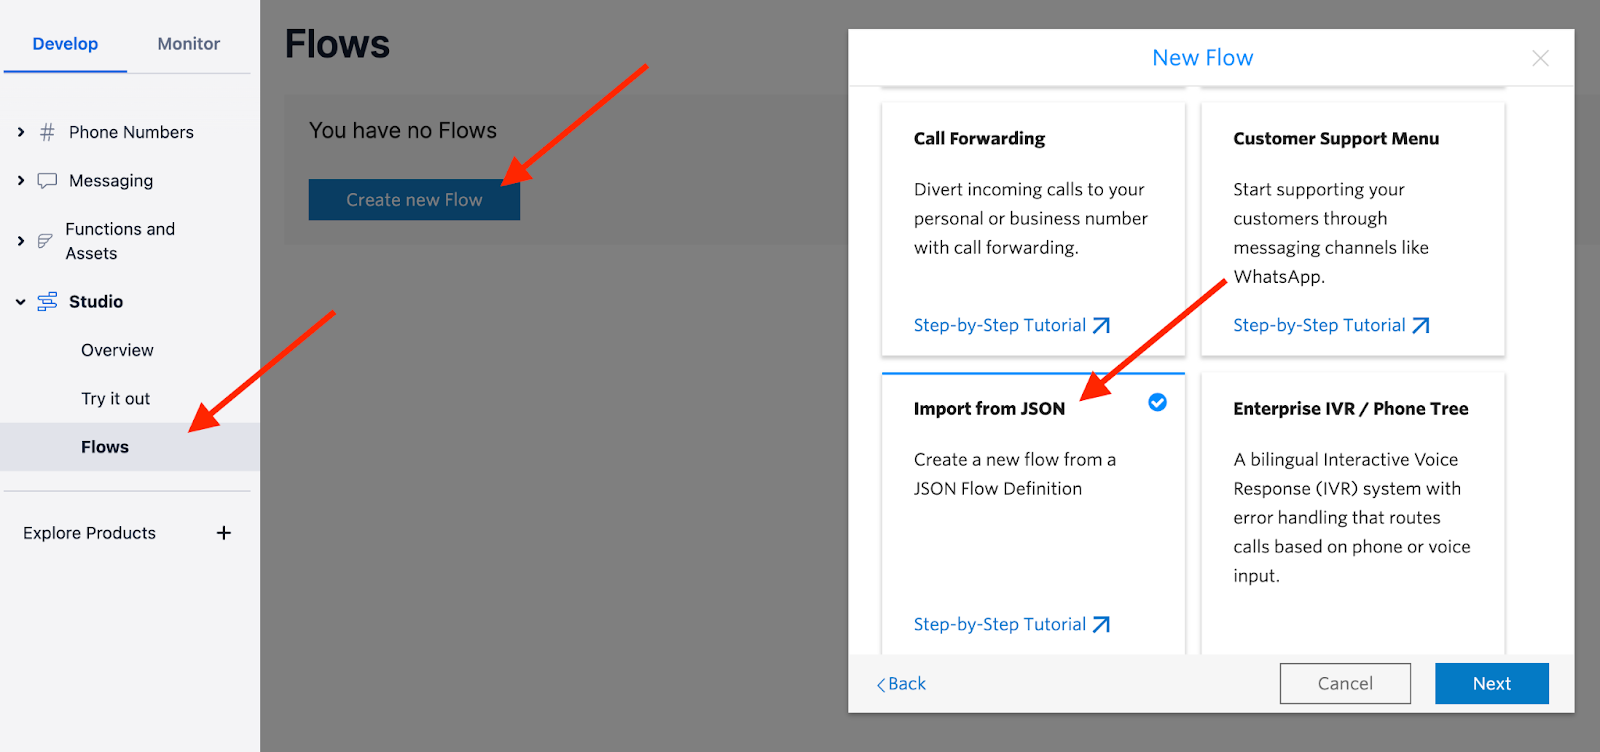
Instead of creating a new flow from scratch and starting yourself, we will give you a head start. You can choose the option Import from JSON and paste the JSON content found here in this file.
You will notice that there are 2 calls to our /openai function in our flow: fetch-sentiment and fetch-content. In a nutshell, the first call is for ChatGPT to understand the sentiment of the message, and the second call will get the content of what was said. In both function calls, we need to pass 2 parameters: message and systemContent.
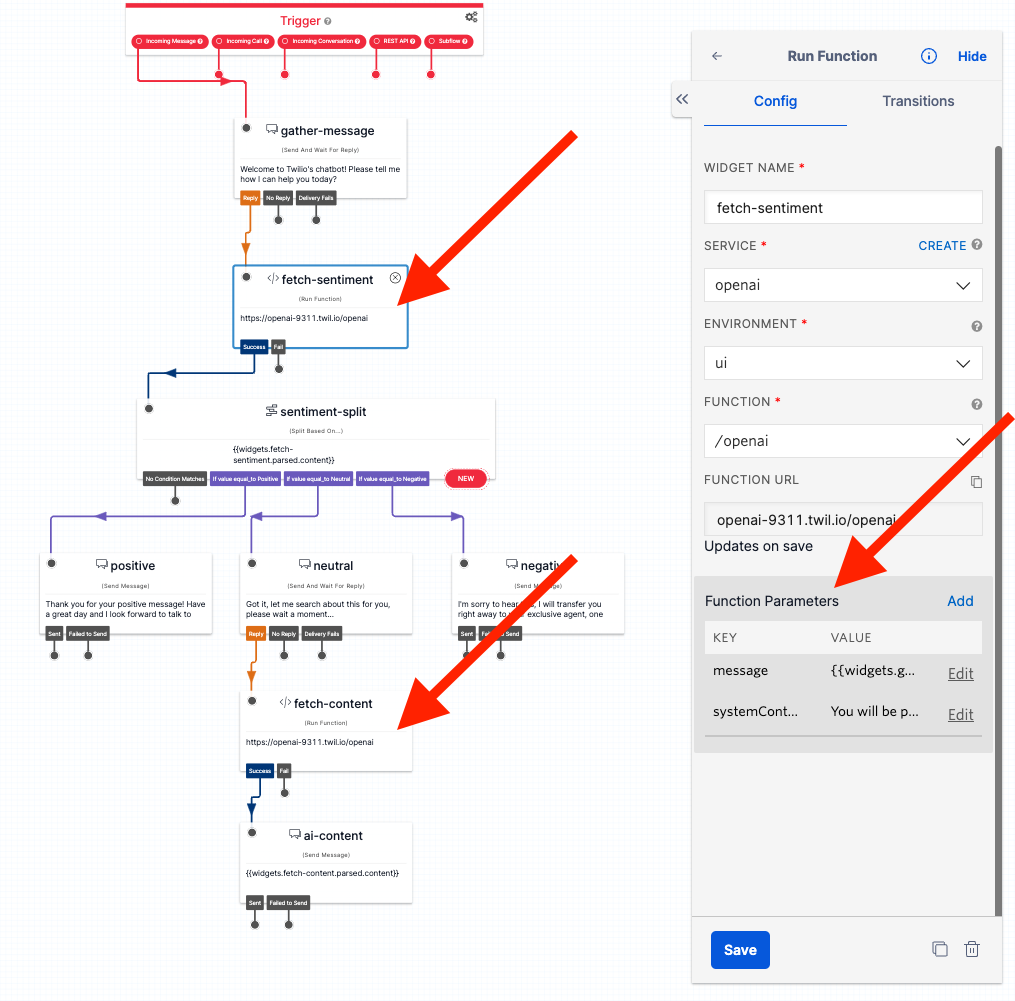
Message is the user input, and system content is the instruction we give to ChatGPT. For example, to get the sentiment, we can send the system content something like “You will be provided with a message, and your task is to classify its sentiment in one word: Positive, neutral or negative”. This way, ChatGPT will return one of those words in order for us to split the flow accordingly. And to get the content, we can just pass something like “Summarize for me in one paragraph”. It is important to understand that this example is not fully error proof. You can test different system instructions, as well as fine tune the prompt as mentioned above in order to get better results.
In our flow, we have a simpler decision split. If it’s negative, we right away transfer to a human agent. Under the negative scenario, you can forward the flow to another phone number, send this payload to your own application for a human to interact with the user, or even forward the user to our contact center solution, Twilio Flex. Twilio Studio allows you to integrate with outside applications and make external requests to send this payload wherever you like.
For the positive result, we just return a thank you message. And on neutral results (a question, for example, is a neutral sentiment) we will proceed to another call to fetch the AI response and send it back to the user.
Here is a short example gif showing all 3 scenarios:

Connect your Twilio Number to your Studio Flow
Now let's proceed to hook up your Twilio number to your Studio Flow. There are a few ways to do this inside Twilio's Console. In this tutorial I’ll teach you how to do it via Messaging Service for both WhatsApp Sender numbers and SMS Capable numbers.
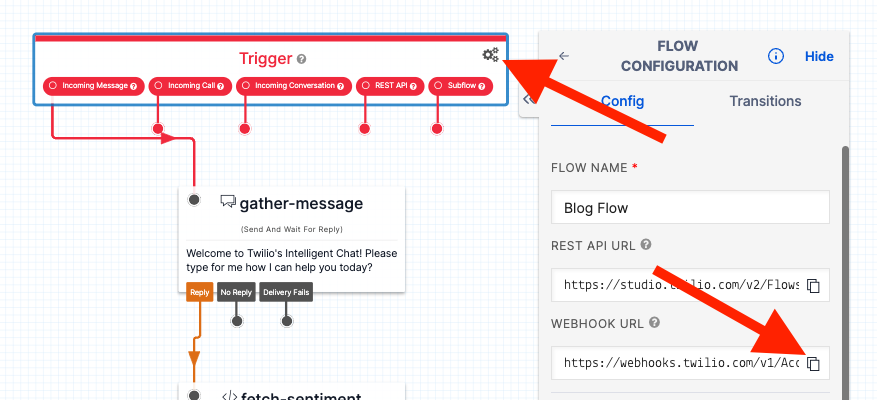
Go to your Studio Flow, click on the configuration icon inside the Trigger widget, and copy the Flow’s Webhook URL:
Next, follow this step by step guide on how to create a Messaging Service in your Twilio console.
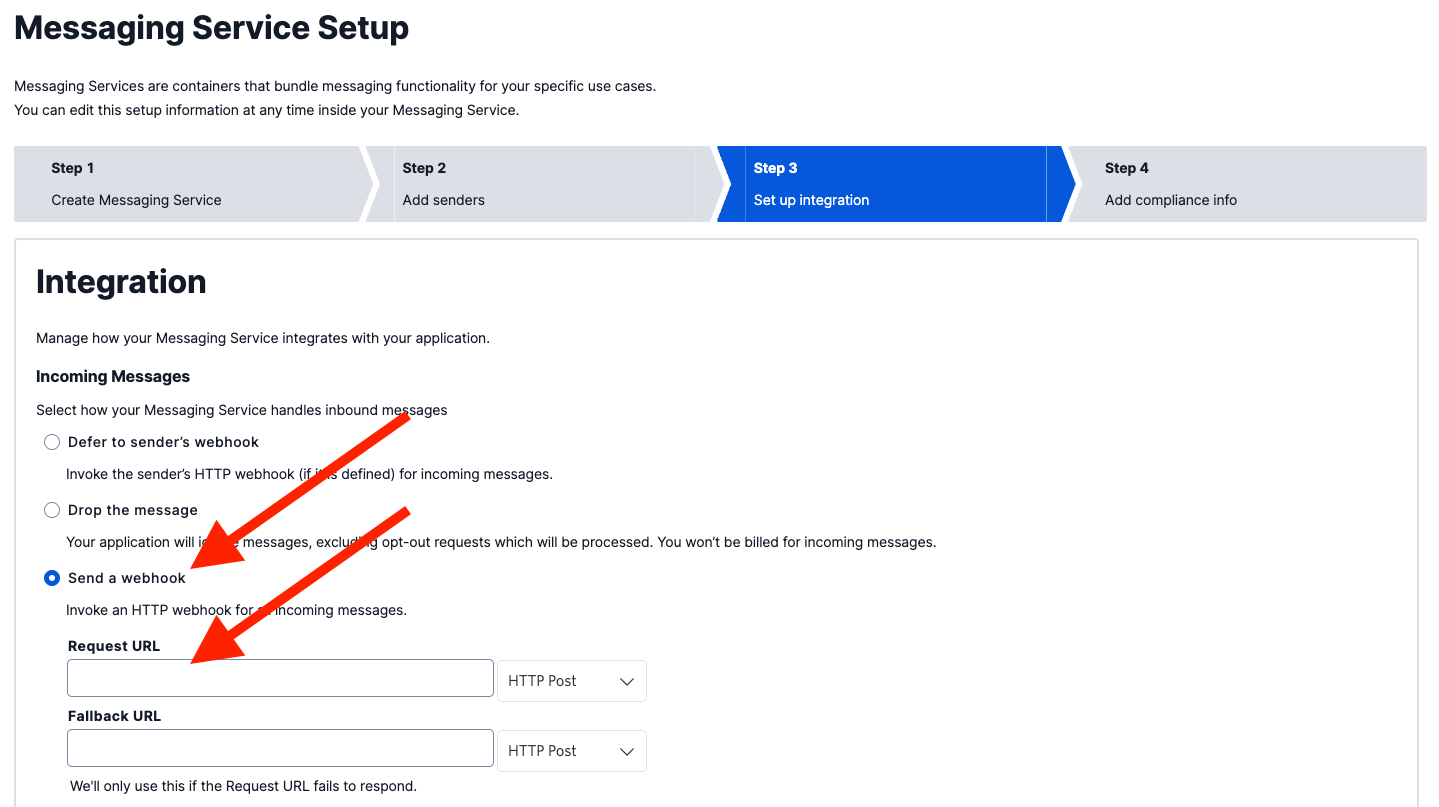
On Step 3, “Set up Integration”, paste the Studio Flow Webhook URL you copied above under Send a webhook > Request URL:
After you completed all the steps and the service was created, you have 2 options depending on the number you have.
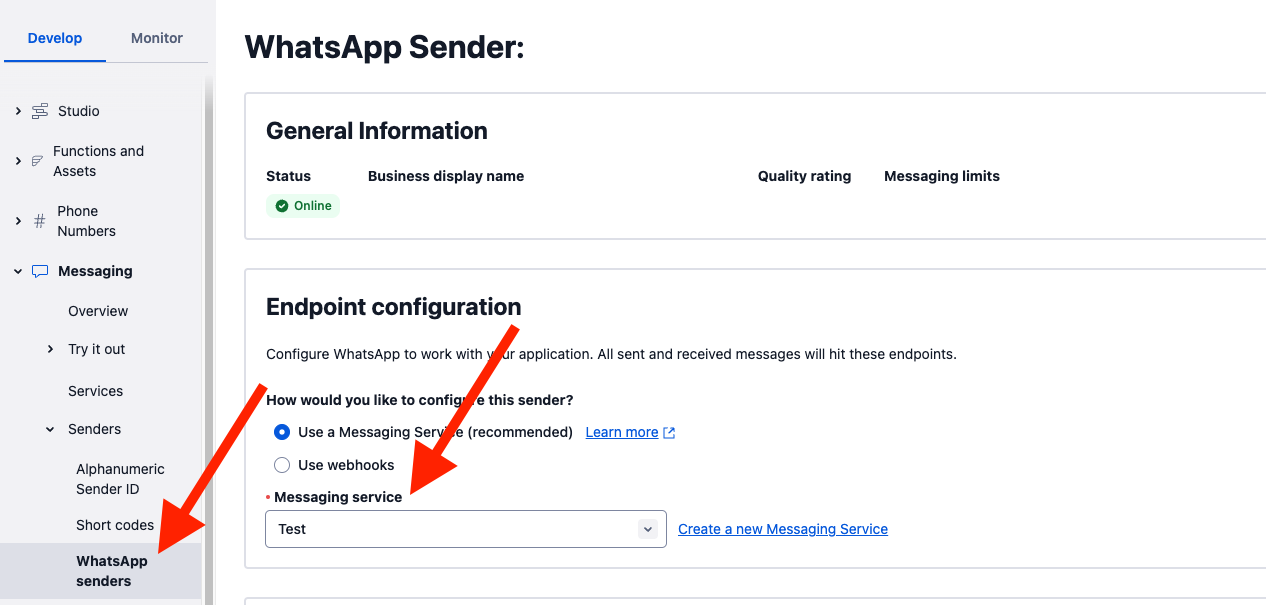
For WhatsApp Sender numbers, you need to go into Messaging > Senders > WhatsApp senders. Now click on your WhatsApp number, and under Endpoint configuration, choose the option to Use a Messaging Service and select your newly created service in the dropdown menu:
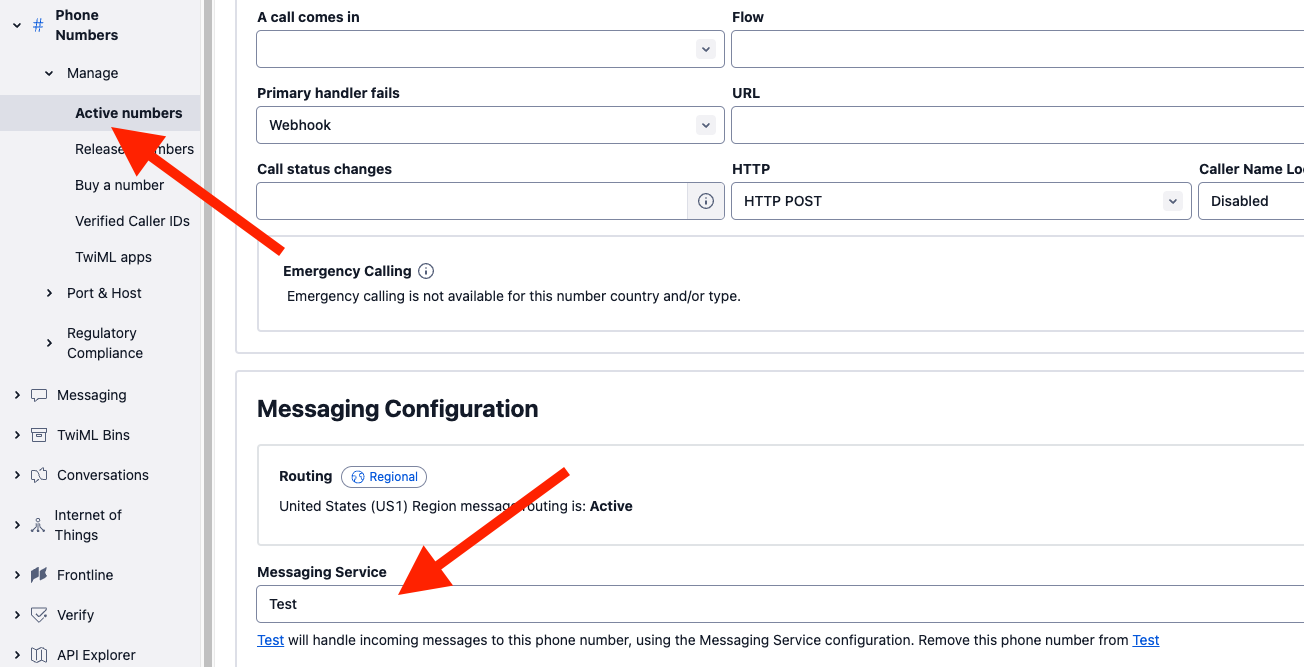
For SMS Capable numbers, you need to go into Phone Numbers > Active numbers, click on your number, and under Messaging Configuration > Messaging Service, choose your newly created service in the dropdown menu:
And that's it. All the incoming messages to your Twilio number will be directed to your Twilio Studio Flow automatically.
Conclusion
This tutorial showed a quick way to get you started building an AI-based sentiment analysis chatbot on WhatsApp and SMS. You can access this tutorial’s function code and Studio Flow JSON on GitHub here.
Now it’s up to you to be creative! Try making a request to your CRM in the beginning of the Flow, to see if the incoming number is from a known customer or a new customer. Create other branches in your Studio Flow. You get the gist; the sky's the limit to what you can do. We can’t wait to see what you build!
Gustavo Varallo is a Solutions Architect and part of the global Solutions Engineering enablement team at Twilio. He helps customers architect complex IT projects using cutting edge technology. Feel free to connect with him on LinkedIn here.
Related Posts
Related Resources
Twilio Docs
From APIs to SDKs to sample apps
API reference documentation, SDKs, helper libraries, quickstarts, and tutorials for your language and platform.
Resource Center
The latest ebooks, industry reports, and webinars
Learn from customer engagement experts to improve your own communication.
Ahoy
Twilio's developer community hub
Best practices, code samples, and inspiration to build communications and digital engagement experiences.


