Adding Vim keybindings to Xcode with XVim
Time to read: 3 minutes

When building iOS applications, you are most likely using Xcode. While Xcode is awesome, I miss the thrill of modal text editing I get when using my favorite text editor: Vim. Although Vim is available on OSX by default, it’s difficult to use for iOS development. Using XVim, it’s possible to get the best of both worlds by adding Vim keybindings and functionality to Xcode.
Preparing a certificate for code signing
Before moving on, make sure you have Xcode closed.
Starting with Xcode 8 Apple no longer loads third party plugins so we have to code-sign Xcode in order to do so. You can follow the steps on this page, or continue reading.
If you already have a certificate from Apple’s developer program, you can skip to the next section. Otherwise, do the following:
- Open “Keychain Access” (in Applications -> Utilities) and select “login” in the left pane.
-
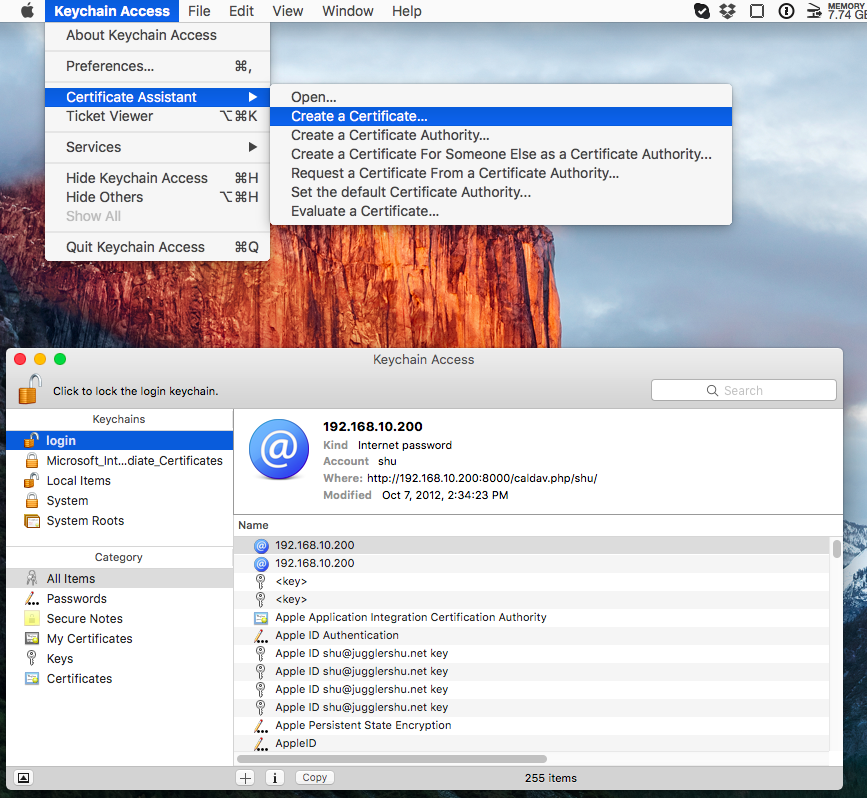
Select Create a Certificate (in KeyChain Access -> Certificate Assistant) as seen in this screenshot:

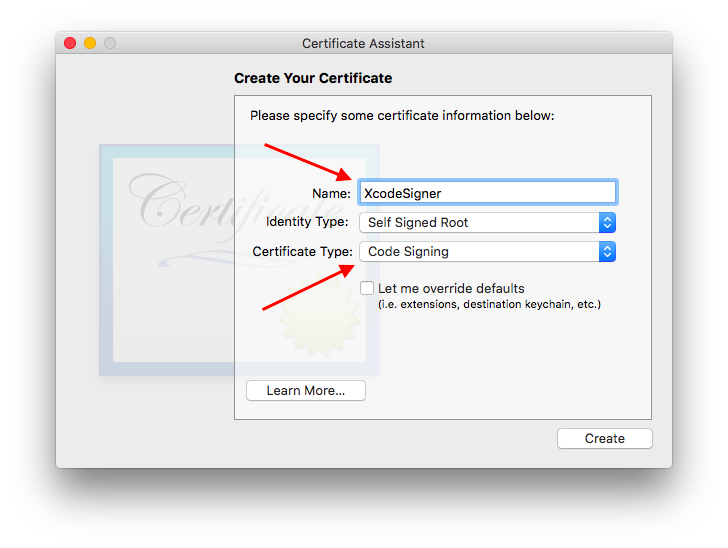
- Input your name you want to use and select “Code Signing” for Certificate Type. This name is used later in a terminal command, so use an easily distinguishable name here. In this example, we’re using XcodeSigner.

You now have a certificate for code signing.
Building XVim
Use your certificate by running the following command in the terminal:
This will probably take a while, so you might want to jam for a bit while you wait.

We’re now ready to actually get started with XVim. I am already excited for all of the modal text editing that the future holds for us! Start by cloning the XVim Github repository by entering this command in your terminal:
Next double check that xcode-select points to your Xcode:
Mine is at /Applications/Xcode.app/Contents/Developer
Use xcode-select -s to set this if it’s not correct. From the XVim directory, run the following command to make:
You will see some nonsensical looking output in your terminal, but there should be a ** BUILD SUCCEEDED ** message at the end. If you have any troubles with the latest Xcode version, this Github issue has a fix you might want to check out. Switch to the develop branch if this is the case: git checkout develop.
During the build process, you might be asked for permission with a message that says compatibility has not been confirmed with your Xcode version. Just enter y if this happens. After this, XVim should be compiled. All that’s left is the fun part – customization of your .xvimrc!
Creating a .xvimrc for customization
Everybody knows that the real fun of using Vim is being able to configure your keybindings the way you want them. Sometimes I feel slightly disoriented when using naked Vim or vi or when my settings aren’t just right.
In XVim, things work pretty similarly at a basic level. Just create a .xvimrc in your home directory, and add to it from there. You can even do it using Vim if you want:
Enter insert mode (unless you’re using a different text editor), and paste the following if you want a basic example .xvimrc:
Feel free to change or not use any of that. It’s a barebones .xvimrc that I threw together which I found helpful. Xcode on its own already takes care of much of the important stuff that Vim is missing, but now you’re equipped with the power of modal editing.
Fire up Xcode and feel the power of Vim!

I’d love to hear more about what you’re working on. Reach out if you ever want to share some Vim or Xcode tips and tricks.
- Email: Sagnew@twilio.com
- Twitter: @Sagnewshreds
- Github: Sagnew
- Twitch (streaming live code): Sagnewshreds
Related Posts
Related Resources
Twilio Docs
From APIs to SDKs to sample apps
API reference documentation, SDKs, helper libraries, quickstarts, and tutorials for your language and platform.
Resource Center
The latest ebooks, industry reports, and webinars
Learn from customer engagement experts to improve your own communication.
Ahoy
Twilio's developer community hub
Best practices, code samples, and inspiration to build communications and digital engagement experiences.


