Add Chat to a Rails App with Twilio Programmable Chat
Time to read:
This post is part of Twilio’s archive and may contain outdated information. We’re always building something new, so be sure to check out our latest posts for the most up-to-date insights.
There’s more to chat than sending messages back and forth. There’s chat history, typing indicators, read receipts and integrating with third party software. On top of all that, there’s making sure it all works across both web and mobile devices.
Twilio Programmable Chat is a set of APIs and SDKs that provide everything you need to build cross-platform messaging. In this tutorial we’ll get started with Programmable Chat by adding simple chat to a Rails app in five steps:
- Authenticate a User In Rails
- Set up Twilio account credentials
- Create a token for the client
- Add chat controls to the Rails view
- Wire up the Programmable Chat with the JavaScript SDK
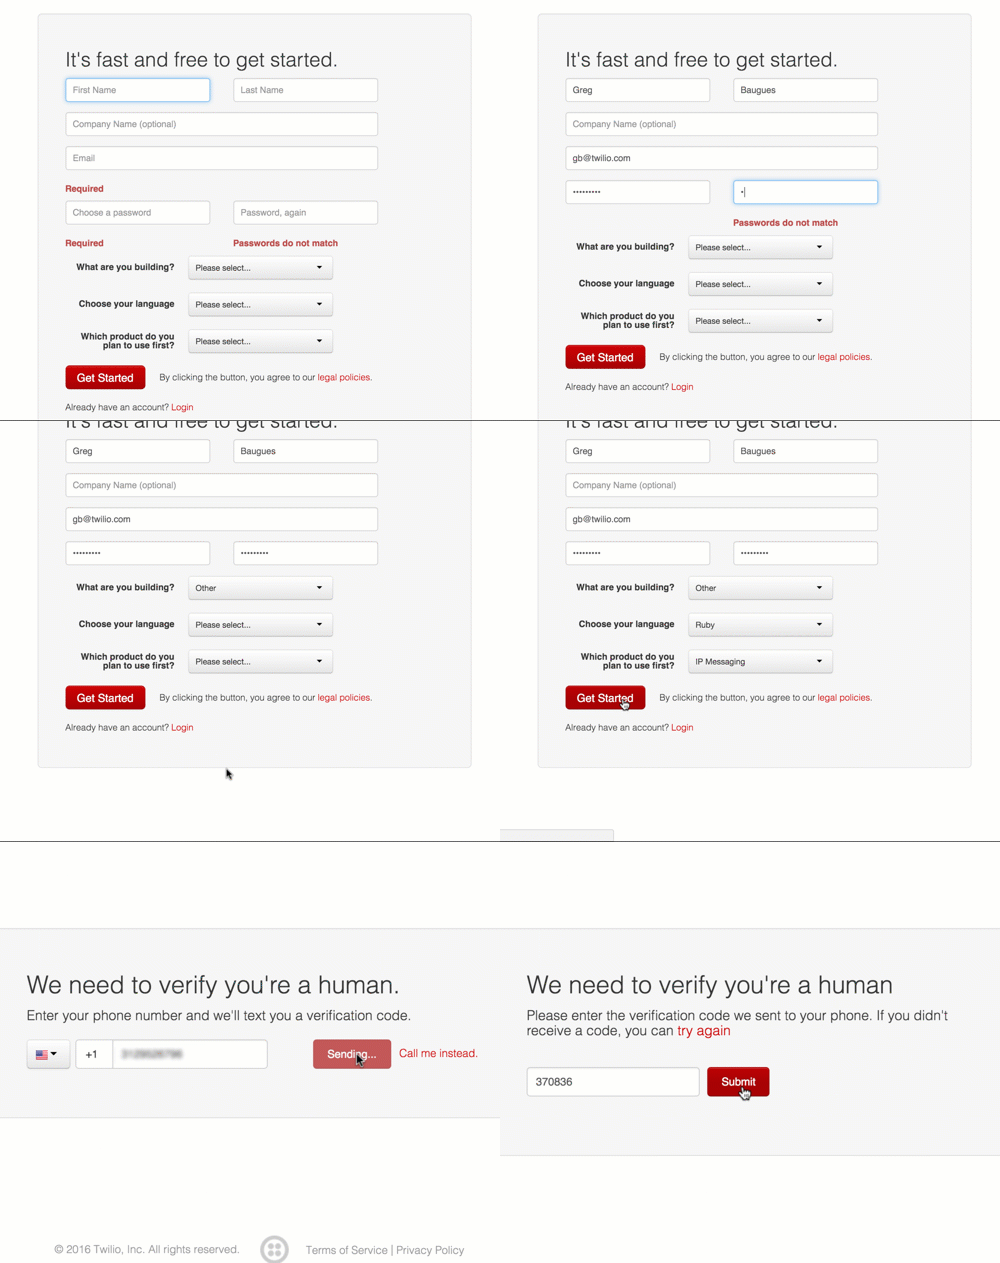
Assuming you have some familiarity with Rails and JavaScript, this tutorial will take about 20 minutes to complete. To get started, sign up for a free Twilio account.
1. Authenticate a User in Rails
Though there are some use-cases for anonymous chat, typically you want to know who you’re talking to with a reasonable degree of certainty. For that reason, we’ll start with a pre-built Rails app that requires a user to create an account and sign in. There are a lot of great tutorials on Rails authentication out there, so we’ll move through this step quickly.
To get started, clone the starter app and run through the standard procedure to get a Rails app up and running (you’ll need PostgreSQL for this to work. On OSX, I like Postgres App):
Once your Rails is running, visit localhost:3000 and create an account. Then watch this one-minute video that walks you through the app and the code that powers it:
To recap, the key pieces are:
- session[:user_id] tracks if a user is signed in
- users_controller and sessions_controller set session[:user_id]
- authenticate! in the application_controller redirects to the sign-in screen if sessions[:user_id] is nil.
- current_user in the application_controller returns the the signed in user.
2. Setup our Twilio Account Credentials
Add two gems to your Gemfile :
Install your gems:
Create a file named config/env.yml and paste in these four lines as placeholders for the credentials need to authenticate with Twilio:
Here’s where you find each of those values:
Account SID
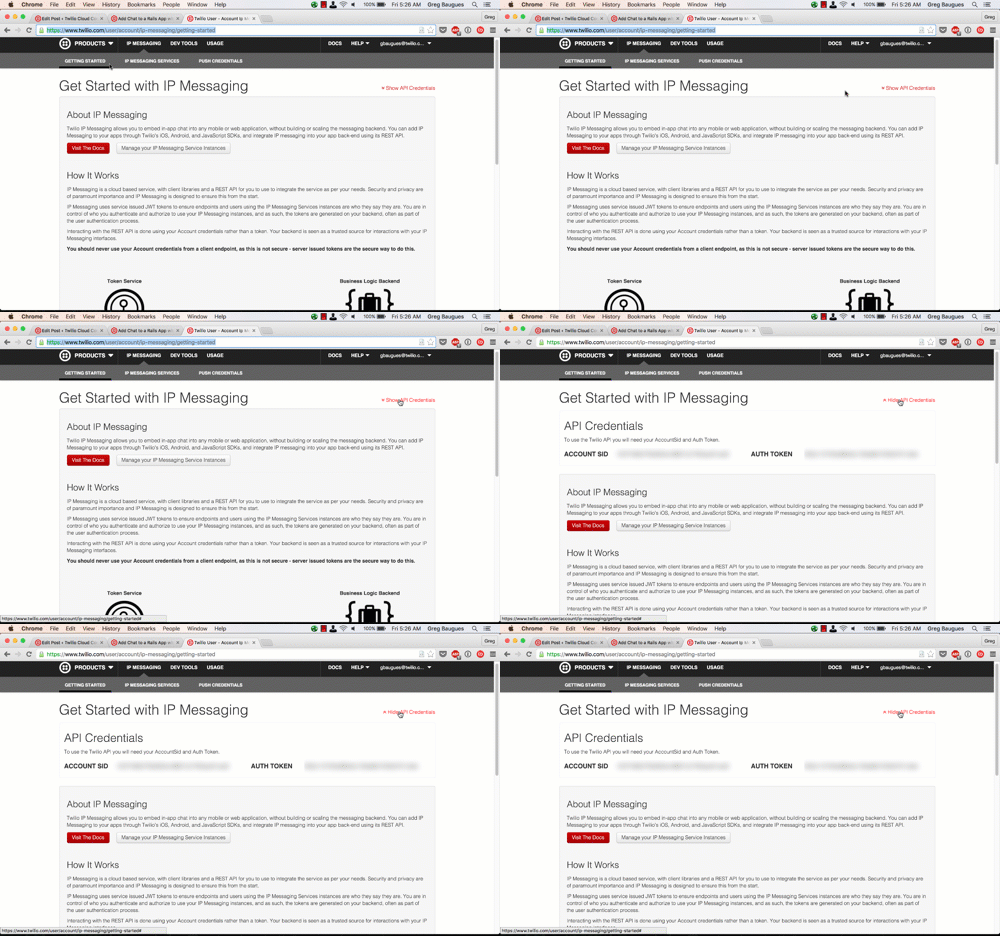
Go to your Programmable Chat dashboard. In the top right hand corner, click Show API Credentials. Copy your Account SID and add it to the first line of env.yml. (You will not use the Auth Token. More on that below.)
IPM Service SID
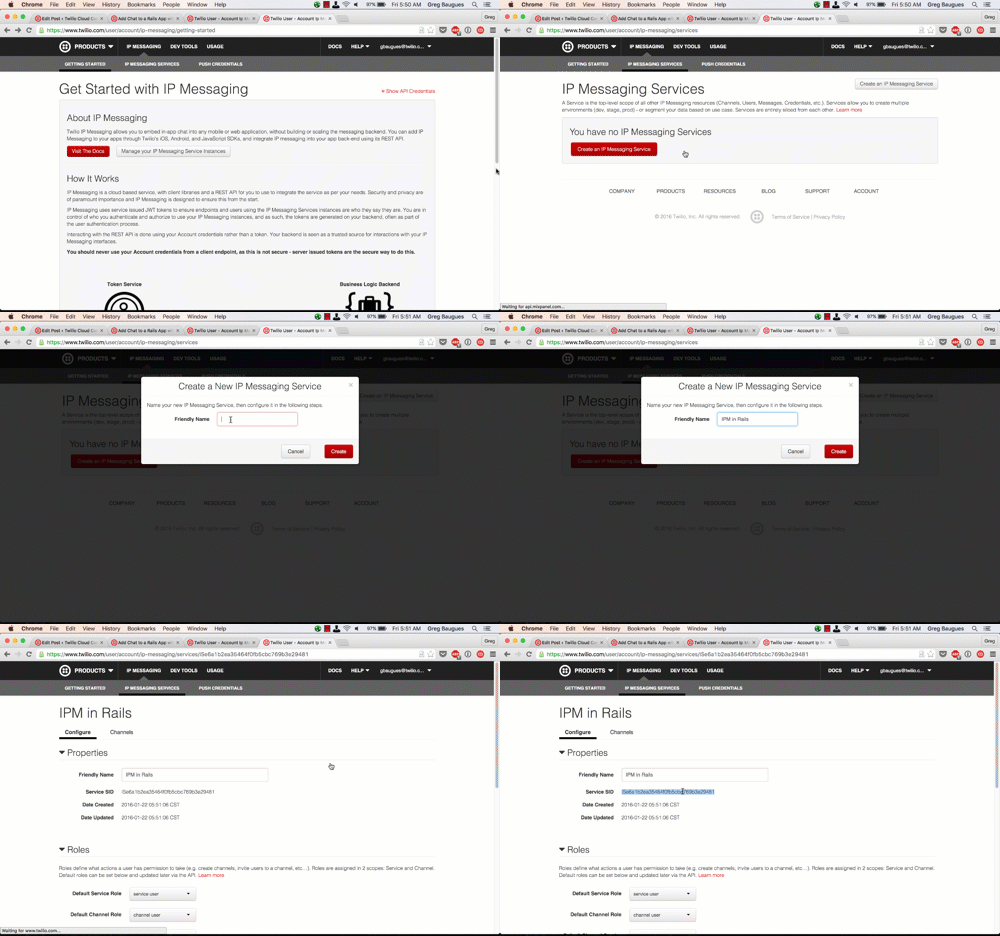
Each Twilio Programmable Chat app has its own channels, conversations, message history and participants. You’ll need an IPM Service SID to identify which IP Messaging app you’d like to use.
On the IP MessagingProgrammable Chat dashboard, click Manage Your Programmable Chat Service Instances, create a new IPM Service, then copy its Service ID to env.yml .
API Keys
If you’ve worked with Twilio before, you may be used to copying the AUTH_TOKEN along with the ACCOUNT_SID. The problem with a single authentication token is that if it gets compromised (e.g. you accidentally commit it to a public repo) then you have to change it in all of your Twilio apps. Instead, we’ll create a set of API keys for use by this app only.
Visit your API keys dashboard, create a set of API Keys and copy their values to env.yml
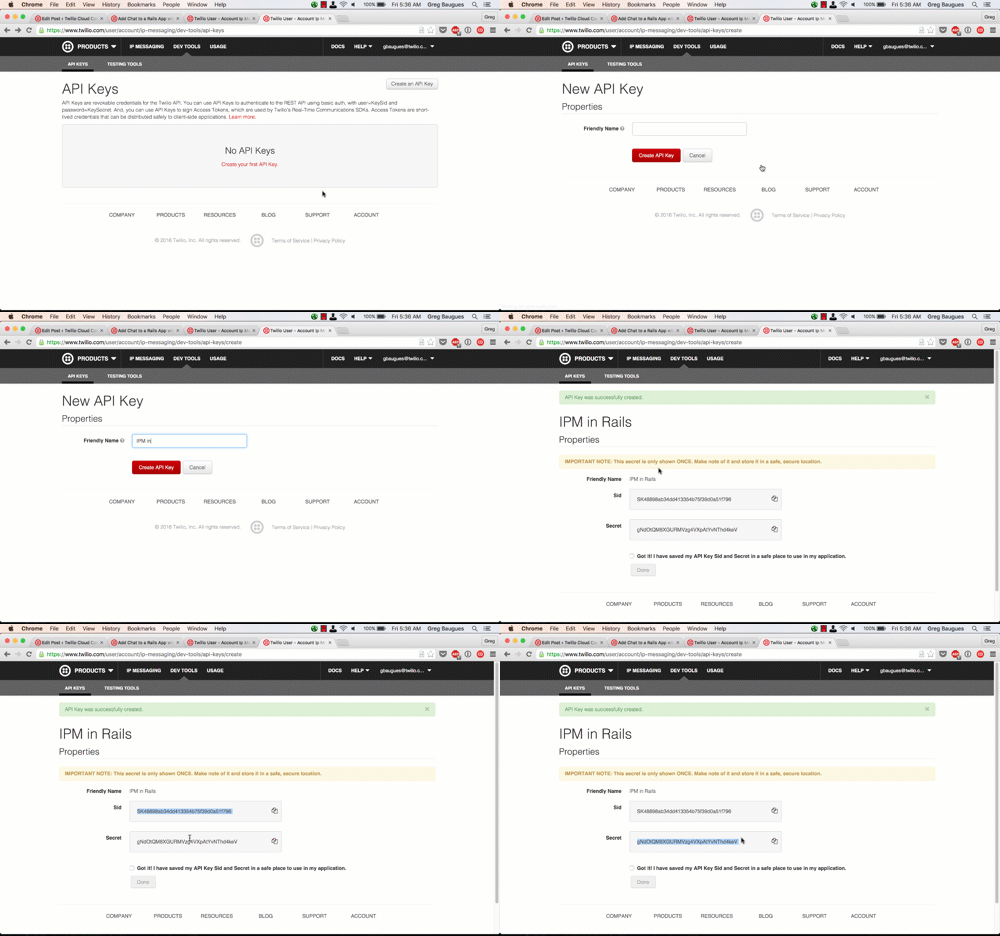
Restart Rails for the values in env.yml values to take effect.
We’ll use the credentials to create a secure token to pass to the client. Why do you need a secure token? Well, let me tell you….
3. Create a token for the client
Imagine an exclusive club that only allows entrance to members and friends of members. Members show a membership card and whisper a password to the doorman to get in. But what if they want to send a friend to the club in their absence? It’d be unwise to simply give that friend their card and password. Instead, the club gives members tokens that they can then give to friends for one-time access.
Client authentication happens in much the same way. Since client side data can be seen by anyone who knows how to open a JavaScript console, we don’t want to pass our Twilio credentials directly to the browser (do you really want to give The Internet access to your Twilio account?) Instead, we’ll create a temporary access token and pass that to the client. The client then passes it to Twilio to make an authenticated API call.
Add a route in config/routes.rb:
In the console, create a tokens controller:
In tokens_controller.rb we need:
- The before_filter authenticate! we saw in Step 1
- a method to get a token from Twilio. This uses the Ruby gem, our account credentials, a timeout, and the users’s name.
Replace everything in tokens_controller.rb with:
Now, we don’t want to give that token carte blanche access. We need to be specific about:
- Which user gets access and what device are they on? This combination of user + device is called an “endpoint.”
- Which Programmable Chat service is this token for?
Add a method to create a “grant” to define the endpoint and Programmable Chat SID. Endpoints can’t have spaces in them, so we’ll replace any spaces in the username with underscores.
The post route we created in routes.rb expects a create action. This action will:
- create a token
- create a grant
- add the grant to the token
- return the token as a JSON Web Token (JWT)
Visit localhost:3000 again and sign in. Open the JavaScript console and paste:
Copy the returned token into into jwt.io and you should see something like this:
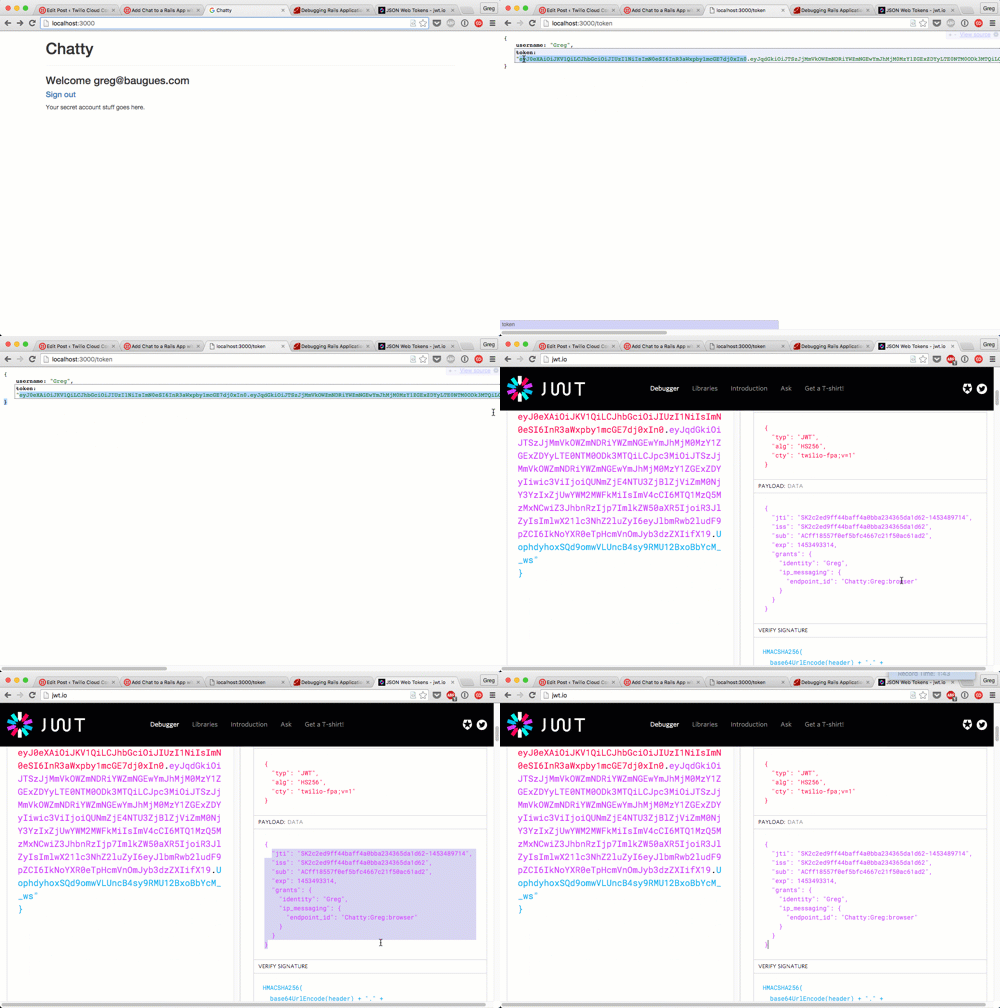
Now that our client can securely communicate with Twilio, we can add the chat functionality.
4. Add chat to the Rails view
We need to add two UI elements to our accounts view:
- a box for the chat messages
- an input field to type new messages
Replace all the code in app/views/accounts/show.html.erb with:
Add this CSS to app/assets/stylesheets/accounts.scss to make the messages box scroll:
Refresh your account page to make sure your messages box and input field are there.
Below the last JavaScript include in app/views/layouts/application.html.erb, include the Twilio Programmable Chat JavaScript SDK, and a yet to be created chat.js .
For the sake of avoiding an asset pipeline tangent in an already long tutorial:
- create the directory public/javascripts
- create a file called chat.js in there.
- In chat.js , add this function to print to the messages box
Reload localhost:3000/account. Open the JavaScript console and type printMessage("Hello Chat!") . If a message shows up in the messages box, you’re good to go.
5. Wire up Programmable Chat
Last step! We’ll use the Twilio Programmable Chat JavaScript SDK to:
- join or create a chat channel
- send and receive messages in that channel
Now, my apologies for the big blocks of code that’s about to follow. I tried breaking it up several times, but JavaScript’s indentations and punctuation made it much easier just to throw it down in one chunk.
Below the printMessage function in chat.js , add a jQuery ready function where the rest of the code in this tutorial will live. Here we create variables for a channel and username. Then we create a setupChannel() function that:
- define variables for the channel and username
- join the channel and then print a message saying that the use has joined the channel
- bind an action to the messageAdded event (which comes from the Twilio SDK) to print the message to the screen
Then we will listen to the #chat-input field for a keyCode of 13 — that’s the enter key. When our bound function hears that, we’ll send the value of that field to the channel as a message.
Here’s the code:
If it feels like something is missing from that setupChannel() function, you’re right. We need to get our channel from the Twilio Programmable Chat SDK. To do that we:
- use an async JSON request to retrieve a token from our token server
- use the token to create an accessManager and a messagingClient
With that messagingClient we can:
- look up the the chat channel
- If the channel exists, store it in our chatChannel variable and run a yet to be created function called setupChannel .
- If it doesn’t exist, create the channel before doing those two things.
Inside the $(function() , below that last bit of code you pasted to listen to the keypress, paste this block:
Open up two browsers (probably need an Incognito mode) and chat on with your bad self!
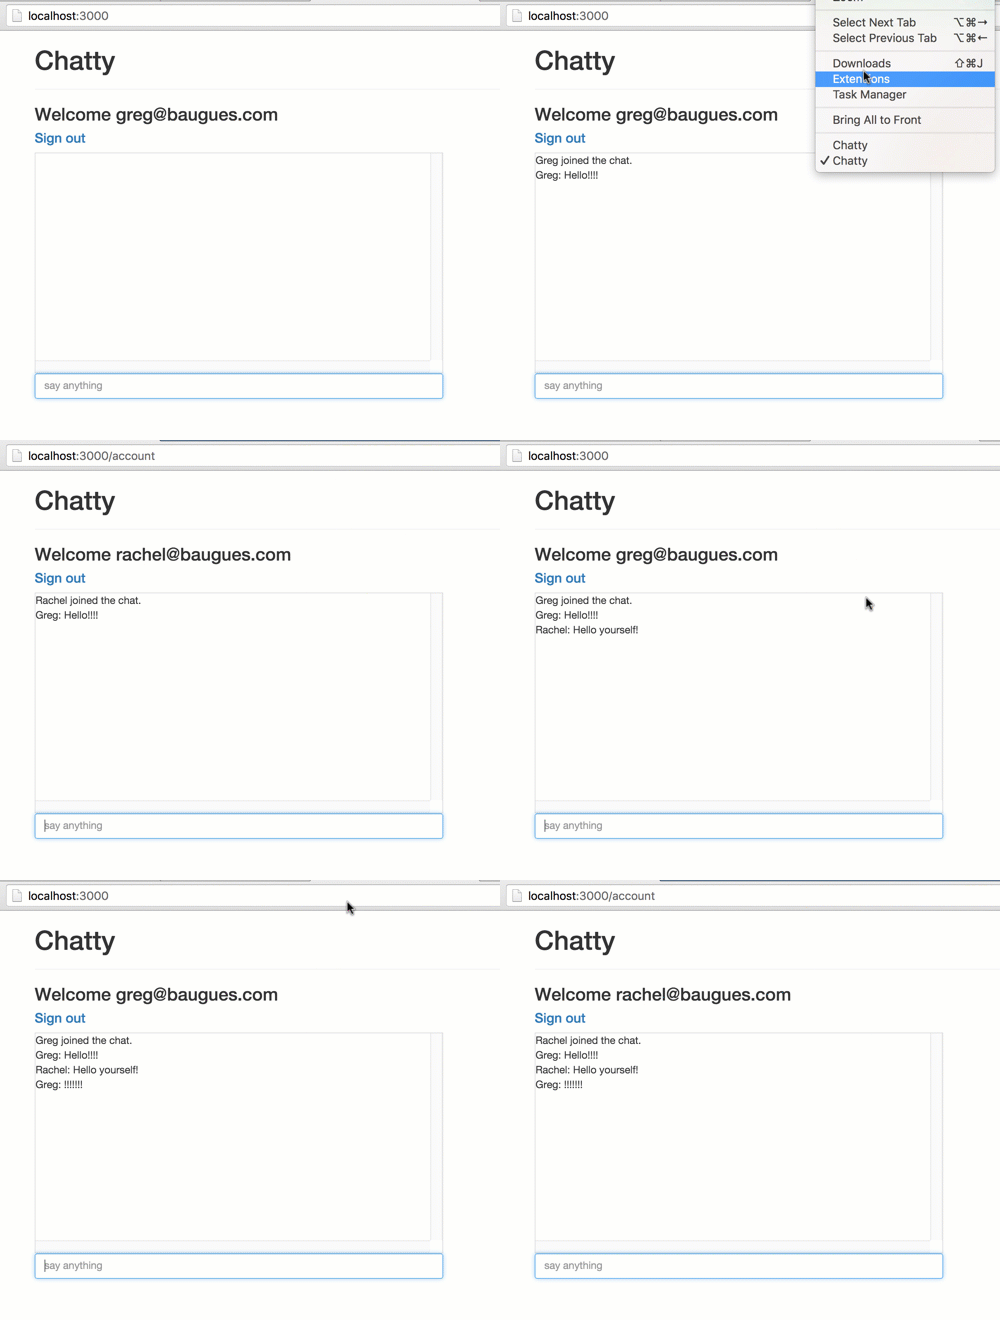
Onward
We’ve just scratched the surface of what’s possible with Programmable Chat. In fact, the full power of Twilio Programmable Chat is that in addition to offering a way to pass real-time messages, it also gives you chat history, typing indicators, read receipts and REST APIs to integrate with 3rd party solutions. There are also SDKs for Android and iOS apps.
To learn more, check out the Twilio Programmable Chat API Documentation.
If you have any questions or build anything cool with Programmable Chat, I’d love to hear about it. Hit me up at gb@twilio.com or on Twitter at @greggyb.
Related Posts
Related Resources
Twilio Docs
From APIs to SDKs to sample apps
API reference documentation, SDKs, helper libraries, quickstarts, and tutorials for your language and platform.
Resource Center
The latest ebooks, industry reports, and webinars
Learn from customer engagement experts to improve your own communication.
Ahoy
Twilio's developer community hub
Best practices, code samples, and inspiration to build communications and digital engagement experiences.


