How to Accept Payments with Laravel Cashier and Paddle
Time to read:
March 11, 2025
Written by
Reviewed by
Implementing Payment with Laravel Cashier and Paddle
For online businesses, having a reliable payment system is critical since most transactions happen online. As a developer, understanding how to implement online payment systems is an important skill, as every business needs an efficient way to handle payments. In this tutorial, we’ll set up a subscription-based payment system using Laravel, Laravel Cashier, and Paddle.
To demonstrate this, we’ll build a basic time-tracking web application with subscription payments. While anyone can sign up, only users with active subscriptions can access the time-tracking dashboard. Now, let's dive into building this!
Prerequisites
The following are required to follow along effectively with this tutorial
- Experience with the Laravel framework
- An understanding of Laravel Breeze
- A Paddle account
- PHP 8.3 or above
- Access to a MySQL database. Feel free to set one up with Laravel Sail if you don't have access to one already.
- Composer installed globally
- ngrok
Set up the project
To get started creating the project, we need to create a new Laravel application, and change into the new project directory, by using the commands below:
Once we’ve set up our Laravel project, the next steps are configuring the database, and implementing authentication for the application. This will ensure that users can securely register, log in, and access the relevant features of the app.
For this tutorial, we'll be using MySQL as our database. In your .env file, update the following fields with your database's credentials.
Next, we’ll set up authentication using Laravel Breeze. You can install it by running the following command.
Then, run the following commands to complete the installation.
When you run the command, you'll be asked to pick a frontend stack. Choose Blade. After that, the rest of the setup will continue. The php artisan migrate command runs your database migrations, npm install installs frontend dependencies, and npm run dev starts the development server.
To make sure everything is functioning properly at this point, you can use the command below to launch the application.
Add time tracking functionality
Subscription-based applications typically offer a service that users must subscribe to in order to access them. In our case, the service will be a simple time-tracking feature. Only users with active subscriptions will be able to use its functionality.
Let’s begin by implementing it. To start, we’ll need to create a model, controller, and migration. You can do this by running the following command:
After creating the files above, head over to app/Http/Controllers/TimeTrackerController.php file and update it to match the following code.
In the code above, the index() function returns the time-tracker.blade.php file along with all the time entries in a variable named $entries.
The start() method starts a new time-tracker entry by recording the current time as start_time. It creates a new record in the TimeTracker model and redirects the user back to the previous page.
The stop() method stops an active time-tracker entry by updating the end_time field to the current time for the specified entry. Like the start() method, it also redirects the user back to the previous page.
Add the accompanying Blade template
Next, we need to create the Blade template for our front end. In the resources\view directory, create a file and name it time-tracker.blade.php. Then, add the following code to the newly created file:
We also need to modify the migration file we created earlier. Then, in database/migrations,open the file ending in _create_time_trackers_table.php and update the up() function to match the following.
Next, update the TimeTracker model by opening the App\Models\TimeTracker.php file. Then, replace the existing content with the following code.
We also need route links, so let's create routes for our time tracker. To do that, add the following to routes\web.php file.
After that, add the following use statement to the top of the file.
Then, run migration using the command below.
If everything works correctly, you should now be able to register and log in. After doing so, your dashboard should also look similar to the screenshot below.

Set up Laravel Cashier
We will handle all payments using the Paddle payment gateway. But, instead of interacting directly with Paddle's API, we will use Laravel Cashier to streamline the process.
Here are the steps that we will follow to set everything up:
- Install Laravel Cashier for Paddle
- Create a Paddle sandbox account
- Generate the necessary API keys
- Set up different products and pricing plans
- Create a webhook to handle payment events
- Initiate payments and restrict access for non-subscribers
Install Laravel Cashier
Similar to many other Laravel packages, Composer can be used to install Laravel Cashier. Run the command below to install it.
Once the installation is done, we need to publish the Cashier migration file using the Artisan command below.
And finally, we need to re-run our migration to make sure all the necessary database tables are created.
Set up the Paddle Sandbox
The Paddle Sandbox is Paddle's development environment, allowing us to test our application's payment functionality using test API keys without processing real transactions. To begin, you need to connect the application to Paddle.
Before you do though, add the following configuration to your .env file.
Now, login to your Paddle Sandbox dashboard and click on Developer Tools > Authentication.
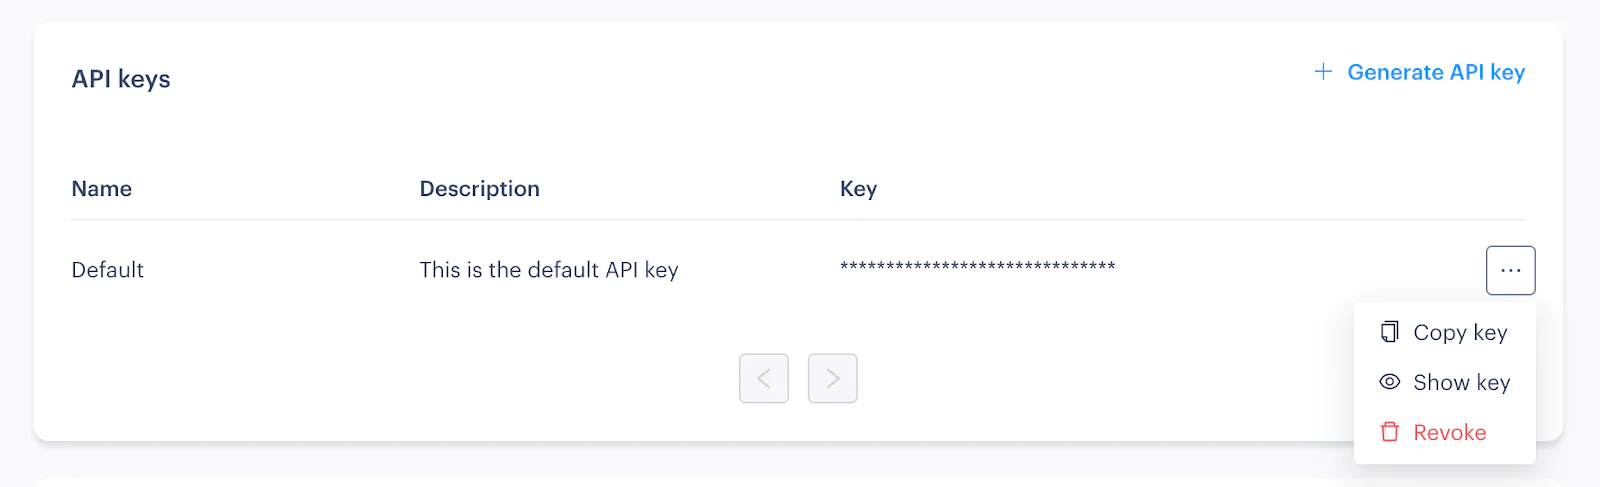
There, on the right-hand side of the API keys section, click the three dot button and click Copy key. Then, paste the key in place of <<PADDLE_API_KEY>> in .env.

Next, in the Client-side tokens section, click Generate client-side token.

In the Generate token form that appears, add a name, such as "Laravel Cashier Integration", and click Generate.

After that, click the three dot button and click "Copy key". Finally, in .env, paste the key in place of <<PADDLE_CLIENT_SIDE_TOKEN>>.
Configure the Paddle Webhook
Next, we need to set up the Paddle webhook for communication between our application and Paddle. Laravel Cashier already took care of the webhook implementation and route in our Laravel codebase. The route paddle/webhook is already defined and works.
You can confirm this by running the following command to list all the available routes in the application.
To connect this route to Paddle, we'll need to expose our local development environment to the Internet. Since we're developing locally, we can use a tunneling service like Ngrok for this, by running the following command.

In the ngrok output, take note of the Forwarding URL. In my case it was https://2bf9-169-159-98-231.ngrok-free.app, it will be different for you.
Using the ngrok Forwarding URL, we can create our webhook in the Paddle sandbox dashboard, by clicking on Developer Tools > Notifications. On the notification page click the New Destination button in the top right corner of the screen.
There:
- Set the URL field as your
<<NGROK_FORWARDING_URL>>/paddle/webhook. For example, in my case I will havehttps://2bf9-169-159-98-231.ngrok-free.app/paddle/webhook. - Set the Description field to "Paddle Webhook"
- Under Events, check: subscription.canceled, subscription.created, subscription.paused, subscription.updated, transaction.completed, and transaction.updated
- Click Save destination

After saving the webhook, you'll see the new notification in the list. Click the three dot button to the right of the new notification and click Edit destination.

Then, copy the Secret key value and paste it in place of <<PADDLE_WEBHOOK_SECRET>> in .env. In .env, PADDLE_SANDBOX=true, as you saw earlier, is already set to true. It informs Laravel Cashier that we are in development and are working with the sandbox. This value would be set to false in production.
Create a Paddle product
In the final step of the Paddle sandbox setup, we’ll define products with fixed prices in the Paddle dashboard. This is where you’ll set up the pricing structure for your subscription services.
Paddle allows you to create products with multiple pricing options. For instance, let’s say you have a subscription service with a "Basic" plan. On the Paddle dashboard, you could define this product with two pricing tiers:
- One for a basic monthly subscription (
price_basic_monthly) - nother for a basic yearly subscription (
price_basic_yearly)
Similarly, you could offer a "Pro" plan with both monthly and yearly pricing options. This flexibility allows you to offer different pricing options.
For this tutorial, we will create two products (Basic and Pro) with monthly and yearly prices for each of them. To get started, from your Paddle sandbox dashboard, navigate to Catalog > Products, then click the New product button on the top right corner of the page. For more clarity, check the image below

When the New product button is clicked, it opens a modal dialog that contains the form to create a product. Fill out the form by providing the required details (product name, tax category, etc). After that, click on the Save button in the top right corner of the page to save the details for the products. Check the image below for further clarification.
After saving the new product, the next step is to create the different prices for the Basic plan. To do this, navigate to Catalog > Products page from the Paddle sandbox dashboard. The product page should look like the image below.


Get started by clicking the button at the far right of Basic on the Products page, then clicking "View". You should be redirected to a page that looks like the screen below. Click the New price button on this page.

This opens up a modal window with the form needed to create the different prices. If everything is done right, your screen should look just like the image below at this stage.

Now, we can add different prices to the basic product by filling out the form. Add the amount to the Base price form field. Select the billing type (Type). In our case, it should be set to Recurring as we are building a billing system. Then, set Billing period to "monthly", and set values for Trial period, Price name, and Internal description respectively. After that, save the changes by clicking the Save button.
You need to repeat the process the second time. This time, set Billing period to "Yearly" and Price name to "price_basic_yearly" to create a yearly plan.
Now, we have created our Basic product and added prices for monthly subscriptions and yearly subscriptions respectively. So, we need to do the same for our Pro product plan. Follow the steps above again to do so with a monthly price named "price_pro_monthly" and a yearly price named "price_pro_yearly" respectively.
If done correctly, you should have two plans with four prices. With that done, let us refactor our time tracker to allow only subscribed users to access the dashboard.
Before we proceed any further, let's add the following to the end of our .env file and add values for the Paddle price IDs to keep things organized and simple.
Set up a default payment link
The final step in the Paddle sandbox configuration is setting up a default payment link. To do this, head to Paddle > Checkout > Checkout Settings and add your default payment link under the "Default payment link" heading. Since we are developing locally, our default link is https://localhost:8000. After that, click the save button and it should save. Check the image below for a visual reference.

Set up a billable model
To start using Cashier, we need to add the Billable trait to our target model. In this case our user model. This trait gives us access to methods for handling billing tasks, like setting up subscriptions and updating payment details. You can add the Billable trait to any models that need to be billable.
Since we want to make our User model billable in this case, let's add the Billable trait to App\Models\User.php like so.
Add the ability to handle payments
To load the Paddle checkout widget, we need to import Paddle's JavaScript library into our project. To do that, add the following to the bottom of the <head> section of resources/views/layouts/app.blade.php.
For a user to subscribe to any of our payment plans, they need to click a button that opens a Paddle payment checkout overlay for the given price and allows them to pay. The payment overlay will be triggered using a Blade component button named paddle-button.
Gladly, we don't need to create this as Cashier already offers a paddle-button Blade component out of the box. You can also choose to render an overlay checkout manually if you prefer. But, for this tutorial, we will use the paddle-button blade component.
Before showing the checkout overlay widget, we need to create a checkout session using Cashier. This session provides the checkout widget with the details of the billing process that needs to be carried out.
The code below is an example of a checkout session instantiated from a /buy route. Let's take a closer look at it. A good understanding of how this code works will come in handy in our own implementation.
The checkout method accepts the price_id, and returns a view where the Cashier Blade component button would accept $checkout as an argument to trigger the checkout overlay.
Let's modify our TimeTrackerController to enable users to pay before accessing the tracker. Update App/Http/Controllers/TimeTrackerController.php with the following code .
We made a few changes to the App/Http/Controllers/TimeTrackerController.php file to send subscribed users to a different view and unsubscribed users to the subscription page.
$basicMonthly, $basicYearly, $proMonthly, $proYearly are variables used to store different subscription plans (monthly and yearly for both Basic and Pro) pulled from .env.
The __construct() method initializes these properties by retrieving the subscription plan IDs from the environment file.
index() is the main entry point for users accessing the time tracker. We modified it to check if the user is subscribed using auth()->user()->subscribed(). If the user is subscribed, it fetches all the time-tracker entries and returns the time-tracker view with these values.
If the user is not subscribed, the method prepares checkout URLs for different subscription plans ( Basic Monthly, Basic Yearly, Pro Monthly, and Pro Yearly) using the paymentInit() method, and returns the dashboard view with these checkout options.
paymentInit() handles payment initialization by generating a Paddle checkout link for a given subscription plan. It uses the user's checkout() method and redirects them back to the dashboard route after a successful payment.
Let's modify the content of the dashboard to display the various payment links for unsubscribed users. To do this, navigate to resources/views/dashboard.blade.php and replace the code in it with the code below.
If you have everything set up correctly, your home screen should look like mine in the screenshot below, and your subscription payment should work using Paddle test cards.

Test the payment flow
Before testing, make sure that your Paddle webhook is set up correctly and that your application is served using ngrok to tunnel it to the internet. The ngrok URL must be the same as the one in your Paddle webhook configuration.
Now, to test the payment flow, register a new user, log in to the application, and pay for any of the subscription plans using the Paddle test card details. After a successful payment, you should be redirected to the dashboard, where you can access the time tracker features, similar to the image below.

That's how to accept payments with Laravel Cashier and Paddle
A thumbs up if you read to the end and follow along with the code. You've learned how to integrate subscription payments in a Laravel application using Laravel Cashier and Paddle.
In this article, we built a very simple time tracker in Laravel, backed by MySQL. We also went through the steps of implementing payments using Laravel Cashier and the Paddle payment gateway.
We explored some of the core features of Paddle like:
- Creating a sandbox environment account
- Creating different products and adding prices to them
- Configuring webhook on Paddle using ngrok to tunnel our application to the internet
- Modified our
Usermodel into a billable model able to make payments - Ensured that only subscribed users can access the core features of the application
This should be enough to get you started, however, there is still a whole lot we did not cover. Take a look at the Laravel Cashier documentation for Paddle for further reading.
Moses Anumadu is a software developer and online educator who loves to write clean, maintainable code. He's creating something awesome for Laravel developers with Laravel. You can get in touch with him through his website.
The Laravel and Paddle logos are copyright of their respective owners.


Related Resources
Twilio Docs
From APIs to SDKs to sample apps
API reference documentation, SDKs, helper libraries, quickstarts, and tutorials for your language and platform.
Resource Center
The latest ebooks, industry reports, and webinars
Learn from customer engagement experts to improve your own communication.
Ahoy
Twilio's developer community hub
Best practices, code samples, and inspiration to build communications and digital engagement experiences.