Transcribe your Phone Calls to Text in Real Time with Twilio and Vosk
Time to read: 12 minutes
In this tutorial, you are going to learn how to implement live transcription of phone calls to text. The phone calls will be routed through a Twilio phone number, and we will use the Media Streams API to stream the incoming audio to a small WebSocket server built using Python. Once in your server, the audio stream will be passed to Vosk, a lightweight open-source speech recognition engine that runs locally on your computer, with support for many languages.
Requirements
To work on this tutorial, you will need:
- Python 3.6 or newer. If your operating system does not provide a Python interpreter, you can go to python.org to download an installer.
- A Twilio account. If you are new to Twilio, click here to create a free account now and receive $10 credit when you upgrade to a paid account. You can review the features and limitations of a free Twilio account.
Add a Twilio phone number
Your first task is to add a Twilio phone number to your account. This is the number that will receive the phone calls to transcribe.
Log in to the Twilio Console, select “Phone Numbers”, and then click on the “Buy a number” button to buy a Twilio number. Note that if you have a free account, you will be using your trial credit for this purchase.
On the “Buy a Number” page, select your country and check “Voice” in the “Capabilities” field. If you’d like to request a number from your region, you can enter your area code prefix in the “Number” field.
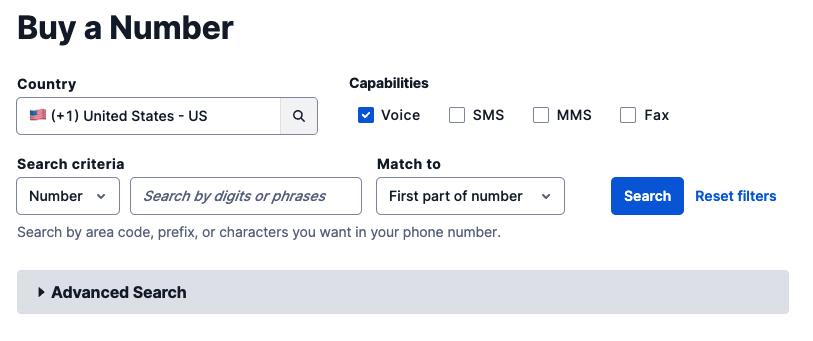
Click the “Search” button to see what numbers are available, and then click “Buy” for the number you like from the results. If you are using a trial account, this purchase uses your trial credit. After you confirm your purchase, write down your new phone number and click the “Close” button.
Project setup
In this section, you are going to set up a brand new Python project. To keep things nicely organized, open a terminal or command prompt, find a suitable location, create a new directory where the project you are about to create will live, and navigate into the project directory:
Create a virtual environment
Following Python best practices, you are now going to create a virtual environment, where you are going to install the Python packages needed for this project.
If you are using a Unix or macOS system, open a terminal and enter the following commands:
If you are following the tutorial on Windows, enter the following commands in a command prompt window:
With the virtual environment activated, you are ready to install the packages required by this project:
The packages installed are:
- twilio: the Twilio helper library for Python
- vosk: a lightweight speech recognition engine
- flask: a Python web framework
- flask-sock: a WebSocket extension for Flask
- simple-websocket: a WebSocket server used by Flask-Sock
- pyngrok: a Python wrapper for ngrok, a utility to temporarily make a server running on your computer publicly available
Download a language model for Vosk
The Vosk package installed in the previous section is just an engine. To be able to transcribe audio, this engine needs to pass the incoming audio data through a model that has been trained for the intended language.
The Vosk models page has models for many languages. Pick one of the models and download it. To test this project, I used the “vosk-model-small-en-us-0.15” model for American English.
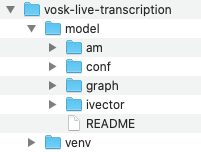
Each model comes as a zip file. Extract the contents of the zip file you downloaded to the vosk-live-transcription directory. The contents of the zip file should all be inside a single folder. Change the name of this top-level model folder to model.
The directory structure of the project, including the Python virtual environment and the Vosk model, should match the following:
Configure the Twilio credentials
To work with Twilio, the Python application needs to have access to your account credentials to authenticate. The most convenient way to define these configuration values is to set environment variables for them. In a bash or zsh session, you can configure these settings as follows:
If you are following this tutorial on Windows, use set instead of export in your command prompt window.
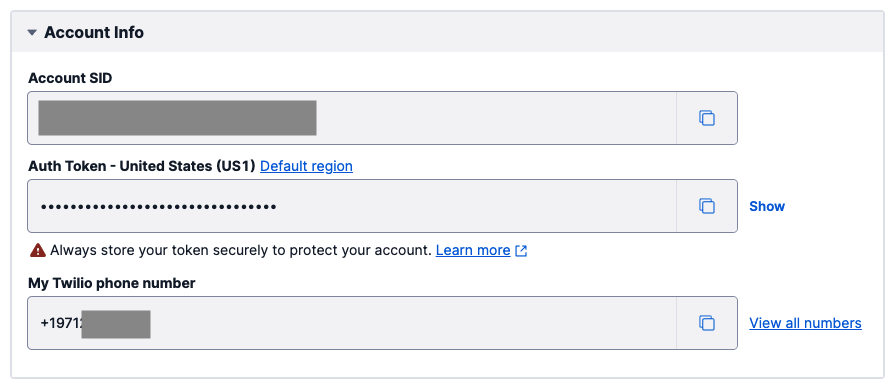
You will need to replace the xxxxxxxxx placeholders with the correct values from your account. The two variables are your Twilio “Account SID” and your “Auth Token”. You can find them in the dashboard of the main page of the Twilio Console, under “Account Info”:
Python web server
You are now ready to code the web server that will support this project in Python. For this, you are going to use the Flask web framework. Since audio will be streamed by Twilio over WebSocket, and Flask does not support this protocol natively, the Flask-Sock extension will be used for this route.
Here is the general structure of the web server. Copy this code to a file named app.py in the project directory. Note that the two functions in this code will be defined later, for now only their definition is provided.
The following sections discuss the different sections of this file.
Imports
This server is going to do several things, so it needs to import a variety of modules. Many of these imports are well known packages that provide general support to the web server, but there are some notable imports that you may not be familiar with.
For example, the audioop module is a little known module that comes with the Python standard library. It provides functions to perform audio encoding, decoding, and conversion. It is going to be extremely useful for this project.
Some of the imports are related to standing up a web server. The Flask class is used to implement HTTP web servers in Python. The Sock class extends Flask with WebSocket support.
The VoiceResponse and Start imports from the twilio package will be used to generate the commands that instruct Twilio to stream audio to the server. The Client import, also from twilio, is used to make Twilio API calls.
Finally, vosk is the speech recognition engine that will do the transcriptions to text.
Global variables
The server has a few variables that are initialized in the global scope. The app variable represents the web server, while sock enables this server to create WebSocket routes.
The twilio_client variable is an instance of Twilio’s Client class, used to make Twilio API calls. This instance will fail to initialize if the TWILIO_ACCOUNT_SID and TWILIO_AUTH_TOKEN environment variables aren’t defined as indicated above.
The model variable holds the language speech recognition model, loaded by Vosk. The 'model' argument passed when this instance is created, is the path to the directory where the model data is stored on disk.
The CL and BS constants define VT-100 terminal codes to clear the line from the cursor position to the end, and to move the cursor back one character respectively. These will be used when printing live transcriptions to the terminal.
Server initialization
At the bottom of app.py, the web server is initialized and started. The logic in this section is more complex than what you may have seen in other Flask based web servers, because the web server needs to have a public URL that can be passed on to Twilio to use. Let’s go over the statements in this section of the application in detail.
First, the ngrok service is initialized:
These instructions create an ngrok tunnel to port 5000, which is the port on which the Flask web server will run. The ngrok service will set up a public web server on a random URL on its ngrok.io domain, and will forward all the traffic it receives on it to port 5000. This is necessary when testing Twilio applications that require webhooks, because Twilio needs to have a public URL to connect to. The bind_tls argument tells ngrok to generate an https:// URL with encryption. The public_url variable receives the URL that ngrok assigned to us. On recent macOS versions, port 5000 might not be available. In that case, switch to a different port.
Using ngrok in this way gives you access to their entry-level service tier, which provides tunnels that expire after two hours. If you run the application for longer than that, you will need to restart it to generate a fresh tunnel with a new URL. If you have an ngrok account, you can configure your ngrok token to remove the time limitation.
The next part of the server initialization configures the webhook URL that Twilio will call when there is an incoming phone call to the Twilio phone number.
To keep this application as simple as possible, this code uses the Twilio API to get a list of phone numbers associated with the account. From this list, only the first number is used. If you have a single number in your account, then this code will work just fine. If you have more than one number and need to choose a specific one to use with this project, then you’ll have to iterate over the returned numbers to find the correct one to use.
The update() method on the phone number object is passed a voice_url argument, set to the public URL from ngrok with a /call path added at the end. This is the webhook URL that will handle incoming phone calls.
The final step to start the server is probably the one you are most familiar with:
This call starts the Flask web server. At this point, the local computer is accepting requests on port 5000, and any requests that are sent to the public URL provisioned by ngrok will be redirected to it.
Accepting phone calls
When a call is made to the Twilio phone number, Twilio sends a POST request to the URL that was configured as the voice_url for the number. The request includes information about the call, such as the caller ID, which is given in a From parameter in the body of the request.
The request handler needs to tell Twilio how it wants to handle the incoming call by returning a TwiML response. TwiML is a language created by Twilio that is derived from XML. It includes an extensive list of “verbs” that allow the application to indicate how calls should be handled. The most simple TwiML example is one in which a call is answered with a text-to-speech message, using the Say verb:
Instead of writing raw XML, Twilio provides a collection of classes that create the XML for us. The above example can be written in Python code as follows:
When Twilio receives TwiML from the application’s webhook, it executes the instructions provided inside the <Response> element, and when it reaches the end it hangs up. The above example says “Please leave a message” to the caller and then immediately hangs up. The Pause verb can be used to give the caller time to speak:
The TwiML response for our application needs to tell Twilio to stream the audio from the caller to the application, so that it can be transcribed. The Stream verb, which is slightly more complex than the previous ones, is used for that purpose.
Below you can find the complete implementation of the /call webhook.
To help you understand the TwiML response that is being constructed, here is its XML representation:
The Stream verb has two modes of operation: synchronous and asynchronous. For this application, an asynchronous stream is best. This means that Twilio will start streaming audio to our application while at the same time will continue to execute the remaining verbs in the TwiML response.
To create an asynchronous stream, the Stream verb must be enclosed in a Start element. The url attribute of the Stream verb is the URL of the WebSocket endpoint where Twilio should stream the audio data. In Flask, the request.host expression is the domain that was used in the current request. The WebSocket URL is constructed with the wss:// scheme, the same domain used in the /call endpoint, and a /stream path. The Stream verb also supports a track attribute, which can be used to specify if the application wants a stream for the inbound, outbound or both audio tracks. The default is to only stream the inbound audio, which is what this application needs.
For information purposes, the handler prints a message with the phone number of the caller, which in Flask can be obtained with the request.form['From'] expression.
The XML response is generated by converting the response object to a string. A 200 status code is used to tell Twilio the call was successful. The Content-Type header is set to indicate that the response contains an XML body.
Shortly after this request ends, Twilio will initiate a WebSocket connection to the URL passed in the Stream verb.
Streaming and transcribing the audio from the call
The last piece of this application is the WebSocket endpoint. The complete code for this endpoint is below.
As soon as the /call endpoint returns the TwiML response, Twilio will make a WebSocket connection to this endpoint.
The rec variable that is initialized at the start is an instance of the Vosk speech recognition engine. The arguments that are passed are the language model loaded earlier, and the sample rate of the audio. At the time I’m writing this, this recognizer only supports an audio rate of 16K samples per second.
The main logic in this function has to deal with a stream of messages that Twilio sends in JSON format. A while loop is used to read each message and decode it to a Python dictionary.
All messages have an event key that indicates their type. The complete list of events is in the documentation, but for the purposes of this application, the most interesting messages are the one with type media, as these messages include the audio data. In addition, the start and stop messages are sent before and after the streaming respectively. This application prints messages to the terminal when these messages are received.
The core portion of this function is in the section that handles the media messages. Let’s go over this part in detail. First, the audio needs to be converted to the proper format for Vosk:
Twilio provides the audio data encoded in a format called μ-law (pronounced mu-law). The encoded audio data is added to the message in base64 format. The code above extracts the base64 payload from the JSON packet and removes the base64 encoding. Then the audioop.ulaw2lin() function from the Python standard library is used to decode the μ-law encoded data to 16-bit uncompressed format. Finally, the audioop.ratecv() function converts the audio from Twilio’s sample rate of 8000 samples per second to the 16000 required by Vosk.
The audio variable now has the raw audio data in the format that Vosk needs. The next section sends the data to the Vosk engine for transcription.
The rec.AcceptWaveform() method receives the blob of audio data, and returns True or False depending on the resulting transcription being final or partial respectively. The idea is that the engine is going to receive the audio from the caller in small chunks, so until the speaker makes a pause or finishes a sentence, it is unlikely that the recognizer will have enough context to make an accurate transcription. When Vosk believes that the transcription can improve after more audio data is provided, it returns False and provides a best-effort partial transcription that is going to be superseded by a better one later. A return value of True means that the provided transcription is final.
Results from the speech recognition engine are provided in JSON format via the rec.Result() method. The application prints the transcribed text to the terminal, regardless of being a final or partial result. When the results are partial, it moves the cursor back to the start of the partial section, so that the next time results are printed, they overwrite the previous text. When a final transcription is provided, the cursor is finally advanced, so that it can start printing the next portion of the dialogue.
To support the cursor movement, the CL and BS constants defined at the beginning of the file are used. These are VT-100 terminal control codes that clear the line from the cursor to the end and move the cursor back one character respectively.
The while loop will continue to run for as long as Twilio maintains the WebSocket connection. When the caller hangs up, or the 60-second timeout from the Pause verb is reached, the connection will end.
Running the application
Ready to try this application out? With the Python virtual environment activated, run the application as follows:
You will see some messages from Vosk as it loads the language model, then you’ll see a message printed by the application:
Right after this, Flask is going to print some log messages regarding the state of the web server.
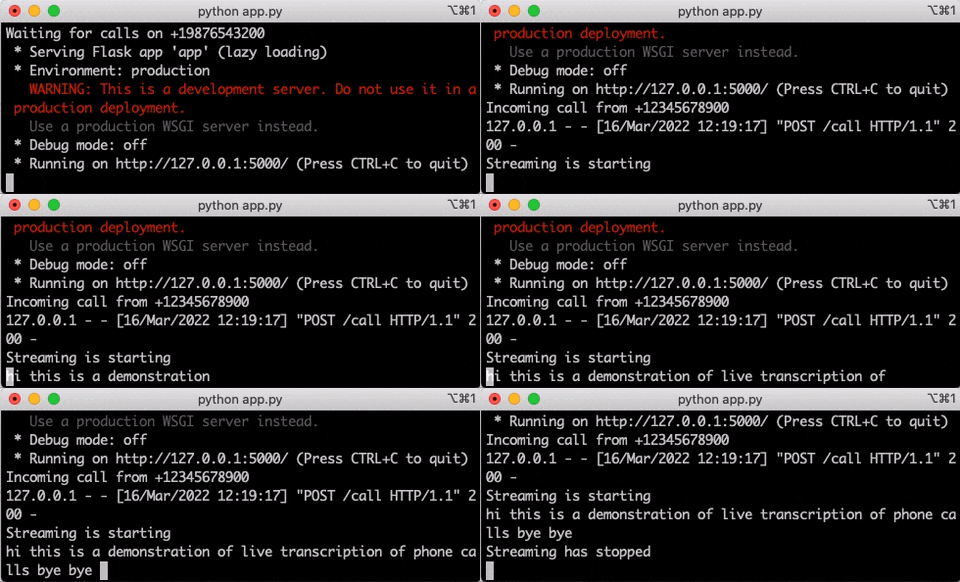
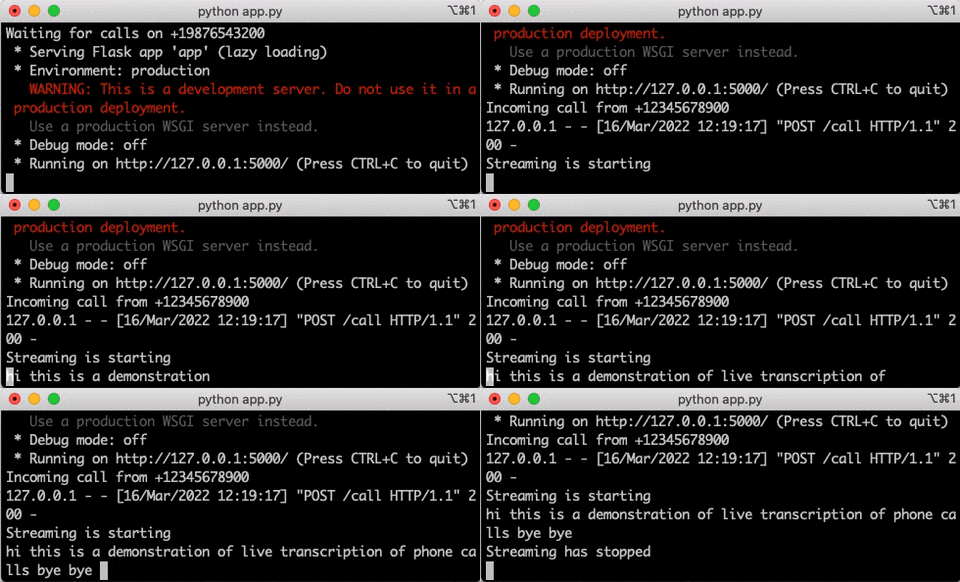
At this point, you can pick up your phone and call your Twilio phone number. Twilio will answer and connect the call to the application, which will start receiving the audio as you speak. A moment later, the transcription of what you speak will start appearing in real time in the terminal.
The effect of partial and final results is clearly seen in the example below. The initial guesses the recognizer made about what I was saying in this example were wrong a couple of times, but they were corrected automatically as I continued speaking and provided more context.
Conclusion
I hope this tutorial gets you started on live transcribing your phone calls. If you are looking for ideas to enhance this project, here are a few:
- Try out different Vosk models. The larger models have greater accuracy.
- Change the
Pauseverb to Dial, to forward the incoming call to your personal phone. Also change the streaming to send both inbound and outbound audio channels, so that both callers are transcribed. - Instead of printing the transcribed text to the console, push it to a web application through WebSocket or maybe Socket.IO.
- Expand the application to allow multiple callers to communicate over a conference call, and transcribe each participant’s audio track as a record of the conversation.
I can’t wait to see what you transcribe with Twilio and Vosk!
Miguel Grinberg is a Principal Software Engineer for Technical Content at Twilio. Reach out to him at mgrinberg@twilio.com if you have a cool project you’d like to share on this blog!
Related Posts
Related Resources
Twilio Docs
From APIs to SDKs to sample apps
API reference documentation, SDKs, helper libraries, quickstarts, and tutorials for your language and platform.
Resource Center
The latest ebooks, industry reports, and webinars
Learn from customer engagement experts to improve your own communication.
Ahoy
Twilio's developer community hub
Best practices, code samples, and inspiration to build communications and digital engagement experiences.

