3 Tips for Installing a Python Web Application on a Cloud Server
Time to read: 6 minutes

(Image credit: Pixabay)
Deploying your first app can be confusing and daunting. There's also the age-old question - which platform should I deploy the service on - AWS, Heroku, or serverlessly on Twilio? Even after you have decided which platform to use, maintaining a live app can cause some troubles on its own, especially when you want to revisit the project to refactor or add new features.
Amazon's Elastic Compute Cloud (EC2) instances are a great choice because they are virtual servers that allow you to pick a default Amazon Machine Image (AMI) or select one from another location in order to tell AWS how to launch the instance to fit your criteria.
In a previous tutorial, we walked through the steps on how to deploy a Python Flask app to EC2. In this article, we will be discussing three tips to installing a Python web app on an AWS EC2 instance that will make your future self thank your past self for maintaining the project in the long term.
Tutorial Requirements
- A GitHub repository with files for your working Flask application. Make sure that the application that you want to deploy into AWS has secured required environment variables and is ready to deploy. You can refer to the Flask Application Tutorial if you need assistance starting a basic Flask app.
- Create a free AWS account or sign in to your AWS console.
- A credit card for AWS to have on file in case you surpass the Free Tier eligibility options. It is worth noting that you should take extra precautions if you are deploying an app onto AWS. Make sure you stay within the Free Tier limits to avoid surplus charges at the end of the month. Refer to the EC2 pricing guide and proper docs to prevent future charges.
Use a virtual environment
Firstly, consider installing all the requirements and running your project inside a virtual environment within your EC2 instance.
If your Python Flask project does not already have a virtual environment, then you can run the following commands to create one named "venv" and activate it.
For a Unix or Mac OS system, open a terminal and enter the following commands:
For Windows developers, enter the following commands in a command prompt window:
A successful activation of the virtual environment should display the name "venv" on your command prompt. Any command entered is now within the virtual shell.
Utilizing a virtual environment is not only efficient and fast to install, but it's a great way to stay organized especially if you have multiple projects on your machine. Each project might have different dependencies or packages that make the specific project work, so by using a virtual machine for each project, you can neatly keep track of all the packages required for your project, as well as the version numbers.
Another way to think about this is that maybe one of your projects works better on an older version of a package, whereas another project might require a newer version to run. You can also have multiple virtual environments for a project where each environment has different versions of the same packages installed. This allows you to test and work on projects with the appropriate package versions as needed.
Pin the package dependencies in a requirements.txt file
If you don't have one already, make sure that your project directory has a requirements.txt file in the root.
Use the command pip freeze > requirements.txt in order to list and save all the packages used in the project along with their currently installed version numbers in a .txt file.
Here's an example of what a requirements.txt file might look like:
Not only is having the requirements.txt file handy to have, but it will help you stay organized in keeping track of when you worked on the project and how many packages and dependencies need to be updated in the future. The file will also be useful if you have to redeploy the app on a new machine because you will be ready to start it up in a jiffy.
Check for package updates
In the example above, twilio is currently on version 6.57.0 so everything in the project will work today. However, if Twilio decides to change the API that you are making calls to in your project and deprecate some services in the future, then your application will run into problems. Your project's endpoints might return 404 errors and you must revisit the project to make upgrades to the Twilio package.
During the publication of this article, any twilio version with a 6.x indicates that unless stated otherwise, the code for twilio is supported and up to date. Your code might work with any 6.x version but potentially may not work if the code for 7.x versions are completely different.
While inside the virtual environment, you can run pip list --outdated in your command line to view the list of packages, the versions installed, the latest version available, and the type of package. Check out the example below:
As you can see, all of the packages above can be upgraded to a slightly newer version. You can run pip install python-dotenv --upgrade so that the python-dotenv package is updated and removed from the list when you re-enter the command to check for outdated dependencies.
However, it's not necessary to always keep every dependency on the newest version, but it's great practice to check for security vulnerabilities or deprecated content, especially if there have been no recent updates.
Once you're ready to deploy the project to your EC2 instance, you can run this command to quickly install each and every package and dependency along with its version in your virtual environment:
If you do not want to manually upgrade each outdated package, you can also add an --upgrade flag at the end of the command shown above to have Pip install and upgrade everything for you. Be careful if you choose to go down this route, as it is advised to test the entire application again and make sure everything works as expected. You might find some deprecated features and need to change your project's code accordingly.
Why are my packages taking so long to install?
It's worth remembering that even though it may take a few seconds or minutes for you to install packages on your local machine, it could potentially take much longer to install on a remote machine because the packages are compiled from C and C++ source code.
However, depending on the AMI you choose, some packages may have even more trouble, as the operating system might not support the binary platform for Python packages. Thus, the package will fall back on installing from source code, making the process even slower. It's important to keep in mind how much CPU performance your virtual machine actually has and create the instances and AMI accordingly.
Other packages you might come across are written in binary and do not require compilation because that was handled before distribution. Some packages require its own set of instructions with Python wheels, which works on Linux, Windows, and macOS machines.
Check the version of the EC2 instance's AMI
If you're like me and you created the EC2 instance a while ago but want to redeploy an app after refactoring and updating the packages, then you might run into some trouble.
Similar to the packages and APIs in your project, operating systems get updated too. Thus, it's worth creating a new EC2 instance to redeploy your app if it has been a while since you last deployed it.
I learned this the hard way when I spent such a long time trying to install the grpcio package on an Ubuntu machine image that was running on 18.04 LTS. Little did I know that updated Ubuntu servers are released every six months and new LTS versions every two years. No wonder the installations failed and crashed the system.
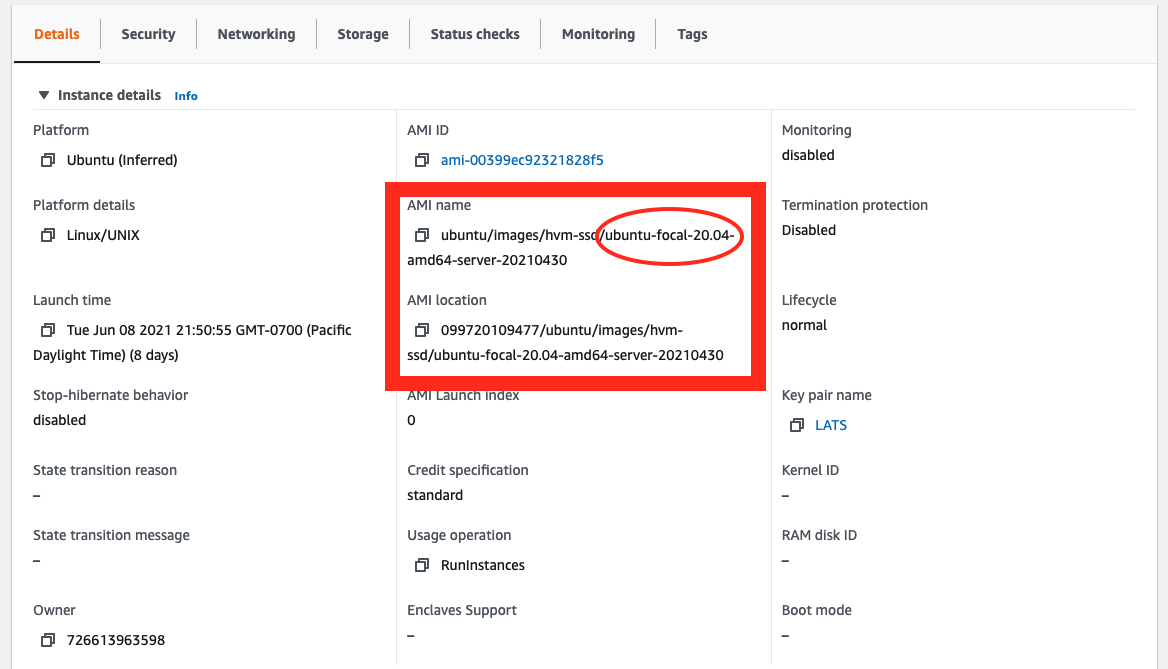
You can check the version of your Amazon EC2 instance’s AMI by logging on to the AWS console and clicking on the Instances tab under Resources or on the left hand side bar. Click on the Instance ID that you want to examine and scroll down to the Details tab. You should see the version number within the AMI name and AMI location as seen in the image below:

As you can see, my Ubuntu instance is currently using the latest version of 20.04 LTS, known as Focal Fossa.
If you choose another machine such as Windows, then you would have to check the Long-Term Servicing Channel (LTSC) instead in order to keep up with each version's lifecycle.
What's next for deploying apps to AWS?
Well there you have it! Deploying and maintaining projects can be very challenging and daunting, so don't worry if it takes some time to understand and get used to the flow of it. At the end of the day, it does not matter which platform you decide to host your project on, as long as you remember to stay organized and up to date with the versions of your machine, packages, and other dependencies involved.
Check out this article if you're ready to expose the app to the world and use your own URL link, refer to this article on how to redirect a website to another domain name.
Keep in touch to let me know what project you're bringing to life!
Diane Phan is a Developer on the Developer Voices team. She loves to help programmers tackle difficult challenges that might prevent them from bringing their projects to life. She can be reached at dphan [at] twilio.com or LinkedIn.
Related Posts
Related Resources
Twilio Docs
From APIs to SDKs to sample apps
API reference documentation, SDKs, helper libraries, quickstarts, and tutorials for your language and platform.
Resource Center
The latest ebooks, industry reports, and webinars
Learn from customer engagement experts to improve your own communication.
Ahoy
Twilio's developer community hub
Best practices, code samples, and inspiration to build communications and digital engagement experiences.

