How I avoid getting trapped on the sweltering London Underground with Twilio and Azure Functions
Time to read:
This post is part of Twilio’s archive and may contain outdated information. We’re always building something new, so be sure to check out our latest posts for the most up-to-date insights.

There’s nothing worse than being stuck on the trains in London during rush hour when there are delays. Summer is wrapping up in London, but if you want to get a really cheap sauna experience, just head onto the Central Line during peak rush hours on a day when there are train delays. I know this because my miserable self has been trapped, sweltering on a tube with an armpit in my face, more times than I care to remember.

If only there was a way that I could get a daily warning about the status of the tube lines I use to get to work every day. Well, thanks to Azure functions, Twilio SMS Output Bindings and the handy Transport for London (TFL) API I can make that a reality.
Before We Begin
Before we get started, this is what you need:
- A Free Azure Account
- An Azure Subscription (There’s a free trial if you’re new to Azure)
- A Free Twilio Account
- A Twilio Phone Number
There are multiple ways to create and deploy JavaScript Azure Functions. You could use the Azure Portal or the Visual Studio Code Azure Functions Extension, but in this tutorial we will be using the Azure CLI and a Code Editor.
To follow this tutorial you’ll also need to:
- Install and sign in to the Azure CLI
- Install Azure Functions Core Tools
Setting up a New Project
Let’s create a new local functions project. Run the following command with your own project name:
Choose the Node runtime and JavaScript language.
Now let’s create our first function. Navigate into your new Project Folder DailyReminders, run the following command and give your function a name:
This will create a new function based on a Timer Triggered Function Template.
Before we start working on our new function, we need to link it to some Azure Resources. Azure has a substantial product offering. We create a Storage Account to hold our new Function App. These are all held together in a ‘Resource Group’. When we deploy our function or use any Azure features such as the Twilio SMS Binding, all our activity will live in this Resource Group.
Run the following command to create a new resource group, giving it a name and region to deploy it to. I’ll go with the location westeurope in the command below. You’ll find more information at the location overview in the azure docs.
Next run the following command to create a new storage account.
Finally create a Function App. (P.S. This might take a few minutes)
At this point you should have an output that starts something like this:
Last bit of prep, retrieve your connection string from the Azure portal. Navigate to your local.settings.json file and replace the value for AzureWebJobsStorage with your connection string. It should look something like this:
Now we’re ready to build our function.
Timer Triggered Functions
There are many ways to trigger an Azure Function. In this tutorial we want our function to be triggered every morning at a certain time. Navigate to the function.json file in your function folder transportStatus and set the schedule value to a CRON Expression. We want to receive our SMS to every day at 8am so set the value to 0 0 8 * * *.
After setting up your new function, open the index.js file. This will have some template code that logs the current time every time the function is triggered.
Let’s get coding
Now that we are all set up, we will check the status of the trains that we use on our commute. To do this, we will make an HTTP Request to the public TFL (Transport For London) API.

One of the great things about locally developing Azure Functions, is that it’s easy to include the JavaScript Modules and Libraries that you already know and love. To make it easier to send HTTP requests, we will install Axios.
From within your project folder on the Command Line, run npm install axios
Require the axios module and make a GET Request to the API. I use the London Overground, Jubilee and Circle Lines to travel to work, so I will include these in the URL and make a request to retrieve the statuses of these lines.
Now, use the data from the response to create a message to send via SMS. I am going to push the status of each line as a string into a msg array. If any of the lines do not have a ‘Good Service’, I will also include the reason for the disruption in my message.
Twilio SMS Bindings
With Azure’s Twilio SMS Bindings, we can automatically trigger a Twilio SMS Message from the phone number we acquired at the start.-
First, we need to register Azure Functions Binding Extensions. Navigate to the host.json file and update it to include the following entry for ExtensionBundle.
Next, in order to test our function locally, we need to include our Twilio Account SID and Auth Token in our local.settings.json file. Navigate to your local.settings.json file and update it to include your Account Sid and Auth Token. You can find these on the homepage of the Twilio Console.
Now we can configure our Twilio SMS Binding. Navigate to the function.json file, it should already have a binding for the Timer Trigger. Update it to include the following Twilio Function Binding, replacing from value with your Twilio number.
Let’s head back to our index.js file and trigger this SMS Binding in our code. We’ll set the body as the text of the message we want to send. In this example, I’m going to join all of the Strings I created earlier and set them as the body of the message.
Testing Time
It’s time to run our app locally, test our function and make sure everything is working.
Head back over to the terminal and run the following command:
After doing so, your function should be running in the terminal.

Watch out for the log: Now listening on: http://0.0.0.0:7071 .
If you see this, your function is now live, being served from localhost:7071.
Let’s get to testing. We don’t want to have to wait for the timer to trigger our function. We can test it manually by sending a POST request to the local application using Postman.

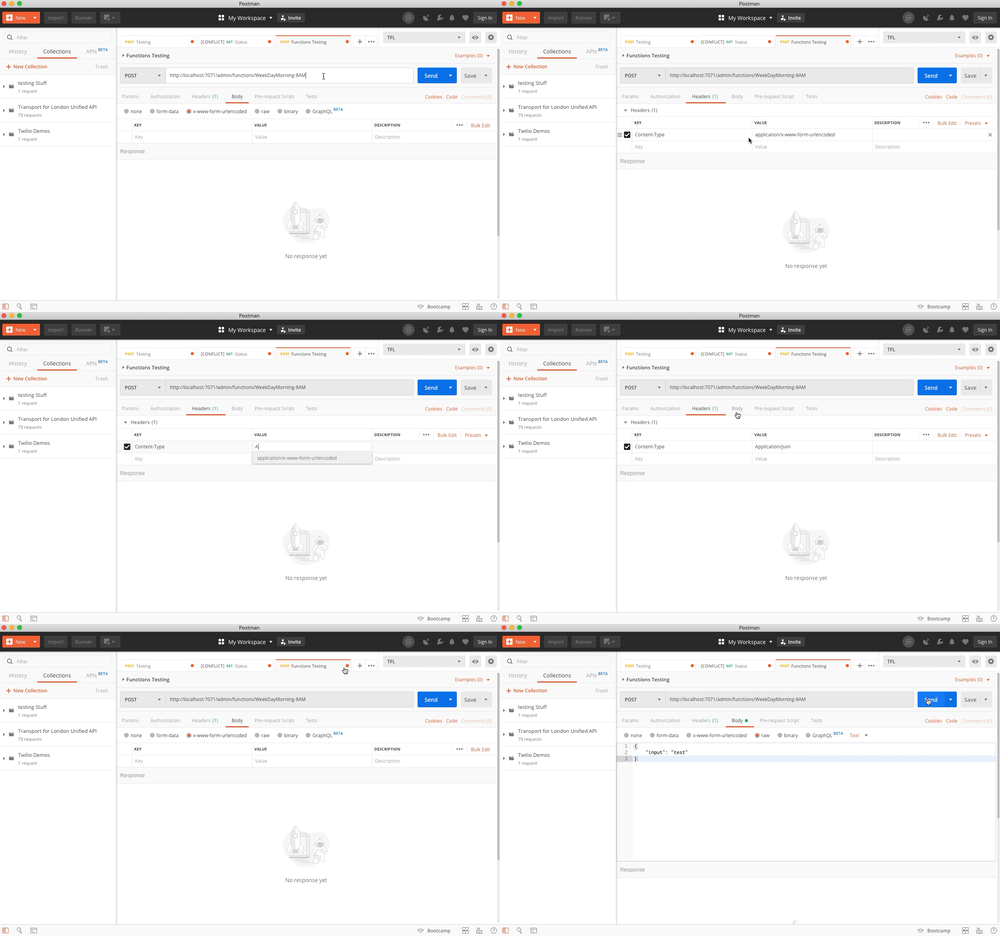
Make a POST request to localhost:7071/admin/functions/transportStatus with the content type set as application/json. Include a body with the JSON key input and its value set to test.
Alternatively you can use cURL in a different terminal tab.
Wait a couple of seconds and your text should arrive.
Deploy to the Web
So far we have been working on our function locally, but we want this to live on Azure’s servers. When you are sure your app is working, deploy your app by running the following command.
You should get a message back saying Deployment completed successfully
Now all we need to do is sit and wait until 8:00 AM tomorrow when our SMS should arrive.
I’ve also shared the completed code on GitHub.
The Morning After
This morning as I got dressed, I received my morning SMS with the good news that all the Lines have a good service. I got to the train station on time and climbed abord the London Overground train to start my journey. As the train rumbled out of the station the driver’s voice sounded over the tannoy, “Due to an earlier incident, there is currently no Jubilee Service”. Crumbs! The incident happened between the time I received the message and arrived at the station. Sometimes technology just can't save you from other people's armpits.
There are many other triggers and bindings that are available with Azure Functions. You could call on different APIs, like the weather, to give you more information about your morning commute. Or use the webhook binding called by Twilio to trigger a function to get this information on demand instead of on a schedule.
I can’t wait to see what you build with Azure and Twilio SMS Bindings. Let me know what you’re working on at:
- Twitter - @chatterboxCoder
- Email - nokenwa@twilio.com
- GitHub - nokenwa
Related Posts
Related Resources
Twilio Docs
From APIs to SDKs to sample apps
API reference documentation, SDKs, helper libraries, quickstarts, and tutorials for your language and platform.
Resource Center
The latest ebooks, industry reports, and webinars
Learn from customer engagement experts to improve your own communication.
Ahoy
Twilio's developer community hub
Best practices, code samples, and inspiration to build communications and digital engagement experiences.


