Create Your Own Phone Backup Service using PHP, Twilio SMS, DigitalOcean Spaces, and Laravel
Time to read: 7 minutes

Have you ever had a voicemail from a loved one that you wanted to keep forever? Maybe a contact that you wanted to save but didn’t want to add to your phone? Whatever the use case, it’s almost impossible to backup some types of media, like voicemail and contacts, without an app.
We're going to learn how to create a phone backup service that allows us to manually transfer data via SMS to cloud storage, just by using our phone number.
We will accomplish this by creating a RESTful API in Laravel, connecting it to Twilio SMS, and adding cloud storage via Digital Ocean Spaces.
In order to complete this tutorial you will need the following:
- Twilio Account
- DigitalOcean Account
- Local installation of Laravel
- Composer globally installed
- Ngrok installed
At the time of writing, DigitalOcean does not provide an official PHP API for connecting to its object storage. So we will also utilize the Spaces API, an open-source wrapper that assists us in easily connecting to the Digital Ocean API in PHP. The Spaces API will be added to our project later via Composer. Special thanks to Devang Srivastava for maintaining this repo.
Create a Backup Service Using a New Laravel Project
Begin this project by creating a RESTful API using the Laravel PHP framework. This API will communicate with the Twilio SMS API and deliver our media. If you haven’t already installed Laravel, you can do so by following the official documentation and installation guide.
After installation, run the following command to generate a new Laravel project:
Add the Spaces API Dependency to Your Laravel Project
In preparation for the next step, the app we’re building will require the Spaces API in order to easily connect to our DigitalOcean Space. Before we set up the Spaces API, we need to add the Spaces API dependency to our Laravel project.
Now that you’re inside the phonebackup directory, run the following command inside of terminal using Composer:
This command added the Spaces API to our project as a dependency. Now, Laravel will use it to communicate with the DigitalOcean API and handle uploading of media received from the API endpoint.
Create a Twilio Account & Number
Our backup service will use a Twilio number as a data entry point. The user will forward media from their phone to a specified number. Once the designated Twilio number receives the SMS, it will be parsed in order to extract the attached media and upload the media into our Space.
If you don’t have a Twilio account, you can sign up for one now and receive a trial account to test your app. Once your account is created, purchase a phone number or use an existing one.
Create a DigitalOcean Space
This tutorial will work with any cloud storage system, including the local file system. However; we are using DigitalOcean’s Spaces, an S3-compatible object storage system able to store and serve large amounts of data with free CDN support. The following steps will illustrate how to create a DigitalOcean Space and connect it to your project.
Create a New Space
Login to your DigitalOcean account or create a new one (with a $50 credit). Create a new container by navigating to the Spaces dashboard and follow these five easy steps:
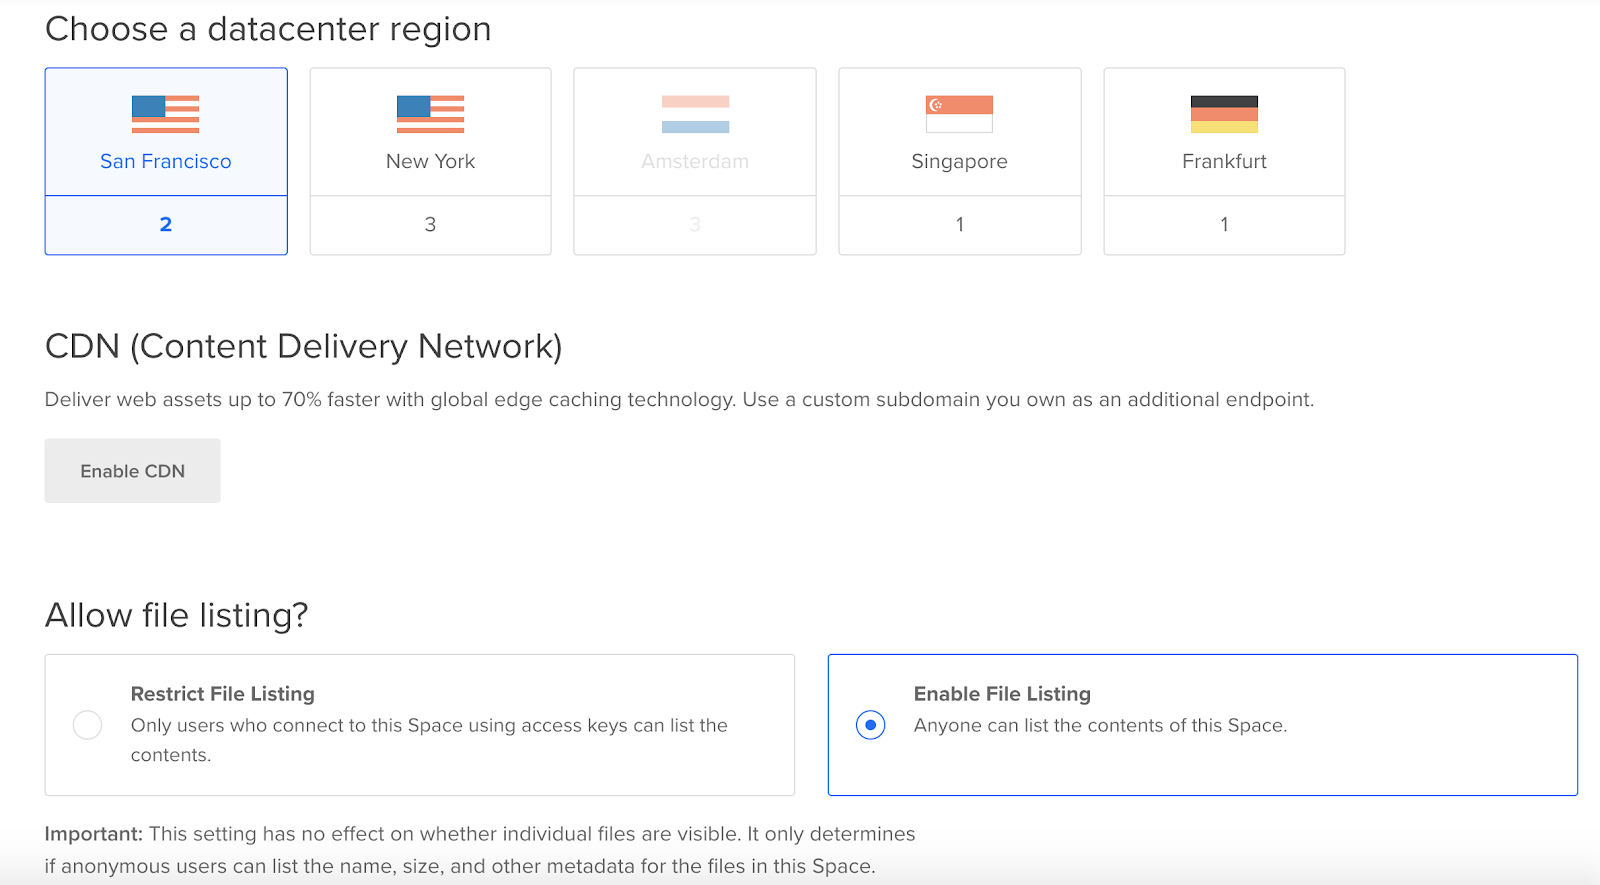
- Select the datacenter that is closest to you for better deliverability.
- “Enable CDN” to increase the speed of content delivery
- For security, leave the “Restrict File Listing” option selected
- Choose a unique subdomain such as “phonebackup” + a unique identifier
- After clicking on “Create a Space” you will have successfully created a new container
Generate a DigitalOcean Access Key
Now that the Space has been created, navigate to the Applications & API page to generate a key/secret pair for secure access and transmittance of data to the Space.
Under “Spaces access keys” click on the “Generate New Key” button and fill in the required fields.

After your key is generated, the secret will be temporarily displayed. Navigate to the .env file and add the following credentials:
Note: Your DO_SPACE_NAME is the unique name you previously created in Step 4. The DO_SPACE_REGION is available on the settings page of your Space in the “Endpoint” field.
Add Credentials to Laravel Config
Although the .env is being utilized, for better portability and support, we will exploit Laravel’s global configuration object to inject the credentials safely and consistently throughout the application. Laravel comes with configurations for various development environments automatically created for you.
For this project, our credentials will be injected into the config/services.php file which has already been predefined for third-party services.
Create the Endpoint to Upload Media
Now that setup of all services is complete, it’s time to write the scripts so we can capture and transfer our media.
Create the MediaController
Laravel by definition is a modern MVC framework and uses its built-in routing to create dynamic and fully extensible API routes. As an important next step, create the controller to support processing of incoming requests from our API and transferring the captured data to our Space.
To generate the MediaController, run the following command:
You will notice that this command has created a file at app/Http/Controllers/API/MediaController.php.
Open this file.
Five methods have been created from this command, index() for listing all resources, store() for saving a single resource, show() for displaying a single resource, update() for updating a single resource, and destroy() for deleting a single resource. Essentially, CRUD operations are generated from the --api flag.
We are only focusing on the store() method because we are technically creating a new resource in our Space.
Modify the method as follows:
In the code above we captured the sender's mobile number. The + prefix is removed since this value will create a subdirectory in our Space. After detecting the media type of the attachment, the filename is auto-generated based on the type, timestamp, and extension. Additionally, a folder relative to the media type is created.
Note: The switch statement can be modified to include any type of file you desire.
The contents of our attachment are downloaded to the local file system and assigned the generated filename. Once that process is complete, the contents are uploaded to your Space, the local file is deleted, and a success message is returned in TwiML with a request to send a response back to the sender’s mobile number.
Connect the MediaController to Routing
By default, when routing is mentioned, it assumes the public-facing, view-controller relationship for a Laravel application. However; for the purpose of what we’re creating, we’ll be focusing on the API routing as defined in routes/api.php which seamlessly generates RESTful endpoints.
Since the logic for MediaController is complete, we need to expose and connect the controller to the routing system.
The recommended endpoint that we’ll POST our request to is /media. Our endpoint will then transfer the request and all of its data to the store() method.
Simply add the following line of code to the routes/api.php file as seen below:
Connect the Endpoint to your Twilio Phone Number
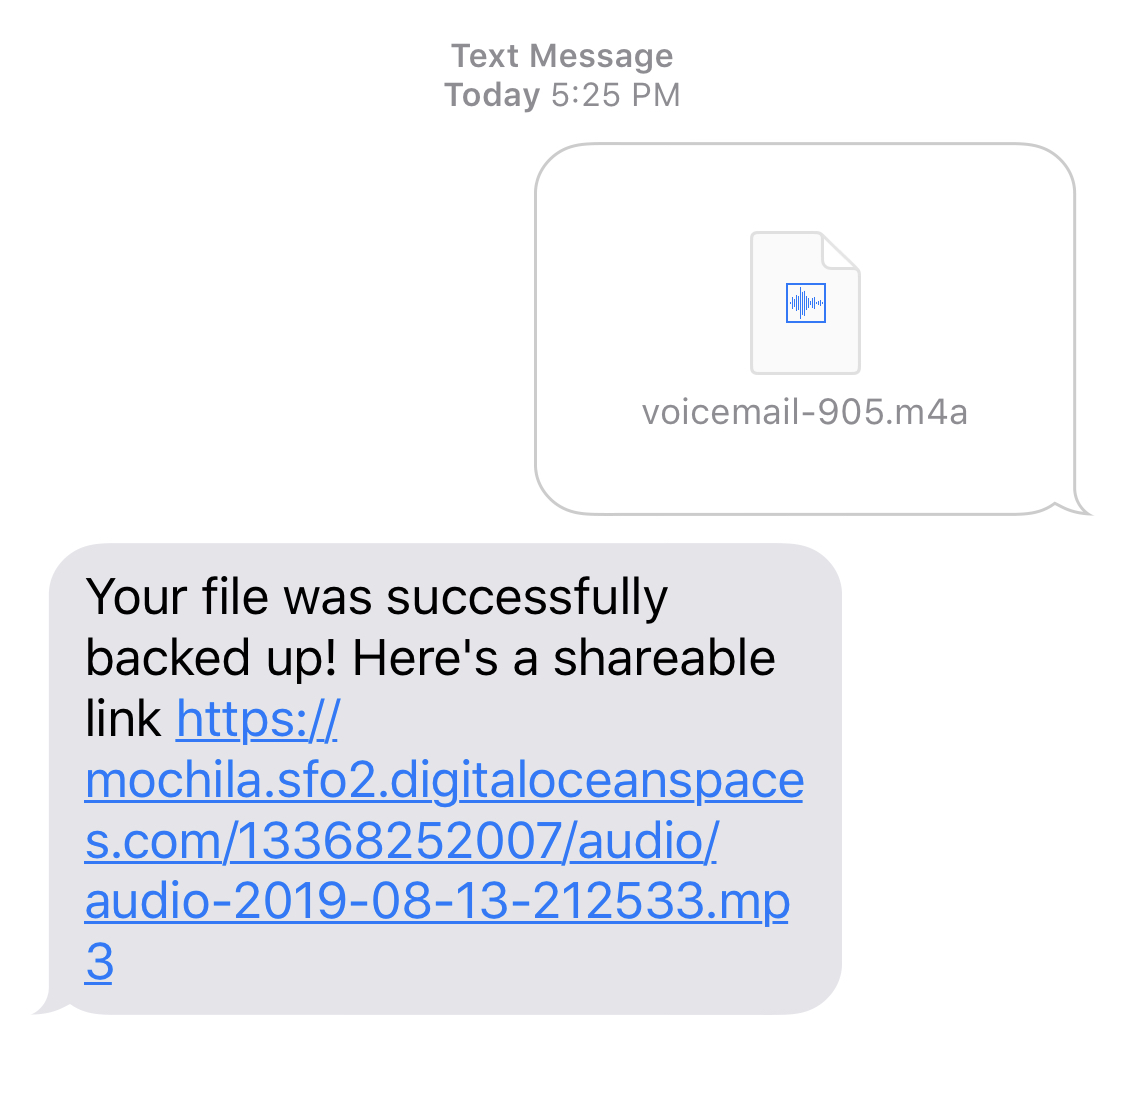
In order to complete this project, we need to connect the Twilio phone number and the endpoint. Once this step is complete, we will be able to forward an attachment from our phone, where it will automatically upload to our DigitalOcean Space, and we will receive an automated SMS receipt with a public link to the file.
Our application lives within our local environment. Therefore it has no direct access from the Internet. Dynamically assign DNS to the localhost and provide a tunnel to communicate with our application using ngrok.
In your terminal and within the project folder, run the following command to serve your website:
This command when successfully executed will serve your Laravel application at http://127.0.0.1:8000.
In another terminal window, run the following ngrok command to create a publicly accessible, temporary domain:
Within this command, we’re telling ngrok to tunnel all traffic to our localhost at port 8000. After this runs successfully, a screen similar to the following will display:
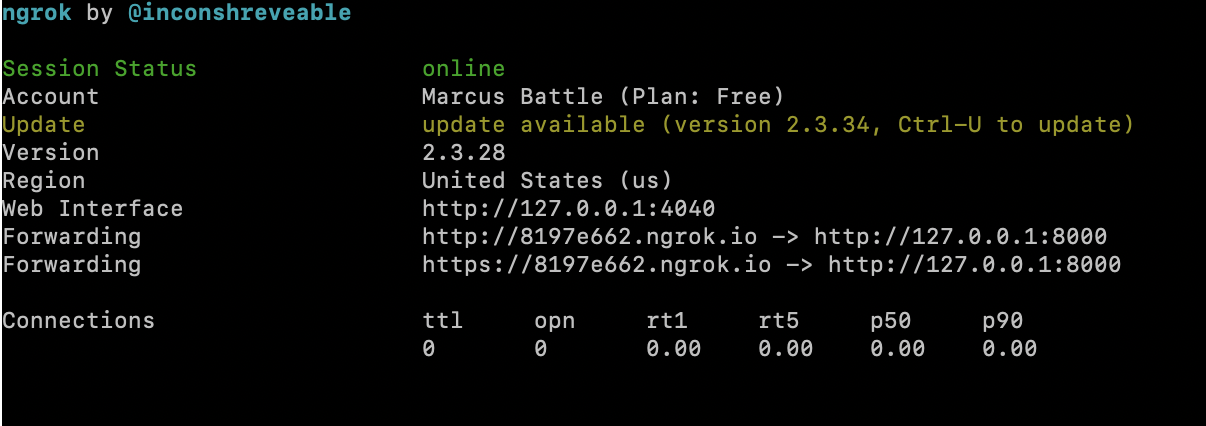
You’ll see above that my “Forwarding” address is http://8197e662.ngrok.io for unsecured traffic and https://8197e662.ngrok.io for https. Do not close this window until you are ready to terminate traffic to your local environment.
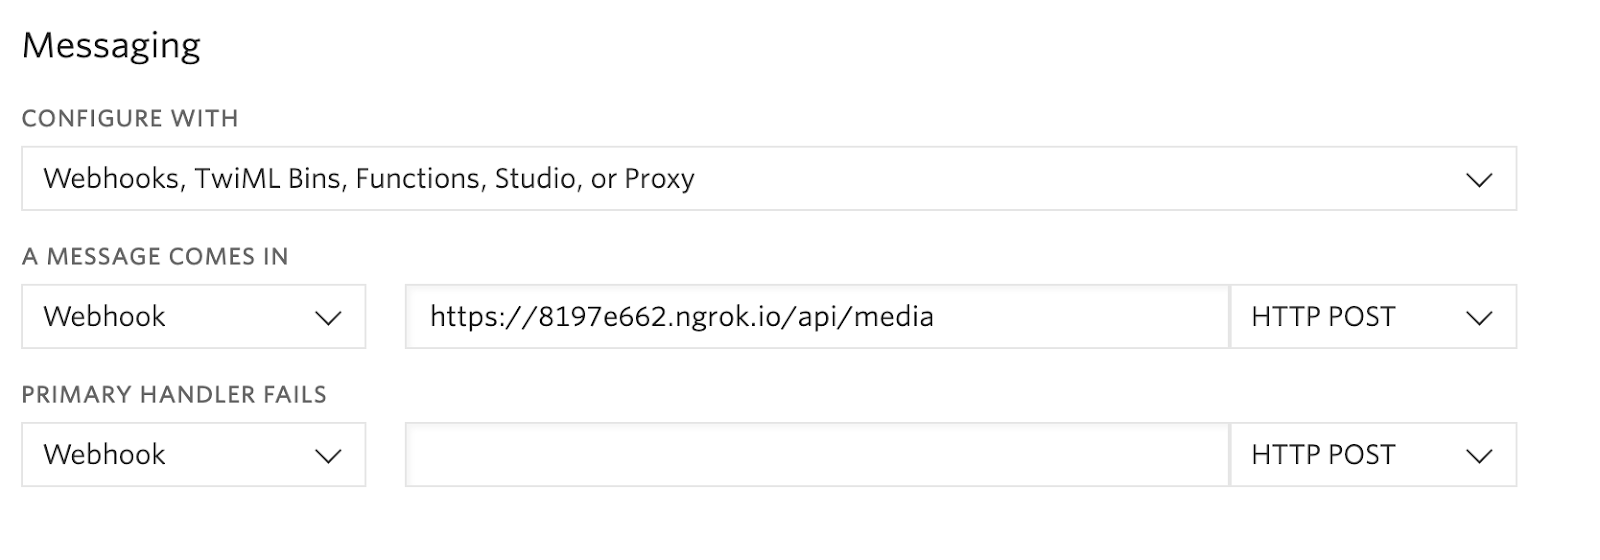
Within your Twilio console, navigate to your phone numbers and click on the preferred phone number. On the details page for that number, navigate to the “Messaging” section and under “Configure with” select “Webhooks, TwiML Bins, Functions, Studio, or Proxy. A new dropdown “A message comes in” will appear.
Make sure to select “Webhooks” as the value.
In the adjacent field, input the https ngrok address + /api/media. For example, my full URL would be https://8197e662.ngrok.io/api/media. Save the updated settings.
Ready to Test
Now that our Twilio phone number is connected to our Laravel Application, we are ready to test the phone backup service. I will demonstrate how to do this with an iPhone, but the principle applies to all capable smartphones.
From the Voicemail app, expand the details of an existing voicemail.
Click on the Share button in the top right-hand corner of the card.
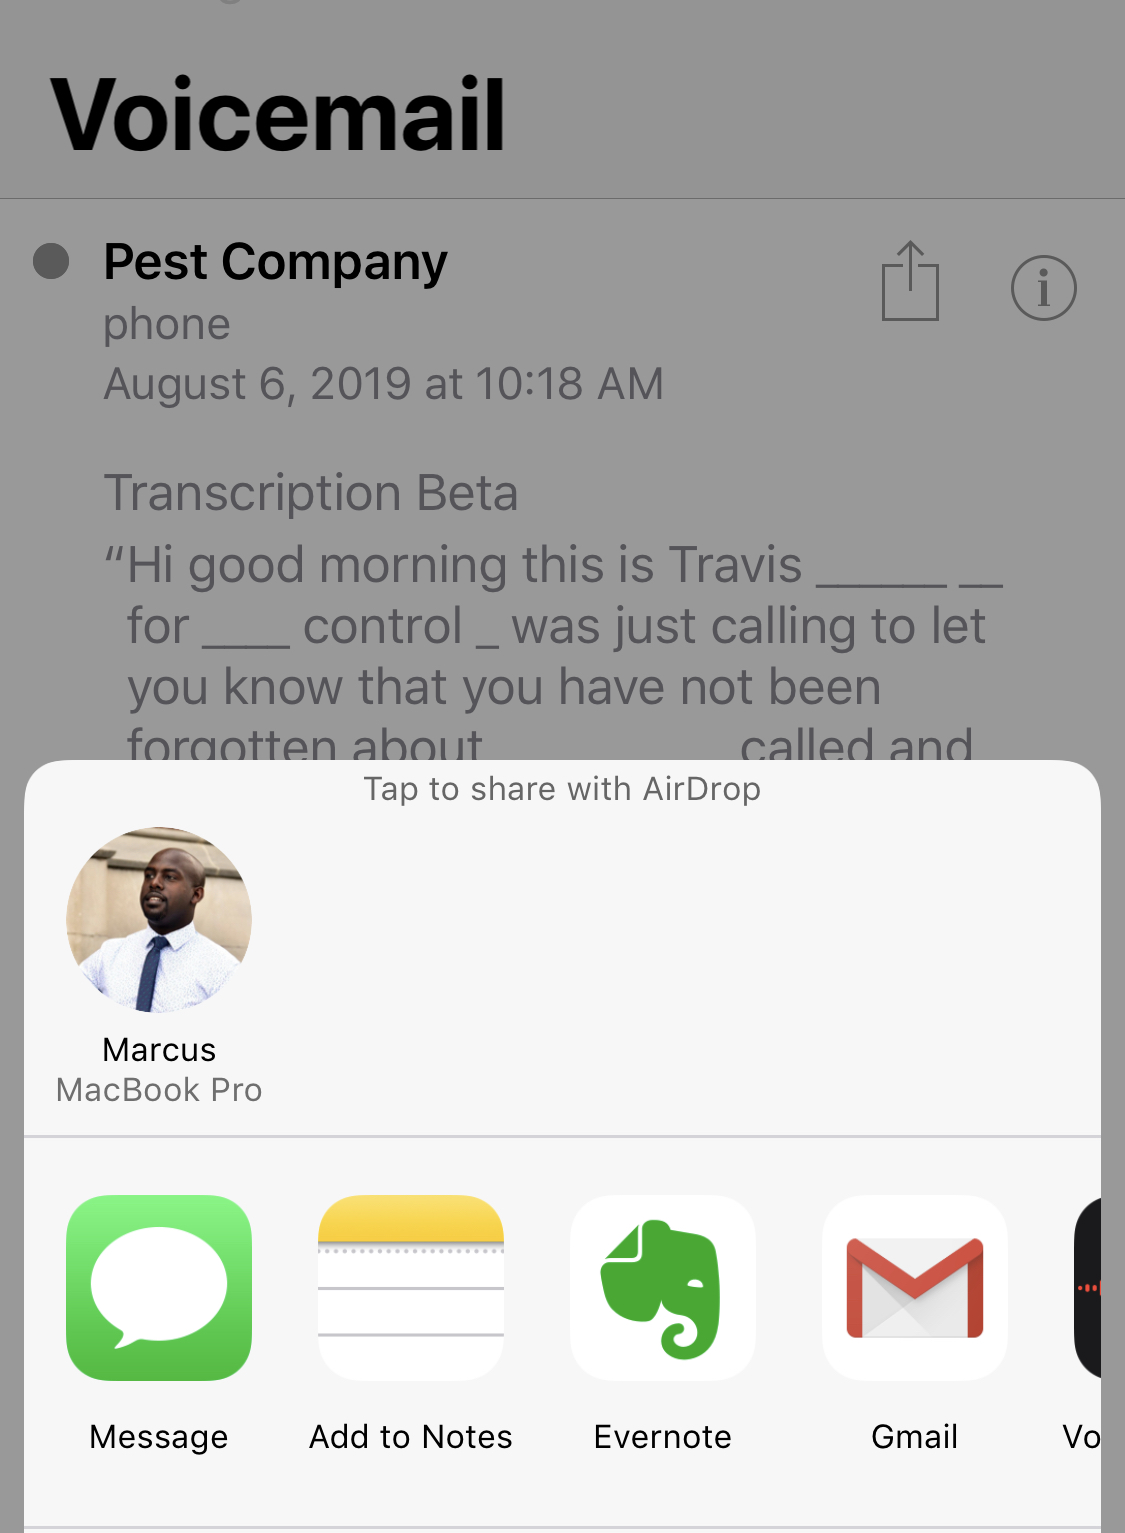
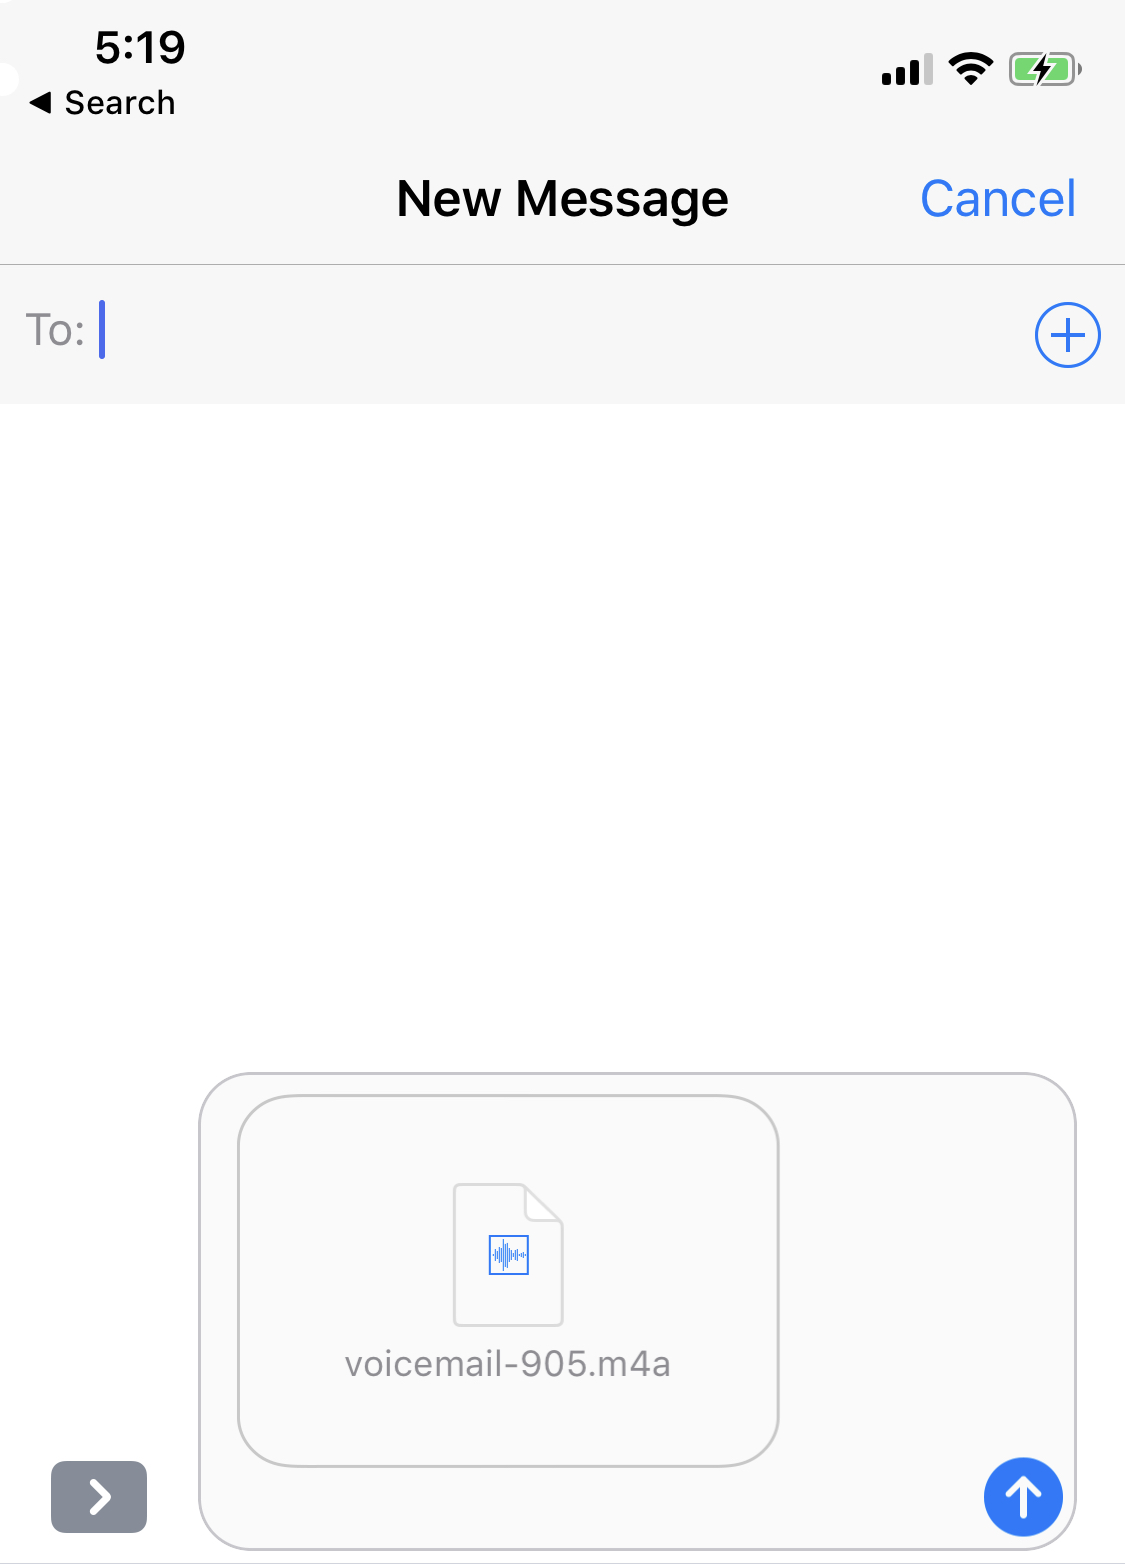
- Click on the “Message” icon
- Input your Twilio phone number in the “To:” field, and
- Click send.
If there were no errors, you will receive an SMS response similar to the screenshot provided below.
Conclusion
I made this app because I have very important voicemails from loved ones that I want to keep “forever”. I also have an iPhone and the backup services are somewhat hit-and-miss. I’ve even heard of people who have loved ones that have passed who hold on to their phones just to replay the messages.
With this tutorial, you’ve learned how to ensure that special digital memories can be transferred from your phone in the event you no longer have access to it.
I’d love to see what you build with this and the modifications you make. If you need any assistance, don’t hesitate to hit me up on Twitter or shoot me an email.
Marcus Battle is Twilio’s PHP Developer of Technical Content. You can learn more about him on the blog or access additional PHP content at Twilio's new PHP Voices.
Related Posts
Related Resources
Twilio Docs
From APIs to SDKs to sample apps
API reference documentation, SDKs, helper libraries, quickstarts, and tutorials for your language and platform.
Resource Center
The latest ebooks, industry reports, and webinars
Learn from customer engagement experts to improve your own communication.
Ahoy
Twilio's developer community hub
Best practices, code samples, and inspiration to build communications and digital engagement experiences.

