Build an Interactive Serverless Voice and Messaging Application using Twilio and AWS
Time to read: 10 minutes
Because of the well-documented benefits of serverless computing (scalability, event-driven, cost, speed), I thought it would be helpful to show you how organizations could build serverless applications to leverage the power of cloud computing and Twilio's awesome APIs.
This blog post will walk you through deploying a serverless application on AWS, and provisioning Voice and Messaging channels in Twilio to build a cloud application that can host a survey over either voice or messaging channels.
Interactive serverless applications architecture
First, let me show you what we’ll be building together. Here’s an overview of the architecture of our app:
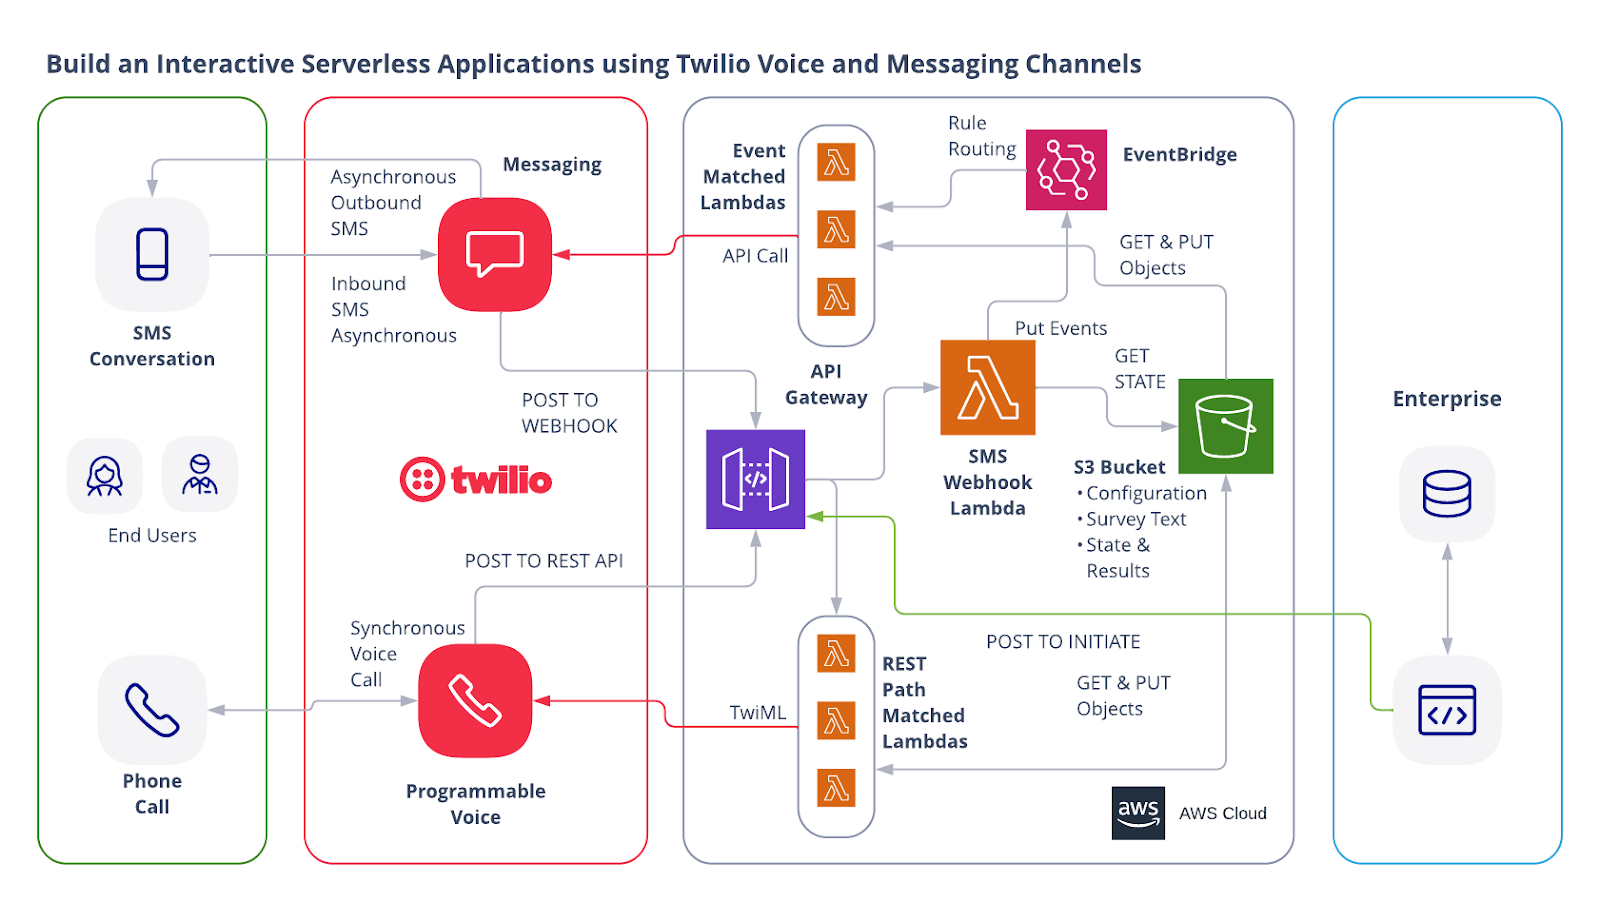
Going left to right, end-users will interact with a voice call or an SMS conversation. Twilio Messaging and Twilio Programmable Voice are used to manage the voice and messaging channels. The AWS container includes the bulk of the functionality for this application. The enterprise can initiate these interactions from its internal systems.
Note here that Voice and Messaging are inherently different channels -- Voice calls are synchronous connections, while Messaging is asynchronous. For Voice calls, this application leverages Twilio's Programmable Voice to maintain the synchronous connection while making REST calls to the serverless application to collect instructions on how to handle the call dynamically. Being asynchronous, Messaging interacts with the application via a single webhook, while the serverless application needs to maintain state to interact with the end-user dynamically.
The serverless application is managed from JSON configuration files, and survey results are also saved as JSON files. The survey created by this application could be initiated after a support interaction, a purchase, or any customer engagement. This code base could also be used as a starter or template for anything you want to build taking advantage of Twilio's Voice and Messaging APIs. For good measure, this survey is also multilingual – a common ask from our customers. Language content and configurations are stored in external configuration files.
AWS Resources
All of the AWS components of the serverless application are provided as "Infrastructure as Code" (oft-shortened to IaC) and deployed via CloudFormation into AWS. Here is an overview of the components:
- AWS SAM => an open-source framework that enables you to build serverless applications on AWS
- AWS CLI => Not required, but recommended because it simplifies credentials when deploying
- AWS Lambda => serverless compute service
- API Gateway => managed api service
- S3 => Persistence layer used to store configuration and data (could be something else)
- EventBridge => serverless event bus
Prerequisites
This is not a beginner level build! You need to have some knowledge of AWS, serverless computing, and programming.
- Twilio Account. If you don’t yet have one, you can sign up for a free account here.
- AWS Account with permissions to provision Lambdas, a S3 bucket, IAM Roles & Policies, an API Gateway, and a custom EventBus. You can sign up for an account here.
- AWS SAM CLI installed
Let’s Build it!
Here are the basic steps of our serverless multichannel build today.
- Provision a Twilio Phone Number
- Add your Twilio Credentials to AWS Parameter Store
- Download the code
- Deploy the code
- Upload the config files to S3
- Set the webhook URL for Messaging
- Try it out!
1. Provision Twilio Phone Number
Purchasing a phone number from Twilio is a snap. Login to your Twilio Account, and then select PHONE NUMBERS > MANAGE > BUY A NUMBER.
Here is a Twilio article that explains this process in more detail.
Copy the phone number that you purchased to use later.
2. Add Parameters to AWS Parameter Store
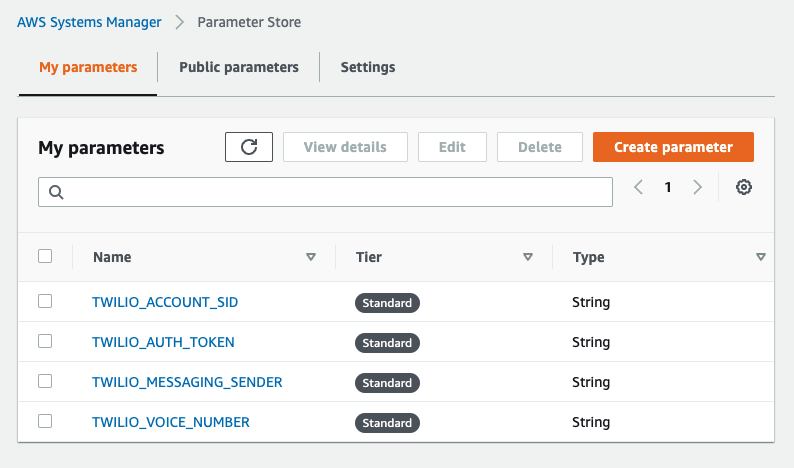
Making sure that you never include credentials in your code is a core security tenet. So we are going to use AWS Parameter Store to save our Twilio credentials. The compute components will be able to access these credentials at runtime to call the Twilio APIs.
From your AWS Console, be sure that you are in the AWS Region where you wish to deploy this project! Next, go to Systems Manager and then select Parameter Store.
Select Create parameter and enter values for:
TWILIO_ACCOUNT_SIDTWILIO_AUTH_TOKENTWILIO_MESSAGING_SENDERTWILIO_VOICE_NUMBER
All of these parameters should be standard tier, type “String, and data type “text”.
Find your TWILIO_ACCOUNT_SID and TWILIO_AUTH_TOKEN on the Account Info card on the dashboard page for the Twilio Account you are using for this project.
For TWILIO_VOICE_NUMBER and the TWILIO_MESSAGING_SENDER, use the phone number that you bought in step 1, in E.164 format. This will be the number that will make the voice calls and send the SMS messages.
3. Download the Code for this Application
Download the code from this repo.
The Lambda Functions in this project share some code in the form of some helper functions and the Twilio SDK. Lambda Layers are a great way to package together shared code and libraries. The Layers are deployed as separate resources, and the Lambda Functions are able to require them as needed.
The Twilio SDK is not stored in the git repository so you need to install it in your project before deploying.
From a command line, go to the project directory, cd to the layers/ directory, and then run:
This will create two new folders and pull down the Twilio SDK into the newly created node_modules. It can now be deployed as a Lambda Layer and available to any Lambda Function that needs it.
4. Deploy Code
Using AWS SAM makes deploying serverless applications really easy. First, run:
This command goes through the yaml file template.yaml and builds all of the functions and layers, preparing the stack to be deployed.
In order to deploy the SAM application, you need to be sure that you have the proper AWS credentials configured. Having the AWS CLI also installed makes it easier, but here are some instructions.
Once you have authenticated into your AWS account, you can run:
This will start an interactive command prompt session to set basic configurations and then deploy all of your resources via a stack in CloudFormation. Here are the answers to enter after running that command (except, substitute your AWS Region of choice – be sure to use the same region as step 2 above!):
After answering the last questions, SAM will create a changeset that lists all of the resources that will be deployed. Answer “y” to the last question to have AWS actually start creating the resources.
The SAM command prompt will let you know when it has finished deploying all of the resources. You can then go to your AWS Console and then CloudFormation, and you can browse through the new stack you just created. All of the Lambdas, Lambda Layers, S3 buckets, Custom EventBus, IAM Roles, and API Gateways are all created automatically. (IaC – Infrastructure as Code – is awesome!)
Also note that the first time you run the deploy command, SAM will create a samconfig.toml file to save your answers for subsequent deployments. After you deploy the first time, you can drop the --guided parameter of sam deploy for future deployments.
Go to the Outputs tab of the deployed stack in CloudFormation. Keep that tab open as you will need those values in later steps (InitiateSurveySMSApi, InitiateSurveyVoiceApi, SrcBucket, TwilioMessagingWebhook). These values are also shown after the sam deploy command completes.
5. Upload config files to S3
This application stores configuration files and results files in an S3 bucket. You could use a different option for persistence with your application (such as DynamoDB or RDS).
We are going to store three different things:
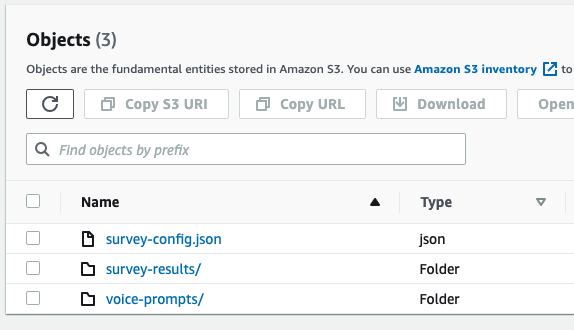
survey-config.json => This contains an array of questions to be asked in the survey.voice-prompts/ => This S3 folder contains env files for each language you want supported in the survey. Name your file using the country identifiers (TwiML Supported Languages), and the application will automatically select the correct file.survey-results/ => This S3 folder holds JSON files for all survey respondents. The files are named using the respondents' phone numbers as the unique identifier.
The sam deploy command created the S3 bucket. Now you need to take a few steps more to finalize the setup. From the AWS Console, go to the S3 bucket (the name of the S3 bucket is the Outputs tab of in the CloudFormation stack page from step 4), and then do the following:
- Upload
config-files/survey-config.jsonto the bucket root - Create a folder called
voice-prompts(encryption not required for this demo) - Upload the two
.envfiles fromconfig-files/voice-promptsto thevoice-prompts/folder - Create a folder in the S3 bucket called
survey-results(encryption not required for this demo)
Here is what your S3 bucket should look like:
6. Set Webhook URL for Messaging
We already talked some about the nature of voice calls versus messaging conversations. Since voice calls are synchronous, Twilio Programmable Voice keeps the call alive. For messaging, Twilio will handle incoming messages by forwarding those messages to a webhook. The application needs to maintain state and respond to incoming messages dynamically.
From the Outputs tab in the CloudFormation Stack, copy the value for TwilioMessagingWebhook.
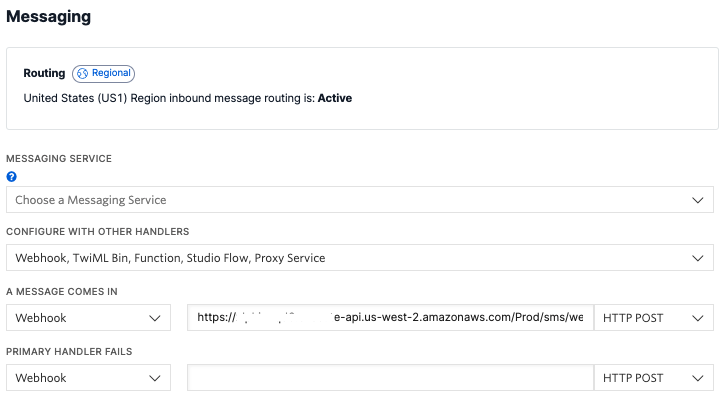
From the Twilio Console, go to Phone Numbers > Manage > Active Numbers. Click on the phone number you are using for this project and then scroll down to the Messaging Section. Set the “A MESSAGING COMES IN” handler to “WEBHOOK” and then paste the URL for TwilioMessagingWebhook as where the webhook will post to when a message comes in.
It should look like this:
On a side note, for this project we will just assign outgoing and incoming message configurations to an individual number. For production, you will likely want to utilize Twilio Messaging Services.
7. Try it out!
Believe it or not, we should now have a working serverless survey application that works on voice and messaging.
Both the voice and the messaging flows are initiated from POST requests.
We can start with a voice call. Use the InitiateSurveyVoiceApi value from the CloudFormation Output tabs. You will also pass in values for To (survey recipient) and defaultLanguage.
Upon POSTing to the InitiateSurveyVoiceApi api, the voice path will do the following:
- Place a call to the number in your POST
- Ask whether you want to continue in English or Switch to Spanish
- Ask you 4 questions
- End the call
- Send an SMS message with your answers to show post survey processing!
Here is a CURL command to initiate a voice survey:
That post request should call the number given in the To argument and initiate a voice survey. Once you finish the survey, you can go to the survey-results folder in the S3 bucket and review the JSON file to see the results.
Before you try out the SMS flow, delete the JSON file if you plan to use the same TO phone number.
For the messaging flow, use the InitiateSurveySMSApi value from the CloudFormation Output tabs. You will also pass in values for To (survey recipient) and defaultLanguage.
Upon POSTng to the InitiateSurveyVoiceApi api, the SMS path will do the following:
- Send an SMS message to the number in the POST
- Ask whether you want to continue in English or Switch to Spanish
- Ask you 4 questions
- End the call
- Send an SMS message with your answers to show post survey processing!
Here is a CURL command to initiate an SMS survey:
Here is a screenshot showing what your SMS flow should look like:
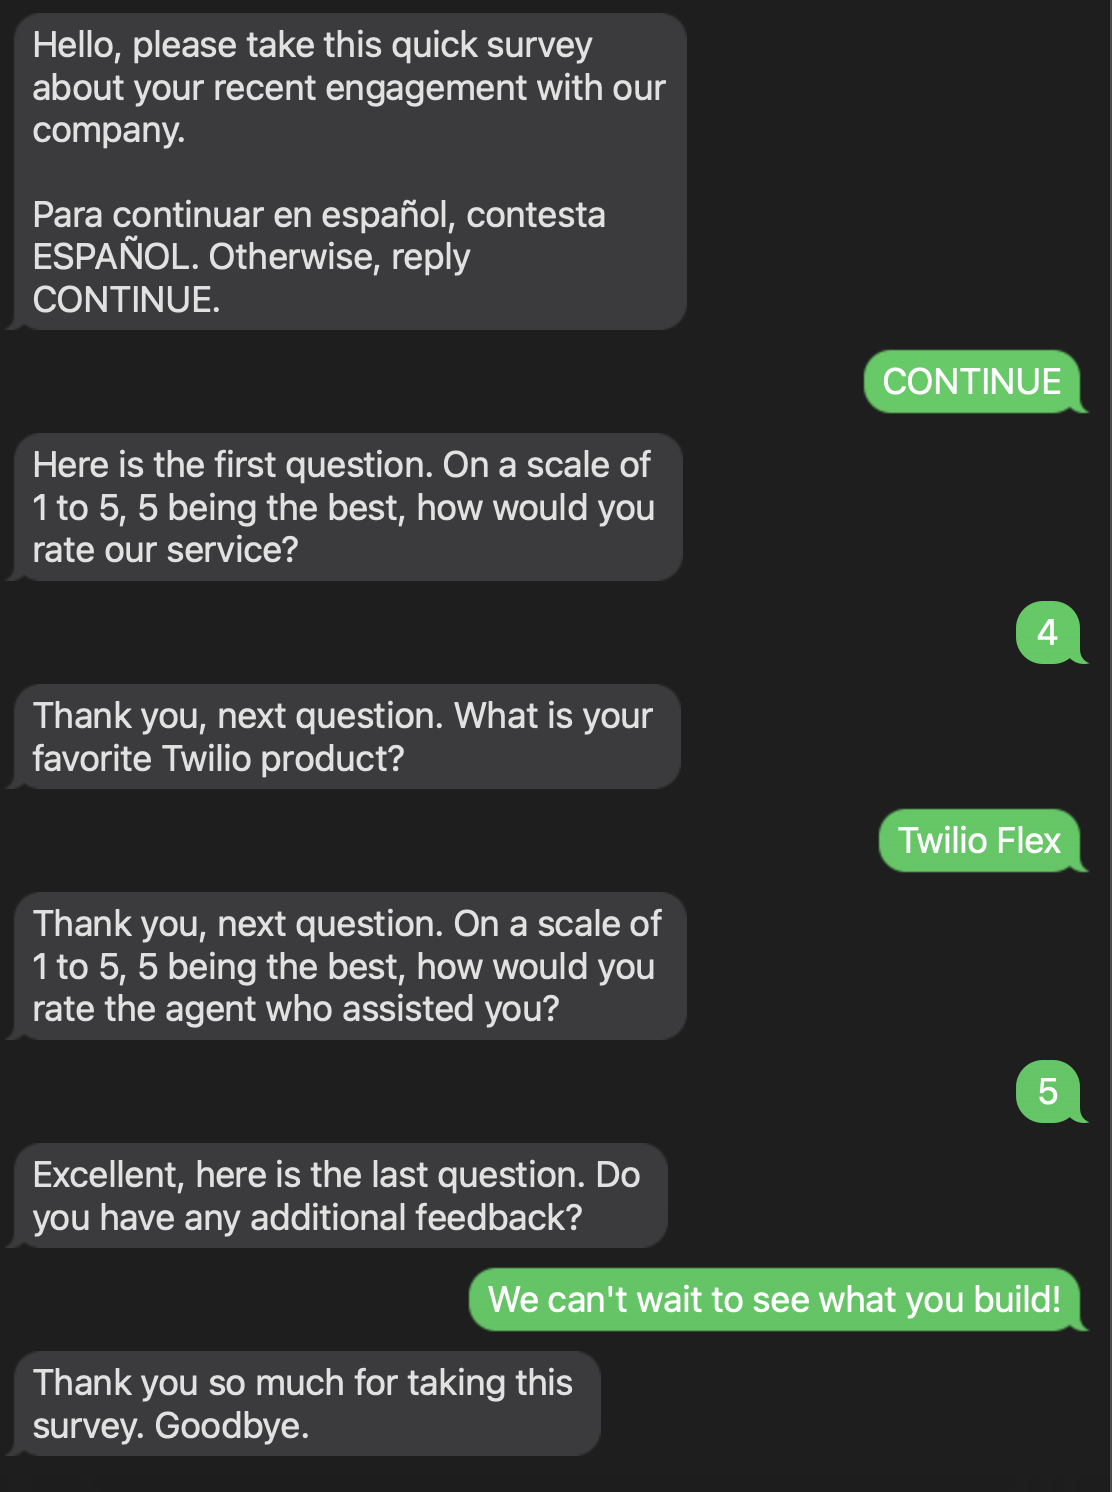
You can delete the JSON file in the survey-results folder of the S3 buckets to try different paths (different languages, different answers, etc.)
Customization, Developing and Debugging
Building applications with AWS SAM takes a little practice but can be very efficient. In addition, writing code in an IaC paradigm means that you end up with solutions that are easily deployed.
As discussed earlier in this blog post, voice calls are synchronous while messaging is asynchronous. You can dig into the voice lambdas and the SMS lambdas to see how each channel is managed. Since state is handled by Twilio in voice, the lambdas return new instructions back to Twilio, while in messaging, each new request needs to check state (stored in S3) and then routed to the correct lambda using EventBridge.
The questions in this survey application are managed in the survey-config.json file. If you want to add or remove questions, make changes to this file and then upload it to the S3 bucket as in step 5.
Multiple languages are handled with configuration files in the voice-prompts folder in the S3 bucket. This survey has US English and MX Spanish. Open up those files and see how the prompts and questions are managed. You can easily edit those files and add your own questions and languages.
To create a new lambda function, copy one of the folders in the functions folder and then customize. In the template.yaml file, copy and paste resource and role definitions for a similar function, and then customize. Run sam build and sam deploy to deploy your changes to the cloud.
Editing existing lambdas, or other resources defined in the template.yaml file is easy as well. Make your changes and then run sam build and sam deploy.
AWS SAM also provides the ability to test locally. Check out the AWS SAM Developer Guide.
For debugging lambda functions, go to the AWS Console, and then select a lambda. Click on the Monitor tab and then the View logs in CloudWatch button as shown here:
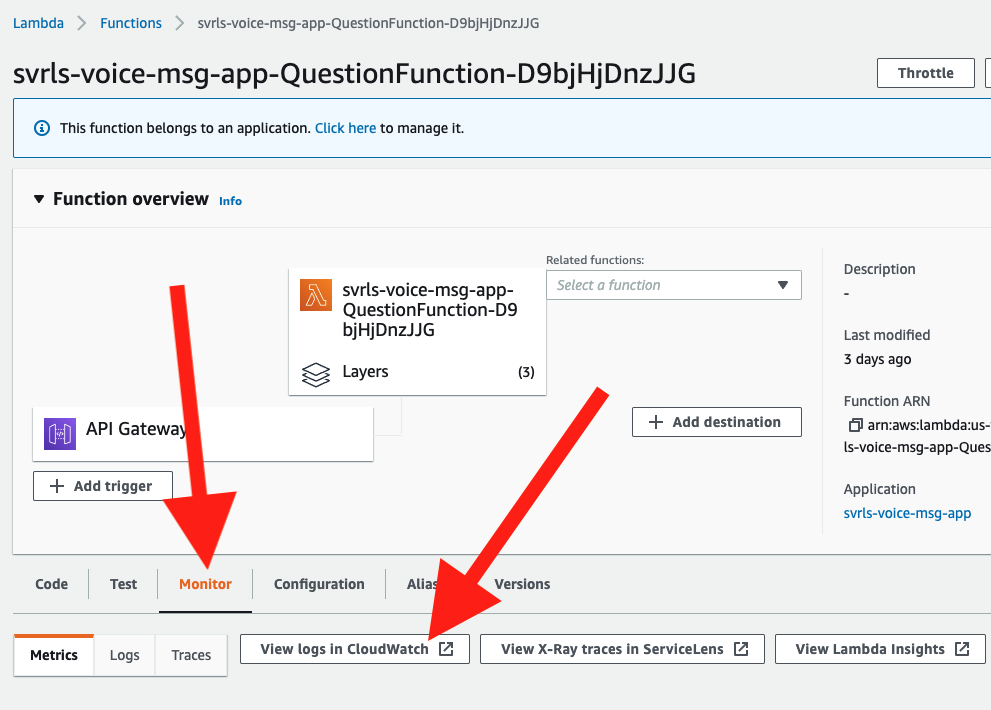
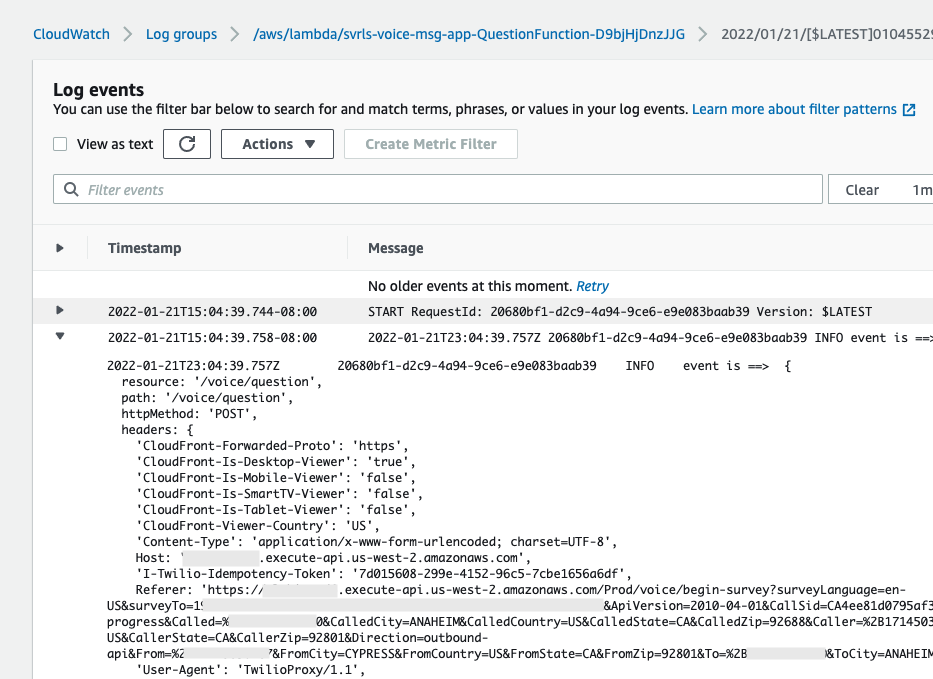
This will give you access to logs from all executions of this function. Note that runtime data and data from the console.logs will show up in the logs to help you build and debug.
Cleanup
You don’t need to do it now, but to avoid any undesired costs, you can easily delete the application that you created using the AWS CLI and the console.
First, delete the contents of the S3 bucket.
Assuming you used your project name for the stack name, you can next run the following:
In addition, you can delete the stack from CloudFormation in the AWS console. Select the “DELETE STACK” option. AWS SAM also creates a stack and an S3 bucket to manage deployments. You can delete them from CloudFormation in the AWS console following the same procedure as above.
Deploying to production
While you can get this system working pretty quickly, it is not production ready. The supported user journeys are largely the "happy paths", so additional error and exception handling are needed.
The webhook for SMS is secured by validating that the requests are coming from Twilio. This uses validation on the X-Twilio-Signature header. This is not covered in this blog post, but it is good practice to put this security check in place. To see this check in action, review the lambda layer called lambda-validate-twilio-header and the sms/twilio-handler function where it is called.
The API to initiate the SMS and voice flows (/sms/initiate-sms and /voice/initiate-call) APIs are not secured. You need to secure those APIs for a production system, and in general be sure that your project's configuration meets your organization's security requirements.
Conclusion
In short order you just created an interactive multilingual serverless application that supports both voice and messaging channels. Impressive!
Next up – you could take this application and build a production ready survey application. Or – if your use case is not a survey – use the patterns in this application, to build your own custom applications that leverage the channels in the Twilio Engagement Platform!
Finally, because of the benefits of serverless computing (speed, cost, agility), this template could be a terrific way to build a POC for projects of any size.
***
Dan Bartlett has been building web applications since the first dotcom wave. The core principles from those days remain the same but these days you can build cooler things faster. He can be reached at dbartlett [at] twilio.com.
Related Posts
Related Resources
Twilio Docs
From APIs to SDKs to sample apps
API reference documentation, SDKs, helper libraries, quickstarts, and tutorials for your language and platform.
Resource Center
The latest ebooks, industry reports, and webinars
Learn from customer engagement experts to improve your own communication.
Ahoy
Twilio's developer community hub
Best practices, code samples, and inspiration to build communications and digital engagement experiences.


