Getting Started with Chrome Extensions
Time to read: 8 minutes
Extensions are small software programs that customize your browsing experience. They are used to block ads and popups, format JSON, edit grammar, help with vocabulary, design, programming, among others. In a nutshell, Chrome extensions enhance the functionality of your browsing experience.
In this tutorial, you will be creating a Chrome extension to track your daily tasks. With the extension enabled, every time you open a new tab, you will see the jobs you want to keep track of for the day. You will be able to add a task, mark the task complete, and delete it.
Prerequisites
To follow this tutorial, you will need working knowledge of the following:
- HTML
- CSS
- JavaScript
You will also need the Chrome web browser to install and test your extension.
Introduction to Chrome extensions
Chrome extensions consist of different components created with web development technologies: HTML, CSS, and JavaScript. These components, including background scripts, content scripts, options page, and UI elements, are used as needed, depending on the extension’s functionality.
Regardless of what you are building, however, there is one file crucial to developing your extension: manifest.json. Every extension has this JSON-formatted file that provides essential information.
Take a moment to dissect an extension you regularly use. Navigate to chrome://extensions/ to explore.
Depending on your extensions, your page will look something like this:
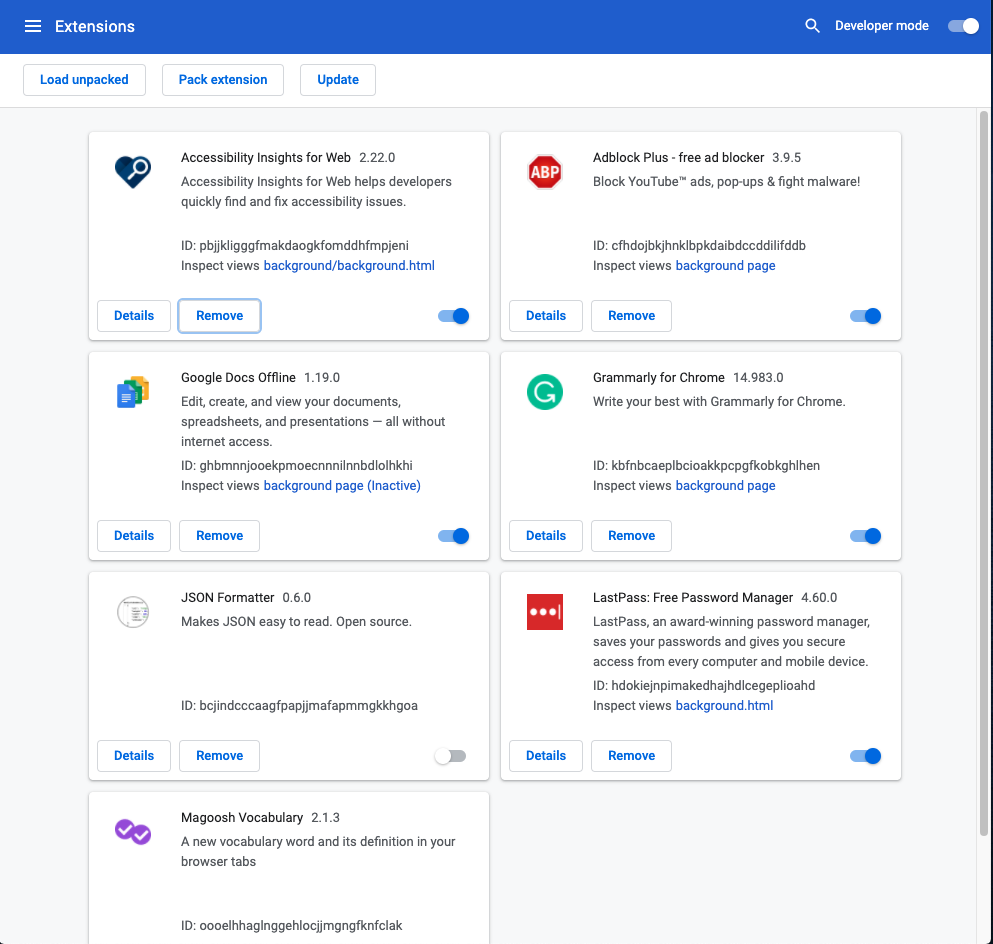
Right off the bat, you will see that each extension has three pieces of information: name, description, and an icon. If you click Details on any given extension, you will see some additional information like the version, permissions needed by the extension to work, and size.
This information is what is included in a manifest file. Some of these data points are required, and others are optional.
Each manifest has can contain several fields, three of which are required:
|
Field |
JSON |
Type |
Description |
Required |
|---|---|---|---|---|
|
Manifest Version |
manifest_version |
number |
It is an integer specifying the version of the manifest specification of your package. As of Chrome 18, developers should use 2. |
true |
|
Name |
name |
string |
With a maximum of 45 characters, this field identifies your extension. |
true |
|
Version |
version |
string |
This field of one to four dot-separated integers identifies the version of your extension |
true |
|
Description |
description |
string |
Capped at 132 characters, this plain text string describes your extension |
false |
|
Icon |
icons |
string |
Icons represent your extension |
false |
Create the manifest file for your Chrome extension
Create a new directory, taskTracker, and in it, create a file called manifest.json. Copy and paste the following lines in your manifest.json:
Each Chrome extension can have icons of different sizes, as shown in the code above. According to the documentation, you should always offer a 128px x 128px icon; it's used during installation and by the Chrome Web Store. The documentation recommends providing a 48px x 48px icon for use on the extension management page. You can also specify a 16px x 16px icon to use as a favicon.
Create an icons folder in your root directory and save the icons there. You can create your own icons or download them from iconfinder.com. I downloaded three icons and named them with respect to their size. For example, I’ve named the icon of size 16px as task/16.png.
Install your Chrome extension in Developer mode
Navigate to chrome://extensions/, and turn on developer mode by using the toggle on the top right of the screen. Once you turn on developer mode, you will see three buttons at the top: Load unpacked, Pack extension, and Update.
Click on Load unpacked and select your extension’s directory, taskTracker, from the file picker. Make sure your manifest.json lives at the root of your directory. Once selected, you will see your Task Tracker extension with the version and the description.
Depending on your settings, you may or may not see the extension in your toolbar. If you don’t see your extension, click on the jigsaw icon, find your extension and pin it.
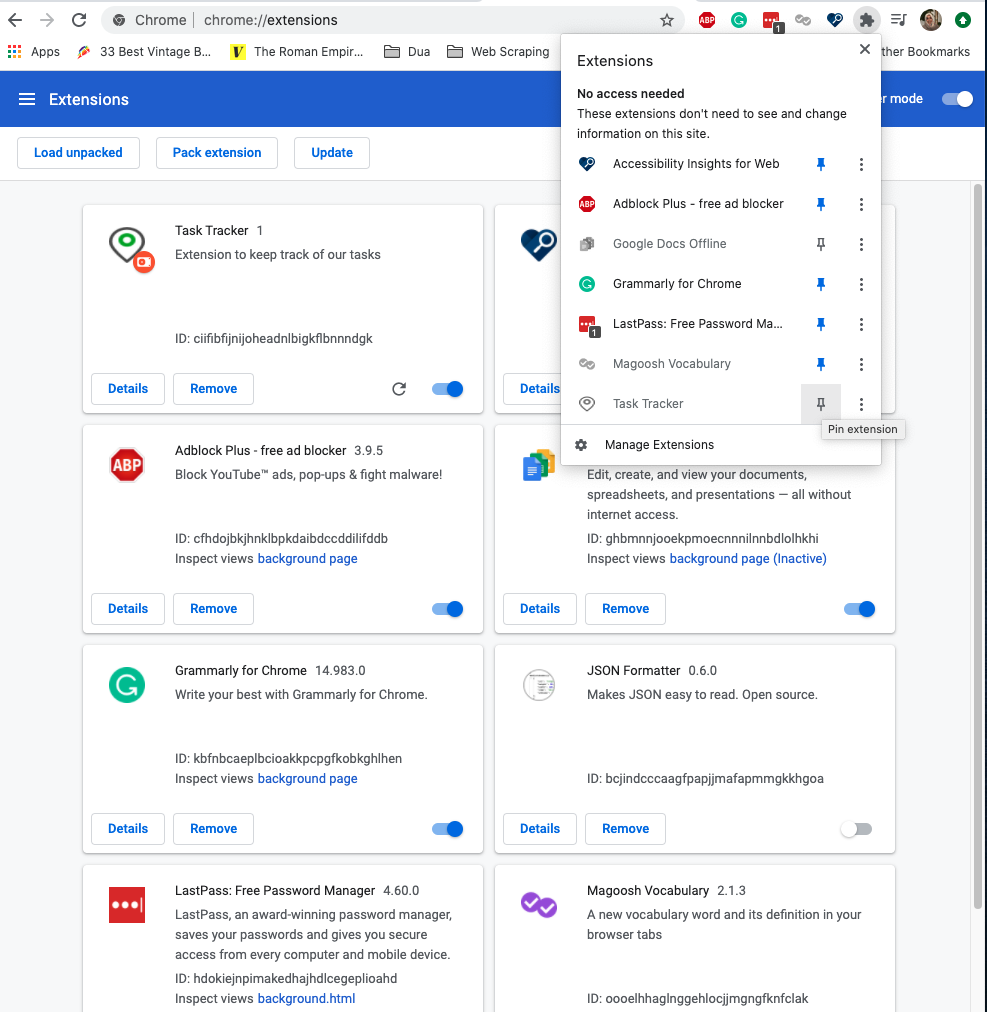
And, there, you have installed your first extension. The extension doesn’t do anything yet. Your next step will be to give it some instructions.
Build the Task Tracker extension
Override the default new tab page
With this extension, every time you open a new tab you’ll be able to see your tasks for the day. This extension will override Google’s default new tab page, which displays the most used websites.
There are three pages an extension can replace:
- Bookmark Manager: chrome://bookmarks.
- History: chrome://history.
- New Tab: chrome://newtab.
Chrome extension uses the chrome_url_overrides key to override the new tab page. The value of this key is another object that can include a key of bookmarks, history or newtab and the value will be an HTML file (in this example, it is called index.html, though it can be named anything). For this project, you will be replacing the New Tab.
Test out the page override. Create an index.html file in the root directory of your extension, and add the following content to it:
Click the refresh icon on the extension and open a new tab. A popup will appear from the browser confirming the changes task tracker has made. You could either keep the changes by selecting Keep it button or discard the changes by selecting Change it back.
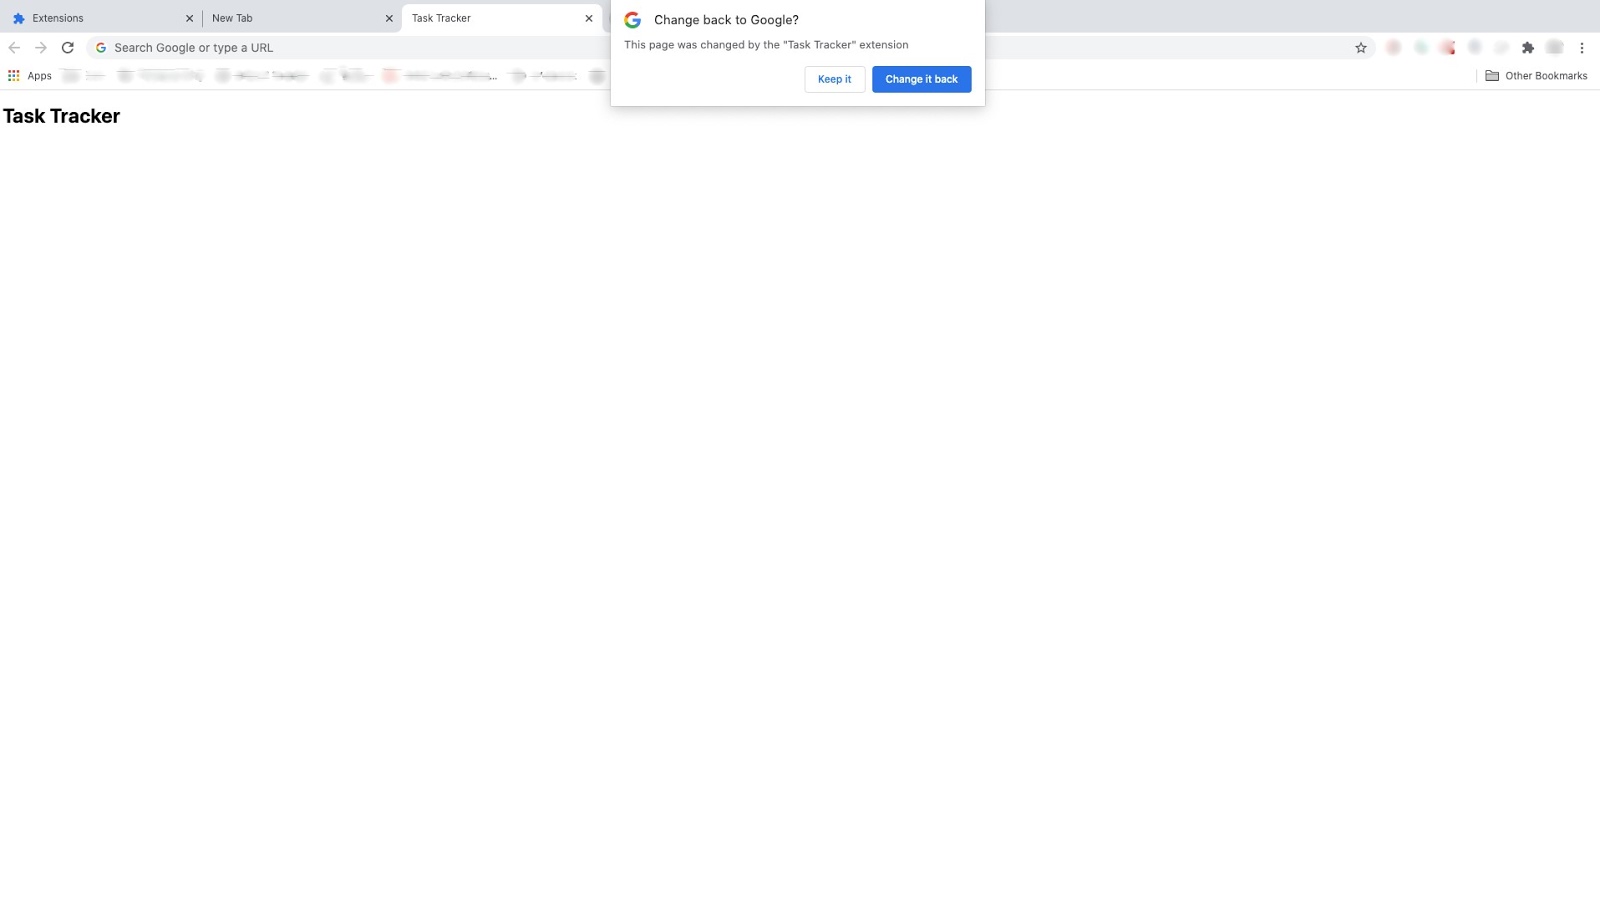
You will select Keep it to see a blank page with a header Task Tracker.
Add the HTML and CSS for the Task Tracker
For this extension, you need two things on our page: a form that adds tasks and a <div> element that displays those newly added tasks. This HTML will be added inside the index.html file. Copy and paste the highlighted lines into index.html:
Create a new file called styles.css at the root directory of your project, and copy and paste the following styles inside:
Refresh your Task Tracker page to see the changes you made. You will see a label, an input field, and a button. Since you haven’t added any tasks yet, the list container is not visible.
An introduction to Chrome’s local storage API
You won’t be setting up a database for this extension; instead, you will be using Chrome's storage API to store, retrieve, and track changes to user data.
Some key features to know about the chrome storage API:
- Data can be automatically synced with Chrome sync (using
storage.sync). If you are logged-in and have sync enabled, you can access your data on multiple devices. - Its asynchronous capability makes it faster than the synchronous localStorage API.
- Data can be stored as objects compared to the localStorage API, which stores data in strings.
- Chrome storage is not encrypted, and so you should not store confidential data.
You can learn more about the key differences between the Web Storage API and Chrome Storage in an article on DEV called Chrome Local Storage in Extensions.
You can use Chrome’s Developer Tools to see how storing, retrieving, and removing data from Chrome sync works.
Right click on a new tab, and click Inspect. A window will appear at the bottom of the browser, then select Console tab. In your console, run the following script to store an example array of tasks:
Running this command would have given you the following error: Uncaught TypeError: Cannot read property 'sync' of undefined at <anonymous>.
This error occurs because you haven’t defined permissions yet. To use most chrome APIs, your extension must declare its intent in the permissions field of the manifest. This helps limit damage in case your app is compromised. For your extension, you will declare the storage permission.
Update your manifest.json file to add "permissions": ["storage"] at the bottom:
Navigate to chrome://extensions and reload the extension. Now when you open a new tab and call the set() method, it will work.
Now that you have stored data, you can retrieve it.
Run the following script in the console:
The result will be an object with one key: task, whose value is the array of two tasks that you added just a moment ago.
You only have one key stored in your storage. If you have multiple keys and you want to see all of them, you can run the same script as before, but replace the task key with null.
And to delete a key from storage:
If you retrieve the data using the get() method now, you will get an empty object. Removing the task key removed the entire array of tasks. But what if you wanted to remove only the first element?
In that case, you can get the task array using the get() method, manipulate the array as needed, and then update the stored value using the set() method.
Running the following code will result in one element in our task array:
Implement local storage in Task Tracker
Apply what you’ve learned to the Task Tracker extension.
Create a new file called app.js in the root directory of your project, and load this file before the closing body tag in index.html.
In app.js, let’s check if the task list exists. If it exists, you will show the items in the list; if it doesn’t exist, you will create one.
The first time you load the extension, it will create and store an empty array called tasks in your storage. If you open dev tools and run the following script, you will see an empty array:
Create an event handler at the top of the page for your button:
Using the document method querySelector(), in the code above you are selecting the Add Task button and attaching the click event listener.
e.preventDefault() is used to cancel the default action when the form is submitted.
Next, you will store the value of the input in a variable called task. You don’t want the user to submit an empty task. When the user submits the task, you will remove whitespace from both sides of the input using the trim() method. If the length of the trimmed input is 0, you will alert the user it’s empty. If it’s not empty, you will create a new object with the following key:value pairs:
- Task: the value user has entered in the input field
- Id: And id generated using
Date.now() - Complete: A boolean which marks the task as complete
Using Chrome’s set() and get() methods, you can then update your tasks array. Lastly, you clear the input field.
Rendering changes to the task list on the UI
Refresh the extension, open a new tab, and add a task. Nothing will happen on the UI. But if you open dev tools and run the following script, you will see that your task has been stored.
But you want to be able to see the task as soon as you’ve hit submit. To do this, copy and paste the following code at the top of app.js:
When the user adds a task, you want to do the following things:
- Create a reference to the
<ul></ul> - Using
document.createElement,create a new<li>element. - Using
inner.HTML, set the value of the newly created list element to the task variable. - If the task is completed, add the complete class using
classList.add() - Add a dataset attribute to store the
id(we will use this to remove the item from the list)
You are also creating a <span> for deleting the tasks. In the end, you will append the <span> to the <li>, and the <li> to the <ul> tag.
At the end of your callback function for addEventListener, call addTasktoTheList(obj) and pass in the object you created.
If you add a task now, you will see the task displayed on the screen. If you open a new tab, you won’t see the task displayed because so far the code is only printing the task to the console and does not show it on the UI. You’ll change that next.
In the function where you check whether the tasks array exists or not, replace the line console.log(task); with addTasktoTheList(task);. Now, when you open a new tab (or refresh the tab you are on), you will see the list of tasks.
Next, add two functions where the user can mark the task as complete and remove it. First, in your addTasktoTheList() function, right before you append the <li> tag, add two more event listeners:
Now, copy and paste the following code right after addTaskToTheList() to add the removeItem() function:
For removing the item from the DOM, you will use the Node.removeChild() method. But that’s not enough; you have to remove the item from both the DOM and the storage.
You will use the object’s id value to select the item, filter, and update the task array.
You will do something similar for toggling the complete class. Copy and paste this code beneath the removeItem() function.
And that’s it. If you open a new tab, you should be able to add, see, remove, and mark the tasks as complete.
Conclusion
Overriding a tab is one way to use chrome extension. You can update the DOM of the current page (replace all the images with kittens or change the background color) or expand this extension by using different APIs. If you are interested in the weather or want to learn a new word, you can use APIs in a chrome extension to enhance your experience.
You could also use Twilio’s SMS API to add tasks to your extension from anywhere. Or use Twilio’s SMS API to send you reminders.
Shajia Abidi is a full-stack web developer with a focus on front-end development. When not coding, she is either writing or reading books.
Related Posts
Related Resources
Twilio Docs
From APIs to SDKs to sample apps
API reference documentation, SDKs, helper libraries, quickstarts, and tutorials for your language and platform.
Resource Center
The latest ebooks, industry reports, and webinars
Learn from customer engagement experts to improve your own communication.
Ahoy
Twilio's developer community hub
Best practices, code samples, and inspiration to build communications and digital engagement experiences.
